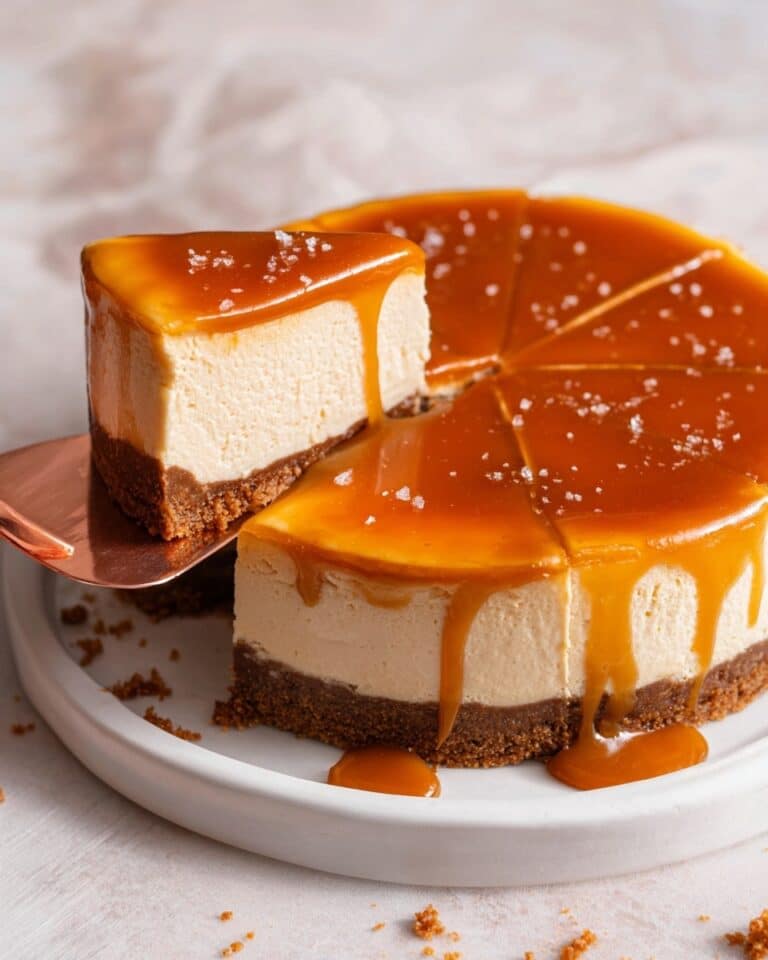
Biscoff Cheesecake {5 Ingredients!} Recipe
I’m so excited to share this Biscoff Cheesecake {5 Ingredients!} Recipe with you because it’s honestly one of those no-fuss desserts that feels special and looks like you spent hours baking. The blend of creamy cheesecake with that caramelized Biscoff flavor is downright addictive. Whenever I make this, friends keep asking for seconds, and it’s perfect for birthdays, dinner parties, or even just a cozy weekend treat.
What I love most about this cheesecake is how simple it is—you only need 5 ingredients! That means less time prepping and more time enjoying. Plus, if you’re looking to impress without the stress, this Biscoff Cheesecake {5 Ingredients!} Recipe totally has your back. Let’s dive in and make a cheesecake you’ll want to make again and again.
Ingredients You’ll Need
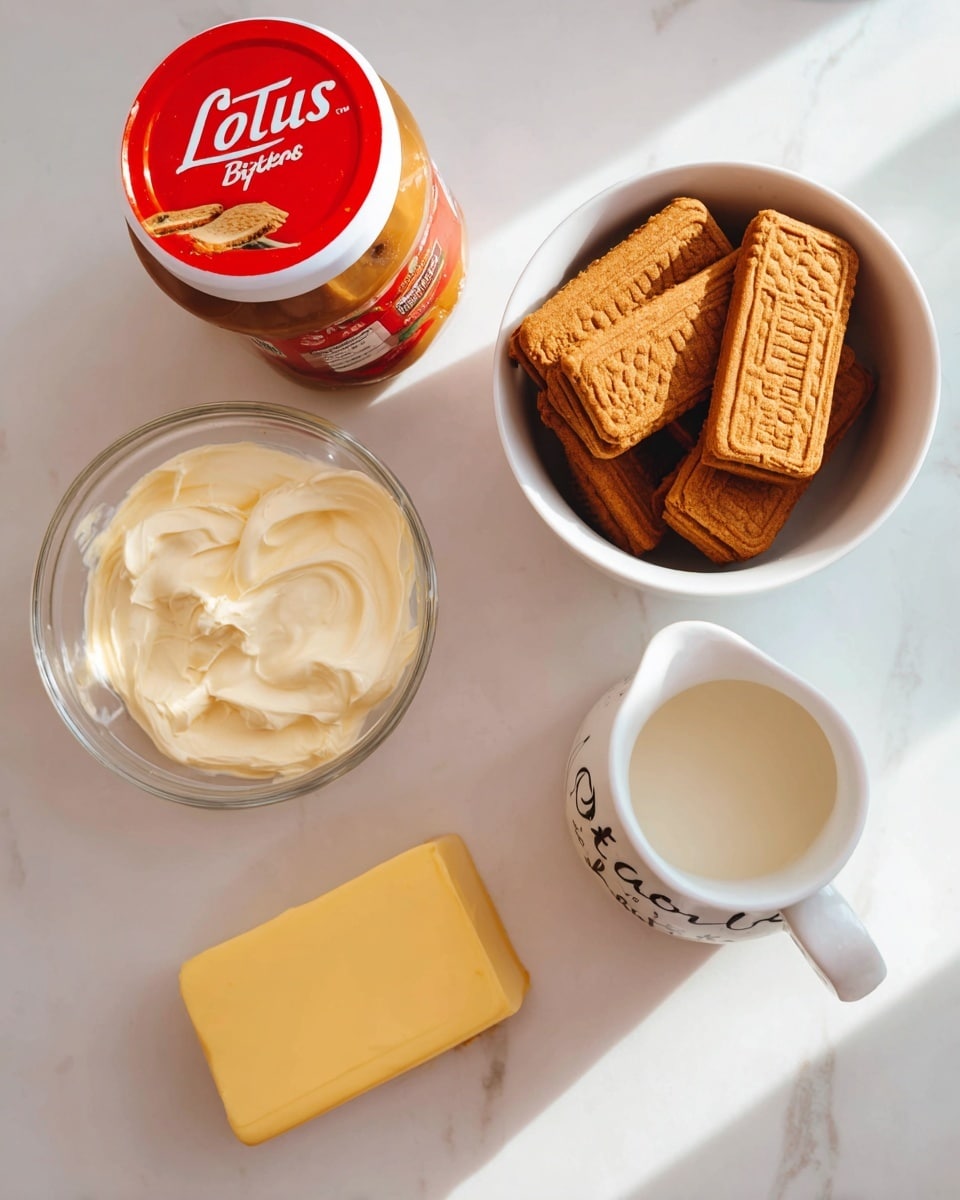
The magic of this cheesecake really comes from how the ingredients complement each other: buttery biscuit base, velvety cream cheese, and that rich Biscoff spread tying it all together. Before shopping, make sure to get the classic Biscoff biscuits and spread—they’re the star players here and totally worth a little splurge.
- Biscoff biscuits: These crunchy biscuits give your base that signature caramelized crunch and spice.
- Unsalted butter: I like to melt it gently and mix it with the biscuit crumbs to form a perfect crust.
- Double cream: This adds the creamy richness needed to make the cheesecake mixture light and fluffy.
- Full fat cream cheese: I recommend full fat for the best texture and taste; Philadelphia brand works wonderfully.
- Biscoff spread: You’ll use this in both the filling and topping for that iconic Biscoff flavor in every bite.
Variations
One of the things I love about this Biscoff Cheesecake {5 Ingredients!} Recipe is how flexible it is. You can easily swap out or add extras based on your preferences or what you have on hand. If you’re feeling adventurous, don’t be shy to put your own spin on it.
- Nutty twist: I once folded in some toasted chopped pecans to the cheesecake layer for extra crunch and flavor—it was a hit!
- Dairy-free option: You can substitute the cream and cream cheese with coconut-based alternatives, though it changes the texture slightly but still delicious.
- Chocolate lovers: Sprinkle some dark chocolate flakes on top along with the crushed biscuits for a chocolate-Biscoff combo.
- Mini cheesecakes: I sometimes make individual cheesecakes in ramekins for easy portion control and a fancy touch.
How to Make Biscoff Cheesecake {5 Ingredients!} Recipe
Step 1: Press the Biscoff Biscuit Base
Start by crushing your Biscoff biscuits into fine crumbs—an easy way is to pop them in a zip-lock bag and bash gently with a rolling pin. Mix these crumbs with the melted unsalted butter until everything’s evenly combined. Press this mixture firmly into the bottom of your springform or removable base tin. I like to use the bottom of a glass to get it nice and compact. Then pop it in the fridge to chill while you make the filling. This step is key for a sturdy base that won’t fall apart when you cut into it.
Step 2: Whisk the Cream, Cream Cheese, and Biscoff Spread
In a chilled bowl, pour your cold double cream and add the cream cheese and Biscoff spread. Now, whisk them together until the mixture is thick—think the texture of soft ice cream. An electric whisk really speeds this up and gives you that smooth, airy consistency. Just be patient and keep going until the mixture holds soft peaks. This step is where the creamy dreaminess of the cheesecake comes together.
Step 3: Assemble and Chill
Take your chilled biscuit base out of the fridge and gently spoon the cheesecake mixture on top, spreading it evenly with a spatula or the back of a spoon. Smooth the top as best you can for that classic cheesecake look. Now, this part requires patience—you’ll want to pop the whole tin back in the fridge for at least 3 hours. If you can wait overnight, that’s even better because it helps the flavors meld and the cake to set perfectly.
Step 4: Add the Biscoff Topping
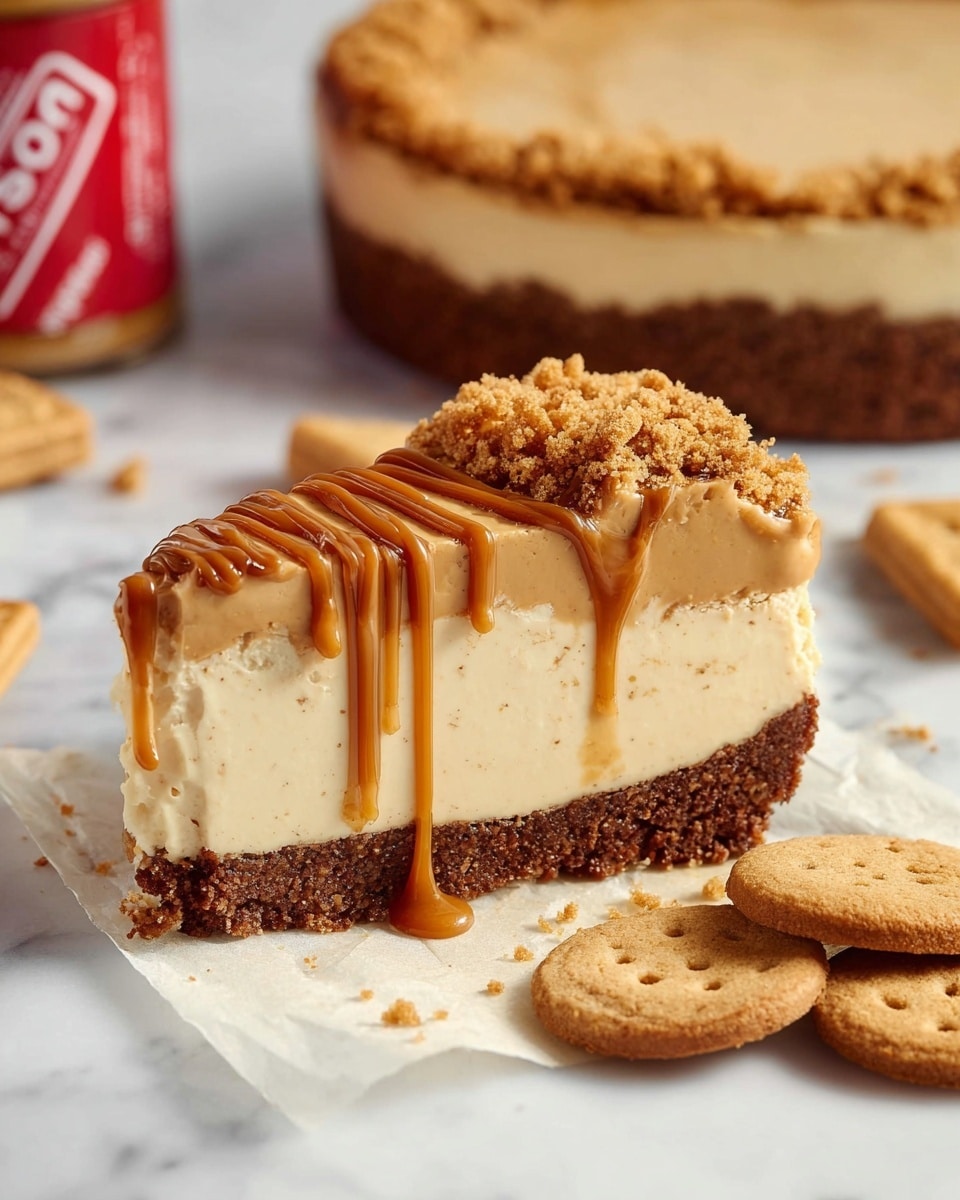
Before serving, gently melt the remaining Biscoff spread on very low heat—don’t let it get hot or bubbly, just warm enough to pour easily. Pour this melted spread over the set cheesecake, smoothing it out delicately with the back of a spoon without disturbing the cheesecake layer beneath. Finally, sprinkle the last bit of crushed biscuits around the edge to add a little texture and pretty finishing touch. Return the cheesecake to the fridge if you can for another hour to let the topping firm up nicely.
How to Serve Biscoff Cheesecake {5 Ingredients!} Recipe
Garnishes
I usually keep it simple and let the Biscoff topping shine, but sometimes I like to add a few extra Biscoff biscuits on top for a cute presentation. A dollop of whipped cream or a sprinkle of cinnamon can also add a lovely touch if you’re serving guests. Fresh berries can provide a nice tangy contrast, too.
Side Dishes
This cheesecake is rich, so I often pair it with light sides like fresh fruit salad or a zesty citrus sorbet. A simple cup of black coffee or spiced chai also complements the caramel flavors perfectly if you’re serving after dinner.
Creative Ways to Present
For special occasions, I’ve served this cheesecake in individual glasses layered with crushed biscotti and drizzles of Biscoff spread for a playful parfait look. Another fun idea is decorating the top with edible gold dust or chocolate shards to make it extra fancy. Trust me, your guests will be impressed no matter how you plate it!
Make Ahead and Storage
Storing Leftovers
I keep leftover cheesecake covered tightly with cling film or in an airtight container in the fridge. It stays fresh and creamy for up to 3 days. Just make sure you handle it gently when slicing afterward so it keeps its beautiful shape.
Freezing
I’ve frozen this cheesecake a couple of times, wrapped well in foil and plastic wrap to avoid freezer burn. When you’re ready to enjoy, thaw it overnight in the fridge. It might be a bit softer but still tastes fantastic—just perfect if you want to prep ahead for a party.
Reheating
This cheesecake is best served cold, so I don’t recommend reheating it. If it’s been frozen, just let it thaw fully in the fridge. Room temperature is fine for a few minutes before serving to let the flavors open up beautifully.
FAQs
-
Can I use low-fat cream cheese or cream for this Biscoff Cheesecake {5 Ingredients!} Recipe?
For the best texture and flavor, I recommend using full-fat cream cheese and double cream (or heavy cream) as they provide the rich, smooth consistency that makes this cheesecake so dreamy. Using low-fat varieties can make the cheesecake less stable and a bit watery.
-
Do I need a special tin to make this cheesecake?
Using a springform or removable-base tin is highly recommended because it makes it much easier to remove the cheesecake without damaging the sides. If you don’t have one, make sure to line your tin well with parchment paper for easy removal.
- Can I make this cheesecake vegan or dairy-free?
Yes, you can experiment by swapping cream and cream cheese for coconut cream and vegan cream cheese alternatives. The texture might change slightly, but you’ll still get that lovely Biscoff flavor.
- How long will the Biscoff Cheesecake {5 Ingredients!} Recipe keep?
This cheesecake stays fresh in the fridge for up to 3 days. Beyond that, it’s best to freeze it if you want to keep it longer.
- Can I make the base without Biscoff biscuits?
You could substitute with graham crackers or digestive biscuits, but you’ll lose that signature Biscoff caramel spice. I highly recommend sticking to Biscoff biscuits for the best result.
Final Thoughts
This Biscoff Cheesecake {5 Ingredients!} Recipe has become one of my go-to desserts whenever I want something quick, impressive, and utterly delicious. It’s like a little jar of caramelized happiness in cheesecake form. I really hope you’ll give it a try—I’m confident it’ll become a favorite in your household too. Let me know how it goes, and don’t forget to savor every bite!
PrintBiscoff Cheesecake {5 Ingredients!} Recipe
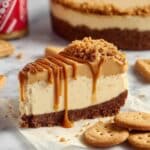
This Biscoff Cheesecake is a deliciously creamy no-bake dessert featuring the rich flavors of Biscoff biscuits and spread. With only five main ingredients, it’s an easy yet indulgent treat perfect for any occasion. The crunchy Biscoff biscuit base combined with the smooth, velvety Biscoff-infused cheesecake filling and a melted Biscoff topping creates a decadent layered dessert that will impress family and friends.
- Prep Time: 20 minutes
- Cook Time: 0 minutes
- Total Time: 4 hours 20 minutes
- Yield: 12 servings 1x
- Category: Dessert
- Method: No-Cook
- Cuisine: British
Ingredients
For the base:
- 200 g (7 oz) Biscoff biscuits, crushed
- 80 g (3 oz) unsalted butter, melted
For the cheesecake mixture:
- 300 ml (1.25 cups) double cream
- 400 g (14 oz) full fat cream cheese
- 200 g (7 oz) Biscoff spread
For the topping:
- 150 g (5 oz) Biscoff spread, melted
- 50 g (2 oz) Biscoff biscuits, crushed
Instructions
- Prepare the base: Combine the crushed Biscoff biscuits with the melted unsalted butter until well mixed. Press this mixture firmly into the base of a springform or removable base tin. Chill the base in the fridge while you prepare the filling.
- Make the cheesecake filling: In a bowl, pour in the double cream, add the full fat cream cheese and the Biscoff spread. Whisk vigorously—an electric whisk works best—until the mixture is very thick and creamy, resembling the texture of ice cream.
- Assemble the cheesecake: Remove the chilled biscuit base from the fridge and spread the cheesecake mixture evenly over the base, smoothing the top with a spatula or the back of a spoon.
- Chill the cheesecake: Place the assembled cheesecake back into the fridge and chill for at least 3 hours. For best results, allow it to chill overnight to set firmly.
- Prepare the topping: When ready to serve, gently melt the remaining 150 g of Biscoff spread in a pan over low heat. Take care not to overheat; it should be warm and pourable but not hot.
- Add the topping: Remove the cheesecake from the fridge and, while still in the tin, pour the melted Biscoff spread evenly over the top layer. Smooth out gently with the back of a spoon without disturbing the cheesecake layer below. Sprinkle the crushed Biscoff biscuits around the edge for decoration.
- Final chill: Return the cheesecake to the fridge for at least one more hour to allow the topping to set fully. While it can be cut sooner, waiting will give cleaner slices.
- Serve: To serve, run a warmed dinner knife carefully around the edges inside the tin to loosen the cheesecake before removing the sides. Cut into 12 slices and enjoy your creamy Biscoff cheesecake.
Notes
- Butter: Use unsalted butter melted quickly in the microwave for easy mixing. This measurement is equivalent to approximately 3/4 of a US butter stick.
- Cream Cheese: Philadelphia brand cream cheese is recommended for easier mixing and best texture. Always use full fat cream cheese and drain any excess liquid.
- Cream: Double cream should be cold and whipped until it holds its shape like ice cream. Heavy cream is the US equivalent.
- Tin: Use a springform or removable base tin for easy removal. Warm a dinner knife and run it around the edges before removing the cheesecake to achieve neat slices.
Keywords: Biscoff cheesecake, no bake cheesecake, easy cheesecake, Biscoff spread dessert, creamy cheesecake, biscuit base dessert