Homemade Pita Bread Recipe
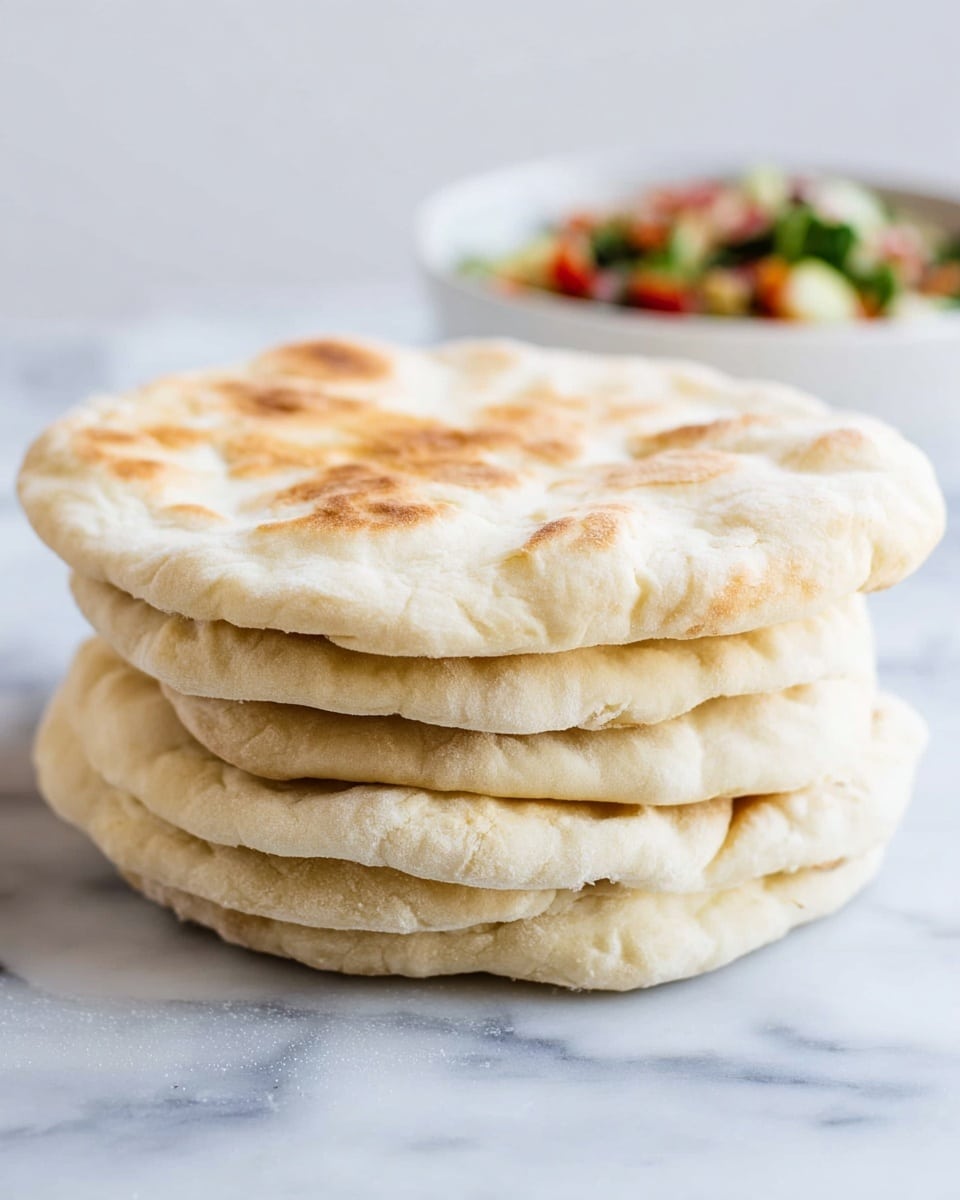
I’m so excited to share this Homemade Pita Bread Recipe with you because it’s one of those magical kitchen moments where simple ingredients turn into something truly special. There’s something incredibly satisfying about pulling warm, fluffy pitas right out of your own oven or skillet, with that perfect pocket that’s just waiting to be stuffed full of your favorite fillings. Whether you’re making sandwiches for lunch, dipping into hummus, or serving alongside a big Mediterranean feast, this recipe really shines.
One thing I’ve learned while making this Homemade Pita Bread Recipe is that the process is easier than you’d think — no fancy equipment needed, just a bit of patience and some basic ingredients. Plus, once you get the hang of it, you’ll want to make it over and over again. Homemade pita bread has a texture and flavor that’s so much better than store-bought, and you can feel proud that you made it yourself.
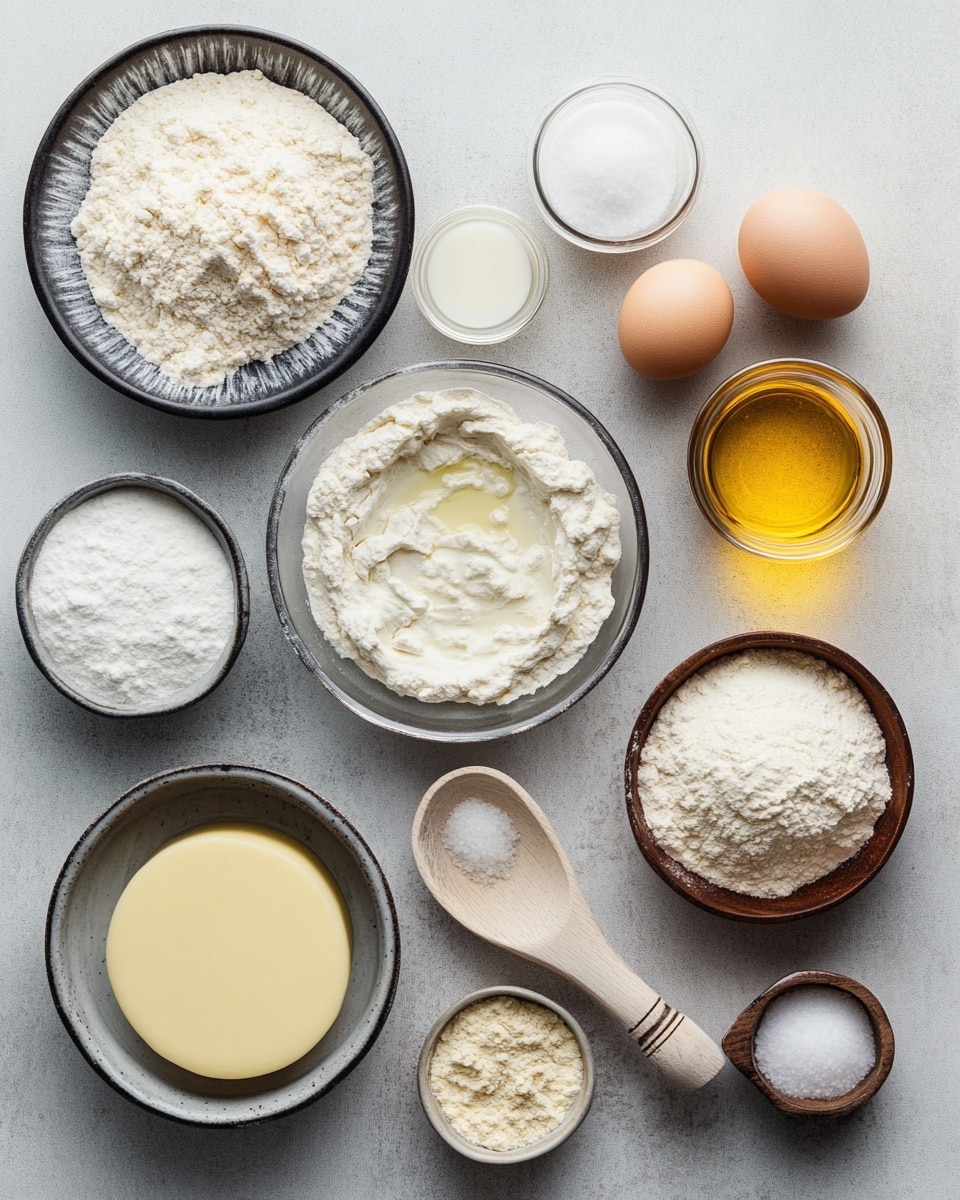
Ingredients You’ll Need
The beauty of this recipe is how these few simple ingredients come together to create pitas that are soft, fluffy, and perfectly pocketed. When shopping, look for fresh yeast and good quality olive oil to really maximize flavor.
- Warm water: Using water around 110°F is key to activate the yeast properly without killing it.
- Active dry yeast: This is what creates those beautiful air pockets in the bread by making it rise.
- Granulated sugar: Just a touch to help feed the yeast and kickstart the rising process.
- All-purpose flour: The base of your dough—feel free to add a little more if the dough feels too sticky.
- Kosher salt: or regular salt balances the flavors and strengthens the dough.
- Olive oil: Adds flavor and helps the dough stay moist and tender.
Variations
I love making this Homemade Pita Bread Recipe my own depending on what mood I’m in or what I have on hand. You can easily tweak it to suit your tastes or dietary needs, and it’s fun to experiment!
- Whole wheat version: Substituting half the all-purpose flour with whole wheat adds a nutty flavor and extra fiber—I’ve found it delicious, though the texture is a bit denser.
- Gluten-free adaptation: I haven’t nailed a totally gluten-free pita with the same pocket effect yet, but using a blend of gluten-free flours and xanthan gum can help. Let me know if you try this!
- Herb-infused dough: Adding finely chopped rosemary or za’atar to the dough gives pitas an amazing aromatic twist I adore, especially when serving with dips like labneh.
How to Make Homemade Pita Bread Recipe
Step 1: Activate your yeast like a pro
Start by mixing the warm water, active dry yeast, and sugar in a large bowl. After stirring in about half a cup of flour, let this mixture rest for 10 minutes—you’ll know it’s ready when it becomes frothy and puffy, which signals that your yeast is alive and kicking. I always take this moment to check my water temperature because too hot or too cold can throw off the yeast.
Step 2: Mix and knead your dough to perfect elasticity
Next, stir in the olive oil and salt, then add the remaining flour a bit at a time. When it’s too stiff to stir, switch to kneading by hand or a dough hook if you have one—about 3 to 5 minutes should do. The dough should be soft but not sticky; if it sticks to your fingers or surface, sprinkle in a little extra flour as you go. Form it into a ball, lightly oil it to prevent drying, then cover and let it rise for about an hour until it doubles in size. Patience here really pays off with soft, airy pita.
Step 3: Shape and rest those pitas
Once your dough has risen, punch it down gently to release the air, then divide it into eight equal pieces. Roll each into a neat little ball, cover with a damp paper towel, and let them rest for 10 minutes—this helps relax the gluten so rolling out is easier. When you roll each ball out on a lightly floured surface to about 1/8 inch thickness, don’t worry if they aren’t perfect circles; rustic shapes taste just as good!
Step 4: Cook your pitas for that signature puff
You’ve got two great options here: oven or stovetop. If you’re using an oven, preheat to 475°F with a pizza stone or cast iron skillet inside. Place 1-2 rolled pitas on the hot surface and bake for 2-3 minutes until they puff up with those lovely bubbles, flip, then bake another minute. This method creates airy, crispy pitas that I adore for sandwiches.
If stovetop is your jam, brush a cast iron skillet with oil and heat over medium. Cook one pita at a time for about 2-3 minutes per side until you see bubbles form and it puffs. The stove method gives you thicker, chewier pitas that are fantastic for dipping. Either way, cover the cooked pitas with a clean towel to keep them soft.
How to Serve Homemade Pita Bread Recipe
Garnishes
I usually sprinkle fresh chopped parsley and a drizzle of good olive oil on my pitas when serving, especially if they’re warm. A little za’atar spice blend or sumac gives a beautiful middle-eastern vibe that I always get asked about!
Side Dishes
This Homemade Pita Bread Recipe pairs beautifully with classic things like hummus, baba ganoush, or tzatziki. It’s also fantastic alongside grilled meats or a fresh Greek salad when you want a full meal. Honestly, it’s the perfect vehicle for just about anything.
Creative Ways to Present
For a dinner party, I like to slice these pitas like little boats and fill them with colorful grilled veggies, falafel, or shawarma-style meats. Arranging them on a big platter with bowls of assorted dips makes for an irresistible spread and a fun communal eating experience.
Make Ahead and Storage
Storing Leftovers
If you have leftovers, simply let them cool fully, then store them at room temperature in an airtight container or resealable bag—I find they stay fresh for 1-2 days this way, perfect for quick snacks or sandwiches the next day.
Freezing
I freeze leftover pitas all the time! Just separate them with parchment paper inside a zip-top freezer bag to keep them from sticking, and they’ll stay good for up to 3 months. It’s a real lifesaver when you want fresh pita but don’t want to do all the work every time.
Reheating
When you’re ready to eat frozen pitas, I recommend wrapping them in a damp towel and heating briefly in the microwave or warming for a minute or two in a hot skillet. This helps the bread steam just enough to get soft and pliable again without drying out.
FAQs
-
Why does my Homemade Pita Bread Recipe not puff up?
Great question! Puffing happens when the dough is rolled evenly thin, the oven or pan is hot enough, and the yeast has properly activated and risen the dough. If your dough is too thick or cold, or the cooking surface isn’t hot enough, you might not get those signature pockets. Also, make sure the yeast is fresh—expired yeast won’t produce good rise.
-
Can I use whole wheat flour instead of all-purpose?
Yes! You can substitute up to half the flour with whole wheat, though keep in mind your pita will be denser and might puff less. I usually mix whole wheat with all-purpose for the best texture and flavor balance.
-
How long does homemade pita bread last?
Fresh pitas are best enjoyed the day they’re made but will keep well at room temperature for up to two days in an airtight container. For longer storage, freezing is the way to go.
-
Is olive oil necessary in this Homemade Pita Bread Recipe?
Olive oil helps soften the dough and adds flavor, but if you don’t have any, you can substitute other neutral oils or even omit it, though expect a slightly different texture.
Final Thoughts
I honestly can’t recommend this Homemade Pita Bread Recipe enough—it’s the kind of recipe that makes you feel like a bread-baking rockstar in your own kitchen. Every time I make it, the warm, pillowy pitas bring a little celebration to our table, whether it’s for a casual lunch or a festive dinner. So go ahead, roll up your sleeves and give it a try—I promise you’ll love the results and impress anyone lucky enough to share them with you!
PrintHomemade Pita Bread Recipe
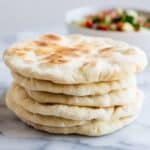
This homemade pita bread recipe yields soft, airy pockets perfect for sandwiches or dipping. Made with simple ingredients like flour, yeast, and olive oil, this versatile flatbread can be cooked in the oven for a crispier texture or on the stovetop for a thicker, chewier bite. With a quick rise and an easy dough, it’s ideal for fresh, warm pita bread anytime.
- Prep Time: 15 minutes
- Cook Time: 25 minutes
- Total Time: 1 hour 40 minutes
- Yield: 8 pita breads 1x
- Category: Bread
- Method: Baking
- Cuisine: Middle Eastern
- Diet: Vegetarian
Ingredients
Dough
- 1 cup warm water, 110°F
- 2 teaspoons active dry yeast (1 packet)
- 2 teaspoons granulated sugar
- 2 ½ cups all-purpose flour, more as needed
- 1 ½ teaspoons kosher salt (or 1 teaspoon regular salt)
- 1 ½ tablespoons olive oil
Instructions
- Activate yeast: Combine warm water, active dry yeast, and sugar in a large bowl. Stir in ½ cup flour and let the mixture sit for 10 minutes until it becomes bubbly and puffy, indicating the yeast is active.
- Mix and rise: Add olive oil and salt to the yeast mixture. Gradually stir in the remaining 2 cups of flour. When the dough becomes difficult to stir, knead by hand for 3-5 minutes or use a dough hook with an electric mixer until smooth. Form into a ball, lightly oil the surface, cover with a towel or plastic wrap, and let rise in a warm place for 1 hour, until doubled in size.
- Divide dough: Punch down the dough to release air. Divide it into eight equal pieces, shaping each into a ball. Cover with a damp paper towel and let rest for 10 minutes.
- Roll out dough: On a lightly floured surface, roll each dough ball into a circle about 1/8-inch thick, working one piece at a time.
- Oven cooking option: Place a pizza stone or cast iron skillet on the lower rack and preheat the oven to 475°F. Once hot, place 1-2 rolled dough circles onto the stone or skillet. Close the oven and bake for 2-3 minutes until the pita puffs with large bubbles. Flip and cook for another 1 minute. Remove and keep warm.
- Stovetop cooking option: Brush ½ teaspoon oil on a large cast iron skillet and heat over medium heat. Place a rolled dough circle in the skillet and cook for 2-3 minutes until puffed with bubbles. Flip and cook an additional minute. Remove and cover with a towel to keep warm.
Notes
- Oven baking produces a more airy, crispy pita bread texture.
- Stovetop cooking yields a thicker, chewier pita.
- Best served warm and fresh; store in an airtight container at room temperature for 1-2 days.
- To freeze, separate pitas with parchment paper in a zip-top freezer bag. Freeze up to 3 months and reheat wrapped in a damp towel.
Keywords: pita bread, homemade pita, flatbread, Middle Eastern bread, easy bread recipe, airy pita, soft pita, baked pita