Twix Cookie Cups Recipe
If you’re a fan of combining that perfect cookie crunch with gooey caramel and a hit of chocolate, then this Twix Cookie Cups Recipe is about to become your new favorite dessert. It’s like having the joy of Twix bars in a handy, homemade cookie cup form—deliciously nostalgic and incredibly satisfying. What I love most is how these cookie cups bring a bit of fancy to snack time without any complicated steps.
Whether you’re baking for a casual get-together, a special holiday, or just an afternoon treat, these Twix Cookie Cups hit all the right notes. The balance of buttery cookie, smooth caramel, and rich milk chocolate makes it worth trying again and again—and trust me, your kitchen will smell amazing while you make them!
Ingredients You’ll Need
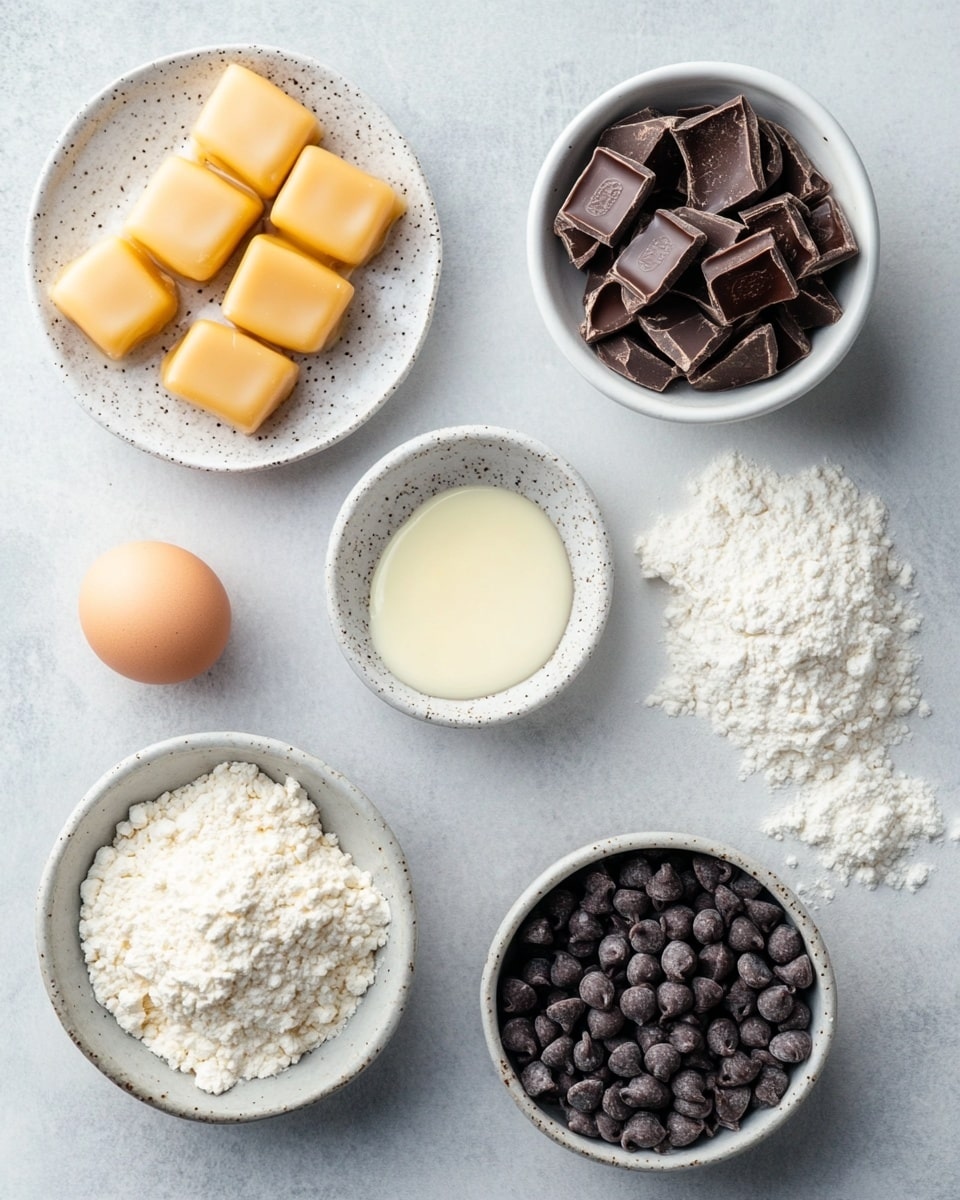
I love how the ingredients here feel simple and familiar, but they come together to create something that tastes totally indulgent. Starting with quality butter and sugar sets the cookie base, while the caramel and chocolate chips are crucial for that signature Twix flavor you know and love.
- Salted butter: Using salted butter adds a nice depth of flavor to the cookie dough—no need to add extra salt.
- Granulated sugar: This helps give the dough just the right sweetness and slight crunch.
- Vanilla extract: A little vanilla goes a long way in enhancing all the flavors.
- Egg white: It binds the dough without making it too dense, keeping your cookie cups light.
- All-purpose flour: The sturdy base of the dough—make sure to measure properly for best results.
- Baking powder: Helps the cookies puff up slightly but keep their shape nicely.
- Caramels (unwrapped): Look for soft caramels for easy melting and creamy topping.
- Milk: Just a bit to loosen the caramel and make it smooth.
- Milk chocolate chips: Melted to make that luscious, smooth topping classic to Twix.
Variations
One of the best parts about the Twix Cookie Cups Recipe is how easy it is to tweak it to your tastes. I often swap out milk chocolate chips for dark chocolate when I want a slight bitterness to balance the caramel’s sweetness. Feel free to make it yours!
- Dark chocolate chips: For a richer, less sweet finish that adds depth.
- Sea salt sprinkle: I sometimes add a pinch of sea salt on top of the chocolate layer to enhance the caramel’s flavor.
- Peanut butter twist: Swirling in a spoonful of peanut butter with the caramel for an extra nutty kick.
- Vegan/dairy-free: Use dairy-free butter, vegan caramel, and dairy-free chocolate chips to suit dietary needs.
How to Make Twix Cookie Cups Recipe
Step 1: Creaming Your Delicious Base
Start by preheating your oven to 350°F so it’s ready when your dough is prepped. Grab your butter and sugar, and cream them together until the mixture is light and fluffy—this is key for nice tender cookies. If it’s too cold, your butter won’t cream well, so sometimes I let mine soften on the countertop for about 30 minutes. Then add the egg white and vanilla extract, mixing until everything is smooth and well combined.
Step 2: Mixing and Cutting the Dough
Next, stir in the flour and baking powder, making sure there are no dry pockets left. The dough should be soft but not sticky—if it’s a bit too sticky, pop it in the fridge for 10 minutes. Roll the dough out between 1/4 and 1/2 inch thick, which creates a sturdy base for the caramel and chocolate without being too thick. Use a round cookie cutter to make circles and gently transfer them to an ungreased baking pan. I find using a small offset spatula helps here to keep the dough circles intact.
Step 3: Baking and Caramel Magic
Bake your cookie circles for about 6 to 8 minutes. You’ll want to pull them out when they’re puffed up and the surface isn’t glossy anymore—that’s your sign they’re perfectly baked but still soft. Let them cool on a wire rack completely before adding caramel.
While the cookies cool, pop the unwrapped caramels and milk into the microwave in 30-second bursts, stirring halfway through. You want a smooth and creamy caramel sauce—if it looks grainy, just give it a bit more stirring or another 15 seconds in the microwave; patience here pays off big time!
Step 4: Assembling the Cookie Cups
Spoon a few teaspoons of the warm caramel onto each cookie and spread it close to the edges, but don’t go over. Pop the cookie pans into the fridge for 10 to 15 minutes to let the caramel chill and firm up. Meanwhile, melt the milk chocolate chips in 30-second increments, stirring often, so you don’t burn the chocolate.
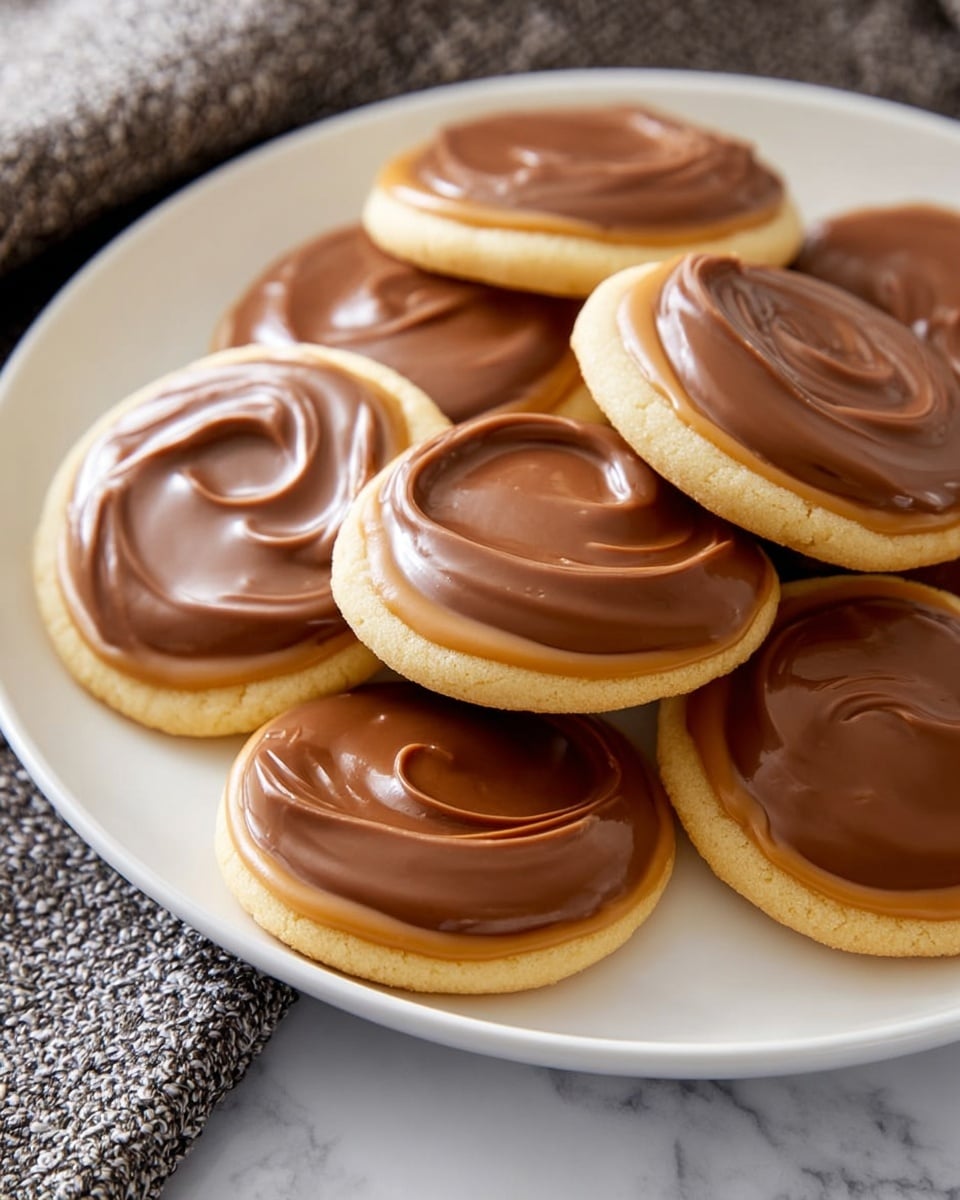
Finally, spread the melted chocolate over the caramel layer and chill once more until the chocolate sets. This layered effect mimics that classic Twix bar look and taste, but with a homemade cookie twist. Trust me, your family and guests will be impressed!
How to Serve Twix Cookie Cups Recipe
Garnishes
When I serve these, I sometimes add a light sprinkle of flaky sea salt on the chocolate for that perfect sweet-salty combo. A few chopped nuts or even a drizzle of white chocolate can add a fun finishing touch and extra flair for special occasions.
Side Dishes
I love pairing these cookie cups with a tall glass of cold milk or a hot cup of coffee—both bring out that caramel-chocolate goodness beautifully. They also make a great dessert alongside vanilla ice cream or fresh berries if you want something a little lighter.
Creative Ways to Present
For parties, I’ve arranged these Twix Cookie Cups Recipe treats on a tiered dessert stand, which instantly makes them feel fancy. Wrapping each cookie cup in mini cupcake liners can help with serving and adds a cute vibe. You can also drizzle contrasting chocolate colors on top for a professional bakery look.
Make Ahead and Storage
Storing Leftovers
I store leftover Twix Cookie Cups in an airtight container in the fridge to keep the caramel soft and the chocolate firm. They usually last about 4-5 days this way, though if you try to keep them out at room temperature, the caramel might get too sticky or oozy.
Freezing
I’ve frozen these cookie cups wrapped individually in plastic wrap and placed in a freezer-safe container. When you want a treat, take one out and let it thaw in the fridge overnight—surprisingly, they thaw without losing that gooey texture!
Reheating
If the chocolate gets too firm after refrigeration, just let your cookie cups sit at room temperature for 10 minutes before eating, or warm gently in the microwave for 5-7 seconds to soften the caramel and chocolate just right. Avoid overheating, or you’ll lose that perfect texture balance.
FAQs
-
Can I make Twix Cookie Cups Recipe ahead of time?
Absolutely! You can prepare the cookie cups, caramel, and chocolate coating a day in advance. Store them in an airtight container in the fridge and pull them out about 10-15 minutes before serving for the best texture.
-
What if I don’t have caramels on hand?
If you don’t have wrapped caramels, you can make a quick caramel from sugar, butter, and cream as a substitute. However, store-bought caramels save a lot of time and provide consistent softness perfect for this recipe.
-
Can I use a different type of chocolate for topping?
Yes! Milk chocolate is classic, but dark chocolate or white chocolate chips work beautifully too, depending on your flavor preference.
-
How thick should I roll the dough for Twix Cookie Cups Recipe?
Rolling the dough to about 1/4 to 1/2 inch thick is ideal. Thinner dough can become too crispy and lose that chewy texture, while thicker might not bake evenly or hold the toppings well.
-
Can these cookie cups be made gluten-free?
Yes, by using a gluten-free all-purpose flour blend that measures cup-for-cup, you can make a gluten-free version. Just be mindful of the caramel and chocolate ingredients for hidden gluten.
Final Thoughts
This Twix Cookie Cups Recipe holds a special place in my recipe box because it’s a wonderful blend of simplicity and indulgence. Baking these felt like sharing a little slice of childhood nostalgia in a fresh, homemade way—and I bet you’ll feel the same. Next time you want a treat that’s both fun to make and irresistible to eat, give this recipe a try. I’m confident you’ll be coming back to it again and again, just like I do!
PrintTwix Cookie Cups Recipe

Delightful Twix Cookie Cups combining buttery soft cookies with gooey caramel and a smooth milk chocolate topping, perfect for a sweet treat or party dessert.
- Prep Time: 10 minutes
- Cook Time: 10 minutes
- Total Time: 40 minutes
- Yield: 24 cookie cups 1x
- Category: Dessert
- Method: Baking
- Cuisine: American
Ingredients
Cookie Dough
- 1/2 cup (111g) salted butter
- 1/2 cup (115g) granulated sugar
- 1 tsp vanilla extract
- 1 egg white
- 1 1/2 cups (228g) all-purpose flour
- 1 tsp baking powder
Caramel Filling
- 20 caramels, unwrapped
- 1 tbsp milk
Chocolate Topping
- 2 cups (400g) milk chocolate chips
Instructions
- Preheat the oven: Set your oven to 350°F (175°C) to prepare for baking the cookie base.
- Cream butter and sugar: In a mixing bowl, cream together 1/2 cup salted butter and 1/2 cup granulated sugar until the mixture is light and fluffy.
- Add egg white and vanilla: Mix in 1 egg white and 1 tsp vanilla extract until fully combined, creating a smooth batter.
- Incorporate dry ingredients: Add 1 1/2 cups all-purpose flour and 1 tsp baking powder to the wet mixture. Stir thoroughly to form the cookie dough.
- Roll and cut dough: Roll the dough out to about 1/4 to 1/2 inch thickness. Use a round cookie cutter to cut circles and place them onto an ungreased baking sheet.
- Bake the cookies: Bake in the preheated oven for 6-8 minutes, removing them when they are puffy and no longer glossy.
- Cool cookies: Transfer the baked cookies to a wire rack and let cool completely to set their shape.
- Prepare caramel filling: While cookies cool, microwave 20 unwrapped caramels with 1 tbsp milk for 1 minute, stirring at 30 seconds until smooth and creamy.
- Spread caramel on cookies: Spoon several teaspoons of the warm caramel onto each cookie, spreading it to nearly cover the surface.
- Chill caramel layer: Place the caramel-topped cookies in the refrigerator for 10-15 minutes to cool and set.
- Melt chocolate chips: Melt 2 cups milk chocolate chips in 30-second intervals, stirring between intervals until smooth and fully melted.
- Top with chocolate: Spread a thin layer of melted chocolate onto each caramel-topped cookie and allow the chocolate to cool and harden before serving.
Notes
- Use an ungreased pan to ensure the cookie cups hold their shape well during baking.
- Do not overbake the cookies; pull them out when they look puffy and lose their glossy surface to maintain soft centers.
- Microwaving caramel with milk helps achieve a smooth, spreadable consistency.
- For a firmer chocolate topping, allow cookies to refrigerate after adding the chocolate layer.
- Store cookies in an airtight container in the refrigerator to maintain freshness.
Keywords: Twix Cookie Cups, caramel cookie cups, chocolate caramel cookies, homemade Twix cookies, easy cookie recipe, dessert cups