Vanilla Bean Crème Brûlée Recipe
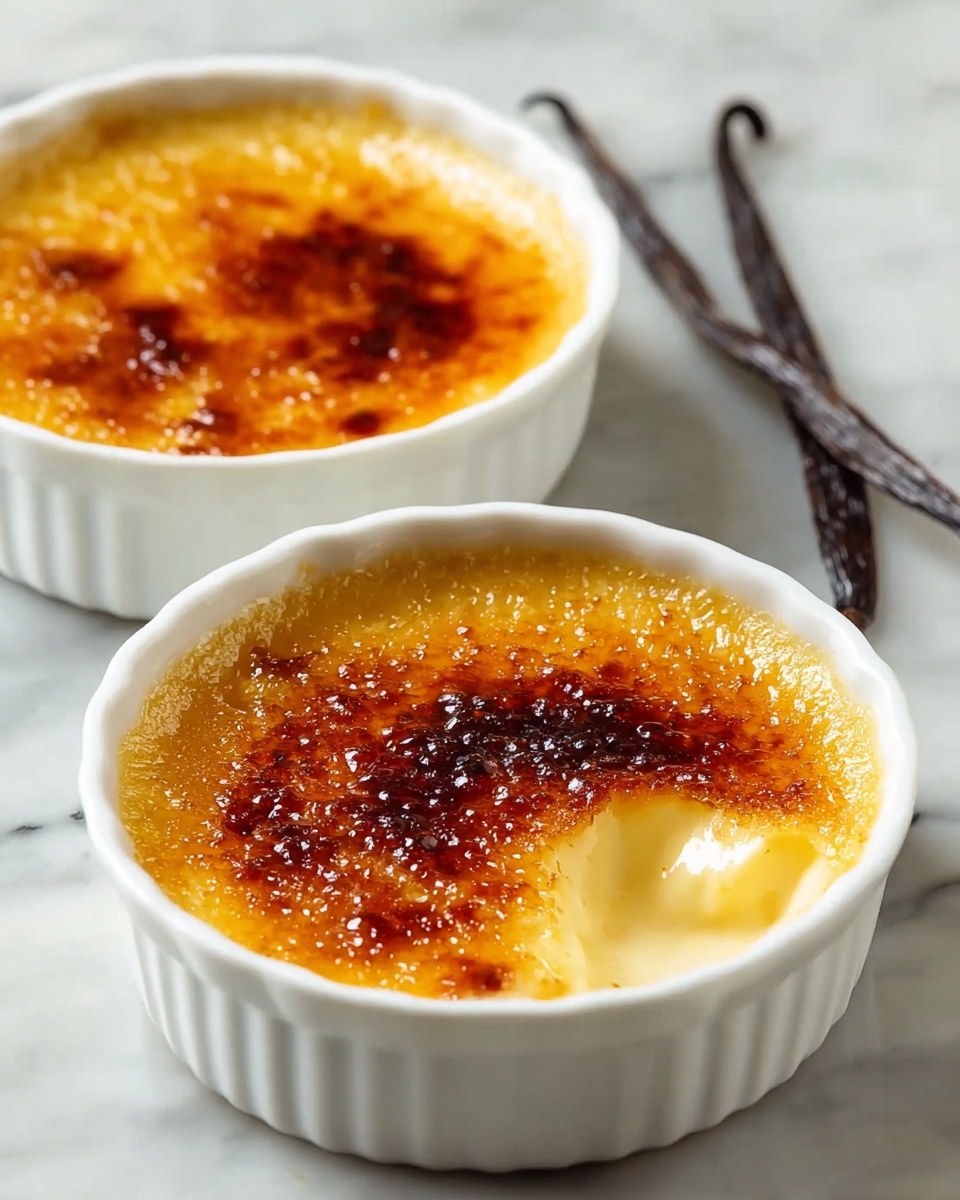
If you’re anything like me, you know there’s something downright magical about cracking through that perfectly caramelized sugar top to reveal silky, creamy custard beneath. This Vanilla Bean Crème Brûlée Recipe delivers exactly that experience—rich, velvety, and infused with the nuanced warmth of real vanilla bean, making it a standout dessert for any occasion. Whether you’re impressing guests or just treating yourself after a long day, this recipe is such a reliable classic I keep coming back to.
What I love most is how accessible it is, even though crème brûlée feels like such a fancy, restaurant-worthy dessert. You don’t need special equipment (a simple kitchen torch works wonders), and the process is straightforward once you know the little tricks that guarantee smooth custard and that perfect crunchy top. Give this Vanilla Bean Crème Brûlée Recipe a try—you’ll see how it turns your kitchen into a cozy, inviting patisserie in no time.
Ingredients You’ll Need
The beauty of this Vanilla Bean Crème Brûlée Recipe lies in the simplicity of its ingredients, each chosen to create the creamiest texture and deepest vanilla flavor. I recommend using high-quality vanilla bean paste or real vanilla beans if you can find them—they really elevate the whole dessert.
- Whipping cream: I always go for cream with at least 33% fat for that rich texture that stands up beautifully to baking.
- Brown sugar: Adds a subtle caramel note that complements the vanilla perfectly, different from plain white sugar.
- Vanilla bean paste: My favorite for that authentic vanilla speckled look and intense flavor—vanilla beans or vanilla extract work great too.
- Salt: Just a pinch to balance the sweetness and boost flavor depth.
- Vanilla extract: Added after heating to keep that fresh vanilla aroma vibrant.
- Egg yolks: They form the custard’s base, making it luscious and smooth.
- Granulated white sugar: Used in the custard for sweetness and again on top to create the crisp brûlée crust.
Variations
While I adore this classic Vanilla Bean Crème Brûlée Recipe as is, I’ve found it fun to play around with subtle tweaks depending on the season or who I’m serving it to. Feel free to customize it—this dessert is forgiving and makes for a great base to get creative.
- Lavender or Earl Grey infusion: Adding a lavender sprig or a tea bag to the cream while it heats adds a lovely floral or bergamot note—I’ve served this variation at tea parties with rave reviews.
- Coconut crème brûlée: Substitute half the cream with canned coconut milk for a tropical twist that’s rich and luscious.
- Lower sugar: If you’re watching sugar intake, reduce the sugar in the custard slightly; just keep the brûlée topping the same for that satisfying crunch.
- Vegan version: Although more advanced, you can experiment with coconut cream and agar to create a non-dairy custard, but this takes more trial and error in texture.
How to Make Vanilla Bean Crème Brûlée Recipe
Step 1: Prep Your Oven and Ramekins
Start by preheating your oven to 325℉ (163℃). Arrange your ramekins snugly in a large baking pan—this is where the water bath comes in, which you don’t want to skip. The water bath gently cooks the custard, preventing it from cracking or turning grainy, so add boiling water around the ramekins until it comes halfway up their sides.
Step 2: Warm the Cream and Infuse Vanilla
In a saucepan, whisk together the whipping cream, brown sugar, vanilla bean paste, and salt. Heat this over medium, stirring constantly until it’s just about to boil—scalding hot but don’t let it fully boil. Remove from heat and stir in the vanilla extract. Let the mixture steep for 10 minutes so those vanilla flavors deepen beautifully while it cools just a bit.
Step 3: Whisk Egg Yolks and Sugar
While the cream is steeping, whisk together the egg yolks and ⅓ cup of granulated sugar in a bowl. Beat them until they lighten in color and slightly thicken—that tells you they’re nicely aerated and ready to blend with the cream. This step is key to achieving that silky custard texture.
Step 4: Temper the Eggs
Now, the trickiest part: slowly add the warm cream mixture to the yolks, about half a cup at a time, whisking constantly. This gentle approach prevents the eggs from scrambling, ensuring a smooth custard. Once combined, strain the custard through a fine sieve to catch any bits of cooked egg or solids—this tip keeps your crème brûlée flawlessly smooth.
Step 5: Bake in a Water Bath
Pour the custard evenly into your ramekins. Remove any bubbles from the surface with the back of a spoon or a clean knife. Carefully pour boiling water into the pan around the ramekins until it reaches halfway up their sides. Bake for 25-30 minutes—look for firm edges with a center that gently jiggles. That slight wobble means it’s perfectly set.
Step 6: Chill and Caramelize the Top
Transfer the ramekins carefully to a wire rack and let them cool to room temperature before refrigerating for at least 5 hours. When you’re ready to serve, sprinkle a thin, even layer of granulated sugar on top of each custard. Use a kitchen torch to caramelize until the sugar crust is golden brown and crackly—that moment is pure dessert bliss!
How to Serve Vanilla Bean Crème Brûlée Recipe

Garnishes
I keep it simple with this Vanilla Bean Crème Brûlée Recipe—just a few fresh berries like raspberries or sliced strawberries add a pop of color and brightness that cuts through the richness perfectly. A sprig of mint is also a lovely touch for a hint of freshness, especially if you’re serving this at a dinner party.
Side Dishes
This dessert really shines on its own, but I sometimes pair it with a light, crisp dessert wine or a cup of strong espresso to balance the creamy sweetness. If you want something more, a simple almond biscotti on the side is delightful for dunking and crunch contrast.
Creative Ways to Present
For special occasions, I like to serve this Vanilla Bean Crème Brûlée Recipe in unique ramekins or even vintage teacups to add charm. You can also caramelize the sugar crust in fun patterns—try a lattice or swirl pattern by using a stencil before torching. It’s a show-stopper that’s surprisingly easy to do.
Make Ahead and Storage
Storing Leftovers
If you have any leftovers (which rarely happens in my house), just cover the ramekins with plastic wrap and refrigerate. I find the crust softens a bit but the custard stays silky and fresh for up to 3 days—just torch the sugar again before serving for that crunch.
Freezing
I generally don’t freeze crème brûlée since the texture can suffer—freezing may cause the custard to separate or get grainy upon thawing. I prefer making it fresh the day before serving for the best taste and texture.
Reheating
Since this dessert is best served chilled and the custard is delicate, I don’t recommend reheating crème brûlée. Instead, focus on refreshing the brûlée crust with a quick torching of sugar right before serving—it revives the crunch perfectly!
FAQs
-
Can I use vanilla extract instead of vanilla bean paste in this Vanilla Bean Crème Brûlée Recipe?
Absolutely! While vanilla bean paste gives you those lovely vanilla specks and a more intense flavor, pure vanilla extract works just fine and makes the recipe more accessible. Just use the same amount as called for and add it at the end of heating the cream to preserve the fresh vanilla aroma.
-
How do I know when the custard is perfectly baked?
The custard is done when the edges are set and firm but the center still has a slight wobble when you gently shake the ramekin. It might seem a little undercooked, but it will continue to firm up as it chills in the fridge.
-
Why is the water bath important in this Vanilla Bean Crème Brûlée Recipe?
The water bath helps cook the custard evenly and gently by surrounding the ramekins with moist heat. This prevents the edges from curdling or cracking and gives you that lusciously smooth texture that makes crème brûlée so special.
-
Can I make this Vanilla Bean Crème Brûlée Recipe ahead of time?
Yes! In fact, making it at least 5 hours – or even the day before – allows the custard to fully set and the flavors to meld beautifully. Just wait to caramelize the sugar crust until right before serving for the best crunch.
-
What if I don’t have a kitchen torch to caramelize the sugar?
If you don’t have a torch, you can broil the sugar-topped ramekins very carefully under the oven’s broiler. Watch closely and rotate the ramekins to caramelize evenly. It’s trickier but doable!
Final Thoughts
This Vanilla Bean Crème Brûlée Recipe holds a special place in my dessert rotation because it’s reliably impressive yet comforting—like a warm hug in custard form. Once you get the hang of balancing the tempering and nail that caramelized crust, you’ll be amazed how often you’ll want to make it. So grab those ingredients, light your torch, and give this classic a try—you’re going to love the way it tastes straight from your own oven!
PrintVanilla Bean Crème Brûlée Recipe

This classic Vanilla Bean Creme Brulee recipe delivers a rich and creamy custard infused with vanilla bean flavor, topped with a perfectly caramelized sugar crust. Gentle baking in a water bath ensures a silky texture, making it an elegant and timeless dessert for any occasion.
- Prep Time: 30 minutes
- Cook Time: 25-30 minutes
- Total Time: 5 hours 55 minutes
- Yield: 6 servings 1x
- Category: Dessert
- Method: Baking
- Cuisine: French
Ingredients
Custard
- 2 cups whipping cream (33% fat)
- 1 tablespoon brown sugar
- 1 teaspoon vanilla bean paste (or vanilla extract or seeds from 1 vanilla bean)
- ⅛ teaspoon salt
- 1 teaspoon vanilla extract
- 6 egg yolks
- ⅓ cup granulated white sugar
Topping
- ½ cup granulated white sugar
Instructions
- Preheat Oven and Prepare Water Bath: Preheat your oven to 325℉. Arrange your creme brûlée ramekins or dishes in a large pan to prepare for the water bath, which will ensure gentle and even cooking.
- Heat Cream Mixture: In a medium saucepan, whisk together the whipping cream, brown sugar, vanilla bean paste, and salt. Heat over medium, stirring constantly until the mixture is scalding hot. Remove from heat and stir in the vanilla extract, then allow the mixture to steep for 10 minutes to infuse flavors.
- Whisk Egg Yolks and Sugar: In a large bowl, whisk the egg yolks with ⅓ cup granulated sugar until the mixture is light in color and slightly thickened. This creates the base for the custard.
- Combine Cream and Egg Mixture: Gradually add the slightly cooled cream mixture to the egg yolks while whisking constantly, about ½ cup at a time. This gentle mixing prevents the eggs from scrambling and combines the ingredients smoothly.
- Fill Ramekins and Add Water Bath: Evenly ladle the custard into the prepared ramekins, removing any bubbles from the surface with a spoon. Carefully pour boiling water into the pan around the ramekins until it reaches halfway up their sides, creating a water bath to help the custard cook evenly.
- Bake the Custards: Place the pan in the oven and bake for 25-30 minutes. The custard should be set on the edges but still jiggle slightly in the center when done. Remove the ramekins from the water bath and transfer them to a wire rack to cool to room temperature.
- Chill: Refrigerate the custards for at least 5 hours or until fully chilled and set, allowing the flavors and texture to develop.
- Caramelize Sugar: Just before serving, sprinkle an even layer of granulated sugar on top of each custard. Use a kitchen torch to caramelize the sugar until golden and crisp, creating the signature crunchy crust. Serve immediately and enjoy your classic creme brûlée.
Notes
- Ensure the cream mixture is hot but not boiling to avoid curdling the eggs.
- Use a kitchen torch for the best caramelized sugar crust; alternatively, broil briefly but watch closely.
- Cool custards completely before refrigerating to achieve perfect texture.
- Steeping the vanilla bean paste or seeds enhances the vanilla flavor significantly.
- Remove bubbles from custard surface for a smooth finish before baking.
Keywords: creme brulee, vanilla bean creme brulee, classic creme brulee, vanilla custard dessert, baked custard, caramelized sugar dessert