Raising Canes Garlic Butter Sesame Bread Recipe
If you’ve ever found yourself craving that perfect buttery, garlicky bread that just melts in your mouth, this Raising Canes Garlic Butter Sesame Bread Recipe is the answer. It’s one of those simple yet irresistible side treats that pairs beautifully with pretty much any meal, especially when you’re craving comfort food vibes. I love how this recipe takes just minutes but delivers big on that rich, savory flavor that feels like a warm hug.
Whenever I make this at home, it’s usually for quick weeknight dinners or as a snack when I want something satisfying without fuss. The Raising Canes Garlic Butter Sesame Bread Recipe has that wonderful crispy sesame crust toasted under golden, garlicky butter, which is honestly my favorite part. Once you try it, you’ll see why this little recipe is worth keeping in your back pocket for those moments when you want something special but super easy.
Ingredients You’ll Need
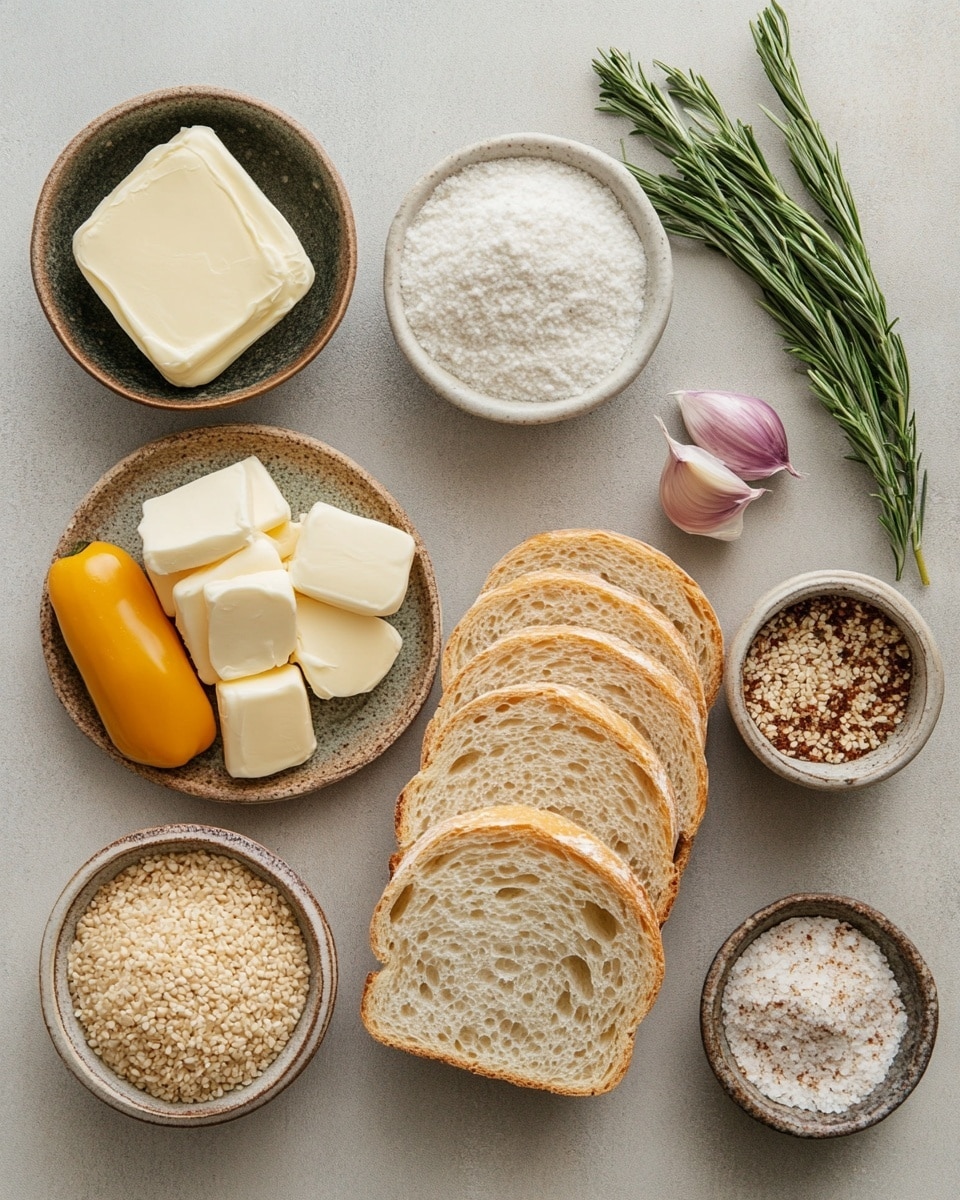
The magic here is really in the balance—the creamy butter, savory garlic salt, and that nutty sesame bread come together perfectly. When you’re picking out your bread, I recommend choosing good-quality BBQ sesame bread or a sandwich bread that has sesame seeds baked right on top. It just adds that extra crunch and flavor punch you want.
- Unsalted butter: Softened butter makes it easier to mix and spread evenly, plus you control the salt level perfectly.
- Garlic salt: This gives you that signature garlicky flavor without any extra prep – easy and tasty!
- BBQ sesame bread: The sesame seeds provide a toasty, nutty texture that’s a delightful contrast to the soft butter and bread.
Variations
I like to play around with this recipe depending on the mood or what I have on hand. The beauty of the Raising Canes Garlic Butter Sesame Bread Recipe is how easily it adapts—you can tweak it to suit your taste buds or dietary needs.
- Extra garlic punch: Sometimes, I add freshly minced garlic along with the garlic salt for a bolder flavor.
- Herb butter version: I’ve tossed in a little chopped parsley or chives into the butter mix—adds freshness that brightens each bite.
- Vegan version: Swap out butter for a vegan spread and use a vegan sesame bread option to keep the flavors while making it plant-based.
- Cheesy twist: Sprinkling a bit of shredded mozzarella or parmesan on top before searing gives you a melty, gooey treat.
How to Make Raising Canes Garlic Butter Sesame Bread Recipe
Step 1: Make Your Garlic Butter Mixture
Start by softening your butter at room temperature—this really helps it blend smoothly with the garlic salt. Mix them together thoroughly in a small bowl until you get a creamy, evenly garlicky spread. I usually give it a good stir with a spoon or spatula and taste just a bit to check the balance—sometimes I add a tiny pinch more garlic salt depending on how garlicky I’m feeling.
Step 2: Butter Up Your Bread
Next, spread a generous layer of your garlic butter on each slice of BBQ sesame bread. Don’t be shy here—the butter is what gives you that gorgeous, golden crust when seared. I find that an even coating makes all the difference for getting a consistent toast without burnt spots. If your bread is thick, a little extra butter on top makes it so much more luscious.
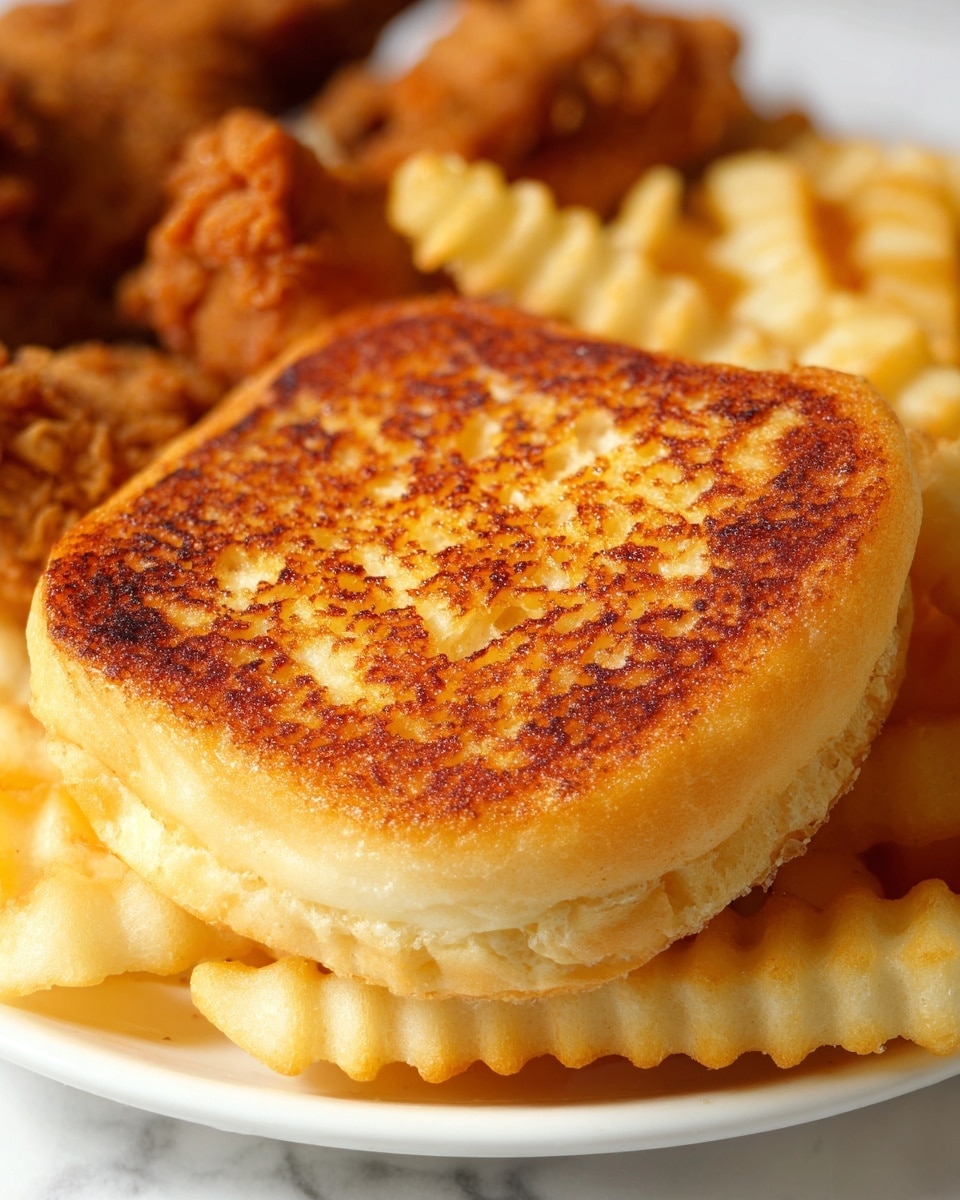
Step 3: Sear to Perfection
Heat a cast-iron skillet over medium-high heat for about 2 minutes. This pan is perfect because it holds heat evenly, ensuring your bread gets that savory crisp without burning. Place your buttered side down in the skillet, giving each slice space so they cook evenly. Let them sear for around 2 minutes—keep an eye on that color! You want a nice golden-brown with a little crunch. Once they’re perfect, remove the bread and get ready to serve immediately for the best texture.
How to Serve Raising Canes Garlic Butter Sesame Bread Recipe
Garnishes
Personally, I love sprinkling a tiny bit of chopped fresh parsley or a pinch of red pepper flakes over the top just before serving. It adds a pop of color and an extra hint of flavor that makes this simple bread feel special. Sometimes, a little grated parmesan on top right after cooking gives a nice savory crust that everyone raves about.
Side Dishes
This bread pairs beautifully with my favorite fried chicken or even a simple grilled burger. It’s also fantastic as a side with hearty soups like tomato bisque or creamy chicken noodle—perfect for dipping! Whenever I’m serving up homemade wings or a BBQ spread, the Raising Canes Garlic Butter Sesame Bread Recipe is always the first thing disappearing from the table.
Creative Ways to Present
For special occasions, I’ve arranged these garlicky sesame bread slices on a wooden board with small bowls of flavored olive oils or spicy honey on the side. It makes the simple bread feel elevated and inviting for guests to snack on as they mingle. You could even stack them like little sliders and add a slice of cheese or pickles inside for a fun appetizer twist.
Make Ahead and Storage
Storing Leftovers
If you have any leftovers (which is rare in my house), wrap them tightly in plastic wrap or aluminum foil and store them in an airtight container in the fridge. They stay good for up to 2 days, though freshly made is definitely tastier. Just keep the bread slices separate so they don’t get soggy from the butter.
Freezing
I’ve tried freezing the buttered bread before cooking, wrapped well in parchment and foil. It works great for meal prep—just thaw in the fridge overnight and then cook as usual. This way, you can enjoy the Raising Canes Garlic Butter Sesame Bread Recipe anytime without any extra effort on busy days.
Reheating
To reheat and refresh that crispy texture, I recommend popping the bread in a warm skillet for a minute or two instead of the microwave. This brings back the toasty crust and buttery goodness without turning it soggy. Alternatively, a quick broil for under a minute works wonders to revive that golden crunch.
FAQs
-
Can I use regular bread instead of BBQ sesame bread for this recipe?
Absolutely! While BBQ sesame bread adds an extra nutty crunch and flavor, you can use any sandwich bread or even artisan bread you love. Just keep in mind the texture and sesame seed presence will be different, but the garlic butter will still shine beautifully.
-
How do I prevent the bread from getting soggy when making this recipe?
The key is to spread the garlic butter evenly rather than piling it on thick, then sear quickly on medium-high heat so the bread crisps up fast. Using a hot cast-iron skillet helps create a crunchy surface sealing in all the flavor without sogginess.
-
Can I make this recipe ahead of time?
Yes, you can prepare the garlic butter mixture in advance and store it in the fridge. You can also butter the bread and keep it wrapped for a few hours before cooking. Just make sure to cook or reheat it shortly before serving to maintain that crispy texture.
-
What’s the best way to reheat Raising Canes Garlic Butter Sesame Bread?
Reheating in a skillet over low heat or under a broiler for a minute or two helps restore the crispiness better than microwaving, which can make the bread soft and chewy instead of crunchy.
Final Thoughts
This Raising Canes Garlic Butter Sesame Bread Recipe has become one of my favorite quick fixes when I want that delicious garlicky bread without the fuss of complicated recipes. It’s simple, forgiving, and so satisfying that I find myself coming back to it again and again. I really hope when you try it, it brings that same little moment of joy and easy comfort to your table—it feels like a small treat that makes any meal feel a bit more special. Trust me, once you taste that perfect buttery garlic crust with sesame crunch, you’ll want to keep this recipe in your kitchen rotation forever.
PrintRaising Canes Garlic Butter Sesame Bread Recipe

This quick and tasty Raising Cane’s style garlic bread is made with BBQ sesame bread spread with a flavorful garlic butter and seared to golden perfection in a cast-iron skillet. Perfect as a side or snack, the recipe comes together in just 5 minutes.
- Prep Time: 2 minutes
- Cook Time: 3 minutes
- Total Time: 5 minutes
- Yield: 4 slices 1x
- Category: Side Dish
- Method: Frying
- Cuisine: American
Ingredients
Garlic Butter Spread
- 4 tablespoons unsalted butter, softened
- 1 teaspoon garlic salt
Bread
- 4 slices BBQ sesame bread
Instructions
- Prepare the Garlic Butter: In a small bowl, mix the softened unsalted butter with garlic salt until well combined, creating a flavorful garlic butter spread.
- Spread the Butter on Bread: Evenly spread the garlic butter mixture over the top side of each slice of BBQ sesame bread, ensuring full coverage for flavor.
- Preheat Skillet: Heat a cast-iron skillet over medium-high heat for about 2 minutes to get it hot enough for searing the bread.
- Sear the Bread: Place the bread slices butter side down onto the hot skillet. Let them cook for about 2 minutes without moving until the bottom side starts to turn golden brown and crispy.
- Serve: Remove the bread from the skillet immediately to prevent burning and serve warm as a delicious side or snack.
Notes
- Use softened butter for easy mixing and spreading.
- Keep an eye on the bread while searing to avoid burning.
- Cast-iron skillet is preferred for even heat distribution and best crispiness.
- Can be served alongside chicken fingers, salads, or enjoyed on its own.
Keywords: Raising Cane’s bread, garlic bread, skillet garlic bread, BBQ sesame bread, quick side, easy garlic butter bread