Easy Baked Meat Buns | Soft & Juicy Recipe
Punch down the dough, then divide it into 18 equal pieces. Roll each piece into a smooth ball and then flatten it into a circle about 3 to 3.5 inches wide. Spoon about 2 tablespoons of your cooled filling into the center of each round, then gather the edges and pinch tightly to seal. Take your time sealing—I’ve learned that well-sealed buns hold their juicy filling perfectly without leaks.
Roll each sealed bun gently in your hands to shape it back into a smooth ball, seam-side down. Arrange the buns on a parchment-lined baking tray, cover, and let them rest for 20 minutes while you preheat the oven to 350°F (180°C).
Step 4: Brush, Sprinkle, and Bake to Golden Perfection
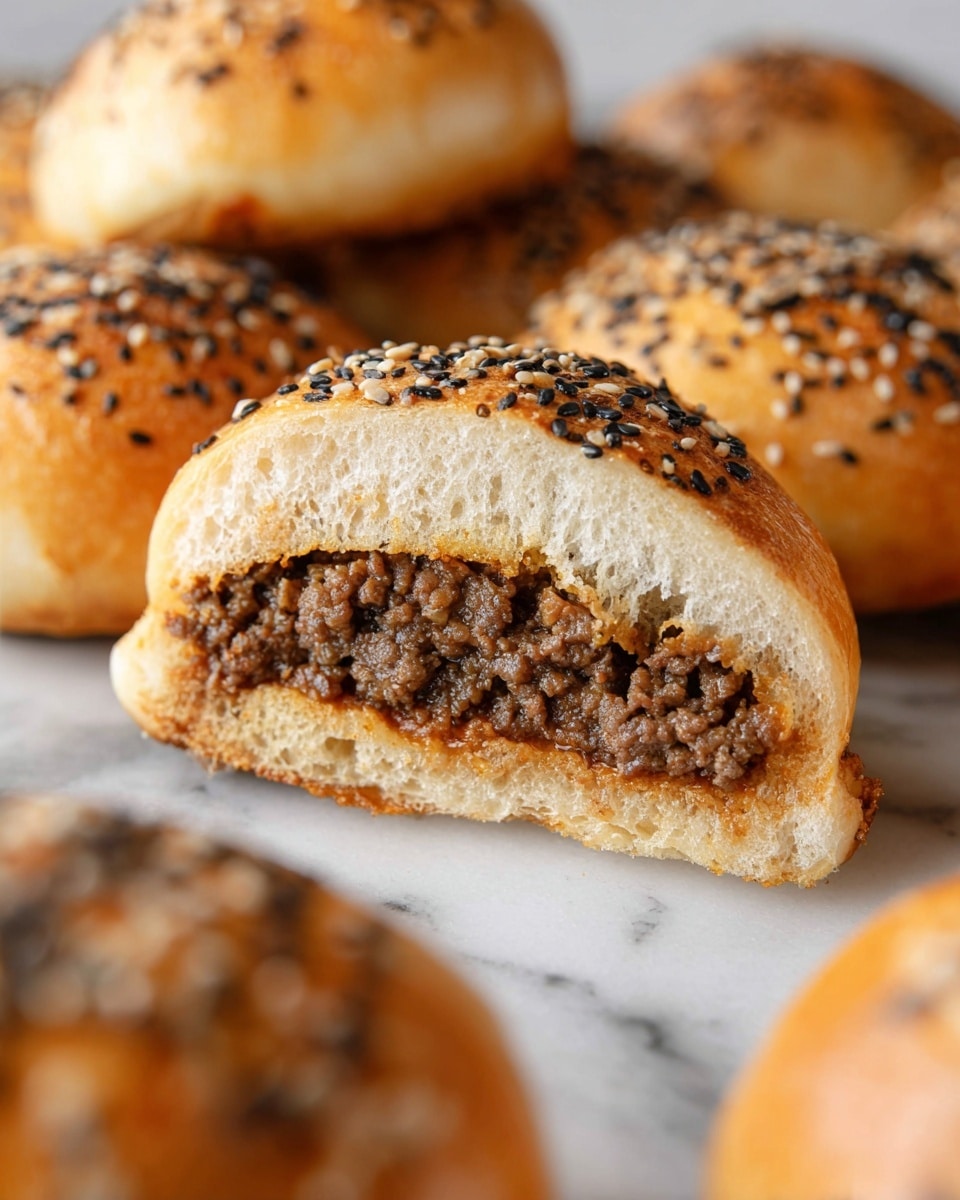
Before baking, brush each bun with the beaten egg to create that irresistible golden color. Sprinkle sesame seeds on top for extra crunch and visual appeal. Bake in the preheated oven for 18 to 22 minutes or until they turn a lovely golden brown. Keep an eye on them near the end; ovens vary, and you want that perfect crust without drying out the buns.
How to Serve Easy Baked Meat Buns | Soft & Juicy Recipe
Garnishes
Honestly, I usually keep it simple with garnishes—just a little sprinkle of freshly chopped parsley or a drizzle of tangy yogurt sauce complements the spices inside the buns wonderfully. Sometimes I add some pickled vegetables on the side for a bit of brightness and crunch.
Side Dishes
These buns are perfect alongside a fresh green salad or a simple cucumber-tomato salad tossed with lemon and olive oil. When I want a heartier plate, I serve them with roasted veggies or even a bowl of soup—comfort food heaven.
Creative Ways to Present
For parties, I like arranging these Easy Baked Meat Buns | Soft & Juicy Recipe on a large wooden board surrounded by small bowls of dipping sauces—think spicy harissa or garlicky yogurt. It turns them into finger food that’s both pretty and practical. Another favorite is wrapping a few in parchment paper tied with twine for a cute, rustic gift.
Make Ahead and Storage
Storing Leftovers
I usually store leftover buns in an airtight container in the fridge for up to 3 days. Reheating in the oven or toaster oven helps keep the crust crisp and the filling warm without drying it out. If you’re short on time, a quick zap in the microwave works—just cover them with a damp paper towel to retain moisture.
Freezing
One of the best parts about this recipe is how well the buns freeze. I let them cool completely after baking, then freeze in a single layer on a tray before transferring to a ziplock bag. When you want some, just pull them out and thaw overnight in the fridge or reheat directly from frozen—perfect for busy days or unexpected guests!
Reheating
To reheat, I preheat the oven to 325°F (160°C), place the buns on a baking tray, and warm them for about 10-15 minutes. This method keeps them soft inside while crisping up the outside nicely. Avoid microwaving too long or they might get rubbery.
FAQs
-
Can I make the dough without a stand mixer?
Absolutely! You can mix and knead the dough entirely by hand. Just make sure you knead it long enough—about 7 to 8 minutes—to develop that nice elastic texture. Using slightly warm water helps activate the yeast properly.
-
Can I use ground chicken or turkey instead of beef?
Yes, ground chicken or turkey works fine but tends to be leaner, so you might want to add a bit more oil or broth to keep the filling juicy. Adjust seasoning to taste since these meats have a milder flavor.
-
How do I know when the buns are fully baked?
Look for a golden brown exterior and a firm feel when gently pressed. If you’re unsure, you can insert a toothpick near the center—it should come out clean. Avoid opening the oven door too often to keep that lovely rise.
-
Are these buns good for making ahead for parties?
Definitely! You can prepare and bake the buns a day ahead, then reheat them before serving. Or freeze in advance and thaw them out as needed—either way, they’re a crowd-pleaser anytime.
-
Can I substitute pine nuts with something else?
If you don’t have pine nuts, toasted chopped walnuts or slivered almonds can work as a crunchy substitute, though the flavor will be a bit different. Or you can skip nuts altogether if preferred.
Final Thoughts
This Easy Baked Meat Buns | Soft & Juicy Recipe has become a go-to for me whenever I want a comforting, homemade treat without fuss. I love how they bring everyone to the table and disappear quickly—there’s just something so satisfying about biting into that soft bun with its flavorful, juicy filling. Honestly, I can’t recommend this recipe enough; it’s straightforward, flexible, and absolutely delicious. Give it a try next time you crave something warm and hearty—you won’t regret it, I promise!
While your dough is rising, heat olive oil in a skillet over medium heat and sauté the chopped onions until they’re translucent and fragrant — about 4 to 5 minutes. Add your crushed garlic and stir for another minute.
Add the ground beef and cook thoroughly, breaking it apart with a wooden spoon until browned. Then stir in the salt, pepper, thyme, cumin, paprika, and tomato paste. Once combined, pour in the broth or water to keep the filling nice and juicy and let it simmer on low heat until just right—about a few minutes. Don’t skip this step; it keeps the meat luscious inside each bun. If you want, toss in pine nuts before letting the mixture cool.
Step 3: Shape the Buns with Love
Punch down the dough, then divide it into 18 equal pieces. Roll each piece into a smooth ball and then flatten it into a circle about 3 to 3.5 inches wide. Spoon about 2 tablespoons of your cooled filling into the center of each round, then gather the edges and pinch tightly to seal. Take your time sealing—I’ve learned that well-sealed buns hold their juicy filling perfectly without leaks.
Roll each sealed bun gently in your hands to shape it back into a smooth ball, seam-side down. Arrange the buns on a parchment-lined baking tray, cover, and let them rest for 20 minutes while you preheat the oven to 350°F (180°C).
Step 4: Brush, Sprinkle, and Bake to Golden Perfection
Before baking, brush each bun with the beaten egg to create that irresistible golden color. Sprinkle sesame seeds on top for extra crunch and visual appeal. Bake in the preheated oven for 18 to 22 minutes or until they turn a lovely golden brown. Keep an eye on them near the end; ovens vary, and you want that perfect crust without drying out the buns.
How to Serve Easy Baked Meat Buns | Soft & Juicy Recipe
Garnishes
Honestly, I usually keep it simple with garnishes—just a little sprinkle of freshly chopped parsley or a drizzle of tangy yogurt sauce complements the spices inside the buns wonderfully. Sometimes I add some pickled vegetables on the side for a bit of brightness and crunch.
Side Dishes
These buns are perfect alongside a fresh green salad or a simple cucumber-tomato salad tossed with lemon and olive oil. When I want a heartier plate, I serve them with roasted veggies or even a bowl of soup—comfort food heaven.
Creative Ways to Present
For parties, I like arranging these Easy Baked Meat Buns | Soft & Juicy Recipe on a large wooden board surrounded by small bowls of dipping sauces—think spicy harissa or garlicky yogurt. It turns them into finger food that’s both pretty and practical. Another favorite is wrapping a few in parchment paper tied with twine for a cute, rustic gift.
Make Ahead and Storage
Storing Leftovers
I usually store leftover buns in an airtight container in the fridge for up to 3 days. Reheating in the oven or toaster oven helps keep the crust crisp and the filling warm without drying it out. If you’re short on time, a quick zap in the microwave works—just cover them with a damp paper towel to retain moisture.
Freezing
One of the best parts about this recipe is how well the buns freeze. I let them cool completely after baking, then freeze in a single layer on a tray before transferring to a ziplock bag. When you want some, just pull them out and thaw overnight in the fridge or reheat directly from frozen—perfect for busy days or unexpected guests!
Reheating
To reheat, I preheat the oven to 325°F (160°C), place the buns on a baking tray, and warm them for about 10-15 minutes. This method keeps them soft inside while crisping up the outside nicely. Avoid microwaving too long or they might get rubbery.
FAQs
-
Can I make the dough without a stand mixer?
Absolutely! You can mix and knead the dough entirely by hand. Just make sure you knead it long enough—about 7 to 8 minutes—to develop that nice elastic texture. Using slightly warm water helps activate the yeast properly.
-
Can I use ground chicken or turkey instead of beef?
Yes, ground chicken or turkey works fine but tends to be leaner, so you might want to add a bit more oil or broth to keep the filling juicy. Adjust seasoning to taste since these meats have a milder flavor.
-
How do I know when the buns are fully baked?
Look for a golden brown exterior and a firm feel when gently pressed. If you’re unsure, you can insert a toothpick near the center—it should come out clean. Avoid opening the oven door too often to keep that lovely rise.
-
Are these buns good for making ahead for parties?
Definitely! You can prepare and bake the buns a day ahead, then reheat them before serving. Or freeze in advance and thaw them out as needed—either way, they’re a crowd-pleaser anytime.
-
Can I substitute pine nuts with something else?
If you don’t have pine nuts, toasted chopped walnuts or slivered almonds can work as a crunchy substitute, though the flavor will be a bit different. Or you can skip nuts altogether if preferred.
Final Thoughts
This Easy Baked Meat Buns | Soft & Juicy Recipe has become a go-to for me whenever I want a comforting, homemade treat without fuss. I love how they bring everyone to the table and disappear quickly—there’s just something so satisfying about biting into that soft bun with its flavorful, juicy filling. Honestly, I can’t recommend this recipe enough; it’s straightforward, flexible, and absolutely delicious. Give it a try next time you crave something warm and hearty—you won’t regret it, I promise!
Start by mixing all your dry dough ingredients in a large bowl—flour, yeast, sugar, and salt. Then add the warm water and oil and mix until a soft dough forms. Knead it for about 7 to 8 minutes until it’s smooth and elastic. Trust me, this kneading step is worth the effort—it really helps build the texture that makes the buns so soft.
Once kneaded, place the dough in a lightly greased bowl, cover it with a clean towel or plastic wrap, and let it rise in a warm spot for about an hour or until it’s doubled in size. This rising period is when all the magic happens!
Step 2: Prepare the Juicy Meat Filling
While your dough is rising, heat olive oil in a skillet over medium heat and sauté the chopped onions until they’re translucent and fragrant — about 4 to 5 minutes. Add your crushed garlic and stir for another minute.
Add the ground beef and cook thoroughly, breaking it apart with a wooden spoon until browned. Then stir in the salt, pepper, thyme, cumin, paprika, and tomato paste. Once combined, pour in the broth or water to keep the filling nice and juicy and let it simmer on low heat until just right—about a few minutes. Don’t skip this step; it keeps the meat luscious inside each bun. If you want, toss in pine nuts before letting the mixture cool.
Step 3: Shape the Buns with Love
Punch down the dough, then divide it into 18 equal pieces. Roll each piece into a smooth ball and then flatten it into a circle about 3 to 3.5 inches wide. Spoon about 2 tablespoons of your cooled filling into the center of each round, then gather the edges and pinch tightly to seal. Take your time sealing—I’ve learned that well-sealed buns hold their juicy filling perfectly without leaks.
Roll each sealed bun gently in your hands to shape it back into a smooth ball, seam-side down. Arrange the buns on a parchment-lined baking tray, cover, and let them rest for 20 minutes while you preheat the oven to 350°F (180°C).
Step 4: Brush, Sprinkle, and Bake to Golden Perfection
Before baking, brush each bun with the beaten egg to create that irresistible golden color. Sprinkle sesame seeds on top for extra crunch and visual appeal. Bake in the preheated oven for 18 to 22 minutes or until they turn a lovely golden brown. Keep an eye on them near the end; ovens vary, and you want that perfect crust without drying out the buns.
How to Serve Easy Baked Meat Buns | Soft & Juicy Recipe
Garnishes
Honestly, I usually keep it simple with garnishes—just a little sprinkle of freshly chopped parsley or a drizzle of tangy yogurt sauce complements the spices inside the buns wonderfully. Sometimes I add some pickled vegetables on the side for a bit of brightness and crunch.
Side Dishes
These buns are perfect alongside a fresh green salad or a simple cucumber-tomato salad tossed with lemon and olive oil. When I want a heartier plate, I serve them with roasted veggies or even a bowl of soup—comfort food heaven.
Creative Ways to Present
For parties, I like arranging these Easy Baked Meat Buns | Soft & Juicy Recipe on a large wooden board surrounded by small bowls of dipping sauces—think spicy harissa or garlicky yogurt. It turns them into finger food that’s both pretty and practical. Another favorite is wrapping a few in parchment paper tied with twine for a cute, rustic gift.
Make Ahead and Storage
Storing Leftovers
I usually store leftover buns in an airtight container in the fridge for up to 3 days. Reheating in the oven or toaster oven helps keep the crust crisp and the filling warm without drying it out. If you’re short on time, a quick zap in the microwave works—just cover them with a damp paper towel to retain moisture.
Freezing
One of the best parts about this recipe is how well the buns freeze. I let them cool completely after baking, then freeze in a single layer on a tray before transferring to a ziplock bag. When you want some, just pull them out and thaw overnight in the fridge or reheat directly from frozen—perfect for busy days or unexpected guests!
Reheating
To reheat, I preheat the oven to 325°F (160°C), place the buns on a baking tray, and warm them for about 10-15 minutes. This method keeps them soft inside while crisping up the outside nicely. Avoid microwaving too long or they might get rubbery.
FAQs
-
Can I make the dough without a stand mixer?
Absolutely! You can mix and knead the dough entirely by hand. Just make sure you knead it long enough—about 7 to 8 minutes—to develop that nice elastic texture. Using slightly warm water helps activate the yeast properly.
-
Can I use ground chicken or turkey instead of beef?
Yes, ground chicken or turkey works fine but tends to be leaner, so you might want to add a bit more oil or broth to keep the filling juicy. Adjust seasoning to taste since these meats have a milder flavor.
-
How do I know when the buns are fully baked?
Look for a golden brown exterior and a firm feel when gently pressed. If you’re unsure, you can insert a toothpick near the center—it should come out clean. Avoid opening the oven door too often to keep that lovely rise.
-
Are these buns good for making ahead for parties?
Definitely! You can prepare and bake the buns a day ahead, then reheat them before serving. Or freeze in advance and thaw them out as needed—either way, they’re a crowd-pleaser anytime.
-
Can I substitute pine nuts with something else?
If you don’t have pine nuts, toasted chopped walnuts or slivered almonds can work as a crunchy substitute, though the flavor will be a bit different. Or you can skip nuts altogether if preferred.
Final Thoughts
This Easy Baked Meat Buns | Soft & Juicy Recipe has become a go-to for me whenever I want a comforting, homemade treat without fuss. I love how they bring everyone to the table and disappear quickly—there’s just something so satisfying about biting into that soft bun with its flavorful, juicy filling. Honestly, I can’t recommend this recipe enough; it’s straightforward, flexible, and absolutely delicious. Give it a try next time you crave something warm and hearty—you won’t regret it, I promise!
Oh, if you’re like me and love those soft, fluffy buns packed with juicy, flavorful meat inside, then you’re going to adore this Easy Baked Meat Buns | Soft & Juicy Recipe. It’s one of those recipes that feels like a warm hug on a plate—perfect for family dinners, potlucks, or whenever you want to impress guests without spending all day in the kitchen. The dough comes out incredibly tender, while the meat filling is juicy and richly spiced, making every bite a delight.
I remember the first time I made these buns; the house smelled amazing, and everyone kept grabbing more before dinner even started! What makes this Easy Baked Meat Buns | Soft & Juicy Recipe stand out is how simple it is to pull together with minimal ingredients you probably already have. Plus, the buns freeze beautifully, so you can enjoy them on busy days without any fuss.
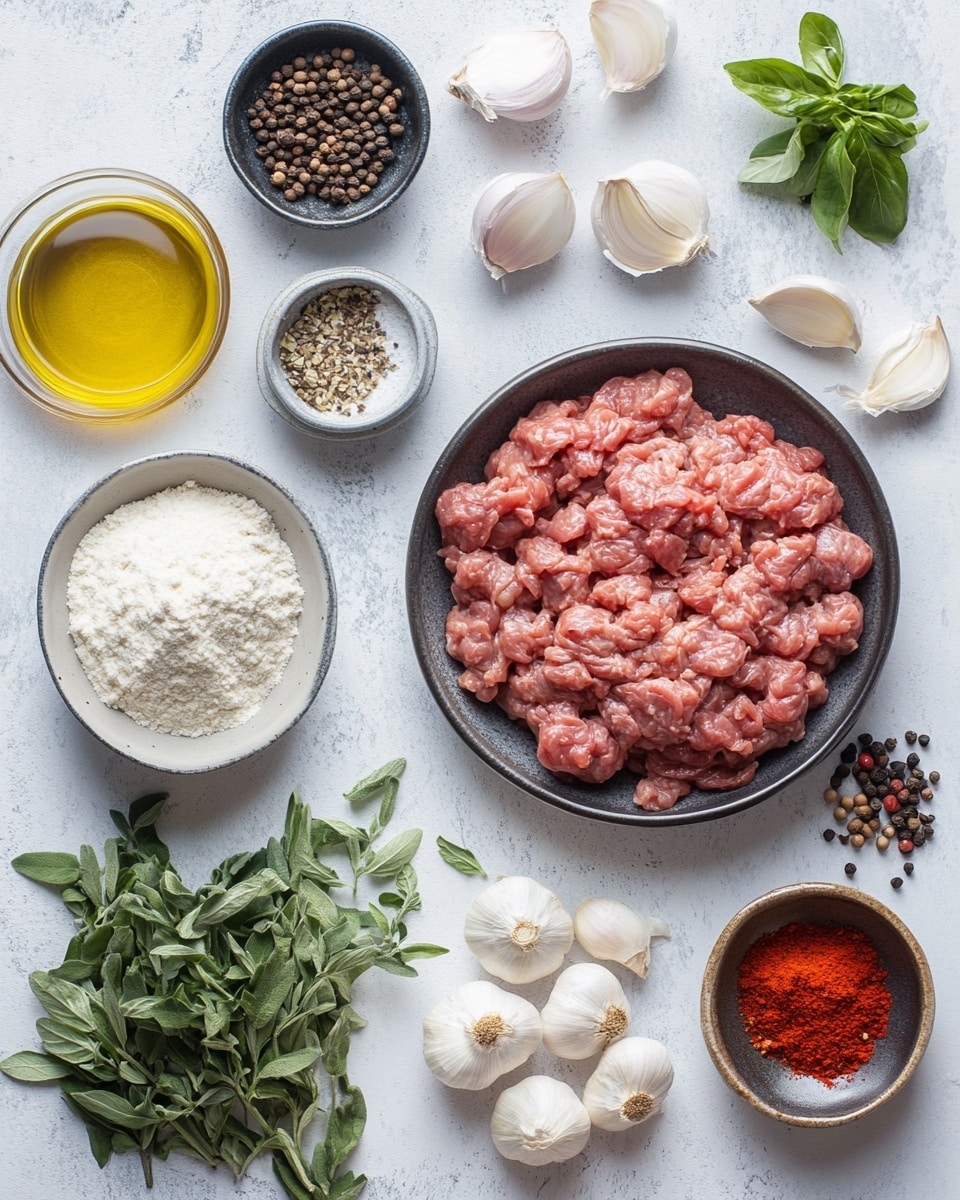
Ingredients You’ll Need
Every ingredient here plays a crucial role in making these Easy Baked Meat Buns | Soft & Juicy Recipe a success. The dough ingredients give you that soft, elastic texture you’ll love, and the filling is a perfect balance of savory spices and tender meat. Here are some shopping tips and why each one matters.
- All-purpose flour: This is your base for the dough, and using a good quality, fresh flour helps with softness and rise.
- Instant dry yeast: Quick to activate and easy to use, it ensures your buns get that perfect lift.
- Sugar: Just enough to feed the yeast and add a subtle hint of sweetness to the dough.
- Salt: Essential for flavor balance in both dough and filling.
- Oil: Adds moisture and tenderness to the dough—I’ve found that using neutral oils like canola or vegetable work best.
- Water: Warm, not hot, is key to waking the yeast without killing it during dough prep.
- Ground beef: I prefer 80/20 for juiciness, but leaner beef works if you want a lighter option.
- Onion: Adds sweetness and depth to the filling.
- Olive oil: For sautéing the filling, it brings a lovely richness.
- Garlic: Crushed fresh garlic offers that punch of aroma and flavor you just can’t skip.
- Salt & Black pepper: Basic seasoning to enhance the beef mixture.
- Thyme: Whether fresh or dried, it adds an earthy herbal note that complements the meat beautifully.
- Cumin: Brings a warm, slightly smoky depth—such a great companion to ground beef.
- Paprika: Adds color and a subtle sweet-spicy kick.
- Tomato paste: Concentrated tomato flavor that enriches the filling sauce.
- Broth or water: Helps keep the filling moist and juicy without being watery.
- Pine nuts (optional): Adds a surprising crunch and a touch of buttery flavor—definitely worth trying if you have them!
- Egg (beaten): For that beautiful golden sheen on top of your buns.
- Sesame seeds: Adds texture and a lovely nutty aroma when baked.
Variations
What I love most about the Easy Baked Meat Buns | Soft & Juicy Recipe is how adaptable it is. I often swap in different fillings depending on mood and what’s in the fridge. Feel free to make it your own!
- Vegetarian Variation: I’ve had great success swapping ground beef with sautéed mushrooms mixed with crumbled tofu and the same spices. It’s surprisingly hearty and satisfying.
- Spicy Twist: Adding a pinch of chili flakes or a dash of hot sauce to the filling spices brings a nice heat that my family loves.
- Cheese-Stuffed Buns: Sometimes, I tuck a small cube of mozzarella inside the meat filling for gooey surprises inside each bun.
- Gluten-Free Option: Using a gluten-free flour blend in the dough works, but the texture changes slightly—worth experimenting if you’re gluten sensitive.
- Herb Variations: Swapping thyme with rosemary or oregano offers a fresh twist depending on what herbs you prefer or have at hand.
How to Make Easy Baked Meat Buns | Soft & Juicy Recipe
Step 1: Make the Dough and Let It Rise
Start by mixing all your dry dough ingredients in a large bowl—flour, yeast, sugar, and salt. Then add the warm water and oil and mix until a soft dough forms. Knead it for about 7 to 8 minutes until it’s smooth and elastic. Trust me, this kneading step is worth the effort—it really helps build the texture that makes the buns so soft.
Once kneaded, place the dough in a lightly greased bowl, cover it with a clean towel or plastic wrap, and let it rise in a warm spot for about an hour or until it’s doubled in size. This rising period is when all the magic happens!
Step 2: Prepare the Juicy Meat Filling
While your dough is rising, heat olive oil in a skillet over medium heat and sauté the chopped onions until they’re translucent and fragrant — about 4 to 5 minutes. Add your crushed garlic and stir for another minute.
Add the ground beef and cook thoroughly, breaking it apart with a wooden spoon until browned. Then stir in the salt, pepper, thyme, cumin, paprika, and tomato paste. Once combined, pour in the broth or water to keep the filling nice and juicy and let it simmer on low heat until just right—about a few minutes. Don’t skip this step; it keeps the meat luscious inside each bun. If you want, toss in pine nuts before letting the mixture cool.
Step 3: Shape the Buns with Love
Punch down the dough, then divide it into 18 equal pieces. Roll each piece into a smooth ball and then flatten it into a circle about 3 to 3.5 inches wide. Spoon about 2 tablespoons of your cooled filling into the center of each round, then gather the edges and pinch tightly to seal. Take your time sealing—I’ve learned that well-sealed buns hold their juicy filling perfectly without leaks.
Roll each sealed bun gently in your hands to shape it back into a smooth ball, seam-side down. Arrange the buns on a parchment-lined baking tray, cover, and let them rest for 20 minutes while you preheat the oven to 350°F (180°C).
Step 4: Brush, Sprinkle, and Bake to Golden Perfection
Before baking, brush each bun with the beaten egg to create that irresistible golden color. Sprinkle sesame seeds on top for extra crunch and visual appeal. Bake in the preheated oven for 18 to 22 minutes or until they turn a lovely golden brown. Keep an eye on them near the end; ovens vary, and you want that perfect crust without drying out the buns.
How to Serve Easy Baked Meat Buns | Soft & Juicy Recipe
Garnishes
Honestly, I usually keep it simple with garnishes—just a little sprinkle of freshly chopped parsley or a drizzle of tangy yogurt sauce complements the spices inside the buns wonderfully. Sometimes I add some pickled vegetables on the side for a bit of brightness and crunch.
Side Dishes
These buns are perfect alongside a fresh green salad or a simple cucumber-tomato salad tossed with lemon and olive oil. When I want a heartier plate, I serve them with roasted veggies or even a bowl of soup—comfort food heaven.
Creative Ways to Present
For parties, I like arranging these Easy Baked Meat Buns | Soft & Juicy Recipe on a large wooden board surrounded by small bowls of dipping sauces—think spicy harissa or garlicky yogurt. It turns them into finger food that’s both pretty and practical. Another favorite is wrapping a few in parchment paper tied with twine for a cute, rustic gift.
Make Ahead and Storage
Storing Leftovers
I usually store leftover buns in an airtight container in the fridge for up to 3 days. Reheating in the oven or toaster oven helps keep the crust crisp and the filling warm without drying it out. If you’re short on time, a quick zap in the microwave works—just cover them with a damp paper towel to retain moisture.
Freezing
One of the best parts about this recipe is how well the buns freeze. I let them cool completely after baking, then freeze in a single layer on a tray before transferring to a ziplock bag. When you want some, just pull them out and thaw overnight in the fridge or reheat directly from frozen—perfect for busy days or unexpected guests!
Reheating
To reheat, I preheat the oven to 325°F (160°C), place the buns on a baking tray, and warm them for about 10-15 minutes. This method keeps them soft inside while crisping up the outside nicely. Avoid microwaving too long or they might get rubbery.
FAQs
-
Can I make the dough without a stand mixer?
Absolutely! You can mix and knead the dough entirely by hand. Just make sure you knead it long enough—about 7 to 8 minutes—to develop that nice elastic texture. Using slightly warm water helps activate the yeast properly.
-
Can I use ground chicken or turkey instead of beef?
Yes, ground chicken or turkey works fine but tends to be leaner, so you might want to add a bit more oil or broth to keep the filling juicy. Adjust seasoning to taste since these meats have a milder flavor.
-
How do I know when the buns are fully baked?
Look for a golden brown exterior and a firm feel when gently pressed. If you’re unsure, you can insert a toothpick near the center—it should come out clean. Avoid opening the oven door too often to keep that lovely rise.
-
Are these buns good for making ahead for parties?
Definitely! You can prepare and bake the buns a day ahead, then reheat them before serving. Or freeze in advance and thaw them out as needed—either way, they’re a crowd-pleaser anytime.
-
Can I substitute pine nuts with something else?
If you don’t have pine nuts, toasted chopped walnuts or slivered almonds can work as a crunchy substitute, though the flavor will be a bit different. Or you can skip nuts altogether if preferred.
Final Thoughts
This Easy Baked Meat Buns | Soft & Juicy Recipe has become a go-to for me whenever I want a comforting, homemade treat without fuss. I love how they bring everyone to the table and disappear quickly—there’s just something so satisfying about biting into that soft bun with its flavorful, juicy filling. Honestly, I can’t recommend this recipe enough; it’s straightforward, flexible, and absolutely delicious. Give it a try next time you crave something warm and hearty—you won’t regret it, I promise!
Oh, if you’re like me and love those soft, fluffy buns packed with juicy, flavorful meat inside, then you’re going to adore this Easy Baked Meat Buns | Soft & Juicy Recipe. It’s one of those recipes that feels like a warm hug on a plate—perfect for family dinners, potlucks, or whenever you want to impress guests without spending all day in the kitchen. The dough comes out incredibly tender, while the meat filling is juicy and richly spiced, making every bite a delight.
I remember the first time I made these buns; the house smelled amazing, and everyone kept grabbing more before dinner even started! What makes this Easy Baked Meat Buns | Soft & Juicy Recipe stand out is how simple it is to pull together with minimal ingredients you probably already have. Plus, the buns freeze beautifully, so you can enjoy them on busy days without any fuss.
Ingredients You’ll Need
Every ingredient here plays a crucial role in making these Easy Baked Meat Buns | Soft & Juicy Recipe a success. The dough ingredients give you that soft, elastic texture you’ll love, and the filling is a perfect balance of savory spices and tender meat. Here are some shopping tips and why each one matters.
- All-purpose flour: This is your base for the dough, and using a good quality, fresh flour helps with softness and rise.
- Instant dry yeast: Quick to activate and easy to use, it ensures your buns get that perfect lift.
- Sugar: Just enough to feed the yeast and add a subtle hint of sweetness to the dough.
- Salt: Essential for flavor balance in both dough and filling.
- Oil: Adds moisture and tenderness to the dough—I’ve found that using neutral oils like canola or vegetable work best.
- Water: Warm, not hot, is key to waking the yeast without killing it during dough prep.
- Ground beef: I prefer 80/20 for juiciness, but leaner beef works if you want a lighter option.
- Onion: Adds sweetness and depth to the filling.
- Olive oil: For sautéing the filling, it brings a lovely richness.
- Garlic: Crushed fresh garlic offers that punch of aroma and flavor you just can’t skip.
- Salt & Black pepper: Basic seasoning to enhance the beef mixture.
- Thyme: Whether fresh or dried, it adds an earthy herbal note that complements the meat beautifully.
- Cumin: Brings a warm, slightly smoky depth—such a great companion to ground beef.
- Paprika: Adds color and a subtle sweet-spicy kick.
- Tomato paste: Concentrated tomato flavor that enriches the filling sauce.
- Broth or water: Helps keep the filling moist and juicy without being watery.
- Pine nuts (optional): Adds a surprising crunch and a touch of buttery flavor—definitely worth trying if you have them!
- Egg (beaten): For that beautiful golden sheen on top of your buns.
- Sesame seeds: Adds texture and a lovely nutty aroma when baked.
Variations
What I love most about the Easy Baked Meat Buns | Soft & Juicy Recipe is how adaptable it is. I often swap in different fillings depending on mood and what’s in the fridge. Feel free to make it your own!
- Vegetarian Variation: I’ve had great success swapping ground beef with sautéed mushrooms mixed with crumbled tofu and the same spices. It’s surprisingly hearty and satisfying.
- Spicy Twist: Adding a pinch of chili flakes or a dash of hot sauce to the filling spices brings a nice heat that my family loves.
- Cheese-Stuffed Buns: Sometimes, I tuck a small cube of mozzarella inside the meat filling for gooey surprises inside each bun.
- Gluten-Free Option: Using a gluten-free flour blend in the dough works, but the texture changes slightly—worth experimenting if you’re gluten sensitive.
- Herb Variations: Swapping thyme with rosemary or oregano offers a fresh twist depending on what herbs you prefer or have at hand.
How to Make Easy Baked Meat Buns | Soft & Juicy Recipe
Step 1: Make the Dough and Let It Rise
Start by mixing all your dry dough ingredients in a large bowl—flour, yeast, sugar, and salt. Then add the warm water and oil and mix until a soft dough forms. Knead it for about 7 to 8 minutes until it’s smooth and elastic. Trust me, this kneading step is worth the effort—it really helps build the texture that makes the buns so soft.
Once kneaded, place the dough in a lightly greased bowl, cover it with a clean towel or plastic wrap, and let it rise in a warm spot for about an hour or until it’s doubled in size. This rising period is when all the magic happens!
Step 2: Prepare the Juicy Meat Filling
While your dough is rising, heat olive oil in a skillet over medium heat and sauté the chopped onions until they’re translucent and fragrant — about 4 to 5 minutes. Add your crushed garlic and stir for another minute.
Add the ground beef and cook thoroughly, breaking it apart with a wooden spoon until browned. Then stir in the salt, pepper, thyme, cumin, paprika, and tomato paste. Once combined, pour in the broth or water to keep the filling nice and juicy and let it simmer on low heat until just right—about a few minutes. Don’t skip this step; it keeps the meat luscious inside each bun. If you want, toss in pine nuts before letting the mixture cool.
Step 3: Shape the Buns with Love
Punch down the dough, then divide it into 18 equal pieces. Roll each piece into a smooth ball and then flatten it into a circle about 3 to 3.5 inches wide. Spoon about 2 tablespoons of your cooled filling into the center of each round, then gather the edges and pinch tightly to seal. Take your time sealing—I’ve learned that well-sealed buns hold their juicy filling perfectly without leaks.
Roll each sealed bun gently in your hands to shape it back into a smooth ball, seam-side down. Arrange the buns on a parchment-lined baking tray, cover, and let them rest for 20 minutes while you preheat the oven to 350°F (180°C).
Step 4: Brush, Sprinkle, and Bake to Golden Perfection
Before baking, brush each bun with the beaten egg to create that irresistible golden color. Sprinkle sesame seeds on top for extra crunch and visual appeal. Bake in the preheated oven for 18 to 22 minutes or until they turn a lovely golden brown. Keep an eye on them near the end; ovens vary, and you want that perfect crust without drying out the buns.
How to Serve Easy Baked Meat Buns | Soft & Juicy Recipe
Garnishes
Honestly, I usually keep it simple with garnishes—just a little sprinkle of freshly chopped parsley or a drizzle of tangy yogurt sauce complements the spices inside the buns wonderfully. Sometimes I add some pickled vegetables on the side for a bit of brightness and crunch.
Side Dishes
These buns are perfect alongside a fresh green salad or a simple cucumber-tomato salad tossed with lemon and olive oil. When I want a heartier plate, I serve them with roasted veggies or even a bowl of soup—comfort food heaven.
Creative Ways to Present
For parties, I like arranging these Easy Baked Meat Buns | Soft & Juicy Recipe on a large wooden board surrounded by small bowls of dipping sauces—think spicy harissa or garlicky yogurt. It turns them into finger food that’s both pretty and practical. Another favorite is wrapping a few in parchment paper tied with twine for a cute, rustic gift.
Make Ahead and Storage
Storing Leftovers
I usually store leftover buns in an airtight container in the fridge for up to 3 days. Reheating in the oven or toaster oven helps keep the crust crisp and the filling warm without drying it out. If you’re short on time, a quick zap in the microwave works—just cover them with a damp paper towel to retain moisture.
Freezing
One of the best parts about this recipe is how well the buns freeze. I let them cool completely after baking, then freeze in a single layer on a tray before transferring to a ziplock bag. When you want some, just pull them out and thaw overnight in the fridge or reheat directly from frozen—perfect for busy days or unexpected guests!
Reheating
To reheat, I preheat the oven to 325°F (160°C), place the buns on a baking tray, and warm them for about 10-15 minutes. This method keeps them soft inside while crisping up the outside nicely. Avoid microwaving too long or they might get rubbery.
FAQs
-
Can I make the dough without a stand mixer?
Absolutely! You can mix and knead the dough entirely by hand. Just make sure you knead it long enough—about 7 to 8 minutes—to develop that nice elastic texture. Using slightly warm water helps activate the yeast properly.
-
Can I use ground chicken or turkey instead of beef?
Yes, ground chicken or turkey works fine but tends to be leaner, so you might want to add a bit more oil or broth to keep the filling juicy. Adjust seasoning to taste since these meats have a milder flavor.
-
How do I know when the buns are fully baked?
Look for a golden brown exterior and a firm feel when gently pressed. If you’re unsure, you can insert a toothpick near the center—it should come out clean. Avoid opening the oven door too often to keep that lovely rise.
-
Are these buns good for making ahead for parties?
Definitely! You can prepare and bake the buns a day ahead, then reheat them before serving. Or freeze in advance and thaw them out as needed—either way, they’re a crowd-pleaser anytime.
-
Can I substitute pine nuts with something else?
If you don’t have pine nuts, toasted chopped walnuts or slivered almonds can work as a crunchy substitute, though the flavor will be a bit different. Or you can skip nuts altogether if preferred.
Final Thoughts
This Easy Baked Meat Buns | Soft & Juicy Recipe has become a go-to for me whenever I want a comforting, homemade treat without fuss. I love how they bring everyone to the table and disappear quickly—there’s just something so satisfying about biting into that soft bun with its flavorful, juicy filling. Honestly, I can’t recommend this recipe enough; it’s straightforward, flexible, and absolutely delicious. Give it a try next time you crave something warm and hearty—you won’t regret it, I promise!
Oh, if you’re like me and love those soft, fluffy buns packed with juicy, flavorful meat inside, then you’re going to adore this Easy Baked Meat Buns | Soft & Juicy Recipe. It’s one of those recipes that feels like a warm hug on a plate—perfect for family dinners, potlucks, or whenever you want to impress guests without spending all day in the kitchen. The dough comes out incredibly tender, while the meat filling is juicy and richly spiced, making every bite a delight.
I remember the first time I made these buns; the house smelled amazing, and everyone kept grabbing more before dinner even started! What makes this Easy Baked Meat Buns | Soft & Juicy Recipe stand out is how simple it is to pull together with minimal ingredients you probably already have. Plus, the buns freeze beautifully, so you can enjoy them on busy days without any fuss.
Ingredients You’ll Need
Every ingredient here plays a crucial role in making these Easy Baked Meat Buns | Soft & Juicy Recipe a success. The dough ingredients give you that soft, elastic texture you’ll love, and the filling is a perfect balance of savory spices and tender meat. Here are some shopping tips and why each one matters.
- All-purpose flour: This is your base for the dough, and using a good quality, fresh flour helps with softness and rise.
- Instant dry yeast: Quick to activate and easy to use, it ensures your buns get that perfect lift.
- Sugar: Just enough to feed the yeast and add a subtle hint of sweetness to the dough.
- Salt: Essential for flavor balance in both dough and filling.
- Oil: Adds moisture and tenderness to the dough—I’ve found that using neutral oils like canola or vegetable work best.
- Water: Warm, not hot, is key to waking the yeast without killing it during dough prep.
- Ground beef: I prefer 80/20 for juiciness, but leaner beef works if you want a lighter option.
- Onion: Adds sweetness and depth to the filling.
- Olive oil: For sautéing the filling, it brings a lovely richness.
- Garlic: Crushed fresh garlic offers that punch of aroma and flavor you just can’t skip.
- Salt & Black pepper: Basic seasoning to enhance the beef mixture.
- Thyme: Whether fresh or dried, it adds an earthy herbal note that complements the meat beautifully.
- Cumin: Brings a warm, slightly smoky depth—such a great companion to ground beef.
- Paprika: Adds color and a subtle sweet-spicy kick.
- Tomato paste: Concentrated tomato flavor that enriches the filling sauce.
- Broth or water: Helps keep the filling moist and juicy without being watery.
- Pine nuts (optional): Adds a surprising crunch and a touch of buttery flavor—definitely worth trying if you have them!
- Egg (beaten): For that beautiful golden sheen on top of your buns.
- Sesame seeds: Adds texture and a lovely nutty aroma when baked.
Variations
What I love most about the Easy Baked Meat Buns | Soft & Juicy Recipe is how adaptable it is. I often swap in different fillings depending on mood and what’s in the fridge. Feel free to make it your own!
- Vegetarian Variation: I’ve had great success swapping ground beef with sautéed mushrooms mixed with crumbled tofu and the same spices. It’s surprisingly hearty and satisfying.
- Spicy Twist: Adding a pinch of chili flakes or a dash of hot sauce to the filling spices brings a nice heat that my family loves.
- Cheese-Stuffed Buns: Sometimes, I tuck a small cube of mozzarella inside the meat filling for gooey surprises inside each bun.
- Gluten-Free Option: Using a gluten-free flour blend in the dough works, but the texture changes slightly—worth experimenting if you’re gluten sensitive.
- Herb Variations: Swapping thyme with rosemary or oregano offers a fresh twist depending on what herbs you prefer or have at hand.
How to Make Easy Baked Meat Buns | Soft & Juicy Recipe
Step 1: Make the Dough and Let It Rise
Start by mixing all your dry dough ingredients in a large bowl—flour, yeast, sugar, and salt. Then add the warm water and oil and mix until a soft dough forms. Knead it for about 7 to 8 minutes until it’s smooth and elastic. Trust me, this kneading step is worth the effort—it really helps build the texture that makes the buns so soft.
Once kneaded, place the dough in a lightly greased bowl, cover it with a clean towel or plastic wrap, and let it rise in a warm spot for about an hour or until it’s doubled in size. This rising period is when all the magic happens!
Step 2: Prepare the Juicy Meat Filling
While your dough is rising, heat olive oil in a skillet over medium heat and sauté the chopped onions until they’re translucent and fragrant — about 4 to 5 minutes. Add your crushed garlic and stir for another minute.
Add the ground beef and cook thoroughly, breaking it apart with a wooden spoon until browned. Then stir in the salt, pepper, thyme, cumin, paprika, and tomato paste. Once combined, pour in the broth or water to keep the filling nice and juicy and let it simmer on low heat until just right—about a few minutes. Don’t skip this step; it keeps the meat luscious inside each bun. If you want, toss in pine nuts before letting the mixture cool.
Step 3: Shape the Buns with Love
Punch down the dough, then divide it into 18 equal pieces. Roll each piece into a smooth ball and then flatten it into a circle about 3 to 3.5 inches wide. Spoon about 2 tablespoons of your cooled filling into the center of each round, then gather the edges and pinch tightly to seal. Take your time sealing—I’ve learned that well-sealed buns hold their juicy filling perfectly without leaks.
Roll each sealed bun gently in your hands to shape it back into a smooth ball, seam-side down. Arrange the buns on a parchment-lined baking tray, cover, and let them rest for 20 minutes while you preheat the oven to 350°F (180°C).
Step 4: Brush, Sprinkle, and Bake to Golden Perfection
Before baking, brush each bun with the beaten egg to create that irresistible golden color. Sprinkle sesame seeds on top for extra crunch and visual appeal. Bake in the preheated oven for 18 to 22 minutes or until they turn a lovely golden brown. Keep an eye on them near the end; ovens vary, and you want that perfect crust without drying out the buns.
How to Serve Easy Baked Meat Buns | Soft & Juicy Recipe
Garnishes
Honestly, I usually keep it simple with garnishes—just a little sprinkle of freshly chopped parsley or a drizzle of tangy yogurt sauce complements the spices inside the buns wonderfully. Sometimes I add some pickled vegetables on the side for a bit of brightness and crunch.
Side Dishes
These buns are perfect alongside a fresh green salad or a simple cucumber-tomato salad tossed with lemon and olive oil. When I want a heartier plate, I serve them with roasted veggies or even a bowl of soup—comfort food heaven.
Creative Ways to Present
For parties, I like arranging these Easy Baked Meat Buns | Soft & Juicy Recipe on a large wooden board surrounded by small bowls of dipping sauces—think spicy harissa or garlicky yogurt. It turns them into finger food that’s both pretty and practical. Another favorite is wrapping a few in parchment paper tied with twine for a cute, rustic gift.
Make Ahead and Storage
Storing Leftovers
I usually store leftover buns in an airtight container in the fridge for up to 3 days. Reheating in the oven or toaster oven helps keep the crust crisp and the filling warm without drying it out. If you’re short on time, a quick zap in the microwave works—just cover them with a damp paper towel to retain moisture.
Freezing
One of the best parts about this recipe is how well the buns freeze. I let them cool completely after baking, then freeze in a single layer on a tray before transferring to a ziplock bag. When you want some, just pull them out and thaw overnight in the fridge or reheat directly from frozen—perfect for busy days or unexpected guests!
Reheating
To reheat, I preheat the oven to 325°F (160°C), place the buns on a baking tray, and warm them for about 10-15 minutes. This method keeps them soft inside while crisping up the outside nicely. Avoid microwaving too long or they might get rubbery.
FAQs
-
Can I make the dough without a stand mixer?
Absolutely! You can mix and knead the dough entirely by hand. Just make sure you knead it long enough—about 7 to 8 minutes—to develop that nice elastic texture. Using slightly warm water helps activate the yeast properly.
-
Can I use ground chicken or turkey instead of beef?
Yes, ground chicken or turkey works fine but tends to be leaner, so you might want to add a bit more oil or broth to keep the filling juicy. Adjust seasoning to taste since these meats have a milder flavor.
-
How do I know when the buns are fully baked?
Look for a golden brown exterior and a firm feel when gently pressed. If you’re unsure, you can insert a toothpick near the center—it should come out clean. Avoid opening the oven door too often to keep that lovely rise.
-
Are these buns good for making ahead for parties?
Definitely! You can prepare and bake the buns a day ahead, then reheat them before serving. Or freeze in advance and thaw them out as needed—either way, they’re a crowd-pleaser anytime.
-
Can I substitute pine nuts with something else?
If you don’t have pine nuts, toasted chopped walnuts or slivered almonds can work as a crunchy substitute, though the flavor will be a bit different. Or you can skip nuts altogether if preferred.
Final Thoughts
This Easy Baked Meat Buns | Soft & Juicy Recipe has become a go-to for me whenever I want a comforting, homemade treat without fuss. I love how they bring everyone to the table and disappear quickly—there’s just something so satisfying about biting into that soft bun with its flavorful, juicy filling. Honestly, I can’t recommend this recipe enough; it’s straightforward, flexible, and absolutely delicious. Give it a try next time you crave something warm and hearty—you won’t regret it, I promise!
Start by mixing all your dry dough ingredients in a large bowl—flour, yeast, sugar, and salt. Then add the warm water and oil and mix until a soft dough forms. Knead it for about 7 to 8 minutes until it’s smooth and elastic. Trust me, this kneading step is worth the effort—it really helps build the texture that makes the buns so soft.
Once kneaded, place the dough in a lightly greased bowl, cover it with a clean towel or plastic wrap, and let it rise in a warm spot for about an hour or until it’s doubled in size. This rising period is when all the magic happens!
Step 2: Prepare the Juicy Meat Filling
While your dough is rising, heat olive oil in a skillet over medium heat and sauté the chopped onions until they’re translucent and fragrant — about 4 to 5 minutes. Add your crushed garlic and stir for another minute.
Add the ground beef and cook thoroughly, breaking it apart with a wooden spoon until browned. Then stir in the salt, pepper, thyme, cumin, paprika, and tomato paste. Once combined, pour in the broth or water to keep the filling nice and juicy and let it simmer on low heat until just right—about a few minutes. Don’t skip this step; it keeps the meat luscious inside each bun. If you want, toss in pine nuts before letting the mixture cool.
Step 3: Shape the Buns with Love
Punch down the dough, then divide it into 18 equal pieces. Roll each piece into a smooth ball and then flatten it into a circle about 3 to 3.5 inches wide. Spoon about 2 tablespoons of your cooled filling into the center of each round, then gather the edges and pinch tightly to seal. Take your time sealing—I’ve learned that well-sealed buns hold their juicy filling perfectly without leaks.
Roll each sealed bun gently in your hands to shape it back into a smooth ball, seam-side down. Arrange the buns on a parchment-lined baking tray, cover, and let them rest for 20 minutes while you preheat the oven to 350°F (180°C).
Step 4: Brush, Sprinkle, and Bake to Golden Perfection
Before baking, brush each bun with the beaten egg to create that irresistible golden color. Sprinkle sesame seeds on top for extra crunch and visual appeal. Bake in the preheated oven for 18 to 22 minutes or until they turn a lovely golden brown. Keep an eye on them near the end; ovens vary, and you want that perfect crust without drying out the buns.
How to Serve Easy Baked Meat Buns | Soft & Juicy Recipe
Garnishes
Honestly, I usually keep it simple with garnishes—just a little sprinkle of freshly chopped parsley or a drizzle of tangy yogurt sauce complements the spices inside the buns wonderfully. Sometimes I add some pickled vegetables on the side for a bit of brightness and crunch.
Side Dishes
These buns are perfect alongside a fresh green salad or a simple cucumber-tomato salad tossed with lemon and olive oil. When I want a heartier plate, I serve them with roasted veggies or even a bowl of soup—comfort food heaven.
Creative Ways to Present
For parties, I like arranging these Easy Baked Meat Buns | Soft & Juicy Recipe on a large wooden board surrounded by small bowls of dipping sauces—think spicy harissa or garlicky yogurt. It turns them into finger food that’s both pretty and practical. Another favorite is wrapping a few in parchment paper tied with twine for a cute, rustic gift.
Make Ahead and Storage
Storing Leftovers
I usually store leftover buns in an airtight container in the fridge for up to 3 days. Reheating in the oven or toaster oven helps keep the crust crisp and the filling warm without drying it out. If you’re short on time, a quick zap in the microwave works—just cover them with a damp paper towel to retain moisture.
Freezing
One of the best parts about this recipe is how well the buns freeze. I let them cool completely after baking, then freeze in a single layer on a tray before transferring to a ziplock bag. When you want some, just pull them out and thaw overnight in the fridge or reheat directly from frozen—perfect for busy days or unexpected guests!
Reheating
To reheat, I preheat the oven to 325°F (160°C), place the buns on a baking tray, and warm them for about 10-15 minutes. This method keeps them soft inside while crisping up the outside nicely. Avoid microwaving too long or they might get rubbery.
FAQs
-
Can I make the dough without a stand mixer?
Absolutely! You can mix and knead the dough entirely by hand. Just make sure you knead it long enough—about 7 to 8 minutes—to develop that nice elastic texture. Using slightly warm water helps activate the yeast properly.
-
Can I use ground chicken or turkey instead of beef?
Yes, ground chicken or turkey works fine but tends to be leaner, so you might want to add a bit more oil or broth to keep the filling juicy. Adjust seasoning to taste since these meats have a milder flavor.
-
How do I know when the buns are fully baked?
Look for a golden brown exterior and a firm feel when gently pressed. If you’re unsure, you can insert a toothpick near the center—it should come out clean. Avoid opening the oven door too often to keep that lovely rise.
-
Are these buns good for making ahead for parties?
Definitely! You can prepare and bake the buns a day ahead, then reheat them before serving. Or freeze in advance and thaw them out as needed—either way, they’re a crowd-pleaser anytime.
-
Can I substitute pine nuts with something else?
If you don’t have pine nuts, toasted chopped walnuts or slivered almonds can work as a crunchy substitute, though the flavor will be a bit different. Or you can skip nuts altogether if preferred.
Final Thoughts
This Easy Baked Meat Buns | Soft & Juicy Recipe has become a go-to for me whenever I want a comforting, homemade treat without fuss. I love how they bring everyone to the table and disappear quickly—there’s just something so satisfying about biting into that soft bun with its flavorful, juicy filling. Honestly, I can’t recommend this recipe enough; it’s straightforward, flexible, and absolutely delicious. Give it a try next time you crave something warm and hearty—you won’t regret it, I promise!
Oh, if you’re like me and love those soft, fluffy buns packed with juicy, flavorful meat inside, then you’re going to adore this Easy Baked Meat Buns | Soft & Juicy Recipe. It’s one of those recipes that feels like a warm hug on a plate—perfect for family dinners, potlucks, or whenever you want to impress guests without spending all day in the kitchen. The dough comes out incredibly tender, while the meat filling is juicy and richly spiced, making every bite a delight.
I remember the first time I made these buns; the house smelled amazing, and everyone kept grabbing more before dinner even started! What makes this Easy Baked Meat Buns | Soft & Juicy Recipe stand out is how simple it is to pull together with minimal ingredients you probably already have. Plus, the buns freeze beautifully, so you can enjoy them on busy days without any fuss.
Ingredients You’ll Need
Every ingredient here plays a crucial role in making these Easy Baked Meat Buns | Soft & Juicy Recipe a success. The dough ingredients give you that soft, elastic texture you’ll love, and the filling is a perfect balance of savory spices and tender meat. Here are some shopping tips and why each one matters.
- All-purpose flour: This is your base for the dough, and using a good quality, fresh flour helps with softness and rise.
- Instant dry yeast: Quick to activate and easy to use, it ensures your buns get that perfect lift.
- Sugar: Just enough to feed the yeast and add a subtle hint of sweetness to the dough.
- Salt: Essential for flavor balance in both dough and filling.
- Oil: Adds moisture and tenderness to the dough—I’ve found that using neutral oils like canola or vegetable work best.
- Water: Warm, not hot, is key to waking the yeast without killing it during dough prep.
- Ground beef: I prefer 80/20 for juiciness, but leaner beef works if you want a lighter option.
- Onion: Adds sweetness and depth to the filling.
- Olive oil: For sautéing the filling, it brings a lovely richness.
- Garlic: Crushed fresh garlic offers that punch of aroma and flavor you just can’t skip.
- Salt & Black pepper: Basic seasoning to enhance the beef mixture.
- Thyme: Whether fresh or dried, it adds an earthy herbal note that complements the meat beautifully.
- Cumin: Brings a warm, slightly smoky depth—such a great companion to ground beef.
- Paprika: Adds color and a subtle sweet-spicy kick.
- Tomato paste: Concentrated tomato flavor that enriches the filling sauce.
- Broth or water: Helps keep the filling moist and juicy without being watery.
- Pine nuts (optional): Adds a surprising crunch and a touch of buttery flavor—definitely worth trying if you have them!
- Egg (beaten): For that beautiful golden sheen on top of your buns.
- Sesame seeds: Adds texture and a lovely nutty aroma when baked.
Variations
What I love most about the Easy Baked Meat Buns | Soft & Juicy Recipe is how adaptable it is. I often swap in different fillings depending on mood and what’s in the fridge. Feel free to make it your own!
- Vegetarian Variation: I’ve had great success swapping ground beef with sautéed mushrooms mixed with crumbled tofu and the same spices. It’s surprisingly hearty and satisfying.
- Spicy Twist: Adding a pinch of chili flakes or a dash of hot sauce to the filling spices brings a nice heat that my family loves.
- Cheese-Stuffed Buns: Sometimes, I tuck a small cube of mozzarella inside the meat filling for gooey surprises inside each bun.
- Gluten-Free Option: Using a gluten-free flour blend in the dough works, but the texture changes slightly—worth experimenting if you’re gluten sensitive.
- Herb Variations: Swapping thyme with rosemary or oregano offers a fresh twist depending on what herbs you prefer or have at hand.
How to Make Easy Baked Meat Buns | Soft & Juicy Recipe
Step 1: Make the Dough and Let It Rise
Start by mixing all your dry dough ingredients in a large bowl—flour, yeast, sugar, and salt. Then add the warm water and oil and mix until a soft dough forms. Knead it for about 7 to 8 minutes until it’s smooth and elastic. Trust me, this kneading step is worth the effort—it really helps build the texture that makes the buns so soft.
Once kneaded, place the dough in a lightly greased bowl, cover it with a clean towel or plastic wrap, and let it rise in a warm spot for about an hour or until it’s doubled in size. This rising period is when all the magic happens!
Step 2: Prepare the Juicy Meat Filling
While your dough is rising, heat olive oil in a skillet over medium heat and sauté the chopped onions until they’re translucent and fragrant — about 4 to 5 minutes. Add your crushed garlic and stir for another minute.
Add the ground beef and cook thoroughly, breaking it apart with a wooden spoon until browned. Then stir in the salt, pepper, thyme, cumin, paprika, and tomato paste. Once combined, pour in the broth or water to keep the filling nice and juicy and let it simmer on low heat until just right—about a few minutes. Don’t skip this step; it keeps the meat luscious inside each bun. If you want, toss in pine nuts before letting the mixture cool.
Step 3: Shape the Buns with Love
Punch down the dough, then divide it into 18 equal pieces. Roll each piece into a smooth ball and then flatten it into a circle about 3 to 3.5 inches wide. Spoon about 2 tablespoons of your cooled filling into the center of each round, then gather the edges and pinch tightly to seal. Take your time sealing—I’ve learned that well-sealed buns hold their juicy filling perfectly without leaks.
Roll each sealed bun gently in your hands to shape it back into a smooth ball, seam-side down. Arrange the buns on a parchment-lined baking tray, cover, and let them rest for 20 minutes while you preheat the oven to 350°F (180°C).
Step 4: Brush, Sprinkle, and Bake to Golden Perfection
Before baking, brush each bun with the beaten egg to create that irresistible golden color. Sprinkle sesame seeds on top for extra crunch and visual appeal. Bake in the preheated oven for 18 to 22 minutes or until they turn a lovely golden brown. Keep an eye on them near the end; ovens vary, and you want that perfect crust without drying out the buns.
How to Serve Easy Baked Meat Buns | Soft & Juicy Recipe
Garnishes
Honestly, I usually keep it simple with garnishes—just a little sprinkle of freshly chopped parsley or a drizzle of tangy yogurt sauce complements the spices inside the buns wonderfully. Sometimes I add some pickled vegetables on the side for a bit of brightness and crunch.
Side Dishes
These buns are perfect alongside a fresh green salad or a simple cucumber-tomato salad tossed with lemon and olive oil. When I want a heartier plate, I serve them with roasted veggies or even a bowl of soup—comfort food heaven.
Creative Ways to Present
For parties, I like arranging these Easy Baked Meat Buns | Soft & Juicy Recipe on a large wooden board surrounded by small bowls of dipping sauces—think spicy harissa or garlicky yogurt. It turns them into finger food that’s both pretty and practical. Another favorite is wrapping a few in parchment paper tied with twine for a cute, rustic gift.
Make Ahead and Storage
Storing Leftovers
I usually store leftover buns in an airtight container in the fridge for up to 3 days. Reheating in the oven or toaster oven helps keep the crust crisp and the filling warm without drying it out. If you’re short on time, a quick zap in the microwave works—just cover them with a damp paper towel to retain moisture.
Freezing
One of the best parts about this recipe is how well the buns freeze. I let them cool completely after baking, then freeze in a single layer on a tray before transferring to a ziplock bag. When you want some, just pull them out and thaw overnight in the fridge or reheat directly from frozen—perfect for busy days or unexpected guests!
Reheating
To reheat, I preheat the oven to 325°F (160°C), place the buns on a baking tray, and warm them for about 10-15 minutes. This method keeps them soft inside while crisping up the outside nicely. Avoid microwaving too long or they might get rubbery.
FAQs
-
Can I make the dough without a stand mixer?
Absolutely! You can mix and knead the dough entirely by hand. Just make sure you knead it long enough—about 7 to 8 minutes—to develop that nice elastic texture. Using slightly warm water helps activate the yeast properly.
-
Can I use ground chicken or turkey instead of beef?
Yes, ground chicken or turkey works fine but tends to be leaner, so you might want to add a bit more oil or broth to keep the filling juicy. Adjust seasoning to taste since these meats have a milder flavor.
-
How do I know when the buns are fully baked?
Look for a golden brown exterior and a firm feel when gently pressed. If you’re unsure, you can insert a toothpick near the center—it should come out clean. Avoid opening the oven door too often to keep that lovely rise.
-
Are these buns good for making ahead for parties?
Definitely! You can prepare and bake the buns a day ahead, then reheat them before serving. Or freeze in advance and thaw them out as needed—either way, they’re a crowd-pleaser anytime.
-
Can I substitute pine nuts with something else?
If you don’t have pine nuts, toasted chopped walnuts or slivered almonds can work as a crunchy substitute, though the flavor will be a bit different. Or you can skip nuts altogether if preferred.
Final Thoughts
This Easy Baked Meat Buns | Soft & Juicy Recipe has become a go-to for me whenever I want a comforting, homemade treat without fuss. I love how they bring everyone to the table and disappear quickly—there’s just something so satisfying about biting into that soft bun with its flavorful, juicy filling. Honestly, I can’t recommend this recipe enough; it’s straightforward, flexible, and absolutely delicious. Give it a try next time you crave something warm and hearty—you won’t regret it, I promise!
Start by mixing all your dry dough ingredients in a large bowl—flour, yeast, sugar, and salt. Then add the warm water and oil and mix until a soft dough forms. Knead it for about 7 to 8 minutes until it’s smooth and elastic. Trust me, this kneading step is worth the effort—it really helps build the texture that makes the buns so soft.
Once kneaded, place the dough in a lightly greased bowl, cover it with a clean towel or plastic wrap, and let it rise in a warm spot for about an hour or until it’s doubled in size. This rising period is when all the magic happens!
Step 2: Prepare the Juicy Meat Filling
While your dough is rising, heat olive oil in a skillet over medium heat and sauté the chopped onions until they’re translucent and fragrant — about 4 to 5 minutes. Add your crushed garlic and stir for another minute.
Add the ground beef and cook thoroughly, breaking it apart with a wooden spoon until browned. Then stir in the salt, pepper, thyme, cumin, paprika, and tomato paste. Once combined, pour in the broth or water to keep the filling nice and juicy and let it simmer on low heat until just right—about a few minutes. Don’t skip this step; it keeps the meat luscious inside each bun. If you want, toss in pine nuts before letting the mixture cool.
Step 3: Shape the Buns with Love
Punch down the dough, then divide it into 18 equal pieces. Roll each piece into a smooth ball and then flatten it into a circle about 3 to 3.5 inches wide. Spoon about 2 tablespoons of your cooled filling into the center of each round, then gather the edges and pinch tightly to seal. Take your time sealing—I’ve learned that well-sealed buns hold their juicy filling perfectly without leaks.
Roll each sealed bun gently in your hands to shape it back into a smooth ball, seam-side down. Arrange the buns on a parchment-lined baking tray, cover, and let them rest for 20 minutes while you preheat the oven to 350°F (180°C).
Step 4: Brush, Sprinkle, and Bake to Golden Perfection
Before baking, brush each bun with the beaten egg to create that irresistible golden color. Sprinkle sesame seeds on top for extra crunch and visual appeal. Bake in the preheated oven for 18 to 22 minutes or until they turn a lovely golden brown. Keep an eye on them near the end; ovens vary, and you want that perfect crust without drying out the buns.
How to Serve Easy Baked Meat Buns | Soft & Juicy Recipe
Garnishes
Honestly, I usually keep it simple with garnishes—just a little sprinkle of freshly chopped parsley or a drizzle of tangy yogurt sauce complements the spices inside the buns wonderfully. Sometimes I add some pickled vegetables on the side for a bit of brightness and crunch.
Side Dishes
These buns are perfect alongside a fresh green salad or a simple cucumber-tomato salad tossed with lemon and olive oil. When I want a heartier plate, I serve them with roasted veggies or even a bowl of soup—comfort food heaven.
Creative Ways to Present
For parties, I like arranging these Easy Baked Meat Buns | Soft & Juicy Recipe on a large wooden board surrounded by small bowls of dipping sauces—think spicy harissa or garlicky yogurt. It turns them into finger food that’s both pretty and practical. Another favorite is wrapping a few in parchment paper tied with twine for a cute, rustic gift.
Make Ahead and Storage
Storing Leftovers
I usually store leftover buns in an airtight container in the fridge for up to 3 days. Reheating in the oven or toaster oven helps keep the crust crisp and the filling warm without drying it out. If you’re short on time, a quick zap in the microwave works—just cover them with a damp paper towel to retain moisture.
Freezing
One of the best parts about this recipe is how well the buns freeze. I let them cool completely after baking, then freeze in a single layer on a tray before transferring to a ziplock bag. When you want some, just pull them out and thaw overnight in the fridge or reheat directly from frozen—perfect for busy days or unexpected guests!
Reheating
To reheat, I preheat the oven to 325°F (160°C), place the buns on a baking tray, and warm them for about 10-15 minutes. This method keeps them soft inside while crisping up the outside nicely. Avoid microwaving too long or they might get rubbery.
FAQs
-
Can I make the dough without a stand mixer?
Absolutely! You can mix and knead the dough entirely by hand. Just make sure you knead it long enough—about 7 to 8 minutes—to develop that nice elastic texture. Using slightly warm water helps activate the yeast properly.
-
Can I use ground chicken or turkey instead of beef?
Yes, ground chicken or turkey works fine but tends to be leaner, so you might want to add a bit more oil or broth to keep the filling juicy. Adjust seasoning to taste since these meats have a milder flavor.
-
How do I know when the buns are fully baked?
Look for a golden brown exterior and a firm feel when gently pressed. If you’re unsure, you can insert a toothpick near the center—it should come out clean. Avoid opening the oven door too often to keep that lovely rise.
-
Are these buns good for making ahead for parties?
Definitely! You can prepare and bake the buns a day ahead, then reheat them before serving. Or freeze in advance and thaw them out as needed—either way, they’re a crowd-pleaser anytime.
-
Can I substitute pine nuts with something else?
If you don’t have pine nuts, toasted chopped walnuts or slivered almonds can work as a crunchy substitute, though the flavor will be a bit different. Or you can skip nuts altogether if preferred.
Final Thoughts
This Easy Baked Meat Buns | Soft & Juicy Recipe has become a go-to for me whenever I want a comforting, homemade treat without fuss. I love how they bring everyone to the table and disappear quickly—there’s just something so satisfying about biting into that soft bun with its flavorful, juicy filling. Honestly, I can’t recommend this recipe enough; it’s straightforward, flexible, and absolutely delicious. Give it a try next time you crave something warm and hearty—you won’t regret it, I promise!
Oh, if you’re like me and love those soft, fluffy buns packed with juicy, flavorful meat inside, then you’re going to adore this Easy Baked Meat Buns | Soft & Juicy Recipe. It’s one of those recipes that feels like a warm hug on a plate—perfect for family dinners, potlucks, or whenever you want to impress guests without spending all day in the kitchen. The dough comes out incredibly tender, while the meat filling is juicy and richly spiced, making every bite a delight.
I remember the first time I made these buns; the house smelled amazing, and everyone kept grabbing more before dinner even started! What makes this Easy Baked Meat Buns | Soft & Juicy Recipe stand out is how simple it is to pull together with minimal ingredients you probably already have. Plus, the buns freeze beautifully, so you can enjoy them on busy days without any fuss.
Ingredients You’ll Need
Every ingredient here plays a crucial role in making these Easy Baked Meat Buns | Soft & Juicy Recipe a success. The dough ingredients give you that soft, elastic texture you’ll love, and the filling is a perfect balance of savory spices and tender meat. Here are some shopping tips and why each one matters.
- All-purpose flour: This is your base for the dough, and using a good quality, fresh flour helps with softness and rise.
- Instant dry yeast: Quick to activate and easy to use, it ensures your buns get that perfect lift.
- Sugar: Just enough to feed the yeast and add a subtle hint of sweetness to the dough.
- Salt: Essential for flavor balance in both dough and filling.
- Oil: Adds moisture and tenderness to the dough—I’ve found that using neutral oils like canola or vegetable work best.
- Water: Warm, not hot, is key to waking the yeast without killing it during dough prep.
- Ground beef: I prefer 80/20 for juiciness, but leaner beef works if you want a lighter option.
- Onion: Adds sweetness and depth to the filling.
- Olive oil: For sautéing the filling, it brings a lovely richness.
- Garlic: Crushed fresh garlic offers that punch of aroma and flavor you just can’t skip.
- Salt & Black pepper: Basic seasoning to enhance the beef mixture.
- Thyme: Whether fresh or dried, it adds an earthy herbal note that complements the meat beautifully.
- Cumin: Brings a warm, slightly smoky depth—such a great companion to ground beef.
- Paprika: Adds color and a subtle sweet-spicy kick.
- Tomato paste: Concentrated tomato flavor that enriches the filling sauce.
- Broth or water: Helps keep the filling moist and juicy without being watery.
- Pine nuts (optional): Adds a surprising crunch and a touch of buttery flavor—definitely worth trying if you have them!
- Egg (beaten): For that beautiful golden sheen on top of your buns.
- Sesame seeds: Adds texture and a lovely nutty aroma when baked.
Variations
What I love most about the Easy Baked Meat Buns | Soft & Juicy Recipe is how adaptable it is. I often swap in different fillings depending on mood and what’s in the fridge. Feel free to make it your own!
- Vegetarian Variation: I’ve had great success swapping ground beef with sautéed mushrooms mixed with crumbled tofu and the same spices. It’s surprisingly hearty and satisfying.
- Spicy Twist: Adding a pinch of chili flakes or a dash of hot sauce to the filling spices brings a nice heat that my family loves.
- Cheese-Stuffed Buns: Sometimes, I tuck a small cube of mozzarella inside the meat filling for gooey surprises inside each bun.
- Gluten-Free Option: Using a gluten-free flour blend in the dough works, but the texture changes slightly—worth experimenting if you’re gluten sensitive.
- Herb Variations: Swapping thyme with rosemary or oregano offers a fresh twist depending on what herbs you prefer or have at hand.
How to Make Easy Baked Meat Buns | Soft & Juicy Recipe
Step 1: Make the Dough and Let It Rise
Start by mixing all your dry dough ingredients in a large bowl—flour, yeast, sugar, and salt. Then add the warm water and oil and mix until a soft dough forms. Knead it for about 7 to 8 minutes until it’s smooth and elastic. Trust me, this kneading step is worth the effort—it really helps build the texture that makes the buns so soft.
Once kneaded, place the dough in a lightly greased bowl, cover it with a clean towel or plastic wrap, and let it rise in a warm spot for about an hour or until it’s doubled in size. This rising period is when all the magic happens!
Step 2: Prepare the Juicy Meat Filling
While your dough is rising, heat olive oil in a skillet over medium heat and sauté the chopped onions until they’re translucent and fragrant — about 4 to 5 minutes. Add your crushed garlic and stir for another minute.
Add the ground beef and cook thoroughly, breaking it apart with a wooden spoon until browned. Then stir in the salt, pepper, thyme, cumin, paprika, and tomato paste. Once combined, pour in the broth or water to keep the filling nice and juicy and let it simmer on low heat until just right—about a few minutes. Don’t skip this step; it keeps the meat luscious inside each bun. If you want, toss in pine nuts before letting the mixture cool.
Step 3: Shape the Buns with Love
Punch down the dough, then divide it into 18 equal pieces. Roll each piece into a smooth ball and then flatten it into a circle about 3 to 3.5 inches wide. Spoon about 2 tablespoons of your cooled filling into the center of each round, then gather the edges and pinch tightly to seal. Take your time sealing—I’ve learned that well-sealed buns hold their juicy filling perfectly without leaks.
Roll each sealed bun gently in your hands to shape it back into a smooth ball, seam-side down. Arrange the buns on a parchment-lined baking tray, cover, and let them rest for 20 minutes while you preheat the oven to 350°F (180°C).
Step 4: Brush, Sprinkle, and Bake to Golden Perfection
Before baking, brush each bun with the beaten egg to create that irresistible golden color. Sprinkle sesame seeds on top for extra crunch and visual appeal. Bake in the preheated oven for 18 to 22 minutes or until they turn a lovely golden brown. Keep an eye on them near the end; ovens vary, and you want that perfect crust without drying out the buns.
How to Serve Easy Baked Meat Buns | Soft & Juicy Recipe
Garnishes
Honestly, I usually keep it simple with garnishes—just a little sprinkle of freshly chopped parsley or a drizzle of tangy yogurt sauce complements the spices inside the buns wonderfully. Sometimes I add some pickled vegetables on the side for a bit of brightness and crunch.
Side Dishes
These buns are perfect alongside a fresh green salad or a simple cucumber-tomato salad tossed with lemon and olive oil. When I want a heartier plate, I serve them with roasted veggies or even a bowl of soup—comfort food heaven.
Creative Ways to Present
For parties, I like arranging these Easy Baked Meat Buns | Soft & Juicy Recipe on a large wooden board surrounded by small bowls of dipping sauces—think spicy harissa or garlicky yogurt. It turns them into finger food that’s both pretty and practical. Another favorite is wrapping a few in parchment paper tied with twine for a cute, rustic gift.
Make Ahead and Storage
Storing Leftovers
I usually store leftover buns in an airtight container in the fridge for up to 3 days. Reheating in the oven or toaster oven helps keep the crust crisp and the filling warm without drying it out. If you’re short on time, a quick zap in the microwave works—just cover them with a damp paper towel to retain moisture.
Freezing
One of the best parts about this recipe is how well the buns freeze. I let them cool completely after baking, then freeze in a single layer on a tray before transferring to a ziplock bag. When you want some, just pull them out and thaw overnight in the fridge or reheat directly from frozen—perfect for busy days or unexpected guests!
Reheating
To reheat, I preheat the oven to 325°F (160°C), place the buns on a baking tray, and warm them for about 10-15 minutes. This method keeps them soft inside while crisping up the outside nicely. Avoid microwaving too long or they might get rubbery.
FAQs
-
Can I make the dough without a stand mixer?
Absolutely! You can mix and knead the dough entirely by hand. Just make sure you knead it long enough—about 7 to 8 minutes—to develop that nice elastic texture. Using slightly warm water helps activate the yeast properly.
-
Can I use ground chicken or turkey instead of beef?
Yes, ground chicken or turkey works fine but tends to be leaner, so you might want to add a bit more oil or broth to keep the filling juicy. Adjust seasoning to taste since these meats have a milder flavor.
-
How do I know when the buns are fully baked?
Look for a golden brown exterior and a firm feel when gently pressed. If you’re unsure, you can insert a toothpick near the center—it should come out clean. Avoid opening the oven door too often to keep that lovely rise.
-
Are these buns good for making ahead for parties?
Definitely! You can prepare and bake the buns a day ahead, then reheat them before serving. Or freeze in advance and thaw them out as needed—either way, they’re a crowd-pleaser anytime.
-
Can I substitute pine nuts with something else?
If you don’t have pine nuts, toasted chopped walnuts or slivered almonds can work as a crunchy substitute, though the flavor will be a bit different. Or you can skip nuts altogether if preferred.
Final Thoughts
This Easy Baked Meat Buns | Soft & Juicy Recipe has become a go-to for me whenever I want a comforting, homemade treat without fuss. I love how they bring everyone to the table and disappear quickly—there’s just something so satisfying about biting into that soft bun with its flavorful, juicy filling. Honestly, I can’t recommend this recipe enough; it’s straightforward, flexible, and absolutely delicious. Give it a try next time you crave something warm and hearty—you won’t regret it, I promise!
Start by mixing all your dry dough ingredients in a large bowl—flour, yeast, sugar, and salt. Then add the warm water and oil and mix until a soft dough forms. Knead it for about 7 to 8 minutes until it’s smooth and elastic. Trust me, this kneading step is worth the effort—it really helps build the texture that makes the buns so soft.
Once kneaded, place the dough in a lightly greased bowl, cover it with a clean towel or plastic wrap, and let it rise in a warm spot for about an hour or until it’s doubled in size. This rising period is when all the magic happens!
Step 2: Prepare the Juicy Meat Filling
While your dough is rising, heat olive oil in a skillet over medium heat and sauté the chopped onions until they’re translucent and fragrant — about 4 to 5 minutes. Add your crushed garlic and stir for another minute.
Add the ground beef and cook thoroughly, breaking it apart with a wooden spoon until browned. Then stir in the salt, pepper, thyme, cumin, paprika, and tomato paste. Once combined, pour in the broth or water to keep the filling nice and juicy and let it simmer on low heat until just right—about a few minutes. Don’t skip this step; it keeps the meat luscious inside each bun. If you want, toss in pine nuts before letting the mixture cool.
Step 3: Shape the Buns with Love
Punch down the dough, then divide it into 18 equal pieces. Roll each piece into a smooth ball and then flatten it into a circle about 3 to 3.5 inches wide. Spoon about 2 tablespoons of your cooled filling into the center of each round, then gather the edges and pinch tightly to seal. Take your time sealing—I’ve learned that well-sealed buns hold their juicy filling perfectly without leaks.
Roll each sealed bun gently in your hands to shape it back into a smooth ball, seam-side down. Arrange the buns on a parchment-lined baking tray, cover, and let them rest for 20 minutes while you preheat the oven to 350°F (180°C).
Step 4: Brush, Sprinkle, and Bake to Golden Perfection
Before baking, brush each bun with the beaten egg to create that irresistible golden color. Sprinkle sesame seeds on top for extra crunch and visual appeal. Bake in the preheated oven for 18 to 22 minutes or until they turn a lovely golden brown. Keep an eye on them near the end; ovens vary, and you want that perfect crust without drying out the buns.
How to Serve Easy Baked Meat Buns | Soft & Juicy Recipe
Garnishes
Honestly, I usually keep it simple with garnishes—just a little sprinkle of freshly chopped parsley or a drizzle of tangy yogurt sauce complements the spices inside the buns wonderfully. Sometimes I add some pickled vegetables on the side for a bit of brightness and crunch.
Side Dishes
These buns are perfect alongside a fresh green salad or a simple cucumber-tomato salad tossed with lemon and olive oil. When I want a heartier plate, I serve them with roasted veggies or even a bowl of soup—comfort food heaven.
Creative Ways to Present
For parties, I like arranging these Easy Baked Meat Buns | Soft & Juicy Recipe on a large wooden board surrounded by small bowls of dipping sauces—think spicy harissa or garlicky yogurt. It turns them into finger food that’s both pretty and practical. Another favorite is wrapping a few in parchment paper tied with twine for a cute, rustic gift.
Make Ahead and Storage
Storing Leftovers
I usually store leftover buns in an airtight container in the fridge for up to 3 days. Reheating in the oven or toaster oven helps keep the crust crisp and the filling warm without drying it out. If you’re short on time, a quick zap in the microwave works—just cover them with a damp paper towel to retain moisture.
Freezing
One of the best parts about this recipe is how well the buns freeze. I let them cool completely after baking, then freeze in a single layer on a tray before transferring to a ziplock bag. When you want some, just pull them out and thaw overnight in the fridge or reheat directly from frozen—perfect for busy days or unexpected guests!
Reheating
To reheat, I preheat the oven to 325°F (160°C), place the buns on a baking tray, and warm them for about 10-15 minutes. This method keeps them soft inside while crisping up the outside nicely. Avoid microwaving too long or they might get rubbery.
FAQs
-
Can I make the dough without a stand mixer?
Absolutely! You can mix and knead the dough entirely by hand. Just make sure you knead it long enough—about 7 to 8 minutes—to develop that nice elastic texture. Using slightly warm water helps activate the yeast properly.
-
Can I use ground chicken or turkey instead of beef?
Yes, ground chicken or turkey works fine but tends to be leaner, so you might want to add a bit more oil or broth to keep the filling juicy. Adjust seasoning to taste since these meats have a milder flavor.
-
How do I know when the buns are fully baked?
Look for a golden brown exterior and a firm feel when gently pressed. If you’re unsure, you can insert a toothpick near the center—it should come out clean. Avoid opening the oven door too often to keep that lovely rise.
-
Are these buns good for making ahead for parties?
Definitely! You can prepare and bake the buns a day ahead, then reheat them before serving. Or freeze in advance and thaw them out as needed—either way, they’re a crowd-pleaser anytime.
-
Can I substitute pine nuts with something else?
If you don’t have pine nuts, toasted chopped walnuts or slivered almonds can work as a crunchy substitute, though the flavor will be a bit different. Or you can skip nuts altogether if preferred.
Final Thoughts
This Easy Baked Meat Buns | Soft & Juicy Recipe has become a go-to for me whenever I want a comforting, homemade treat without fuss. I love how they bring everyone to the table and disappear quickly—there’s just something so satisfying about biting into that soft bun with its flavorful, juicy filling. Honestly, I can’t recommend this recipe enough; it’s straightforward, flexible, and absolutely delicious. Give it a try next time you crave something warm and hearty—you won’t regret it, I promise!
Oh, if you’re like me and love those soft, fluffy buns packed with juicy, flavorful meat inside, then you’re going to adore this Easy Baked Meat Buns | Soft & Juicy Recipe. It’s one of those recipes that feels like a warm hug on a plate—perfect for family dinners, potlucks, or whenever you want to impress guests without spending all day in the kitchen. The dough comes out incredibly tender, while the meat filling is juicy and richly spiced, making every bite a delight.
I remember the first time I made these buns; the house smelled amazing, and everyone kept grabbing more before dinner even started! What makes this Easy Baked Meat Buns | Soft & Juicy Recipe stand out is how simple it is to pull together with minimal ingredients you probably already have. Plus, the buns freeze beautifully, so you can enjoy them on busy days without any fuss.
Ingredients You’ll Need
Every ingredient here plays a crucial role in making these Easy Baked Meat Buns | Soft & Juicy Recipe a success. The dough ingredients give you that soft, elastic texture you’ll love, and the filling is a perfect balance of savory spices and tender meat. Here are some shopping tips and why each one matters.
- All-purpose flour: This is your base for the dough, and using a good quality, fresh flour helps with softness and rise.
- Instant dry yeast: Quick to activate and easy to use, it ensures your buns get that perfect lift.
- Sugar: Just enough to feed the yeast and add a subtle hint of sweetness to the dough.
- Salt: Essential for flavor balance in both dough and filling.
- Oil: Adds moisture and tenderness to the dough—I’ve found that using neutral oils like canola or vegetable work best.
- Water: Warm, not hot, is key to waking the yeast without killing it during dough prep.
- Ground beef: I prefer 80/20 for juiciness, but leaner beef works if you want a lighter option.
- Onion: Adds sweetness and depth to the filling.
- Olive oil: For sautéing the filling, it brings a lovely richness.
- Garlic: Crushed fresh garlic offers that punch of aroma and flavor you just can’t skip.
- Salt & Black pepper: Basic seasoning to enhance the beef mixture.
- Thyme: Whether fresh or dried, it adds an earthy herbal note that complements the meat beautifully.
- Cumin: Brings a warm, slightly smoky depth—such a great companion to ground beef.
- Paprika: Adds color and a subtle sweet-spicy kick.
- Tomato paste: Concentrated tomato flavor that enriches the filling sauce.
- Broth or water: Helps keep the filling moist and juicy without being watery.
- Pine nuts (optional): Adds a surprising crunch and a touch of buttery flavor—definitely worth trying if you have them!
- Egg (beaten): For that beautiful golden sheen on top of your buns.
- Sesame seeds: Adds texture and a lovely nutty aroma when baked.
Variations
What I love most about the Easy Baked Meat Buns | Soft & Juicy Recipe is how adaptable it is. I often swap in different fillings depending on mood and what’s in the fridge. Feel free to make it your own!
- Vegetarian Variation: I’ve had great success swapping ground beef with sautéed mushrooms mixed with crumbled tofu and the same spices. It’s surprisingly hearty and satisfying.
- Spicy Twist: Adding a pinch of chili flakes or a dash of hot sauce to the filling spices brings a nice heat that my family loves.
- Cheese-Stuffed Buns: Sometimes, I tuck a small cube of mozzarella inside the meat filling for gooey surprises inside each bun.
- Gluten-Free Option: Using a gluten-free flour blend in the dough works, but the texture changes slightly—worth experimenting if you’re gluten sensitive.
- Herb Variations: Swapping thyme with rosemary or oregano offers a fresh twist depending on what herbs you prefer or have at hand.
How to Make Easy Baked Meat Buns | Soft & Juicy Recipe
Step 1: Make the Dough and Let It Rise
Start by mixing all your dry dough ingredients in a large bowl—flour, yeast, sugar, and salt. Then add the warm water and oil and mix until a soft dough forms. Knead it for about 7 to 8 minutes until it’s smooth and elastic. Trust me, this kneading step is worth the effort—it really helps build the texture that makes the buns so soft.
Once kneaded, place the dough in a lightly greased bowl, cover it with a clean towel or plastic wrap, and let it rise in a warm spot for about an hour or until it’s doubled in size. This rising period is when all the magic happens!
Step 2: Prepare the Juicy Meat Filling
While your dough is rising, heat olive oil in a skillet over medium heat and sauté the chopped onions until they’re translucent and fragrant — about 4 to 5 minutes. Add your crushed garlic and stir for another minute.
Add the ground beef and cook thoroughly, breaking it apart with a wooden spoon until browned. Then stir in the salt, pepper, thyme, cumin, paprika, and tomato paste. Once combined, pour in the broth or water to keep the filling nice and juicy and let it simmer on low heat until just right—about a few minutes. Don’t skip this step; it keeps the meat luscious inside each bun. If you want, toss in pine nuts before letting the mixture cool.
Step 3: Shape the Buns with Love
Punch down the dough, then divide it into 18 equal pieces. Roll each piece into a smooth ball and then flatten it into a circle about 3 to 3.5 inches wide. Spoon about 2 tablespoons of your cooled filling into the center of each round, then gather the edges and pinch tightly to seal. Take your time sealing—I’ve learned that well-sealed buns hold their juicy filling perfectly without leaks.
Roll each sealed bun gently in your hands to shape it back into a smooth ball, seam-side down. Arrange the buns on a parchment-lined baking tray, cover, and let them rest for 20 minutes while you preheat the oven to 350°F (180°C).
Step 4: Brush, Sprinkle, and Bake to Golden Perfection
Before baking, brush each bun with the beaten egg to create that irresistible golden color. Sprinkle sesame seeds on top for extra crunch and visual appeal. Bake in the preheated oven for 18 to 22 minutes or until they turn a lovely golden brown. Keep an eye on them near the end; ovens vary, and you want that perfect crust without drying out the buns.
How to Serve Easy Baked Meat Buns | Soft & Juicy Recipe
Garnishes
Honestly, I usually keep it simple with garnishes—just a little sprinkle of freshly chopped parsley or a drizzle of tangy yogurt sauce complements the spices inside the buns wonderfully. Sometimes I add some pickled vegetables on the side for a bit of brightness and crunch.
Side Dishes
These buns are perfect alongside a fresh green salad or a simple cucumber-tomato salad tossed with lemon and olive oil. When I want a heartier plate, I serve them with roasted veggies or even a bowl of soup—comfort food heaven.
Creative Ways to Present
For parties, I like arranging these Easy Baked Meat Buns | Soft & Juicy Recipe on a large wooden board surrounded by small bowls of dipping sauces—think spicy harissa or garlicky yogurt. It turns them into finger food that’s both pretty and practical. Another favorite is wrapping a few in parchment paper tied with twine for a cute, rustic gift.
Make Ahead and Storage
Storing Leftovers
I usually store leftover buns in an airtight container in the fridge for up to 3 days. Reheating in the oven or toaster oven helps keep the crust crisp and the filling warm without drying it out. If you’re short on time, a quick zap in the microwave works—just cover them with a damp paper towel to retain moisture.
Freezing
One of the best parts about this recipe is how well the buns freeze. I let them cool completely after baking, then freeze in a single layer on a tray before transferring to a ziplock bag. When you want some, just pull them out and thaw overnight in the fridge or reheat directly from frozen—perfect for busy days or unexpected guests!
Reheating
To reheat, I preheat the oven to 325°F (160°C), place the buns on a baking tray, and warm them for about 10-15 minutes. This method keeps them soft inside while crisping up the outside nicely. Avoid microwaving too long or they might get rubbery.
FAQs
-
Can I make the dough without a stand mixer?
Absolutely! You can mix and knead the dough entirely by hand. Just make sure you knead it long enough—about 7 to 8 minutes—to develop that nice elastic texture. Using slightly warm water helps activate the yeast properly.
-
Can I use ground chicken or turkey instead of beef?
Yes, ground chicken or turkey works fine but tends to be leaner, so you might want to add a bit more oil or broth to keep the filling juicy. Adjust seasoning to taste since these meats have a milder flavor.
-
How do I know when the buns are fully baked?
Look for a golden brown exterior and a firm feel when gently pressed. If you’re unsure, you can insert a toothpick near the center—it should come out clean. Avoid opening the oven door too often to keep that lovely rise.
-
Are these buns good for making ahead for parties?
Definitely! You can prepare and bake the buns a day ahead, then reheat them before serving. Or freeze in advance and thaw them out as needed—either way, they’re a crowd-pleaser anytime.
-
Can I substitute pine nuts with something else?
If you don’t have pine nuts, toasted chopped walnuts or slivered almonds can work as a crunchy substitute, though the flavor will be a bit different. Or you can skip nuts altogether if preferred.
Final Thoughts
This Easy Baked Meat Buns | Soft & Juicy Recipe has become a go-to for me whenever I want a comforting, homemade treat without fuss. I love how they bring everyone to the table and disappear quickly—there’s just something so satisfying about biting into that soft bun with its flavorful, juicy filling. Honestly, I can’t recommend this recipe enough; it’s straightforward, flexible, and absolutely delicious. Give it a try next time you crave something warm and hearty—you won’t regret it, I promise!
While your dough is rising, heat olive oil in a skillet over medium heat and sauté the chopped onions until they’re translucent and fragrant — about 4 to 5 minutes. Add your crushed garlic and stir for another minute.
Add the ground beef and cook thoroughly, breaking it apart with a wooden spoon until browned. Then stir in the salt, pepper, thyme, cumin, paprika, and tomato paste. Once combined, pour in the broth or water to keep the filling nice and juicy and let it simmer on low heat until just right—about a few minutes. Don’t skip this step; it keeps the meat luscious inside each bun. If you want, toss in pine nuts before letting the mixture cool.
Step 3: Shape the Buns with Love
Punch down the dough, then divide it into 18 equal pieces. Roll each piece into a smooth ball and then flatten it into a circle about 3 to 3.5 inches wide. Spoon about 2 tablespoons of your cooled filling into the center of each round, then gather the edges and pinch tightly to seal. Take your time sealing—I’ve learned that well-sealed buns hold their juicy filling perfectly without leaks.
Roll each sealed bun gently in your hands to shape it back into a smooth ball, seam-side down. Arrange the buns on a parchment-lined baking tray, cover, and let them rest for 20 minutes while you preheat the oven to 350°F (180°C).
Step 4: Brush, Sprinkle, and Bake to Golden Perfection
Before baking, brush each bun with the beaten egg to create that irresistible golden color. Sprinkle sesame seeds on top for extra crunch and visual appeal. Bake in the preheated oven for 18 to 22 minutes or until they turn a lovely golden brown. Keep an eye on them near the end; ovens vary, and you want that perfect crust without drying out the buns.
How to Serve Easy Baked Meat Buns | Soft & Juicy Recipe
Garnishes
Honestly, I usually keep it simple with garnishes—just a little sprinkle of freshly chopped parsley or a drizzle of tangy yogurt sauce complements the spices inside the buns wonderfully. Sometimes I add some pickled vegetables on the side for a bit of brightness and crunch.
Side Dishes
These buns are perfect alongside a fresh green salad or a simple cucumber-tomato salad tossed with lemon and olive oil. When I want a heartier plate, I serve them with roasted veggies or even a bowl of soup—comfort food heaven.
Creative Ways to Present
For parties, I like arranging these Easy Baked Meat Buns | Soft & Juicy Recipe on a large wooden board surrounded by small bowls of dipping sauces—think spicy harissa or garlicky yogurt. It turns them into finger food that’s both pretty and practical. Another favorite is wrapping a few in parchment paper tied with twine for a cute, rustic gift.
Make Ahead and Storage
Storing Leftovers
I usually store leftover buns in an airtight container in the fridge for up to 3 days. Reheating in the oven or toaster oven helps keep the crust crisp and the filling warm without drying it out. If you’re short on time, a quick zap in the microwave works—just cover them with a damp paper towel to retain moisture.
Freezing
One of the best parts about this recipe is how well the buns freeze. I let them cool completely after baking, then freeze in a single layer on a tray before transferring to a ziplock bag. When you want some, just pull them out and thaw overnight in the fridge or reheat directly from frozen—perfect for busy days or unexpected guests!
Reheating
To reheat, I preheat the oven to 325°F (160°C), place the buns on a baking tray, and warm them for about 10-15 minutes. This method keeps them soft inside while crisping up the outside nicely. Avoid microwaving too long or they might get rubbery.
FAQs
-
Can I make the dough without a stand mixer?
Absolutely! You can mix and knead the dough entirely by hand. Just make sure you knead it long enough—about 7 to 8 minutes—to develop that nice elastic texture. Using slightly warm water helps activate the yeast properly.
-
Can I use ground chicken or turkey instead of beef?
Yes, ground chicken or turkey works fine but tends to be leaner, so you might want to add a bit more oil or broth to keep the filling juicy. Adjust seasoning to taste since these meats have a milder flavor.
-
How do I know when the buns are fully baked?
Look for a golden brown exterior and a firm feel when gently pressed. If you’re unsure, you can insert a toothpick near the center—it should come out clean. Avoid opening the oven door too often to keep that lovely rise.
-
Are these buns good for making ahead for parties?
Definitely! You can prepare and bake the buns a day ahead, then reheat them before serving. Or freeze in advance and thaw them out as needed—either way, they’re a crowd-pleaser anytime.
-
Can I substitute pine nuts with something else?
If you don’t have pine nuts, toasted chopped walnuts or slivered almonds can work as a crunchy substitute, though the flavor will be a bit different. Or you can skip nuts altogether if preferred.
Final Thoughts
This Easy Baked Meat Buns | Soft & Juicy Recipe has become a go-to for me whenever I want a comforting, homemade treat without fuss. I love how they bring everyone to the table and disappear quickly—there’s just something so satisfying about biting into that soft bun with its flavorful, juicy filling. Honestly, I can’t recommend this recipe enough; it’s straightforward, flexible, and absolutely delicious. Give it a try next time you crave something warm and hearty—you won’t regret it, I promise!
Start by mixing all your dry dough ingredients in a large bowl—flour, yeast, sugar, and salt. Then add the warm water and oil and mix until a soft dough forms. Knead it for about 7 to 8 minutes until it’s smooth and elastic. Trust me, this kneading step is worth the effort—it really helps build the texture that makes the buns so soft.
Once kneaded, place the dough in a lightly greased bowl, cover it with a clean towel or plastic wrap, and let it rise in a warm spot for about an hour or until it’s doubled in size. This rising period is when all the magic happens!
Step 2: Prepare the Juicy Meat Filling
While your dough is rising, heat olive oil in a skillet over medium heat and sauté the chopped onions until they’re translucent and fragrant — about 4 to 5 minutes. Add your crushed garlic and stir for another minute.
Add the ground beef and cook thoroughly, breaking it apart with a wooden spoon until browned. Then stir in the salt, pepper, thyme, cumin, paprika, and tomato paste. Once combined, pour in the broth or water to keep the filling nice and juicy and let it simmer on low heat until just right—about a few minutes. Don’t skip this step; it keeps the meat luscious inside each bun. If you want, toss in pine nuts before letting the mixture cool.
Step 3: Shape the Buns with Love
Punch down the dough, then divide it into 18 equal pieces. Roll each piece into a smooth ball and then flatten it into a circle about 3 to 3.5 inches wide. Spoon about 2 tablespoons of your cooled filling into the center of each round, then gather the edges and pinch tightly to seal. Take your time sealing—I’ve learned that well-sealed buns hold their juicy filling perfectly without leaks.
Roll each sealed bun gently in your hands to shape it back into a smooth ball, seam-side down. Arrange the buns on a parchment-lined baking tray, cover, and let them rest for 20 minutes while you preheat the oven to 350°F (180°C).
Step 4: Brush, Sprinkle, and Bake to Golden Perfection
Before baking, brush each bun with the beaten egg to create that irresistible golden color. Sprinkle sesame seeds on top for extra crunch and visual appeal. Bake in the preheated oven for 18 to 22 minutes or until they turn a lovely golden brown. Keep an eye on them near the end; ovens vary, and you want that perfect crust without drying out the buns.
How to Serve Easy Baked Meat Buns | Soft & Juicy Recipe
Garnishes
Honestly, I usually keep it simple with garnishes—just a little sprinkle of freshly chopped parsley or a drizzle of tangy yogurt sauce complements the spices inside the buns wonderfully. Sometimes I add some pickled vegetables on the side for a bit of brightness and crunch.
Side Dishes
These buns are perfect alongside a fresh green salad or a simple cucumber-tomato salad tossed with lemon and olive oil. When I want a heartier plate, I serve them with roasted veggies or even a bowl of soup—comfort food heaven.
Creative Ways to Present
For parties, I like arranging these Easy Baked Meat Buns | Soft & Juicy Recipe on a large wooden board surrounded by small bowls of dipping sauces—think spicy harissa or garlicky yogurt. It turns them into finger food that’s both pretty and practical. Another favorite is wrapping a few in parchment paper tied with twine for a cute, rustic gift.
Make Ahead and Storage
Storing Leftovers
I usually store leftover buns in an airtight container in the fridge for up to 3 days. Reheating in the oven or toaster oven helps keep the crust crisp and the filling warm without drying it out. If you’re short on time, a quick zap in the microwave works—just cover them with a damp paper towel to retain moisture.
Freezing
One of the best parts about this recipe is how well the buns freeze. I let them cool completely after baking, then freeze in a single layer on a tray before transferring to a ziplock bag. When you want some, just pull them out and thaw overnight in the fridge or reheat directly from frozen—perfect for busy days or unexpected guests!
Reheating
To reheat, I preheat the oven to 325°F (160°C), place the buns on a baking tray, and warm them for about 10-15 minutes. This method keeps them soft inside while crisping up the outside nicely. Avoid microwaving too long or they might get rubbery.
FAQs
-
Can I make the dough without a stand mixer?
Absolutely! You can mix and knead the dough entirely by hand. Just make sure you knead it long enough—about 7 to 8 minutes—to develop that nice elastic texture. Using slightly warm water helps activate the yeast properly.
-
Can I use ground chicken or turkey instead of beef?
Yes, ground chicken or turkey works fine but tends to be leaner, so you might want to add a bit more oil or broth to keep the filling juicy. Adjust seasoning to taste since these meats have a milder flavor.
-
How do I know when the buns are fully baked?
Look for a golden brown exterior and a firm feel when gently pressed. If you’re unsure, you can insert a toothpick near the center—it should come out clean. Avoid opening the oven door too often to keep that lovely rise.
-
Are these buns good for making ahead for parties?
Definitely! You can prepare and bake the buns a day ahead, then reheat them before serving. Or freeze in advance and thaw them out as needed—either way, they’re a crowd-pleaser anytime.
-
Can I substitute pine nuts with something else?
If you don’t have pine nuts, toasted chopped walnuts or slivered almonds can work as a crunchy substitute, though the flavor will be a bit different. Or you can skip nuts altogether if preferred.
Final Thoughts
This Easy Baked Meat Buns | Soft & Juicy Recipe has become a go-to for me whenever I want a comforting, homemade treat without fuss. I love how they bring everyone to the table and disappear quickly—there’s just something so satisfying about biting into that soft bun with its flavorful, juicy filling. Honestly, I can’t recommend this recipe enough; it’s straightforward, flexible, and absolutely delicious. Give it a try next time you crave something warm and hearty—you won’t regret it, I promise!
Oh, if you’re like me and love those soft, fluffy buns packed with juicy, flavorful meat inside, then you’re going to adore this Easy Baked Meat Buns | Soft & Juicy Recipe. It’s one of those recipes that feels like a warm hug on a plate—perfect for family dinners, potlucks, or whenever you want to impress guests without spending all day in the kitchen. The dough comes out incredibly tender, while the meat filling is juicy and richly spiced, making every bite a delight.
I remember the first time I made these buns; the house smelled amazing, and everyone kept grabbing more before dinner even started! What makes this Easy Baked Meat Buns | Soft & Juicy Recipe stand out is how simple it is to pull together with minimal ingredients you probably already have. Plus, the buns freeze beautifully, so you can enjoy them on busy days without any fuss.
Ingredients You’ll Need
Every ingredient here plays a crucial role in making these Easy Baked Meat Buns | Soft & Juicy Recipe a success. The dough ingredients give you that soft, elastic texture you’ll love, and the filling is a perfect balance of savory spices and tender meat. Here are some shopping tips and why each one matters.
- All-purpose flour: This is your base for the dough, and using a good quality, fresh flour helps with softness and rise.
- Instant dry yeast: Quick to activate and easy to use, it ensures your buns get that perfect lift.
- Sugar: Just enough to feed the yeast and add a subtle hint of sweetness to the dough.
- Salt: Essential for flavor balance in both dough and filling.
- Oil: Adds moisture and tenderness to the dough—I’ve found that using neutral oils like canola or vegetable work best.
- Water: Warm, not hot, is key to waking the yeast without killing it during dough prep.
- Ground beef: I prefer 80/20 for juiciness, but leaner beef works if you want a lighter option.
- Onion: Adds sweetness and depth to the filling.
- Olive oil: For sautéing the filling, it brings a lovely richness.
- Garlic: Crushed fresh garlic offers that punch of aroma and flavor you just can’t skip.
- Salt & Black pepper: Basic seasoning to enhance the beef mixture.
- Thyme: Whether fresh or dried, it adds an earthy herbal note that complements the meat beautifully.
- Cumin: Brings a warm, slightly smoky depth—such a great companion to ground beef.
- Paprika: Adds color and a subtle sweet-spicy kick.
- Tomato paste: Concentrated tomato flavor that enriches the filling sauce.
- Broth or water: Helps keep the filling moist and juicy without being watery.
- Pine nuts (optional): Adds a surprising crunch and a touch of buttery flavor—definitely worth trying if you have them!
- Egg (beaten): For that beautiful golden sheen on top of your buns.
- Sesame seeds: Adds texture and a lovely nutty aroma when baked.
Variations
What I love most about the Easy Baked Meat Buns | Soft & Juicy Recipe is how adaptable it is. I often swap in different fillings depending on mood and what’s in the fridge. Feel free to make it your own!
- Vegetarian Variation: I’ve had great success swapping ground beef with sautéed mushrooms mixed with crumbled tofu and the same spices. It’s surprisingly hearty and satisfying.
- Spicy Twist: Adding a pinch of chili flakes or a dash of hot sauce to the filling spices brings a nice heat that my family loves.
- Cheese-Stuffed Buns: Sometimes, I tuck a small cube of mozzarella inside the meat filling for gooey surprises inside each bun.
- Gluten-Free Option: Using a gluten-free flour blend in the dough works, but the texture changes slightly—worth experimenting if you’re gluten sensitive.
- Herb Variations: Swapping thyme with rosemary or oregano offers a fresh twist depending on what herbs you prefer or have at hand.
How to Make Easy Baked Meat Buns | Soft & Juicy Recipe
Step 1: Make the Dough and Let It Rise
Start by mixing all your dry dough ingredients in a large bowl—flour, yeast, sugar, and salt. Then add the warm water and oil and mix until a soft dough forms. Knead it for about 7 to 8 minutes until it’s smooth and elastic. Trust me, this kneading step is worth the effort—it really helps build the texture that makes the buns so soft.
Once kneaded, place the dough in a lightly greased bowl, cover it with a clean towel or plastic wrap, and let it rise in a warm spot for about an hour or until it’s doubled in size. This rising period is when all the magic happens!
Step 2: Prepare the Juicy Meat Filling
While your dough is rising, heat olive oil in a skillet over medium heat and sauté the chopped onions until they’re translucent and fragrant — about 4 to 5 minutes. Add your crushed garlic and stir for another minute.
Add the ground beef and cook thoroughly, breaking it apart with a wooden spoon until browned. Then stir in the salt, pepper, thyme, cumin, paprika, and tomato paste. Once combined, pour in the broth or water to keep the filling nice and juicy and let it simmer on low heat until just right—about a few minutes. Don’t skip this step; it keeps the meat luscious inside each bun. If you want, toss in pine nuts before letting the mixture cool.
Step 3: Shape the Buns with Love
Punch down the dough, then divide it into 18 equal pieces. Roll each piece into a smooth ball and then flatten it into a circle about 3 to 3.5 inches wide. Spoon about 2 tablespoons of your cooled filling into the center of each round, then gather the edges and pinch tightly to seal. Take your time sealing—I’ve learned that well-sealed buns hold their juicy filling perfectly without leaks.
Roll each sealed bun gently in your hands to shape it back into a smooth ball, seam-side down. Arrange the buns on a parchment-lined baking tray, cover, and let them rest for 20 minutes while you preheat the oven to 350°F (180°C).
Step 4: Brush, Sprinkle, and Bake to Golden Perfection
Before baking, brush each bun with the beaten egg to create that irresistible golden color. Sprinkle sesame seeds on top for extra crunch and visual appeal. Bake in the preheated oven for 18 to 22 minutes or until they turn a lovely golden brown. Keep an eye on them near the end; ovens vary, and you want that perfect crust without drying out the buns.
How to Serve Easy Baked Meat Buns | Soft & Juicy Recipe
Garnishes
Honestly, I usually keep it simple with garnishes—just a little sprinkle of freshly chopped parsley or a drizzle of tangy yogurt sauce complements the spices inside the buns wonderfully. Sometimes I add some pickled vegetables on the side for a bit of brightness and crunch.
Side Dishes
These buns are perfect alongside a fresh green salad or a simple cucumber-tomato salad tossed with lemon and olive oil. When I want a heartier plate, I serve them with roasted veggies or even a bowl of soup—comfort food heaven.
Creative Ways to Present
For parties, I like arranging these Easy Baked Meat Buns | Soft & Juicy Recipe on a large wooden board surrounded by small bowls of dipping sauces—think spicy harissa or garlicky yogurt. It turns them into finger food that’s both pretty and practical. Another favorite is wrapping a few in parchment paper tied with twine for a cute, rustic gift.
Make Ahead and Storage
Storing Leftovers
I usually store leftover buns in an airtight container in the fridge for up to 3 days. Reheating in the oven or toaster oven helps keep the crust crisp and the filling warm without drying it out. If you’re short on time, a quick zap in the microwave works—just cover them with a damp paper towel to retain moisture.
Freezing
One of the best parts about this recipe is how well the buns freeze. I let them cool completely after baking, then freeze in a single layer on a tray before transferring to a ziplock bag. When you want some, just pull them out and thaw overnight in the fridge or reheat directly from frozen—perfect for busy days or unexpected guests!
Reheating
To reheat, I preheat the oven to 325°F (160°C), place the buns on a baking tray, and warm them for about 10-15 minutes. This method keeps them soft inside while crisping up the outside nicely. Avoid microwaving too long or they might get rubbery.
FAQs
-
Can I make the dough without a stand mixer?
Absolutely! You can mix and knead the dough entirely by hand. Just make sure you knead it long enough—about 7 to 8 minutes—to develop that nice elastic texture. Using slightly warm water helps activate the yeast properly.
-
Can I use ground chicken or turkey instead of beef?
Yes, ground chicken or turkey works fine but tends to be leaner, so you might want to add a bit more oil or broth to keep the filling juicy. Adjust seasoning to taste since these meats have a milder flavor.
-
How do I know when the buns are fully baked?
Look for a golden brown exterior and a firm feel when gently pressed. If you’re unsure, you can insert a toothpick near the center—it should come out clean. Avoid opening the oven door too often to keep that lovely rise.
-
Are these buns good for making ahead for parties?
Definitely! You can prepare and bake the buns a day ahead, then reheat them before serving. Or freeze in advance and thaw them out as needed—either way, they’re a crowd-pleaser anytime.
-
Can I substitute pine nuts with something else?
If you don’t have pine nuts, toasted chopped walnuts or slivered almonds can work as a crunchy substitute, though the flavor will be a bit different. Or you can skip nuts altogether if preferred.
Final Thoughts
This Easy Baked Meat Buns | Soft & Juicy Recipe has become a go-to for me whenever I want a comforting, homemade treat without fuss. I love how they bring everyone to the table and disappear quickly—there’s just something so satisfying about biting into that soft bun with its flavorful, juicy filling. Honestly, I can’t recommend this recipe enough; it’s straightforward, flexible, and absolutely delicious. Give it a try next time you crave something warm and hearty—you won’t regret it, I promise!
Oh, if you’re like me and love those soft, fluffy buns packed with juicy, flavorful meat inside, then you’re going to adore this Easy Baked Meat Buns | Soft & Juicy Recipe. It’s one of those recipes that feels like a warm hug on a plate—perfect for family dinners, potlucks, or whenever you want to impress guests without spending all day in the kitchen. The dough comes out incredibly tender, while the meat filling is juicy and richly spiced, making every bite a delight.
I remember the first time I made these buns; the house smelled amazing, and everyone kept grabbing more before dinner even started! What makes this Easy Baked Meat Buns | Soft & Juicy Recipe stand out is how simple it is to pull together with minimal ingredients you probably already have. Plus, the buns freeze beautifully, so you can enjoy them on busy days without any fuss.
Ingredients You’ll Need
Every ingredient here plays a crucial role in making these Easy Baked Meat Buns | Soft & Juicy Recipe a success. The dough ingredients give you that soft, elastic texture you’ll love, and the filling is a perfect balance of savory spices and tender meat. Here are some shopping tips and why each one matters.
- All-purpose flour: This is your base for the dough, and using a good quality, fresh flour helps with softness and rise.
- Instant dry yeast: Quick to activate and easy to use, it ensures your buns get that perfect lift.
- Sugar: Just enough to feed the yeast and add a subtle hint of sweetness to the dough.
- Salt: Essential for flavor balance in both dough and filling.
- Oil: Adds moisture and tenderness to the dough—I’ve found that using neutral oils like canola or vegetable work best.
- Water: Warm, not hot, is key to waking the yeast without killing it during dough prep.
- Ground beef: I prefer 80/20 for juiciness, but leaner beef works if you want a lighter option.
- Onion: Adds sweetness and depth to the filling.
- Olive oil: For sautéing the filling, it brings a lovely richness.
- Garlic: Crushed fresh garlic offers that punch of aroma and flavor you just can’t skip.
- Salt & Black pepper: Basic seasoning to enhance the beef mixture.
- Thyme: Whether fresh or dried, it adds an earthy herbal note that complements the meat beautifully.
- Cumin: Brings a warm, slightly smoky depth—such a great companion to ground beef.
- Paprika: Adds color and a subtle sweet-spicy kick.
- Tomato paste: Concentrated tomato flavor that enriches the filling sauce.
- Broth or water: Helps keep the filling moist and juicy without being watery.
- Pine nuts (optional): Adds a surprising crunch and a touch of buttery flavor—definitely worth trying if you have them!
- Egg (beaten): For that beautiful golden sheen on top of your buns.
- Sesame seeds: Adds texture and a lovely nutty aroma when baked.
Variations
What I love most about the Easy Baked Meat Buns | Soft & Juicy Recipe is how adaptable it is. I often swap in different fillings depending on mood and what’s in the fridge. Feel free to make it your own!
- Vegetarian Variation: I’ve had great success swapping ground beef with sautéed mushrooms mixed with crumbled tofu and the same spices. It’s surprisingly hearty and satisfying.
- Spicy Twist: Adding a pinch of chili flakes or a dash of hot sauce to the filling spices brings a nice heat that my family loves.
- Cheese-Stuffed Buns: Sometimes, I tuck a small cube of mozzarella inside the meat filling for gooey surprises inside each bun.
- Gluten-Free Option: Using a gluten-free flour blend in the dough works, but the texture changes slightly—worth experimenting if you’re gluten sensitive.
- Herb Variations: Swapping thyme with rosemary or oregano offers a fresh twist depending on what herbs you prefer or have at hand.
How to Make Easy Baked Meat Buns | Soft & Juicy Recipe
Step 1: Make the Dough and Let It Rise
Start by mixing all your dry dough ingredients in a large bowl—flour, yeast, sugar, and salt. Then add the warm water and oil and mix until a soft dough forms. Knead it for about 7 to 8 minutes until it’s smooth and elastic. Trust me, this kneading step is worth the effort—it really helps build the texture that makes the buns so soft.
Once kneaded, place the dough in a lightly greased bowl, cover it with a clean towel or plastic wrap, and let it rise in a warm spot for about an hour or until it’s doubled in size. This rising period is when all the magic happens!
Step 2: Prepare the Juicy Meat Filling
While your dough is rising, heat olive oil in a skillet over medium heat and sauté the chopped onions until they’re translucent and fragrant — about 4 to 5 minutes. Add your crushed garlic and stir for another minute.
Add the ground beef and cook thoroughly, breaking it apart with a wooden spoon until browned. Then stir in the salt, pepper, thyme, cumin, paprika, and tomato paste. Once combined, pour in the broth or water to keep the filling nice and juicy and let it simmer on low heat until just right—about a few minutes. Don’t skip this step; it keeps the meat luscious inside each bun. If you want, toss in pine nuts before letting the mixture cool.
Step 3: Shape the Buns with Love
Punch down the dough, then divide it into 18 equal pieces. Roll each piece into a smooth ball and then flatten it into a circle about 3 to 3.5 inches wide. Spoon about 2 tablespoons of your cooled filling into the center of each round, then gather the edges and pinch tightly to seal. Take your time sealing—I’ve learned that well-sealed buns hold their juicy filling perfectly without leaks.
Roll each sealed bun gently in your hands to shape it back into a smooth ball, seam-side down. Arrange the buns on a parchment-lined baking tray, cover, and let them rest for 20 minutes while you preheat the oven to 350°F (180°C).
Step 4: Brush, Sprinkle, and Bake to Golden Perfection
Before baking, brush each bun with the beaten egg to create that irresistible golden color. Sprinkle sesame seeds on top for extra crunch and visual appeal. Bake in the preheated oven for 18 to 22 minutes or until they turn a lovely golden brown. Keep an eye on them near the end; ovens vary, and you want that perfect crust without drying out the buns.
How to Serve Easy Baked Meat Buns | Soft & Juicy Recipe
Garnishes
Honestly, I usually keep it simple with garnishes—just a little sprinkle of freshly chopped parsley or a drizzle of tangy yogurt sauce complements the spices inside the buns wonderfully. Sometimes I add some pickled vegetables on the side for a bit of brightness and crunch.
Side Dishes
These buns are perfect alongside a fresh green salad or a simple cucumber-tomato salad tossed with lemon and olive oil. When I want a heartier plate, I serve them with roasted veggies or even a bowl of soup—comfort food heaven.
Creative Ways to Present
For parties, I like arranging these Easy Baked Meat Buns | Soft & Juicy Recipe on a large wooden board surrounded by small bowls of dipping sauces—think spicy harissa or garlicky yogurt. It turns them into finger food that’s both pretty and practical. Another favorite is wrapping a few in parchment paper tied with twine for a cute, rustic gift.
Make Ahead and Storage
Storing Leftovers
I usually store leftover buns in an airtight container in the fridge for up to 3 days. Reheating in the oven or toaster oven helps keep the crust crisp and the filling warm without drying it out. If you’re short on time, a quick zap in the microwave works—just cover them with a damp paper towel to retain moisture.
Freezing
One of the best parts about this recipe is how well the buns freeze. I let them cool completely after baking, then freeze in a single layer on a tray before transferring to a ziplock bag. When you want some, just pull them out and thaw overnight in the fridge or reheat directly from frozen—perfect for busy days or unexpected guests!
Reheating
To reheat, I preheat the oven to 325°F (160°C), place the buns on a baking tray, and warm them for about 10-15 minutes. This method keeps them soft inside while crisping up the outside nicely. Avoid microwaving too long or they might get rubbery.
FAQs
-
Can I make the dough without a stand mixer?
Absolutely! You can mix and knead the dough entirely by hand. Just make sure you knead it long enough—about 7 to 8 minutes—to develop that nice elastic texture. Using slightly warm water helps activate the yeast properly.
-
Can I use ground chicken or turkey instead of beef?
Yes, ground chicken or turkey works fine but tends to be leaner, so you might want to add a bit more oil or broth to keep the filling juicy. Adjust seasoning to taste since these meats have a milder flavor.
-
How do I know when the buns are fully baked?
Look for a golden brown exterior and a firm feel when gently pressed. If you’re unsure, you can insert a toothpick near the center—it should come out clean. Avoid opening the oven door too often to keep that lovely rise.
-
Are these buns good for making ahead for parties?
Definitely! You can prepare and bake the buns a day ahead, then reheat them before serving. Or freeze in advance and thaw them out as needed—either way, they’re a crowd-pleaser anytime.
-
Can I substitute pine nuts with something else?
If you don’t have pine nuts, toasted chopped walnuts or slivered almonds can work as a crunchy substitute, though the flavor will be a bit different. Or you can skip nuts altogether if preferred.
Final Thoughts
This Easy Baked Meat Buns | Soft & Juicy Recipe has become a go-to for me whenever I want a comforting, homemade treat without fuss. I love how they bring everyone to the table and disappear quickly—there’s just something so satisfying about biting into that soft bun with its flavorful, juicy filling. Honestly, I can’t recommend this recipe enough; it’s straightforward, flexible, and absolutely delicious. Give it a try next time you crave something warm and hearty—you won’t regret it, I promise!
Start by mixing all your dry dough ingredients in a large bowl—flour, yeast, sugar, and salt. Then add the warm water and oil and mix until a soft dough forms. Knead it for about 7 to 8 minutes until it’s smooth and elastic. Trust me, this kneading step is worth the effort—it really helps build the texture that makes the buns so soft.
Once kneaded, place the dough in a lightly greased bowl, cover it with a clean towel or plastic wrap, and let it rise in a warm spot for about an hour or until it’s doubled in size. This rising period is when all the magic happens!
Step 2: Prepare the Juicy Meat Filling
While your dough is rising, heat olive oil in a skillet over medium heat and sauté the chopped onions until they’re translucent and fragrant — about 4 to 5 minutes. Add your crushed garlic and stir for another minute.
Add the ground beef and cook thoroughly, breaking it apart with a wooden spoon until browned. Then stir in the salt, pepper, thyme, cumin, paprika, and tomato paste. Once combined, pour in the broth or water to keep the filling nice and juicy and let it simmer on low heat until just right—about a few minutes. Don’t skip this step; it keeps the meat luscious inside each bun. If you want, toss in pine nuts before letting the mixture cool.
Step 3: Shape the Buns with Love
Punch down the dough, then divide it into 18 equal pieces. Roll each piece into a smooth ball and then flatten it into a circle about 3 to 3.5 inches wide. Spoon about 2 tablespoons of your cooled filling into the center of each round, then gather the edges and pinch tightly to seal. Take your time sealing—I’ve learned that well-sealed buns hold their juicy filling perfectly without leaks.
Roll each sealed bun gently in your hands to shape it back into a smooth ball, seam-side down. Arrange the buns on a parchment-lined baking tray, cover, and let them rest for 20 minutes while you preheat the oven to 350°F (180°C).
Step 4: Brush, Sprinkle, and Bake to Golden Perfection
Before baking, brush each bun with the beaten egg to create that irresistible golden color. Sprinkle sesame seeds on top for extra crunch and visual appeal. Bake in the preheated oven for 18 to 22 minutes or until they turn a lovely golden brown. Keep an eye on them near the end; ovens vary, and you want that perfect crust without drying out the buns.
How to Serve Easy Baked Meat Buns | Soft & Juicy Recipe
Garnishes
Honestly, I usually keep it simple with garnishes—just a little sprinkle of freshly chopped parsley or a drizzle of tangy yogurt sauce complements the spices inside the buns wonderfully. Sometimes I add some pickled vegetables on the side for a bit of brightness and crunch.
Side Dishes
These buns are perfect alongside a fresh green salad or a simple cucumber-tomato salad tossed with lemon and olive oil. When I want a heartier plate, I serve them with roasted veggies or even a bowl of soup—comfort food heaven.
Creative Ways to Present
For parties, I like arranging these Easy Baked Meat Buns | Soft & Juicy Recipe on a large wooden board surrounded by small bowls of dipping sauces—think spicy harissa or garlicky yogurt. It turns them into finger food that’s both pretty and practical. Another favorite is wrapping a few in parchment paper tied with twine for a cute, rustic gift.
Make Ahead and Storage
Storing Leftovers
I usually store leftover buns in an airtight container in the fridge for up to 3 days. Reheating in the oven or toaster oven helps keep the crust crisp and the filling warm without drying it out. If you’re short on time, a quick zap in the microwave works—just cover them with a damp paper towel to retain moisture.
Freezing
One of the best parts about this recipe is how well the buns freeze. I let them cool completely after baking, then freeze in a single layer on a tray before transferring to a ziplock bag. When you want some, just pull them out and thaw overnight in the fridge or reheat directly from frozen—perfect for busy days or unexpected guests!
Reheating
To reheat, I preheat the oven to 325°F (160°C), place the buns on a baking tray, and warm them for about 10-15 minutes. This method keeps them soft inside while crisping up the outside nicely. Avoid microwaving too long or they might get rubbery.
FAQs
-
Can I make the dough without a stand mixer?
Absolutely! You can mix and knead the dough entirely by hand. Just make sure you knead it long enough—about 7 to 8 minutes—to develop that nice elastic texture. Using slightly warm water helps activate the yeast properly.
-
Can I use ground chicken or turkey instead of beef?
Yes, ground chicken or turkey works fine but tends to be leaner, so you might want to add a bit more oil or broth to keep the filling juicy. Adjust seasoning to taste since these meats have a milder flavor.
-
How do I know when the buns are fully baked?
Look for a golden brown exterior and a firm feel when gently pressed. If you’re unsure, you can insert a toothpick near the center—it should come out clean. Avoid opening the oven door too often to keep that lovely rise.
-
Are these buns good for making ahead for parties?
Definitely! You can prepare and bake the buns a day ahead, then reheat them before serving. Or freeze in advance and thaw them out as needed—either way, they’re a crowd-pleaser anytime.
-
Can I substitute pine nuts with something else?
If you don’t have pine nuts, toasted chopped walnuts or slivered almonds can work as a crunchy substitute, though the flavor will be a bit different. Or you can skip nuts altogether if preferred.
Final Thoughts
This Easy Baked Meat Buns | Soft & Juicy Recipe has become a go-to for me whenever I want a comforting, homemade treat without fuss. I love how they bring everyone to the table and disappear quickly—there’s just something so satisfying about biting into that soft bun with its flavorful, juicy filling. Honestly, I can’t recommend this recipe enough; it’s straightforward, flexible, and absolutely delicious. Give it a try next time you crave something warm and hearty—you won’t regret it, I promise!
Oh, if you’re like me and love those soft, fluffy buns packed with juicy, flavorful meat inside, then you’re going to adore this Easy Baked Meat Buns | Soft & Juicy Recipe. It’s one of those recipes that feels like a warm hug on a plate—perfect for family dinners, potlucks, or whenever you want to impress guests without spending all day in the kitchen. The dough comes out incredibly tender, while the meat filling is juicy and richly spiced, making every bite a delight.
I remember the first time I made these buns; the house smelled amazing, and everyone kept grabbing more before dinner even started! What makes this Easy Baked Meat Buns | Soft & Juicy Recipe stand out is how simple it is to pull together with minimal ingredients you probably already have. Plus, the buns freeze beautifully, so you can enjoy them on busy days without any fuss.
Ingredients You’ll Need
Every ingredient here plays a crucial role in making these Easy Baked Meat Buns | Soft & Juicy Recipe a success. The dough ingredients give you that soft, elastic texture you’ll love, and the filling is a perfect balance of savory spices and tender meat. Here are some shopping tips and why each one matters.
- All-purpose flour: This is your base for the dough, and using a good quality, fresh flour helps with softness and rise.
- Instant dry yeast: Quick to activate and easy to use, it ensures your buns get that perfect lift.
- Sugar: Just enough to feed the yeast and add a subtle hint of sweetness to the dough.
- Salt: Essential for flavor balance in both dough and filling.
- Oil: Adds moisture and tenderness to the dough—I’ve found that using neutral oils like canola or vegetable work best.
- Water: Warm, not hot, is key to waking the yeast without killing it during dough prep.
- Ground beef: I prefer 80/20 for juiciness, but leaner beef works if you want a lighter option.
- Onion: Adds sweetness and depth to the filling.
- Olive oil: For sautéing the filling, it brings a lovely richness.
- Garlic: Crushed fresh garlic offers that punch of aroma and flavor you just can’t skip.
- Salt & Black pepper: Basic seasoning to enhance the beef mixture.
- Thyme: Whether fresh or dried, it adds an earthy herbal note that complements the meat beautifully.
- Cumin: Brings a warm, slightly smoky depth—such a great companion to ground beef.
- Paprika: Adds color and a subtle sweet-spicy kick.
- Tomato paste: Concentrated tomato flavor that enriches the filling sauce.
- Broth or water: Helps keep the filling moist and juicy without being watery.
- Pine nuts (optional): Adds a surprising crunch and a touch of buttery flavor—definitely worth trying if you have them!
- Egg (beaten): For that beautiful golden sheen on top of your buns.
- Sesame seeds: Adds texture and a lovely nutty aroma when baked.
Variations
What I love most about the Easy Baked Meat Buns | Soft & Juicy Recipe is how adaptable it is. I often swap in different fillings depending on mood and what’s in the fridge. Feel free to make it your own!
- Vegetarian Variation: I’ve had great success swapping ground beef with sautéed mushrooms mixed with crumbled tofu and the same spices. It’s surprisingly hearty and satisfying.
- Spicy Twist: Adding a pinch of chili flakes or a dash of hot sauce to the filling spices brings a nice heat that my family loves.
- Cheese-Stuffed Buns: Sometimes, I tuck a small cube of mozzarella inside the meat filling for gooey surprises inside each bun.
- Gluten-Free Option: Using a gluten-free flour blend in the dough works, but the texture changes slightly—worth experimenting if you’re gluten sensitive.
- Herb Variations: Swapping thyme with rosemary or oregano offers a fresh twist depending on what herbs you prefer or have at hand.
How to Make Easy Baked Meat Buns | Soft & Juicy Recipe
Step 1: Make the Dough and Let It Rise
Start by mixing all your dry dough ingredients in a large bowl—flour, yeast, sugar, and salt. Then add the warm water and oil and mix until a soft dough forms. Knead it for about 7 to 8 minutes until it’s smooth and elastic. Trust me, this kneading step is worth the effort—it really helps build the texture that makes the buns so soft.
Once kneaded, place the dough in a lightly greased bowl, cover it with a clean towel or plastic wrap, and let it rise in a warm spot for about an hour or until it’s doubled in size. This rising period is when all the magic happens!
Step 2: Prepare the Juicy Meat Filling
While your dough is rising, heat olive oil in a skillet over medium heat and sauté the chopped onions until they’re translucent and fragrant — about 4 to 5 minutes. Add your crushed garlic and stir for another minute.
Add the ground beef and cook thoroughly, breaking it apart with a wooden spoon until browned. Then stir in the salt, pepper, thyme, cumin, paprika, and tomato paste. Once combined, pour in the broth or water to keep the filling nice and juicy and let it simmer on low heat until just right—about a few minutes. Don’t skip this step; it keeps the meat luscious inside each bun. If you want, toss in pine nuts before letting the mixture cool.
Step 3: Shape the Buns with Love
Punch down the dough, then divide it into 18 equal pieces. Roll each piece into a smooth ball and then flatten it into a circle about 3 to 3.5 inches wide. Spoon about 2 tablespoons of your cooled filling into the center of each round, then gather the edges and pinch tightly to seal. Take your time sealing—I’ve learned that well-sealed buns hold their juicy filling perfectly without leaks.
Roll each sealed bun gently in your hands to shape it back into a smooth ball, seam-side down. Arrange the buns on a parchment-lined baking tray, cover, and let them rest for 20 minutes while you preheat the oven to 350°F (180°C).
Step 4: Brush, Sprinkle, and Bake to Golden Perfection
Before baking, brush each bun with the beaten egg to create that irresistible golden color. Sprinkle sesame seeds on top for extra crunch and visual appeal. Bake in the preheated oven for 18 to 22 minutes or until they turn a lovely golden brown. Keep an eye on them near the end; ovens vary, and you want that perfect crust without drying out the buns.
How to Serve Easy Baked Meat Buns | Soft & Juicy Recipe
Garnishes
Honestly, I usually keep it simple with garnishes—just a little sprinkle of freshly chopped parsley or a drizzle of tangy yogurt sauce complements the spices inside the buns wonderfully. Sometimes I add some pickled vegetables on the side for a bit of brightness and crunch.
Side Dishes
These buns are perfect alongside a fresh green salad or a simple cucumber-tomato salad tossed with lemon and olive oil. When I want a heartier plate, I serve them with roasted veggies or even a bowl of soup—comfort food heaven.
Creative Ways to Present
For parties, I like arranging these Easy Baked Meat Buns | Soft & Juicy Recipe on a large wooden board surrounded by small bowls of dipping sauces—think spicy harissa or garlicky yogurt. It turns them into finger food that’s both pretty and practical. Another favorite is wrapping a few in parchment paper tied with twine for a cute, rustic gift.
Make Ahead and Storage
Storing Leftovers
I usually store leftover buns in an airtight container in the fridge for up to 3 days. Reheating in the oven or toaster oven helps keep the crust crisp and the filling warm without drying it out. If you’re short on time, a quick zap in the microwave works—just cover them with a damp paper towel to retain moisture.
Freezing
One of the best parts about this recipe is how well the buns freeze. I let them cool completely after baking, then freeze in a single layer on a tray before transferring to a ziplock bag. When you want some, just pull them out and thaw overnight in the fridge or reheat directly from frozen—perfect for busy days or unexpected guests!
Reheating
To reheat, I preheat the oven to 325°F (160°C), place the buns on a baking tray, and warm them for about 10-15 minutes. This method keeps them soft inside while crisping up the outside nicely. Avoid microwaving too long or they might get rubbery.
FAQs
-
Can I make the dough without a stand mixer?
Absolutely! You can mix and knead the dough entirely by hand. Just make sure you knead it long enough—about 7 to 8 minutes—to develop that nice elastic texture. Using slightly warm water helps activate the yeast properly.
-
Can I use ground chicken or turkey instead of beef?
Yes, ground chicken or turkey works fine but tends to be leaner, so you might want to add a bit more oil or broth to keep the filling juicy. Adjust seasoning to taste since these meats have a milder flavor.
-
How do I know when the buns are fully baked?
Look for a golden brown exterior and a firm feel when gently pressed. If you’re unsure, you can insert a toothpick near the center—it should come out clean. Avoid opening the oven door too often to keep that lovely rise.
-
Are these buns good for making ahead for parties?
Definitely! You can prepare and bake the buns a day ahead, then reheat them before serving. Or freeze in advance and thaw them out as needed—either way, they’re a crowd-pleaser anytime.
-
Can I substitute pine nuts with something else?
If you don’t have pine nuts, toasted chopped walnuts or slivered almonds can work as a crunchy substitute, though the flavor will be a bit different. Or you can skip nuts altogether if preferred.
Final Thoughts
This Easy Baked Meat Buns | Soft & Juicy Recipe has become a go-to for me whenever I want a comforting, homemade treat without fuss. I love how they bring everyone to the table and disappear quickly—there’s just something so satisfying about biting into that soft bun with its flavorful, juicy filling. Honestly, I can’t recommend this recipe enough; it’s straightforward, flexible, and absolutely delicious. Give it a try next time you crave something warm and hearty—you won’t regret it, I promise!
Oh, if you’re like me and love those soft, fluffy buns packed with juicy, flavorful meat inside, then you’re going to adore this Easy Baked Meat Buns | Soft & Juicy Recipe. It’s one of those recipes that feels like a warm hug on a plate—perfect for family dinners, potlucks, or whenever you want to impress guests without spending all day in the kitchen. The dough comes out incredibly tender, while the meat filling is juicy and richly spiced, making every bite a delight.
I remember the first time I made these buns; the house smelled amazing, and everyone kept grabbing more before dinner even started! What makes this Easy Baked Meat Buns | Soft & Juicy Recipe stand out is how simple it is to pull together with minimal ingredients you probably already have. Plus, the buns freeze beautifully, so you can enjoy them on busy days without any fuss.
Ingredients You’ll Need
Every ingredient here plays a crucial role in making these Easy Baked Meat Buns | Soft & Juicy Recipe a success. The dough ingredients give you that soft, elastic texture you’ll love, and the filling is a perfect balance of savory spices and tender meat. Here are some shopping tips and why each one matters.
- All-purpose flour: This is your base for the dough, and using a good quality, fresh flour helps with softness and rise.
- Instant dry yeast: Quick to activate and easy to use, it ensures your buns get that perfect lift.
- Sugar: Just enough to feed the yeast and add a subtle hint of sweetness to the dough.
- Salt: Essential for flavor balance in both dough and filling.
- Oil: Adds moisture and tenderness to the dough—I’ve found that using neutral oils like canola or vegetable work best.
- Water: Warm, not hot, is key to waking the yeast without killing it during dough prep.
- Ground beef: I prefer 80/20 for juiciness, but leaner beef works if you want a lighter option.
- Onion: Adds sweetness and depth to the filling.
- Olive oil: For sautéing the filling, it brings a lovely richness.
- Garlic: Crushed fresh garlic offers that punch of aroma and flavor you just can’t skip.
- Salt & Black pepper: Basic seasoning to enhance the beef mixture.
- Thyme: Whether fresh or dried, it adds an earthy herbal note that complements the meat beautifully.
- Cumin: Brings a warm, slightly smoky depth—such a great companion to ground beef.
- Paprika: Adds color and a subtle sweet-spicy kick.
- Tomato paste: Concentrated tomato flavor that enriches the filling sauce.
- Broth or water: Helps keep the filling moist and juicy without being watery.
- Pine nuts (optional): Adds a surprising crunch and a touch of buttery flavor—definitely worth trying if you have them!
- Egg (beaten): For that beautiful golden sheen on top of your buns.
- Sesame seeds: Adds texture and a lovely nutty aroma when baked.
Variations
What I love most about the Easy Baked Meat Buns | Soft & Juicy Recipe is how adaptable it is. I often swap in different fillings depending on mood and what’s in the fridge. Feel free to make it your own!
- Vegetarian Variation: I’ve had great success swapping ground beef with sautéed mushrooms mixed with crumbled tofu and the same spices. It’s surprisingly hearty and satisfying.
- Spicy Twist: Adding a pinch of chili flakes or a dash of hot sauce to the filling spices brings a nice heat that my family loves.
- Cheese-Stuffed Buns: Sometimes, I tuck a small cube of mozzarella inside the meat filling for gooey surprises inside each bun.
- Gluten-Free Option: Using a gluten-free flour blend in the dough works, but the texture changes slightly—worth experimenting if you’re gluten sensitive.
- Herb Variations: Swapping thyme with rosemary or oregano offers a fresh twist depending on what herbs you prefer or have at hand.
How to Make Easy Baked Meat Buns | Soft & Juicy Recipe
Step 1: Make the Dough and Let It Rise
Start by mixing all your dry dough ingredients in a large bowl—flour, yeast, sugar, and salt. Then add the warm water and oil and mix until a soft dough forms. Knead it for about 7 to 8 minutes until it’s smooth and elastic. Trust me, this kneading step is worth the effort—it really helps build the texture that makes the buns so soft.
Once kneaded, place the dough in a lightly greased bowl, cover it with a clean towel or plastic wrap, and let it rise in a warm spot for about an hour or until it’s doubled in size. This rising period is when all the magic happens!
Step 2: Prepare the Juicy Meat Filling
While your dough is rising, heat olive oil in a skillet over medium heat and sauté the chopped onions until they’re translucent and fragrant — about 4 to 5 minutes. Add your crushed garlic and stir for another minute.
Add the ground beef and cook thoroughly, breaking it apart with a wooden spoon until browned. Then stir in the salt, pepper, thyme, cumin, paprika, and tomato paste. Once combined, pour in the broth or water to keep the filling nice and juicy and let it simmer on low heat until just right—about a few minutes. Don’t skip this step; it keeps the meat luscious inside each bun. If you want, toss in pine nuts before letting the mixture cool.
Step 3: Shape the Buns with Love
Punch down the dough, then divide it into 18 equal pieces. Roll each piece into a smooth ball and then flatten it into a circle about 3 to 3.5 inches wide. Spoon about 2 tablespoons of your cooled filling into the center of each round, then gather the edges and pinch tightly to seal. Take your time sealing—I’ve learned that well-sealed buns hold their juicy filling perfectly without leaks.
Roll each sealed bun gently in your hands to shape it back into a smooth ball, seam-side down. Arrange the buns on a parchment-lined baking tray, cover, and let them rest for 20 minutes while you preheat the oven to 350°F (180°C).
Step 4: Brush, Sprinkle, and Bake to Golden Perfection
Before baking, brush each bun with the beaten egg to create that irresistible golden color. Sprinkle sesame seeds on top for extra crunch and visual appeal. Bake in the preheated oven for 18 to 22 minutes or until they turn a lovely golden brown. Keep an eye on them near the end; ovens vary, and you want that perfect crust without drying out the buns.
How to Serve Easy Baked Meat Buns | Soft & Juicy Recipe
Garnishes
Honestly, I usually keep it simple with garnishes—just a little sprinkle of freshly chopped parsley or a drizzle of tangy yogurt sauce complements the spices inside the buns wonderfully. Sometimes I add some pickled vegetables on the side for a bit of brightness and crunch.
Side Dishes
These buns are perfect alongside a fresh green salad or a simple cucumber-tomato salad tossed with lemon and olive oil. When I want a heartier plate, I serve them with roasted veggies or even a bowl of soup—comfort food heaven.
Creative Ways to Present
For parties, I like arranging these Easy Baked Meat Buns | Soft & Juicy Recipe on a large wooden board surrounded by small bowls of dipping sauces—think spicy harissa or garlicky yogurt. It turns them into finger food that’s both pretty and practical. Another favorite is wrapping a few in parchment paper tied with twine for a cute, rustic gift.
Make Ahead and Storage
Storing Leftovers
I usually store leftover buns in an airtight container in the fridge for up to 3 days. Reheating in the oven or toaster oven helps keep the crust crisp and the filling warm without drying it out. If you’re short on time, a quick zap in the microwave works—just cover them with a damp paper towel to retain moisture.
Freezing
One of the best parts about this recipe is how well the buns freeze. I let them cool completely after baking, then freeze in a single layer on a tray before transferring to a ziplock bag. When you want some, just pull them out and thaw overnight in the fridge or reheat directly from frozen—perfect for busy days or unexpected guests!
Reheating
To reheat, I preheat the oven to 325°F (160°C), place the buns on a baking tray, and warm them for about 10-15 minutes. This method keeps them soft inside while crisping up the outside nicely. Avoid microwaving too long or they might get rubbery.
FAQs
-
Can I make the dough without a stand mixer?
Absolutely! You can mix and knead the dough entirely by hand. Just make sure you knead it long enough—about 7 to 8 minutes—to develop that nice elastic texture. Using slightly warm water helps activate the yeast properly.
-
Can I use ground chicken or turkey instead of beef?
Yes, ground chicken or turkey works fine but tends to be leaner, so you might want to add a bit more oil or broth to keep the filling juicy. Adjust seasoning to taste since these meats have a milder flavor.
-
How do I know when the buns are fully baked?
Look for a golden brown exterior and a firm feel when gently pressed. If you’re unsure, you can insert a toothpick near the center—it should come out clean. Avoid opening the oven door too often to keep that lovely rise.
-
Are these buns good for making ahead for parties?
Definitely! You can prepare and bake the buns a day ahead, then reheat them before serving. Or freeze in advance and thaw them out as needed—either way, they’re a crowd-pleaser anytime.
-
Can I substitute pine nuts with something else?
If you don’t have pine nuts, toasted chopped walnuts or slivered almonds can work as a crunchy substitute, though the flavor will be a bit different. Or you can skip nuts altogether if preferred.
Final Thoughts
This Easy Baked Meat Buns | Soft & Juicy Recipe has become a go-to for me whenever I want a comforting, homemade treat without fuss. I love how they bring everyone to the table and disappear quickly—there’s just something so satisfying about biting into that soft bun with its flavorful, juicy filling. Honestly, I can’t recommend this recipe enough; it’s straightforward, flexible, and absolutely delicious. Give it a try next time you crave something warm and hearty—you won’t regret it, I promise!
Start by mixing all your dry dough ingredients in a large bowl—flour, yeast, sugar, and salt. Then add the warm water and oil and mix until a soft dough forms. Knead it for about 7 to 8 minutes until it’s smooth and elastic. Trust me, this kneading step is worth the effort—it really helps build the texture that makes the buns so soft.
Once kneaded, place the dough in a lightly greased bowl, cover it with a clean towel or plastic wrap, and let it rise in a warm spot for about an hour or until it’s doubled in size. This rising period is when all the magic happens!
Step 2: Prepare the Juicy Meat Filling
While your dough is rising, heat olive oil in a skillet over medium heat and sauté the chopped onions until they’re translucent and fragrant — about 4 to 5 minutes. Add your crushed garlic and stir for another minute.
Add the ground beef and cook thoroughly, breaking it apart with a wooden spoon until browned. Then stir in the salt, pepper, thyme, cumin, paprika, and tomato paste. Once combined, pour in the broth or water to keep the filling nice and juicy and let it simmer on low heat until just right—about a few minutes. Don’t skip this step; it keeps the meat luscious inside each bun. If you want, toss in pine nuts before letting the mixture cool.
Step 3: Shape the Buns with Love
Punch down the dough, then divide it into 18 equal pieces. Roll each piece into a smooth ball and then flatten it into a circle about 3 to 3.5 inches wide. Spoon about 2 tablespoons of your cooled filling into the center of each round, then gather the edges and pinch tightly to seal. Take your time sealing—I’ve learned that well-sealed buns hold their juicy filling perfectly without leaks.
Roll each sealed bun gently in your hands to shape it back into a smooth ball, seam-side down. Arrange the buns on a parchment-lined baking tray, cover, and let them rest for 20 minutes while you preheat the oven to 350°F (180°C).
Step 4: Brush, Sprinkle, and Bake to Golden Perfection
Before baking, brush each bun with the beaten egg to create that irresistible golden color. Sprinkle sesame seeds on top for extra crunch and visual appeal. Bake in the preheated oven for 18 to 22 minutes or until they turn a lovely golden brown. Keep an eye on them near the end; ovens vary, and you want that perfect crust without drying out the buns.
How to Serve Easy Baked Meat Buns | Soft & Juicy Recipe
Garnishes
Honestly, I usually keep it simple with garnishes—just a little sprinkle of freshly chopped parsley or a drizzle of tangy yogurt sauce complements the spices inside the buns wonderfully. Sometimes I add some pickled vegetables on the side for a bit of brightness and crunch.
Side Dishes
These buns are perfect alongside a fresh green salad or a simple cucumber-tomato salad tossed with lemon and olive oil. When I want a heartier plate, I serve them with roasted veggies or even a bowl of soup—comfort food heaven.
Creative Ways to Present
For parties, I like arranging these Easy Baked Meat Buns | Soft & Juicy Recipe on a large wooden board surrounded by small bowls of dipping sauces—think spicy harissa or garlicky yogurt. It turns them into finger food that’s both pretty and practical. Another favorite is wrapping a few in parchment paper tied with twine for a cute, rustic gift.
Make Ahead and Storage
Storing Leftovers
I usually store leftover buns in an airtight container in the fridge for up to 3 days. Reheating in the oven or toaster oven helps keep the crust crisp and the filling warm without drying it out. If you’re short on time, a quick zap in the microwave works—just cover them with a damp paper towel to retain moisture.
Freezing
One of the best parts about this recipe is how well the buns freeze. I let them cool completely after baking, then freeze in a single layer on a tray before transferring to a ziplock bag. When you want some, just pull them out and thaw overnight in the fridge or reheat directly from frozen—perfect for busy days or unexpected guests!
Reheating
To reheat, I preheat the oven to 325°F (160°C), place the buns on a baking tray, and warm them for about 10-15 minutes. This method keeps them soft inside while crisping up the outside nicely. Avoid microwaving too long or they might get rubbery.
FAQs
-
Can I make the dough without a stand mixer?
Absolutely! You can mix and knead the dough entirely by hand. Just make sure you knead it long enough—about 7 to 8 minutes—to develop that nice elastic texture. Using slightly warm water helps activate the yeast properly.
-
Can I use ground chicken or turkey instead of beef?
Yes, ground chicken or turkey works fine but tends to be leaner, so you might want to add a bit more oil or broth to keep the filling juicy. Adjust seasoning to taste since these meats have a milder flavor.
-
How do I know when the buns are fully baked?
Look for a golden brown exterior and a firm feel when gently pressed. If you’re unsure, you can insert a toothpick near the center—it should come out clean. Avoid opening the oven door too often to keep that lovely rise.
-
Are these buns good for making ahead for parties?
Definitely! You can prepare and bake the buns a day ahead, then reheat them before serving. Or freeze in advance and thaw them out as needed—either way, they’re a crowd-pleaser anytime.
-
Can I substitute pine nuts with something else?
If you don’t have pine nuts, toasted chopped walnuts or slivered almonds can work as a crunchy substitute, though the flavor will be a bit different. Or you can skip nuts altogether if preferred.
Final Thoughts
This Easy Baked Meat Buns | Soft & Juicy Recipe has become a go-to for me whenever I want a comforting, homemade treat without fuss. I love how they bring everyone to the table and disappear quickly—there’s just something so satisfying about biting into that soft bun with its flavorful, juicy filling. Honestly, I can’t recommend this recipe enough; it’s straightforward, flexible, and absolutely delicious. Give it a try next time you crave something warm and hearty—you won’t regret it, I promise!
Oh, if you’re like me and love those soft, fluffy buns packed with juicy, flavorful meat inside, then you’re going to adore this Easy Baked Meat Buns | Soft & Juicy Recipe. It’s one of those recipes that feels like a warm hug on a plate—perfect for family dinners, potlucks, or whenever you want to impress guests without spending all day in the kitchen. The dough comes out incredibly tender, while the meat filling is juicy and richly spiced, making every bite a delight.
I remember the first time I made these buns; the house smelled amazing, and everyone kept grabbing more before dinner even started! What makes this Easy Baked Meat Buns | Soft & Juicy Recipe stand out is how simple it is to pull together with minimal ingredients you probably already have. Plus, the buns freeze beautifully, so you can enjoy them on busy days without any fuss.
Ingredients You’ll Need
Every ingredient here plays a crucial role in making these Easy Baked Meat Buns | Soft & Juicy Recipe a success. The dough ingredients give you that soft, elastic texture you’ll love, and the filling is a perfect balance of savory spices and tender meat. Here are some shopping tips and why each one matters.
- All-purpose flour: This is your base for the dough, and using a good quality, fresh flour helps with softness and rise.
- Instant dry yeast: Quick to activate and easy to use, it ensures your buns get that perfect lift.
- Sugar: Just enough to feed the yeast and add a subtle hint of sweetness to the dough.
- Salt: Essential for flavor balance in both dough and filling.
- Oil: Adds moisture and tenderness to the dough—I’ve found that using neutral oils like canola or vegetable work best.
- Water: Warm, not hot, is key to waking the yeast without killing it during dough prep.
- Ground beef: I prefer 80/20 for juiciness, but leaner beef works if you want a lighter option.
- Onion: Adds sweetness and depth to the filling.
- Olive oil: For sautéing the filling, it brings a lovely richness.
- Garlic: Crushed fresh garlic offers that punch of aroma and flavor you just can’t skip.
- Salt & Black pepper: Basic seasoning to enhance the beef mixture.
- Thyme: Whether fresh or dried, it adds an earthy herbal note that complements the meat beautifully.
- Cumin: Brings a warm, slightly smoky depth—such a great companion to ground beef.
- Paprika: Adds color and a subtle sweet-spicy kick.
- Tomato paste: Concentrated tomato flavor that enriches the filling sauce.
- Broth or water: Helps keep the filling moist and juicy without being watery.
- Pine nuts (optional): Adds a surprising crunch and a touch of buttery flavor—definitely worth trying if you have them!
- Egg (beaten): For that beautiful golden sheen on top of your buns.
- Sesame seeds: Adds texture and a lovely nutty aroma when baked.
Variations
What I love most about the Easy Baked Meat Buns | Soft & Juicy Recipe is how adaptable it is. I often swap in different fillings depending on mood and what’s in the fridge. Feel free to make it your own!
- Vegetarian Variation: I’ve had great success swapping ground beef with sautéed mushrooms mixed with crumbled tofu and the same spices. It’s surprisingly hearty and satisfying.
- Spicy Twist: Adding a pinch of chili flakes or a dash of hot sauce to the filling spices brings a nice heat that my family loves.
- Cheese-Stuffed Buns: Sometimes, I tuck a small cube of mozzarella inside the meat filling for gooey surprises inside each bun.
- Gluten-Free Option: Using a gluten-free flour blend in the dough works, but the texture changes slightly—worth experimenting if you’re gluten sensitive.
- Herb Variations: Swapping thyme with rosemary or oregano offers a fresh twist depending on what herbs you prefer or have at hand.
How to Make Easy Baked Meat Buns | Soft & Juicy Recipe
Step 1: Make the Dough and Let It Rise
Start by mixing all your dry dough ingredients in a large bowl—flour, yeast, sugar, and salt. Then add the warm water and oil and mix until a soft dough forms. Knead it for about 7 to 8 minutes until it’s smooth and elastic. Trust me, this kneading step is worth the effort—it really helps build the texture that makes the buns so soft.
Once kneaded, place the dough in a lightly greased bowl, cover it with a clean towel or plastic wrap, and let it rise in a warm spot for about an hour or until it’s doubled in size. This rising period is when all the magic happens!
Step 2: Prepare the Juicy Meat Filling
While your dough is rising, heat olive oil in a skillet over medium heat and sauté the chopped onions until they’re translucent and fragrant — about 4 to 5 minutes. Add your crushed garlic and stir for another minute.
Add the ground beef and cook thoroughly, breaking it apart with a wooden spoon until browned. Then stir in the salt, pepper, thyme, cumin, paprika, and tomato paste. Once combined, pour in the broth or water to keep the filling nice and juicy and let it simmer on low heat until just right—about a few minutes. Don’t skip this step; it keeps the meat luscious inside each bun. If you want, toss in pine nuts before letting the mixture cool.
Step 3: Shape the Buns with Love
Punch down the dough, then divide it into 18 equal pieces. Roll each piece into a smooth ball and then flatten it into a circle about 3 to 3.5 inches wide. Spoon about 2 tablespoons of your cooled filling into the center of each round, then gather the edges and pinch tightly to seal. Take your time sealing—I’ve learned that well-sealed buns hold their juicy filling perfectly without leaks.
Roll each sealed bun gently in your hands to shape it back into a smooth ball, seam-side down. Arrange the buns on a parchment-lined baking tray, cover, and let them rest for 20 minutes while you preheat the oven to 350°F (180°C).
Step 4: Brush, Sprinkle, and Bake to Golden Perfection
Before baking, brush each bun with the beaten egg to create that irresistible golden color. Sprinkle sesame seeds on top for extra crunch and visual appeal. Bake in the preheated oven for 18 to 22 minutes or until they turn a lovely golden brown. Keep an eye on them near the end; ovens vary, and you want that perfect crust without drying out the buns.
How to Serve Easy Baked Meat Buns | Soft & Juicy Recipe
Garnishes
Honestly, I usually keep it simple with garnishes—just a little sprinkle of freshly chopped parsley or a drizzle of tangy yogurt sauce complements the spices inside the buns wonderfully. Sometimes I add some pickled vegetables on the side for a bit of brightness and crunch.
Side Dishes
These buns are perfect alongside a fresh green salad or a simple cucumber-tomato salad tossed with lemon and olive oil. When I want a heartier plate, I serve them with roasted veggies or even a bowl of soup—comfort food heaven.
Creative Ways to Present
For parties, I like arranging these Easy Baked Meat Buns | Soft & Juicy Recipe on a large wooden board surrounded by small bowls of dipping sauces—think spicy harissa or garlicky yogurt. It turns them into finger food that’s both pretty and practical. Another favorite is wrapping a few in parchment paper tied with twine for a cute, rustic gift.
Make Ahead and Storage
Storing Leftovers
I usually store leftover buns in an airtight container in the fridge for up to 3 days. Reheating in the oven or toaster oven helps keep the crust crisp and the filling warm without drying it out. If you’re short on time, a quick zap in the microwave works—just cover them with a damp paper towel to retain moisture.
Freezing
One of the best parts about this recipe is how well the buns freeze. I let them cool completely after baking, then freeze in a single layer on a tray before transferring to a ziplock bag. When you want some, just pull them out and thaw overnight in the fridge or reheat directly from frozen—perfect for busy days or unexpected guests!
Reheating
To reheat, I preheat the oven to 325°F (160°C), place the buns on a baking tray, and warm them for about 10-15 minutes. This method keeps them soft inside while crisping up the outside nicely. Avoid microwaving too long or they might get rubbery.
FAQs
-
Can I make the dough without a stand mixer?
Absolutely! You can mix and knead the dough entirely by hand. Just make sure you knead it long enough—about 7 to 8 minutes—to develop that nice elastic texture. Using slightly warm water helps activate the yeast properly.
-
Can I use ground chicken or turkey instead of beef?
Yes, ground chicken or turkey works fine but tends to be leaner, so you might want to add a bit more oil or broth to keep the filling juicy. Adjust seasoning to taste since these meats have a milder flavor.
-
How do I know when the buns are fully baked?
Look for a golden brown exterior and a firm feel when gently pressed. If you’re unsure, you can insert a toothpick near the center—it should come out clean. Avoid opening the oven door too often to keep that lovely rise.
-
Are these buns good for making ahead for parties?
Definitely! You can prepare and bake the buns a day ahead, then reheat them before serving. Or freeze in advance and thaw them out as needed—either way, they’re a crowd-pleaser anytime.
-
Can I substitute pine nuts with something else?
If you don’t have pine nuts, toasted chopped walnuts or slivered almonds can work as a crunchy substitute, though the flavor will be a bit different. Or you can skip nuts altogether if preferred.
Final Thoughts
This Easy Baked Meat Buns | Soft & Juicy Recipe has become a go-to for me whenever I want a comforting, homemade treat without fuss. I love how they bring everyone to the table and disappear quickly—there’s just something so satisfying about biting into that soft bun with its flavorful, juicy filling. Honestly, I can’t recommend this recipe enough; it’s straightforward, flexible, and absolutely delicious. Give it a try next time you crave something warm and hearty—you won’t regret it, I promise!
Oh, if you’re like me and love those soft, fluffy buns packed with juicy, flavorful meat inside, then you’re going to adore this Easy Baked Meat Buns | Soft & Juicy Recipe. It’s one of those recipes that feels like a warm hug on a plate—perfect for family dinners, potlucks, or whenever you want to impress guests without spending all day in the kitchen. The dough comes out incredibly tender, while the meat filling is juicy and richly spiced, making every bite a delight.
I remember the first time I made these buns; the house smelled amazing, and everyone kept grabbing more before dinner even started! What makes this Easy Baked Meat Buns | Soft & Juicy Recipe stand out is how simple it is to pull together with minimal ingredients you probably already have. Plus, the buns freeze beautifully, so you can enjoy them on busy days without any fuss.
Ingredients You’ll Need
Every ingredient here plays a crucial role in making these Easy Baked Meat Buns | Soft & Juicy Recipe a success. The dough ingredients give you that soft, elastic texture you’ll love, and the filling is a perfect balance of savory spices and tender meat. Here are some shopping tips and why each one matters.
- All-purpose flour: This is your base for the dough, and using a good quality, fresh flour helps with softness and rise.
- Instant dry yeast: Quick to activate and easy to use, it ensures your buns get that perfect lift.
- Sugar: Just enough to feed the yeast and add a subtle hint of sweetness to the dough.
- Salt: Essential for flavor balance in both dough and filling.
- Oil: Adds moisture and tenderness to the dough—I’ve found that using neutral oils like canola or vegetable work best.
- Water: Warm, not hot, is key to waking the yeast without killing it during dough prep.
- Ground beef: I prefer 80/20 for juiciness, but leaner beef works if you want a lighter option.
- Onion: Adds sweetness and depth to the filling.
- Olive oil: For sautéing the filling, it brings a lovely richness.
- Garlic: Crushed fresh garlic offers that punch of aroma and flavor you just can’t skip.
- Salt & Black pepper: Basic seasoning to enhance the beef mixture.
- Thyme: Whether fresh or dried, it adds an earthy herbal note that complements the meat beautifully.
- Cumin: Brings a warm, slightly smoky depth—such a great companion to ground beef.
- Paprika: Adds color and a subtle sweet-spicy kick.
- Tomato paste: Concentrated tomato flavor that enriches the filling sauce.
- Broth or water: Helps keep the filling moist and juicy without being watery.
- Pine nuts (optional): Adds a surprising crunch and a touch of buttery flavor—definitely worth trying if you have them!
- Egg (beaten): For that beautiful golden sheen on top of your buns.
- Sesame seeds: Adds texture and a lovely nutty aroma when baked.
Variations
What I love most about the Easy Baked Meat Buns | Soft & Juicy Recipe is how adaptable it is. I often swap in different fillings depending on mood and what’s in the fridge. Feel free to make it your own!
- Vegetarian Variation: I’ve had great success swapping ground beef with sautéed mushrooms mixed with crumbled tofu and the same spices. It’s surprisingly hearty and satisfying.
- Spicy Twist: Adding a pinch of chili flakes or a dash of hot sauce to the filling spices brings a nice heat that my family loves.
- Cheese-Stuffed Buns: Sometimes, I tuck a small cube of mozzarella inside the meat filling for gooey surprises inside each bun.
- Gluten-Free Option: Using a gluten-free flour blend in the dough works, but the texture changes slightly—worth experimenting if you’re gluten sensitive.
- Herb Variations: Swapping thyme with rosemary or oregano offers a fresh twist depending on what herbs you prefer or have at hand.
How to Make Easy Baked Meat Buns | Soft & Juicy Recipe
Step 1: Make the Dough and Let It Rise
Start by mixing all your dry dough ingredients in a large bowl—flour, yeast, sugar, and salt. Then add the warm water and oil and mix until a soft dough forms. Knead it for about 7 to 8 minutes until it’s smooth and elastic. Trust me, this kneading step is worth the effort—it really helps build the texture that makes the buns so soft.
Once kneaded, place the dough in a lightly greased bowl, cover it with a clean towel or plastic wrap, and let it rise in a warm spot for about an hour or until it’s doubled in size. This rising period is when all the magic happens!
Step 2: Prepare the Juicy Meat Filling
While your dough is rising, heat olive oil in a skillet over medium heat and sauté the chopped onions until they’re translucent and fragrant — about 4 to 5 minutes. Add your crushed garlic and stir for another minute.
Add the ground beef and cook thoroughly, breaking it apart with a wooden spoon until browned. Then stir in the salt, pepper, thyme, cumin, paprika, and tomato paste. Once combined, pour in the broth or water to keep the filling nice and juicy and let it simmer on low heat until just right—about a few minutes. Don’t skip this step; it keeps the meat luscious inside each bun. If you want, toss in pine nuts before letting the mixture cool.
Step 3: Shape the Buns with Love
Punch down the dough, then divide it into 18 equal pieces. Roll each piece into a smooth ball and then flatten it into a circle about 3 to 3.5 inches wide. Spoon about 2 tablespoons of your cooled filling into the center of each round, then gather the edges and pinch tightly to seal. Take your time sealing—I’ve learned that well-sealed buns hold their juicy filling perfectly without leaks.
Roll each sealed bun gently in your hands to shape it back into a smooth ball, seam-side down. Arrange the buns on a parchment-lined baking tray, cover, and let them rest for 20 minutes while you preheat the oven to 350°F (180°C).
Step 4: Brush, Sprinkle, and Bake to Golden Perfection
Before baking, brush each bun with the beaten egg to create that irresistible golden color. Sprinkle sesame seeds on top for extra crunch and visual appeal. Bake in the preheated oven for 18 to 22 minutes or until they turn a lovely golden brown. Keep an eye on them near the end; ovens vary, and you want that perfect crust without drying out the buns.
How to Serve Easy Baked Meat Buns | Soft & Juicy Recipe
Garnishes
Honestly, I usually keep it simple with garnishes—just a little sprinkle of freshly chopped parsley or a drizzle of tangy yogurt sauce complements the spices inside the buns wonderfully. Sometimes I add some pickled vegetables on the side for a bit of brightness and crunch.
Side Dishes
These buns are perfect alongside a fresh green salad or a simple cucumber-tomato salad tossed with lemon and olive oil. When I want a heartier plate, I serve them with roasted veggies or even a bowl of soup—comfort food heaven.
Creative Ways to Present
For parties, I like arranging these Easy Baked Meat Buns | Soft & Juicy Recipe on a large wooden board surrounded by small bowls of dipping sauces—think spicy harissa or garlicky yogurt. It turns them into finger food that’s both pretty and practical. Another favorite is wrapping a few in parchment paper tied with twine for a cute, rustic gift.
Make Ahead and Storage
Storing Leftovers
I usually store leftover buns in an airtight container in the fridge for up to 3 days. Reheating in the oven or toaster oven helps keep the crust crisp and the filling warm without drying it out. If you’re short on time, a quick zap in the microwave works—just cover them with a damp paper towel to retain moisture.
Freezing
One of the best parts about this recipe is how well the buns freeze. I let them cool completely after baking, then freeze in a single layer on a tray before transferring to a ziplock bag. When you want some, just pull them out and thaw overnight in the fridge or reheat directly from frozen—perfect for busy days or unexpected guests!
Reheating
To reheat, I preheat the oven to 325°F (160°C), place the buns on a baking tray, and warm them for about 10-15 minutes. This method keeps them soft inside while crisping up the outside nicely. Avoid microwaving too long or they might get rubbery.
FAQs
-
Can I make the dough without a stand mixer?
Absolutely! You can mix and knead the dough entirely by hand. Just make sure you knead it long enough—about 7 to 8 minutes—to develop that nice elastic texture. Using slightly warm water helps activate the yeast properly.
-
Can I use ground chicken or turkey instead of beef?
Yes, ground chicken or turkey works fine but tends to be leaner, so you might want to add a bit more oil or broth to keep the filling juicy. Adjust seasoning to taste since these meats have a milder flavor.
-
How do I know when the buns are fully baked?
Look for a golden brown exterior and a firm feel when gently pressed. If you’re unsure, you can insert a toothpick near the center—it should come out clean. Avoid opening the oven door too often to keep that lovely rise.
-
Are these buns good for making ahead for parties?
Definitely! You can prepare and bake the buns a day ahead, then reheat them before serving. Or freeze in advance and thaw them out as needed—either way, they’re a crowd-pleaser anytime.
-
Can I substitute pine nuts with something else?
If you don’t have pine nuts, toasted chopped walnuts or slivered almonds can work as a crunchy substitute, though the flavor will be a bit different. Or you can skip nuts altogether if preferred.
Final Thoughts
This Easy Baked Meat Buns | Soft & Juicy Recipe has become a go-to for me whenever I want a comforting, homemade treat without fuss. I love how they bring everyone to the table and disappear quickly—there’s just something so satisfying about biting into that soft bun with its flavorful, juicy filling. Honestly, I can’t recommend this recipe enough; it’s straightforward, flexible, and absolutely delicious. Give it a try next time you crave something warm and hearty—you won’t regret it, I promise!
Start by mixing all your dry dough ingredients in a large bowl—flour, yeast, sugar, and salt. Then add the warm water and oil and mix until a soft dough forms. Knead it for about 7 to 8 minutes until it’s smooth and elastic. Trust me, this kneading step is worth the effort—it really helps build the texture that makes the buns so soft.
Once kneaded, place the dough in a lightly greased bowl, cover it with a clean towel or plastic wrap, and let it rise in a warm spot for about an hour or until it’s doubled in size. This rising period is when all the magic happens!
Step 2: Prepare the Juicy Meat Filling
While your dough is rising, heat olive oil in a skillet over medium heat and sauté the chopped onions until they’re translucent and fragrant — about 4 to 5 minutes. Add your crushed garlic and stir for another minute.
Add the ground beef and cook thoroughly, breaking it apart with a wooden spoon until browned. Then stir in the salt, pepper, thyme, cumin, paprika, and tomato paste. Once combined, pour in the broth or water to keep the filling nice and juicy and let it simmer on low heat until just right—about a few minutes. Don’t skip this step; it keeps the meat luscious inside each bun. If you want, toss in pine nuts before letting the mixture cool.
Step 3: Shape the Buns with Love
Punch down the dough, then divide it into 18 equal pieces. Roll each piece into a smooth ball and then flatten it into a circle about 3 to 3.5 inches wide. Spoon about 2 tablespoons of your cooled filling into the center of each round, then gather the edges and pinch tightly to seal. Take your time sealing—I’ve learned that well-sealed buns hold their juicy filling perfectly without leaks.
Roll each sealed bun gently in your hands to shape it back into a smooth ball, seam-side down. Arrange the buns on a parchment-lined baking tray, cover, and let them rest for 20 minutes while you preheat the oven to 350°F (180°C).
Step 4: Brush, Sprinkle, and Bake to Golden Perfection
Before baking, brush each bun with the beaten egg to create that irresistible golden color. Sprinkle sesame seeds on top for extra crunch and visual appeal. Bake in the preheated oven for 18 to 22 minutes or until they turn a lovely golden brown. Keep an eye on them near the end; ovens vary, and you want that perfect crust without drying out the buns.
How to Serve Easy Baked Meat Buns | Soft & Juicy Recipe
Garnishes
Honestly, I usually keep it simple with garnishes—just a little sprinkle of freshly chopped parsley or a drizzle of tangy yogurt sauce complements the spices inside the buns wonderfully. Sometimes I add some pickled vegetables on the side for a bit of brightness and crunch.
Side Dishes
These buns are perfect alongside a fresh green salad or a simple cucumber-tomato salad tossed with lemon and olive oil. When I want a heartier plate, I serve them with roasted veggies or even a bowl of soup—comfort food heaven.
Creative Ways to Present
For parties, I like arranging these Easy Baked Meat Buns | Soft & Juicy Recipe on a large wooden board surrounded by small bowls of dipping sauces—think spicy harissa or garlicky yogurt. It turns them into finger food that’s both pretty and practical. Another favorite is wrapping a few in parchment paper tied with twine for a cute, rustic gift.
Make Ahead and Storage
Storing Leftovers
I usually store leftover buns in an airtight container in the fridge for up to 3 days. Reheating in the oven or toaster oven helps keep the crust crisp and the filling warm without drying it out. If you’re short on time, a quick zap in the microwave works—just cover them with a damp paper towel to retain moisture.
Freezing
One of the best parts about this recipe is how well the buns freeze. I let them cool completely after baking, then freeze in a single layer on a tray before transferring to a ziplock bag. When you want some, just pull them out and thaw overnight in the fridge or reheat directly from frozen—perfect for busy days or unexpected guests!
Reheating
To reheat, I preheat the oven to 325°F (160°C), place the buns on a baking tray, and warm them for about 10-15 minutes. This method keeps them soft inside while crisping up the outside nicely. Avoid microwaving too long or they might get rubbery.
FAQs
-
Can I make the dough without a stand mixer?
Absolutely! You can mix and knead the dough entirely by hand. Just make sure you knead it long enough—about 7 to 8 minutes—to develop that nice elastic texture. Using slightly warm water helps activate the yeast properly.
-
Can I use ground chicken or turkey instead of beef?
Yes, ground chicken or turkey works fine but tends to be leaner, so you might want to add a bit more oil or broth to keep the filling juicy. Adjust seasoning to taste since these meats have a milder flavor.
-
How do I know when the buns are fully baked?
Look for a golden brown exterior and a firm feel when gently pressed. If you’re unsure, you can insert a toothpick near the center—it should come out clean. Avoid opening the oven door too often to keep that lovely rise.
-
Are these buns good for making ahead for parties?
Definitely! You can prepare and bake the buns a day ahead, then reheat them before serving. Or freeze in advance and thaw them out as needed—either way, they’re a crowd-pleaser anytime.
-
Can I substitute pine nuts with something else?
If you don’t have pine nuts, toasted chopped walnuts or slivered almonds can work as a crunchy substitute, though the flavor will be a bit different. Or you can skip nuts altogether if preferred.
Final Thoughts
This Easy Baked Meat Buns | Soft & Juicy Recipe has become a go-to for me whenever I want a comforting, homemade treat without fuss. I love how they bring everyone to the table and disappear quickly—there’s just something so satisfying about biting into that soft bun with its flavorful, juicy filling. Honestly, I can’t recommend this recipe enough; it’s straightforward, flexible, and absolutely delicious. Give it a try next time you crave something warm and hearty—you won’t regret it, I promise!
Oh, if you’re like me and love those soft, fluffy buns packed with juicy, flavorful meat inside, then you’re going to adore this Easy Baked Meat Buns | Soft & Juicy Recipe. It’s one of those recipes that feels like a warm hug on a plate—perfect for family dinners, potlucks, or whenever you want to impress guests without spending all day in the kitchen. The dough comes out incredibly tender, while the meat filling is juicy and richly spiced, making every bite a delight.
I remember the first time I made these buns; the house smelled amazing, and everyone kept grabbing more before dinner even started! What makes this Easy Baked Meat Buns | Soft & Juicy Recipe stand out is how simple it is to pull together with minimal ingredients you probably already have. Plus, the buns freeze beautifully, so you can enjoy them on busy days without any fuss.
Ingredients You’ll Need
Every ingredient here plays a crucial role in making these Easy Baked Meat Buns | Soft & Juicy Recipe a success. The dough ingredients give you that soft, elastic texture you’ll love, and the filling is a perfect balance of savory spices and tender meat. Here are some shopping tips and why each one matters.
- All-purpose flour: This is your base for the dough, and using a good quality, fresh flour helps with softness and rise.
- Instant dry yeast: Quick to activate and easy to use, it ensures your buns get that perfect lift.
- Sugar: Just enough to feed the yeast and add a subtle hint of sweetness to the dough.
- Salt: Essential for flavor balance in both dough and filling.
- Oil: Adds moisture and tenderness to the dough—I’ve found that using neutral oils like canola or vegetable work best.
- Water: Warm, not hot, is key to waking the yeast without killing it during dough prep.
- Ground beef: I prefer 80/20 for juiciness, but leaner beef works if you want a lighter option.
- Onion: Adds sweetness and depth to the filling.
- Olive oil: For sautéing the filling, it brings a lovely richness.
- Garlic: Crushed fresh garlic offers that punch of aroma and flavor you just can’t skip.
- Salt & Black pepper: Basic seasoning to enhance the beef mixture.
- Thyme: Whether fresh or dried, it adds an earthy herbal note that complements the meat beautifully.
- Cumin: Brings a warm, slightly smoky depth—such a great companion to ground beef.
- Paprika: Adds color and a subtle sweet-spicy kick.
- Tomato paste: Concentrated tomato flavor that enriches the filling sauce.
- Broth or water: Helps keep the filling moist and juicy without being watery.
- Pine nuts (optional): Adds a surprising crunch and a touch of buttery flavor—definitely worth trying if you have them!
- Egg (beaten): For that beautiful golden sheen on top of your buns.
- Sesame seeds: Adds texture and a lovely nutty aroma when baked.
Variations
What I love most about the Easy Baked Meat Buns | Soft & Juicy Recipe is how adaptable it is. I often swap in different fillings depending on mood and what’s in the fridge. Feel free to make it your own!
- Vegetarian Variation: I’ve had great success swapping ground beef with sautéed mushrooms mixed with crumbled tofu and the same spices. It’s surprisingly hearty and satisfying.
- Spicy Twist: Adding a pinch of chili flakes or a dash of hot sauce to the filling spices brings a nice heat that my family loves.
- Cheese-Stuffed Buns: Sometimes, I tuck a small cube of mozzarella inside the meat filling for gooey surprises inside each bun.
- Gluten-Free Option: Using a gluten-free flour blend in the dough works, but the texture changes slightly—worth experimenting if you’re gluten sensitive.
- Herb Variations: Swapping thyme with rosemary or oregano offers a fresh twist depending on what herbs you prefer or have at hand.
How to Make Easy Baked Meat Buns | Soft & Juicy Recipe
Step 1: Make the Dough and Let It Rise
Start by mixing all your dry dough ingredients in a large bowl—flour, yeast, sugar, and salt. Then add the warm water and oil and mix until a soft dough forms. Knead it for about 7 to 8 minutes until it’s smooth and elastic. Trust me, this kneading step is worth the effort—it really helps build the texture that makes the buns so soft.
Once kneaded, place the dough in a lightly greased bowl, cover it with a clean towel or plastic wrap, and let it rise in a warm spot for about an hour or until it’s doubled in size. This rising period is when all the magic happens!
Step 2: Prepare the Juicy Meat Filling
While your dough is rising, heat olive oil in a skillet over medium heat and sauté the chopped onions until they’re translucent and fragrant — about 4 to 5 minutes. Add your crushed garlic and stir for another minute.
Add the ground beef and cook thoroughly, breaking it apart with a wooden spoon until browned. Then stir in the salt, pepper, thyme, cumin, paprika, and tomato paste. Once combined, pour in the broth or water to keep the filling nice and juicy and let it simmer on low heat until just right—about a few minutes. Don’t skip this step; it keeps the meat luscious inside each bun. If you want, toss in pine nuts before letting the mixture cool.
Step 3: Shape the Buns with Love
Punch down the dough, then divide it into 18 equal pieces. Roll each piece into a smooth ball and then flatten it into a circle about 3 to 3.5 inches wide. Spoon about 2 tablespoons of your cooled filling into the center of each round, then gather the edges and pinch tightly to seal. Take your time sealing—I’ve learned that well-sealed buns hold their juicy filling perfectly without leaks.
Roll each sealed bun gently in your hands to shape it back into a smooth ball, seam-side down. Arrange the buns on a parchment-lined baking tray, cover, and let them rest for 20 minutes while you preheat the oven to 350°F (180°C).
Step 4: Brush, Sprinkle, and Bake to Golden Perfection
Before baking, brush each bun with the beaten egg to create that irresistible golden color. Sprinkle sesame seeds on top for extra crunch and visual appeal. Bake in the preheated oven for 18 to 22 minutes or until they turn a lovely golden brown. Keep an eye on them near the end; ovens vary, and you want that perfect crust without drying out the buns.
How to Serve Easy Baked Meat Buns | Soft & Juicy Recipe
Garnishes
Honestly, I usually keep it simple with garnishes—just a little sprinkle of freshly chopped parsley or a drizzle of tangy yogurt sauce complements the spices inside the buns wonderfully. Sometimes I add some pickled vegetables on the side for a bit of brightness and crunch.
Side Dishes
These buns are perfect alongside a fresh green salad or a simple cucumber-tomato salad tossed with lemon and olive oil. When I want a heartier plate, I serve them with roasted veggies or even a bowl of soup—comfort food heaven.
Creative Ways to Present
For parties, I like arranging these Easy Baked Meat Buns | Soft & Juicy Recipe on a large wooden board surrounded by small bowls of dipping sauces—think spicy harissa or garlicky yogurt. It turns them into finger food that’s both pretty and practical. Another favorite is wrapping a few in parchment paper tied with twine for a cute, rustic gift.
Make Ahead and Storage
Storing Leftovers
I usually store leftover buns in an airtight container in the fridge for up to 3 days. Reheating in the oven or toaster oven helps keep the crust crisp and the filling warm without drying it out. If you’re short on time, a quick zap in the microwave works—just cover them with a damp paper towel to retain moisture.
Freezing
One of the best parts about this recipe is how well the buns freeze. I let them cool completely after baking, then freeze in a single layer on a tray before transferring to a ziplock bag. When you want some, just pull them out and thaw overnight in the fridge or reheat directly from frozen—perfect for busy days or unexpected guests!
Reheating
To reheat, I preheat the oven to 325°F (160°C), place the buns on a baking tray, and warm them for about 10-15 minutes. This method keeps them soft inside while crisping up the outside nicely. Avoid microwaving too long or they might get rubbery.
FAQs
-
Can I make the dough without a stand mixer?
Absolutely! You can mix and knead the dough entirely by hand. Just make sure you knead it long enough—about 7 to 8 minutes—to develop that nice elastic texture. Using slightly warm water helps activate the yeast properly.
-
Can I use ground chicken or turkey instead of beef?
Yes, ground chicken or turkey works fine but tends to be leaner, so you might want to add a bit more oil or broth to keep the filling juicy. Adjust seasoning to taste since these meats have a milder flavor.
-
How do I know when the buns are fully baked?
Look for a golden brown exterior and a firm feel when gently pressed. If you’re unsure, you can insert a toothpick near the center—it should come out clean. Avoid opening the oven door too often to keep that lovely rise.
-
Are these buns good for making ahead for parties?
Definitely! You can prepare and bake the buns a day ahead, then reheat them before serving. Or freeze in advance and thaw them out as needed—either way, they’re a crowd-pleaser anytime.
-
Can I substitute pine nuts with something else?
If you don’t have pine nuts, toasted chopped walnuts or slivered almonds can work as a crunchy substitute, though the flavor will be a bit different. Or you can skip nuts altogether if preferred.
Final Thoughts
This Easy Baked Meat Buns | Soft & Juicy Recipe has become a go-to for me whenever I want a comforting, homemade treat without fuss. I love how they bring everyone to the table and disappear quickly—there’s just something so satisfying about biting into that soft bun with its flavorful, juicy filling. Honestly, I can’t recommend this recipe enough; it’s straightforward, flexible, and absolutely delicious. Give it a try next time you crave something warm and hearty—you won’t regret it, I promise!
While your dough is rising, heat olive oil in a skillet over medium heat and sauté the chopped onions until they’re translucent and fragrant — about 4 to 5 minutes. Add your crushed garlic and stir for another minute.
Add the ground beef and cook thoroughly, breaking it apart with a wooden spoon until browned. Then stir in the salt, pepper, thyme, cumin, paprika, and tomato paste. Once combined, pour in the broth or water to keep the filling nice and juicy and let it simmer on low heat until just right—about a few minutes. Don’t skip this step; it keeps the meat luscious inside each bun. If you want, toss in pine nuts before letting the mixture cool.
Step 3: Shape the Buns with Love
Punch down the dough, then divide it into 18 equal pieces. Roll each piece into a smooth ball and then flatten it into a circle about 3 to 3.5 inches wide. Spoon about 2 tablespoons of your cooled filling into the center of each round, then gather the edges and pinch tightly to seal. Take your time sealing—I’ve learned that well-sealed buns hold their juicy filling perfectly without leaks.
Roll each sealed bun gently in your hands to shape it back into a smooth ball, seam-side down. Arrange the buns on a parchment-lined baking tray, cover, and let them rest for 20 minutes while you preheat the oven to 350°F (180°C).
Step 4: Brush, Sprinkle, and Bake to Golden Perfection
Before baking, brush each bun with the beaten egg to create that irresistible golden color. Sprinkle sesame seeds on top for extra crunch and visual appeal. Bake in the preheated oven for 18 to 22 minutes or until they turn a lovely golden brown. Keep an eye on them near the end; ovens vary, and you want that perfect crust without drying out the buns.
How to Serve Easy Baked Meat Buns | Soft & Juicy Recipe
Garnishes
Honestly, I usually keep it simple with garnishes—just a little sprinkle of freshly chopped parsley or a drizzle of tangy yogurt sauce complements the spices inside the buns wonderfully. Sometimes I add some pickled vegetables on the side for a bit of brightness and crunch.
Side Dishes
These buns are perfect alongside a fresh green salad or a simple cucumber-tomato salad tossed with lemon and olive oil. When I want a heartier plate, I serve them with roasted veggies or even a bowl of soup—comfort food heaven.
Creative Ways to Present
For parties, I like arranging these Easy Baked Meat Buns | Soft & Juicy Recipe on a large wooden board surrounded by small bowls of dipping sauces—think spicy harissa or garlicky yogurt. It turns them into finger food that’s both pretty and practical. Another favorite is wrapping a few in parchment paper tied with twine for a cute, rustic gift.
Make Ahead and Storage
Storing Leftovers
I usually store leftover buns in an airtight container in the fridge for up to 3 days. Reheating in the oven or toaster oven helps keep the crust crisp and the filling warm without drying it out. If you’re short on time, a quick zap in the microwave works—just cover them with a damp paper towel to retain moisture.
Freezing
One of the best parts about this recipe is how well the buns freeze. I let them cool completely after baking, then freeze in a single layer on a tray before transferring to a ziplock bag. When you want some, just pull them out and thaw overnight in the fridge or reheat directly from frozen—perfect for busy days or unexpected guests!
Reheating
To reheat, I preheat the oven to 325°F (160°C), place the buns on a baking tray, and warm them for about 10-15 minutes. This method keeps them soft inside while crisping up the outside nicely. Avoid microwaving too long or they might get rubbery.
FAQs
-
Can I make the dough without a stand mixer?
Absolutely! You can mix and knead the dough entirely by hand. Just make sure you knead it long enough—about 7 to 8 minutes—to develop that nice elastic texture. Using slightly warm water helps activate the yeast properly.
-
Can I use ground chicken or turkey instead of beef?
Yes, ground chicken or turkey works fine but tends to be leaner, so you might want to add a bit more oil or broth to keep the filling juicy. Adjust seasoning to taste since these meats have a milder flavor.
-
How do I know when the buns are fully baked?
Look for a golden brown exterior and a firm feel when gently pressed. If you’re unsure, you can insert a toothpick near the center—it should come out clean. Avoid opening the oven door too often to keep that lovely rise.
-
Are these buns good for making ahead for parties?
Definitely! You can prepare and bake the buns a day ahead, then reheat them before serving. Or freeze in advance and thaw them out as needed—either way, they’re a crowd-pleaser anytime.
-
Can I substitute pine nuts with something else?
If you don’t have pine nuts, toasted chopped walnuts or slivered almonds can work as a crunchy substitute, though the flavor will be a bit different. Or you can skip nuts altogether if preferred.
Final Thoughts
This Easy Baked Meat Buns | Soft & Juicy Recipe has become a go-to for me whenever I want a comforting, homemade treat without fuss. I love how they bring everyone to the table and disappear quickly—there’s just something so satisfying about biting into that soft bun with its flavorful, juicy filling. Honestly, I can’t recommend this recipe enough; it’s straightforward, flexible, and absolutely delicious. Give it a try next time you crave something warm and hearty—you won’t regret it, I promise!
Oh, if you’re like me and love those soft, fluffy buns packed with juicy, flavorful meat inside, then you’re going to adore this Easy Baked Meat Buns | Soft & Juicy Recipe. It’s one of those recipes that feels like a warm hug on a plate—perfect for family dinners, potlucks, or whenever you want to impress guests without spending all day in the kitchen. The dough comes out incredibly tender, while the meat filling is juicy and richly spiced, making every bite a delight.
I remember the first time I made these buns; the house smelled amazing, and everyone kept grabbing more before dinner even started! What makes this Easy Baked Meat Buns | Soft & Juicy Recipe stand out is how simple it is to pull together with minimal ingredients you probably already have. Plus, the buns freeze beautifully, so you can enjoy them on busy days without any fuss.
Ingredients You’ll Need
Every ingredient here plays a crucial role in making these Easy Baked Meat Buns | Soft & Juicy Recipe a success. The dough ingredients give you that soft, elastic texture you’ll love, and the filling is a perfect balance of savory spices and tender meat. Here are some shopping tips and why each one matters.
- All-purpose flour: This is your base for the dough, and using a good quality, fresh flour helps with softness and rise.
- Instant dry yeast: Quick to activate and easy to use, it ensures your buns get that perfect lift.
- Sugar: Just enough to feed the yeast and add a subtle hint of sweetness to the dough.
- Salt: Essential for flavor balance in both dough and filling.
- Oil: Adds moisture and tenderness to the dough—I’ve found that using neutral oils like canola or vegetable work best.
- Water: Warm, not hot, is key to waking the yeast without killing it during dough prep.
- Ground beef: I prefer 80/20 for juiciness, but leaner beef works if you want a lighter option.
- Onion: Adds sweetness and depth to the filling.
- Olive oil: For sautéing the filling, it brings a lovely richness.
- Garlic: Crushed fresh garlic offers that punch of aroma and flavor you just can’t skip.
- Salt & Black pepper: Basic seasoning to enhance the beef mixture.
- Thyme: Whether fresh or dried, it adds an earthy herbal note that complements the meat beautifully.
- Cumin: Brings a warm, slightly smoky depth—such a great companion to ground beef.
- Paprika: Adds color and a subtle sweet-spicy kick.
- Tomato paste: Concentrated tomato flavor that enriches the filling sauce.
- Broth or water: Helps keep the filling moist and juicy without being watery.
- Pine nuts (optional): Adds a surprising crunch and a touch of buttery flavor—definitely worth trying if you have them!
- Egg (beaten): For that beautiful golden sheen on top of your buns.
- Sesame seeds: Adds texture and a lovely nutty aroma when baked.
Variations
What I love most about the Easy Baked Meat Buns | Soft & Juicy Recipe is how adaptable it is. I often swap in different fillings depending on mood and what’s in the fridge. Feel free to make it your own!
- Vegetarian Variation: I’ve had great success swapping ground beef with sautéed mushrooms mixed with crumbled tofu and the same spices. It’s surprisingly hearty and satisfying.
- Spicy Twist: Adding a pinch of chili flakes or a dash of hot sauce to the filling spices brings a nice heat that my family loves.
- Cheese-Stuffed Buns: Sometimes, I tuck a small cube of mozzarella inside the meat filling for gooey surprises inside each bun.
- Gluten-Free Option: Using a gluten-free flour blend in the dough works, but the texture changes slightly—worth experimenting if you’re gluten sensitive.
- Herb Variations: Swapping thyme with rosemary or oregano offers a fresh twist depending on what herbs you prefer or have at hand.
How to Make Easy Baked Meat Buns | Soft & Juicy Recipe
Step 1: Make the Dough and Let It Rise
Start by mixing all your dry dough ingredients in a large bowl—flour, yeast, sugar, and salt. Then add the warm water and oil and mix until a soft dough forms. Knead it for about 7 to 8 minutes until it’s smooth and elastic. Trust me, this kneading step is worth the effort—it really helps build the texture that makes the buns so soft.
Once kneaded, place the dough in a lightly greased bowl, cover it with a clean towel or plastic wrap, and let it rise in a warm spot for about an hour or until it’s doubled in size. This rising period is when all the magic happens!
Step 2: Prepare the Juicy Meat Filling
While your dough is rising, heat olive oil in a skillet over medium heat and sauté the chopped onions until they’re translucent and fragrant — about 4 to 5 minutes. Add your crushed garlic and stir for another minute.
Add the ground beef and cook thoroughly, breaking it apart with a wooden spoon until browned. Then stir in the salt, pepper, thyme, cumin, paprika, and tomato paste. Once combined, pour in the broth or water to keep the filling nice and juicy and let it simmer on low heat until just right—about a few minutes. Don’t skip this step; it keeps the meat luscious inside each bun. If you want, toss in pine nuts before letting the mixture cool.
Step 3: Shape the Buns with Love
Punch down the dough, then divide it into 18 equal pieces. Roll each piece into a smooth ball and then flatten it into a circle about 3 to 3.5 inches wide. Spoon about 2 tablespoons of your cooled filling into the center of each round, then gather the edges and pinch tightly to seal. Take your time sealing—I’ve learned that well-sealed buns hold their juicy filling perfectly without leaks.
Roll each sealed bun gently in your hands to shape it back into a smooth ball, seam-side down. Arrange the buns on a parchment-lined baking tray, cover, and let them rest for 20 minutes while you preheat the oven to 350°F (180°C).
Step 4: Brush, Sprinkle, and Bake to Golden Perfection
Before baking, brush each bun with the beaten egg to create that irresistible golden color. Sprinkle sesame seeds on top for extra crunch and visual appeal. Bake in the preheated oven for 18 to 22 minutes or until they turn a lovely golden brown. Keep an eye on them near the end; ovens vary, and you want that perfect crust without drying out the buns.
How to Serve Easy Baked Meat Buns | Soft & Juicy Recipe
Garnishes
Honestly, I usually keep it simple with garnishes—just a little sprinkle of freshly chopped parsley or a drizzle of tangy yogurt sauce complements the spices inside the buns wonderfully. Sometimes I add some pickled vegetables on the side for a bit of brightness and crunch.
Side Dishes
These buns are perfect alongside a fresh green salad or a simple cucumber-tomato salad tossed with lemon and olive oil. When I want a heartier plate, I serve them with roasted veggies or even a bowl of soup—comfort food heaven.
Creative Ways to Present
For parties, I like arranging these Easy Baked Meat Buns | Soft & Juicy Recipe on a large wooden board surrounded by small bowls of dipping sauces—think spicy harissa or garlicky yogurt. It turns them into finger food that’s both pretty and practical. Another favorite is wrapping a few in parchment paper tied with twine for a cute, rustic gift.
Make Ahead and Storage
Storing Leftovers
I usually store leftover buns in an airtight container in the fridge for up to 3 days. Reheating in the oven or toaster oven helps keep the crust crisp and the filling warm without drying it out. If you’re short on time, a quick zap in the microwave works—just cover them with a damp paper towel to retain moisture.
Freezing
One of the best parts about this recipe is how well the buns freeze. I let them cool completely after baking, then freeze in a single layer on a tray before transferring to a ziplock bag. When you want some, just pull them out and thaw overnight in the fridge or reheat directly from frozen—perfect for busy days or unexpected guests!
Reheating
To reheat, I preheat the oven to 325°F (160°C), place the buns on a baking tray, and warm them for about 10-15 minutes. This method keeps them soft inside while crisping up the outside nicely. Avoid microwaving too long or they might get rubbery.
FAQs
-
Can I make the dough without a stand mixer?
Absolutely! You can mix and knead the dough entirely by hand. Just make sure you knead it long enough—about 7 to 8 minutes—to develop that nice elastic texture. Using slightly warm water helps activate the yeast properly.
-
Can I use ground chicken or turkey instead of beef?
Yes, ground chicken or turkey works fine but tends to be leaner, so you might want to add a bit more oil or broth to keep the filling juicy. Adjust seasoning to taste since these meats have a milder flavor.
-
How do I know when the buns are fully baked?
Look for a golden brown exterior and a firm feel when gently pressed. If you’re unsure, you can insert a toothpick near the center—it should come out clean. Avoid opening the oven door too often to keep that lovely rise.
-
Are these buns good for making ahead for parties?
Definitely! You can prepare and bake the buns a day ahead, then reheat them before serving. Or freeze in advance and thaw them out as needed—either way, they’re a crowd-pleaser anytime.
-
Can I substitute pine nuts with something else?
If you don’t have pine nuts, toasted chopped walnuts or slivered almonds can work as a crunchy substitute, though the flavor will be a bit different. Or you can skip nuts altogether if preferred.
Final Thoughts
This Easy Baked Meat Buns | Soft & Juicy Recipe has become a go-to for me whenever I want a comforting, homemade treat without fuss. I love how they bring everyone to the table and disappear quickly—there’s just something so satisfying about biting into that soft bun with its flavorful, juicy filling. Honestly, I can’t recommend this recipe enough; it’s straightforward, flexible, and absolutely delicious. Give it a try next time you crave something warm and hearty—you won’t regret it, I promise!
Oh, if you’re like me and love those soft, fluffy buns packed with juicy, flavorful meat inside, then you’re going to adore this Easy Baked Meat Buns | Soft & Juicy Recipe. It’s one of those recipes that feels like a warm hug on a plate—perfect for family dinners, potlucks, or whenever you want to impress guests without spending all day in the kitchen. The dough comes out incredibly tender, while the meat filling is juicy and richly spiced, making every bite a delight.
I remember the first time I made these buns; the house smelled amazing, and everyone kept grabbing more before dinner even started! What makes this Easy Baked Meat Buns | Soft & Juicy Recipe stand out is how simple it is to pull together with minimal ingredients you probably already have. Plus, the buns freeze beautifully, so you can enjoy them on busy days without any fuss.
Ingredients You’ll Need
Every ingredient here plays a crucial role in making these Easy Baked Meat Buns | Soft & Juicy Recipe a success. The dough ingredients give you that soft, elastic texture you’ll love, and the filling is a perfect balance of savory spices and tender meat. Here are some shopping tips and why each one matters.
- All-purpose flour: This is your base for the dough, and using a good quality, fresh flour helps with softness and rise.
- Instant dry yeast: Quick to activate and easy to use, it ensures your buns get that perfect lift.
- Sugar: Just enough to feed the yeast and add a subtle hint of sweetness to the dough.
- Salt: Essential for flavor balance in both dough and filling.
- Oil: Adds moisture and tenderness to the dough—I’ve found that using neutral oils like canola or vegetable work best.
- Water: Warm, not hot, is key to waking the yeast without killing it during dough prep.
- Ground beef: I prefer 80/20 for juiciness, but leaner beef works if you want a lighter option.
- Onion: Adds sweetness and depth to the filling.
- Olive oil: For sautéing the filling, it brings a lovely richness.
- Garlic: Crushed fresh garlic offers that punch of aroma and flavor you just can’t skip.
- Salt & Black pepper: Basic seasoning to enhance the beef mixture.
- Thyme: Whether fresh or dried, it adds an earthy herbal note that complements the meat beautifully.
- Cumin: Brings a warm, slightly smoky depth—such a great companion to ground beef.
- Paprika: Adds color and a subtle sweet-spicy kick.
- Tomato paste: Concentrated tomato flavor that enriches the filling sauce.
- Broth or water: Helps keep the filling moist and juicy without being watery.
- Pine nuts (optional): Adds a surprising crunch and a touch of buttery flavor—definitely worth trying if you have them!
- Egg (beaten): For that beautiful golden sheen on top of your buns.
- Sesame seeds: Adds texture and a lovely nutty aroma when baked.
Variations
What I love most about the Easy Baked Meat Buns | Soft & Juicy Recipe is how adaptable it is. I often swap in different fillings depending on mood and what’s in the fridge. Feel free to make it your own!
- Vegetarian Variation: I’ve had great success swapping ground beef with sautéed mushrooms mixed with crumbled tofu and the same spices. It’s surprisingly hearty and satisfying.
- Spicy Twist: Adding a pinch of chili flakes or a dash of hot sauce to the filling spices brings a nice heat that my family loves.
- Cheese-Stuffed Buns: Sometimes, I tuck a small cube of mozzarella inside the meat filling for gooey surprises inside each bun.
- Gluten-Free Option: Using a gluten-free flour blend in the dough works, but the texture changes slightly—worth experimenting if you’re gluten sensitive.
- Herb Variations: Swapping thyme with rosemary or oregano offers a fresh twist depending on what herbs you prefer or have at hand.
How to Make Easy Baked Meat Buns | Soft & Juicy Recipe
Step 1: Make the Dough and Let It Rise
Start by mixing all your dry dough ingredients in a large bowl—flour, yeast, sugar, and salt. Then add the warm water and oil and mix until a soft dough forms. Knead it for about 7 to 8 minutes until it’s smooth and elastic. Trust me, this kneading step is worth the effort—it really helps build the texture that makes the buns so soft.
Once kneaded, place the dough in a lightly greased bowl, cover it with a clean towel or plastic wrap, and let it rise in a warm spot for about an hour or until it’s doubled in size. This rising period is when all the magic happens!
Step 2: Prepare the Juicy Meat Filling
While your dough is rising, heat olive oil in a skillet over medium heat and sauté the chopped onions until they’re translucent and fragrant — about 4 to 5 minutes. Add your crushed garlic and stir for another minute.
Add the ground beef and cook thoroughly, breaking it apart with a wooden spoon until browned. Then stir in the salt, pepper, thyme, cumin, paprika, and tomato paste. Once combined, pour in the broth or water to keep the filling nice and juicy and let it simmer on low heat until just right—about a few minutes. Don’t skip this step; it keeps the meat luscious inside each bun. If you want, toss in pine nuts before letting the mixture cool.
Step 3: Shape the Buns with Love
Punch down the dough, then divide it into 18 equal pieces. Roll each piece into a smooth ball and then flatten it into a circle about 3 to 3.5 inches wide. Spoon about 2 tablespoons of your cooled filling into the center of each round, then gather the edges and pinch tightly to seal. Take your time sealing—I’ve learned that well-sealed buns hold their juicy filling perfectly without leaks.
Roll each sealed bun gently in your hands to shape it back into a smooth ball, seam-side down. Arrange the buns on a parchment-lined baking tray, cover, and let them rest for 20 minutes while you preheat the oven to 350°F (180°C).
Step 4: Brush, Sprinkle, and Bake to Golden Perfection
Before baking, brush each bun with the beaten egg to create that irresistible golden color. Sprinkle sesame seeds on top for extra crunch and visual appeal. Bake in the preheated oven for 18 to 22 minutes or until they turn a lovely golden brown. Keep an eye on them near the end; ovens vary, and you want that perfect crust without drying out the buns.
How to Serve Easy Baked Meat Buns | Soft & Juicy Recipe
Garnishes
Honestly, I usually keep it simple with garnishes—just a little sprinkle of freshly chopped parsley or a drizzle of tangy yogurt sauce complements the spices inside the buns wonderfully. Sometimes I add some pickled vegetables on the side for a bit of brightness and crunch.
Side Dishes
These buns are perfect alongside a fresh green salad or a simple cucumber-tomato salad tossed with lemon and olive oil. When I want a heartier plate, I serve them with roasted veggies or even a bowl of soup—comfort food heaven.
Creative Ways to Present
For parties, I like arranging these Easy Baked Meat Buns | Soft & Juicy Recipe on a large wooden board surrounded by small bowls of dipping sauces—think spicy harissa or garlicky yogurt. It turns them into finger food that’s both pretty and practical. Another favorite is wrapping a few in parchment paper tied with twine for a cute, rustic gift.
Make Ahead and Storage
Storing Leftovers
I usually store leftover buns in an airtight container in the fridge for up to 3 days. Reheating in the oven or toaster oven helps keep the crust crisp and the filling warm without drying it out. If you’re short on time, a quick zap in the microwave works—just cover them with a damp paper towel to retain moisture.
Freezing
One of the best parts about this recipe is how well the buns freeze. I let them cool completely after baking, then freeze in a single layer on a tray before transferring to a ziplock bag. When you want some, just pull them out and thaw overnight in the fridge or reheat directly from frozen—perfect for busy days or unexpected guests!
Reheating
To reheat, I preheat the oven to 325°F (160°C), place the buns on a baking tray, and warm them for about 10-15 minutes. This method keeps them soft inside while crisping up the outside nicely. Avoid microwaving too long or they might get rubbery.
FAQs
-
Can I make the dough without a stand mixer?
Absolutely! You can mix and knead the dough entirely by hand. Just make sure you knead it long enough—about 7 to 8 minutes—to develop that nice elastic texture. Using slightly warm water helps activate the yeast properly.
-
Can I use ground chicken or turkey instead of beef?
Yes, ground chicken or turkey works fine but tends to be leaner, so you might want to add a bit more oil or broth to keep the filling juicy. Adjust seasoning to taste since these meats have a milder flavor.
-
How do I know when the buns are fully baked?
Look for a golden brown exterior and a firm feel when gently pressed. If you’re unsure, you can insert a toothpick near the center—it should come out clean. Avoid opening the oven door too often to keep that lovely rise.
-
Are these buns good for making ahead for parties?
Definitely! You can prepare and bake the buns a day ahead, then reheat them before serving. Or freeze in advance and thaw them out as needed—either way, they’re a crowd-pleaser anytime.
-
Can I substitute pine nuts with something else?
If you don’t have pine nuts, toasted chopped walnuts or slivered almonds can work as a crunchy substitute, though the flavor will be a bit different. Or you can skip nuts altogether if preferred.
Final Thoughts
This Easy Baked Meat Buns | Soft & Juicy Recipe has become a go-to for me whenever I want a comforting, homemade treat without fuss. I love how they bring everyone to the table and disappear quickly—there’s just something so satisfying about biting into that soft bun with its flavorful, juicy filling. Honestly, I can’t recommend this recipe enough; it’s straightforward, flexible, and absolutely delicious. Give it a try next time you crave something warm and hearty—you won’t regret it, I promise!
Start by mixing all your dry dough ingredients in a large bowl—flour, yeast, sugar, and salt. Then add the warm water and oil and mix until a soft dough forms. Knead it for about 7 to 8 minutes until it’s smooth and elastic. Trust me, this kneading step is worth the effort—it really helps build the texture that makes the buns so soft.
Once kneaded, place the dough in a lightly greased bowl, cover it with a clean towel or plastic wrap, and let it rise in a warm spot for about an hour or until it’s doubled in size. This rising period is when all the magic happens!
Step 2: Prepare the Juicy Meat Filling
While your dough is rising, heat olive oil in a skillet over medium heat and sauté the chopped onions until they’re translucent and fragrant — about 4 to 5 minutes. Add your crushed garlic and stir for another minute.
Add the ground beef and cook thoroughly, breaking it apart with a wooden spoon until browned. Then stir in the salt, pepper, thyme, cumin, paprika, and tomato paste. Once combined, pour in the broth or water to keep the filling nice and juicy and let it simmer on low heat until just right—about a few minutes. Don’t skip this step; it keeps the meat luscious inside each bun. If you want, toss in pine nuts before letting the mixture cool.
Step 3: Shape the Buns with Love
Punch down the dough, then divide it into 18 equal pieces. Roll each piece into a smooth ball and then flatten it into a circle about 3 to 3.5 inches wide. Spoon about 2 tablespoons of your cooled filling into the center of each round, then gather the edges and pinch tightly to seal. Take your time sealing—I’ve learned that well-sealed buns hold their juicy filling perfectly without leaks.
Roll each sealed bun gently in your hands to shape it back into a smooth ball, seam-side down. Arrange the buns on a parchment-lined baking tray, cover, and let them rest for 20 minutes while you preheat the oven to 350°F (180°C).
Step 4: Brush, Sprinkle, and Bake to Golden Perfection
Before baking, brush each bun with the beaten egg to create that irresistible golden color. Sprinkle sesame seeds on top for extra crunch and visual appeal. Bake in the preheated oven for 18 to 22 minutes or until they turn a lovely golden brown. Keep an eye on them near the end; ovens vary, and you want that perfect crust without drying out the buns.
How to Serve Easy Baked Meat Buns | Soft & Juicy Recipe
Garnishes
Honestly, I usually keep it simple with garnishes—just a little sprinkle of freshly chopped parsley or a drizzle of tangy yogurt sauce complements the spices inside the buns wonderfully. Sometimes I add some pickled vegetables on the side for a bit of brightness and crunch.
Side Dishes
These buns are perfect alongside a fresh green salad or a simple cucumber-tomato salad tossed with lemon and olive oil. When I want a heartier plate, I serve them with roasted veggies or even a bowl of soup—comfort food heaven.
Creative Ways to Present
For parties, I like arranging these Easy Baked Meat Buns | Soft & Juicy Recipe on a large wooden board surrounded by small bowls of dipping sauces—think spicy harissa or garlicky yogurt. It turns them into finger food that’s both pretty and practical. Another favorite is wrapping a few in parchment paper tied with twine for a cute, rustic gift.
Make Ahead and Storage
Storing Leftovers
I usually store leftover buns in an airtight container in the fridge for up to 3 days. Reheating in the oven or toaster oven helps keep the crust crisp and the filling warm without drying it out. If you’re short on time, a quick zap in the microwave works—just cover them with a damp paper towel to retain moisture.
Freezing
One of the best parts about this recipe is how well the buns freeze. I let them cool completely after baking, then freeze in a single layer on a tray before transferring to a ziplock bag. When you want some, just pull them out and thaw overnight in the fridge or reheat directly from frozen—perfect for busy days or unexpected guests!
Reheating
To reheat, I preheat the oven to 325°F (160°C), place the buns on a baking tray, and warm them for about 10-15 minutes. This method keeps them soft inside while crisping up the outside nicely. Avoid microwaving too long or they might get rubbery.
FAQs
-
Can I make the dough without a stand mixer?
Absolutely! You can mix and knead the dough entirely by hand. Just make sure you knead it long enough—about 7 to 8 minutes—to develop that nice elastic texture. Using slightly warm water helps activate the yeast properly.
-
Can I use ground chicken or turkey instead of beef?
Yes, ground chicken or turkey works fine but tends to be leaner, so you might want to add a bit more oil or broth to keep the filling juicy. Adjust seasoning to taste since these meats have a milder flavor.
-
How do I know when the buns are fully baked?
Look for a golden brown exterior and a firm feel when gently pressed. If you’re unsure, you can insert a toothpick near the center—it should come out clean. Avoid opening the oven door too often to keep that lovely rise.
-
Are these buns good for making ahead for parties?
Definitely! You can prepare and bake the buns a day ahead, then reheat them before serving. Or freeze in advance and thaw them out as needed—either way, they’re a crowd-pleaser anytime.
-
Can I substitute pine nuts with something else?
If you don’t have pine nuts, toasted chopped walnuts or slivered almonds can work as a crunchy substitute, though the flavor will be a bit different. Or you can skip nuts altogether if preferred.
Final Thoughts
This Easy Baked Meat Buns | Soft & Juicy Recipe has become a go-to for me whenever I want a comforting, homemade treat without fuss. I love how they bring everyone to the table and disappear quickly—there’s just something so satisfying about biting into that soft bun with its flavorful, juicy filling. Honestly, I can’t recommend this recipe enough; it’s straightforward, flexible, and absolutely delicious. Give it a try next time you crave something warm and hearty—you won’t regret it, I promise!
Oh, if you’re like me and love those soft, fluffy buns packed with juicy, flavorful meat inside, then you’re going to adore this Easy Baked Meat Buns | Soft & Juicy Recipe. It’s one of those recipes that feels like a warm hug on a plate—perfect for family dinners, potlucks, or whenever you want to impress guests without spending all day in the kitchen. The dough comes out incredibly tender, while the meat filling is juicy and richly spiced, making every bite a delight.
I remember the first time I made these buns; the house smelled amazing, and everyone kept grabbing more before dinner even started! What makes this Easy Baked Meat Buns | Soft & Juicy Recipe stand out is how simple it is to pull together with minimal ingredients you probably already have. Plus, the buns freeze beautifully, so you can enjoy them on busy days without any fuss.
Ingredients You’ll Need
Every ingredient here plays a crucial role in making these Easy Baked Meat Buns | Soft & Juicy Recipe a success. The dough ingredients give you that soft, elastic texture you’ll love, and the filling is a perfect balance of savory spices and tender meat. Here are some shopping tips and why each one matters.
- All-purpose flour: This is your base for the dough, and using a good quality, fresh flour helps with softness and rise.
- Instant dry yeast: Quick to activate and easy to use, it ensures your buns get that perfect lift.
- Sugar: Just enough to feed the yeast and add a subtle hint of sweetness to the dough.
- Salt: Essential for flavor balance in both dough and filling.
- Oil: Adds moisture and tenderness to the dough—I’ve found that using neutral oils like canola or vegetable work best.
- Water: Warm, not hot, is key to waking the yeast without killing it during dough prep.
- Ground beef: I prefer 80/20 for juiciness, but leaner beef works if you want a lighter option.
- Onion: Adds sweetness and depth to the filling.
- Olive oil: For sautéing the filling, it brings a lovely richness.
- Garlic: Crushed fresh garlic offers that punch of aroma and flavor you just can’t skip.
- Salt & Black pepper: Basic seasoning to enhance the beef mixture.
- Thyme: Whether fresh or dried, it adds an earthy herbal note that complements the meat beautifully.
- Cumin: Brings a warm, slightly smoky depth—such a great companion to ground beef.
- Paprika: Adds color and a subtle sweet-spicy kick.
- Tomato paste: Concentrated tomato flavor that enriches the filling sauce.
- Broth or water: Helps keep the filling moist and juicy without being watery.
- Pine nuts (optional): Adds a surprising crunch and a touch of buttery flavor—definitely worth trying if you have them!
- Egg (beaten): For that beautiful golden sheen on top of your buns.
- Sesame seeds: Adds texture and a lovely nutty aroma when baked.
Variations
What I love most about the Easy Baked Meat Buns | Soft & Juicy Recipe is how adaptable it is. I often swap in different fillings depending on mood and what’s in the fridge. Feel free to make it your own!
- Vegetarian Variation: I’ve had great success swapping ground beef with sautéed mushrooms mixed with crumbled tofu and the same spices. It’s surprisingly hearty and satisfying.
- Spicy Twist: Adding a pinch of chili flakes or a dash of hot sauce to the filling spices brings a nice heat that my family loves.
- Cheese-Stuffed Buns: Sometimes, I tuck a small cube of mozzarella inside the meat filling for gooey surprises inside each bun.
- Gluten-Free Option: Using a gluten-free flour blend in the dough works, but the texture changes slightly—worth experimenting if you’re gluten sensitive.
- Herb Variations: Swapping thyme with rosemary or oregano offers a fresh twist depending on what herbs you prefer or have at hand.
How to Make Easy Baked Meat Buns | Soft & Juicy Recipe
Step 1: Make the Dough and Let It Rise
Start by mixing all your dry dough ingredients in a large bowl—flour, yeast, sugar, and salt. Then add the warm water and oil and mix until a soft dough forms. Knead it for about 7 to 8 minutes until it’s smooth and elastic. Trust me, this kneading step is worth the effort—it really helps build the texture that makes the buns so soft.
Once kneaded, place the dough in a lightly greased bowl, cover it with a clean towel or plastic wrap, and let it rise in a warm spot for about an hour or until it’s doubled in size. This rising period is when all the magic happens!
Step 2: Prepare the Juicy Meat Filling
While your dough is rising, heat olive oil in a skillet over medium heat and sauté the chopped onions until they’re translucent and fragrant — about 4 to 5 minutes. Add your crushed garlic and stir for another minute.
Add the ground beef and cook thoroughly, breaking it apart with a wooden spoon until browned. Then stir in the salt, pepper, thyme, cumin, paprika, and tomato paste. Once combined, pour in the broth or water to keep the filling nice and juicy and let it simmer on low heat until just right—about a few minutes. Don’t skip this step; it keeps the meat luscious inside each bun. If you want, toss in pine nuts before letting the mixture cool.
Step 3: Shape the Buns with Love
Punch down the dough, then divide it into 18 equal pieces. Roll each piece into a smooth ball and then flatten it into a circle about 3 to 3.5 inches wide. Spoon about 2 tablespoons of your cooled filling into the center of each round, then gather the edges and pinch tightly to seal. Take your time sealing—I’ve learned that well-sealed buns hold their juicy filling perfectly without leaks.
Roll each sealed bun gently in your hands to shape it back into a smooth ball, seam-side down. Arrange the buns on a parchment-lined baking tray, cover, and let them rest for 20 minutes while you preheat the oven to 350°F (180°C).
Step 4: Brush, Sprinkle, and Bake to Golden Perfection
Before baking, brush each bun with the beaten egg to create that irresistible golden color. Sprinkle sesame seeds on top for extra crunch and visual appeal. Bake in the preheated oven for 18 to 22 minutes or until they turn a lovely golden brown. Keep an eye on them near the end; ovens vary, and you want that perfect crust without drying out the buns.
How to Serve Easy Baked Meat Buns | Soft & Juicy Recipe
Garnishes
Honestly, I usually keep it simple with garnishes—just a little sprinkle of freshly chopped parsley or a drizzle of tangy yogurt sauce complements the spices inside the buns wonderfully. Sometimes I add some pickled vegetables on the side for a bit of brightness and crunch.
Side Dishes
These buns are perfect alongside a fresh green salad or a simple cucumber-tomato salad tossed with lemon and olive oil. When I want a heartier plate, I serve them with roasted veggies or even a bowl of soup—comfort food heaven.
Creative Ways to Present
For parties, I like arranging these Easy Baked Meat Buns | Soft & Juicy Recipe on a large wooden board surrounded by small bowls of dipping sauces—think spicy harissa or garlicky yogurt. It turns them into finger food that’s both pretty and practical. Another favorite is wrapping a few in parchment paper tied with twine for a cute, rustic gift.
Make Ahead and Storage
Storing Leftovers
I usually store leftover buns in an airtight container in the fridge for up to 3 days. Reheating in the oven or toaster oven helps keep the crust crisp and the filling warm without drying it out. If you’re short on time, a quick zap in the microwave works—just cover them with a damp paper towel to retain moisture.
Freezing
One of the best parts about this recipe is how well the buns freeze. I let them cool completely after baking, then freeze in a single layer on a tray before transferring to a ziplock bag. When you want some, just pull them out and thaw overnight in the fridge or reheat directly from frozen—perfect for busy days or unexpected guests!
Reheating
To reheat, I preheat the oven to 325°F (160°C), place the buns on a baking tray, and warm them for about 10-15 minutes. This method keeps them soft inside while crisping up the outside nicely. Avoid microwaving too long or they might get rubbery.
FAQs
-
Can I make the dough without a stand mixer?
Absolutely! You can mix and knead the dough entirely by hand. Just make sure you knead it long enough—about 7 to 8 minutes—to develop that nice elastic texture. Using slightly warm water helps activate the yeast properly.
-
Can I use ground chicken or turkey instead of beef?
Yes, ground chicken or turkey works fine but tends to be leaner, so you might want to add a bit more oil or broth to keep the filling juicy. Adjust seasoning to taste since these meats have a milder flavor.
-
How do I know when the buns are fully baked?
Look for a golden brown exterior and a firm feel when gently pressed. If you’re unsure, you can insert a toothpick near the center—it should come out clean. Avoid opening the oven door too often to keep that lovely rise.
-
Are these buns good for making ahead for parties?
Definitely! You can prepare and bake the buns a day ahead, then reheat them before serving. Or freeze in advance and thaw them out as needed—either way, they’re a crowd-pleaser anytime.
-
Can I substitute pine nuts with something else?
If you don’t have pine nuts, toasted chopped walnuts or slivered almonds can work as a crunchy substitute, though the flavor will be a bit different. Or you can skip nuts altogether if preferred.
Final Thoughts
This Easy Baked Meat Buns | Soft & Juicy Recipe has become a go-to for me whenever I want a comforting, homemade treat without fuss. I love how they bring everyone to the table and disappear quickly—there’s just something so satisfying about biting into that soft bun with its flavorful, juicy filling. Honestly, I can’t recommend this recipe enough; it’s straightforward, flexible, and absolutely delicious. Give it a try next time you crave something warm and hearty—you won’t regret it, I promise!
Oh, if you’re like me and love those soft, fluffy buns packed with juicy, flavorful meat inside, then you’re going to adore this Easy Baked Meat Buns | Soft & Juicy Recipe. It’s one of those recipes that feels like a warm hug on a plate—perfect for family dinners, potlucks, or whenever you want to impress guests without spending all day in the kitchen. The dough comes out incredibly tender, while the meat filling is juicy and richly spiced, making every bite a delight.
I remember the first time I made these buns; the house smelled amazing, and everyone kept grabbing more before dinner even started! What makes this Easy Baked Meat Buns | Soft & Juicy Recipe stand out is how simple it is to pull together with minimal ingredients you probably already have. Plus, the buns freeze beautifully, so you can enjoy them on busy days without any fuss.
Ingredients You’ll Need
Every ingredient here plays a crucial role in making these Easy Baked Meat Buns | Soft & Juicy Recipe a success. The dough ingredients give you that soft, elastic texture you’ll love, and the filling is a perfect balance of savory spices and tender meat. Here are some shopping tips and why each one matters.
- All-purpose flour: This is your base for the dough, and using a good quality, fresh flour helps with softness and rise.
- Instant dry yeast: Quick to activate and easy to use, it ensures your buns get that perfect lift.
- Sugar: Just enough to feed the yeast and add a subtle hint of sweetness to the dough.
- Salt: Essential for flavor balance in both dough and filling.
- Oil: Adds moisture and tenderness to the dough—I’ve found that using neutral oils like canola or vegetable work best.
- Water: Warm, not hot, is key to waking the yeast without killing it during dough prep.
- Ground beef: I prefer 80/20 for juiciness, but leaner beef works if you want a lighter option.
- Onion: Adds sweetness and depth to the filling.
- Olive oil: For sautéing the filling, it brings a lovely richness.
- Garlic: Crushed fresh garlic offers that punch of aroma and flavor you just can’t skip.
- Salt & Black pepper: Basic seasoning to enhance the beef mixture.
- Thyme: Whether fresh or dried, it adds an earthy herbal note that complements the meat beautifully.
- Cumin: Brings a warm, slightly smoky depth—such a great companion to ground beef.
- Paprika: Adds color and a subtle sweet-spicy kick.
- Tomato paste: Concentrated tomato flavor that enriches the filling sauce.
- Broth or water: Helps keep the filling moist and juicy without being watery.
- Pine nuts (optional): Adds a surprising crunch and a touch of buttery flavor—definitely worth trying if you have them!
- Egg (beaten): For that beautiful golden sheen on top of your buns.
- Sesame seeds: Adds texture and a lovely nutty aroma when baked.
Variations
What I love most about the Easy Baked Meat Buns | Soft & Juicy Recipe is how adaptable it is. I often swap in different fillings depending on mood and what’s in the fridge. Feel free to make it your own!
- Vegetarian Variation: I’ve had great success swapping ground beef with sautéed mushrooms mixed with crumbled tofu and the same spices. It’s surprisingly hearty and satisfying.
- Spicy Twist: Adding a pinch of chili flakes or a dash of hot sauce to the filling spices brings a nice heat that my family loves.
- Cheese-Stuffed Buns: Sometimes, I tuck a small cube of mozzarella inside the meat filling for gooey surprises inside each bun.
- Gluten-Free Option: Using a gluten-free flour blend in the dough works, but the texture changes slightly—worth experimenting if you’re gluten sensitive.
- Herb Variations: Swapping thyme with rosemary or oregano offers a fresh twist depending on what herbs you prefer or have at hand.
How to Make Easy Baked Meat Buns | Soft & Juicy Recipe
Step 1: Make the Dough and Let It Rise
Start by mixing all your dry dough ingredients in a large bowl—flour, yeast, sugar, and salt. Then add the warm water and oil and mix until a soft dough forms. Knead it for about 7 to 8 minutes until it’s smooth and elastic. Trust me, this kneading step is worth the effort—it really helps build the texture that makes the buns so soft.
Once kneaded, place the dough in a lightly greased bowl, cover it with a clean towel or plastic wrap, and let it rise in a warm spot for about an hour or until it’s doubled in size. This rising period is when all the magic happens!
Step 2: Prepare the Juicy Meat Filling
While your dough is rising, heat olive oil in a skillet over medium heat and sauté the chopped onions until they’re translucent and fragrant — about 4 to 5 minutes. Add your crushed garlic and stir for another minute.
Add the ground beef and cook thoroughly, breaking it apart with a wooden spoon until browned. Then stir in the salt, pepper, thyme, cumin, paprika, and tomato paste. Once combined, pour in the broth or water to keep the filling nice and juicy and let it simmer on low heat until just right—about a few minutes. Don’t skip this step; it keeps the meat luscious inside each bun. If you want, toss in pine nuts before letting the mixture cool.
Step 3: Shape the Buns with Love
Punch down the dough, then divide it into 18 equal pieces. Roll each piece into a smooth ball and then flatten it into a circle about 3 to 3.5 inches wide. Spoon about 2 tablespoons of your cooled filling into the center of each round, then gather the edges and pinch tightly to seal. Take your time sealing—I’ve learned that well-sealed buns hold their juicy filling perfectly without leaks.
Roll each sealed bun gently in your hands to shape it back into a smooth ball, seam-side down. Arrange the buns on a parchment-lined baking tray, cover, and let them rest for 20 minutes while you preheat the oven to 350°F (180°C).
Step 4: Brush, Sprinkle, and Bake to Golden Perfection
Before baking, brush each bun with the beaten egg to create that irresistible golden color. Sprinkle sesame seeds on top for extra crunch and visual appeal. Bake in the preheated oven for 18 to 22 minutes or until they turn a lovely golden brown. Keep an eye on them near the end; ovens vary, and you want that perfect crust without drying out the buns.
How to Serve Easy Baked Meat Buns | Soft & Juicy Recipe
Garnishes
Honestly, I usually keep it simple with garnishes—just a little sprinkle of freshly chopped parsley or a drizzle of tangy yogurt sauce complements the spices inside the buns wonderfully. Sometimes I add some pickled vegetables on the side for a bit of brightness and crunch.
Side Dishes
These buns are perfect alongside a fresh green salad or a simple cucumber-tomato salad tossed with lemon and olive oil. When I want a heartier plate, I serve them with roasted veggies or even a bowl of soup—comfort food heaven.
Creative Ways to Present
For parties, I like arranging these Easy Baked Meat Buns | Soft & Juicy Recipe on a large wooden board surrounded by small bowls of dipping sauces—think spicy harissa or garlicky yogurt. It turns them into finger food that’s both pretty and practical. Another favorite is wrapping a few in parchment paper tied with twine for a cute, rustic gift.
Make Ahead and Storage
Storing Leftovers
I usually store leftover buns in an airtight container in the fridge for up to 3 days. Reheating in the oven or toaster oven helps keep the crust crisp and the filling warm without drying it out. If you’re short on time, a quick zap in the microwave works—just cover them with a damp paper towel to retain moisture.
Freezing
One of the best parts about this recipe is how well the buns freeze. I let them cool completely after baking, then freeze in a single layer on a tray before transferring to a ziplock bag. When you want some, just pull them out and thaw overnight in the fridge or reheat directly from frozen—perfect for busy days or unexpected guests!
Reheating
To reheat, I preheat the oven to 325°F (160°C), place the buns on a baking tray, and warm them for about 10-15 minutes. This method keeps them soft inside while crisping up the outside nicely. Avoid microwaving too long or they might get rubbery.
FAQs
-
Can I make the dough without a stand mixer?
Absolutely! You can mix and knead the dough entirely by hand. Just make sure you knead it long enough—about 7 to 8 minutes—to develop that nice elastic texture. Using slightly warm water helps activate the yeast properly.
-
Can I use ground chicken or turkey instead of beef?
Yes, ground chicken or turkey works fine but tends to be leaner, so you might want to add a bit more oil or broth to keep the filling juicy. Adjust seasoning to taste since these meats have a milder flavor.
-
How do I know when the buns are fully baked?
Look for a golden brown exterior and a firm feel when gently pressed. If you’re unsure, you can insert a toothpick near the center—it should come out clean. Avoid opening the oven door too often to keep that lovely rise.
-
Are these buns good for making ahead for parties?
Definitely! You can prepare and bake the buns a day ahead, then reheat them before serving. Or freeze in advance and thaw them out as needed—either way, they’re a crowd-pleaser anytime.
-
Can I substitute pine nuts with something else?
If you don’t have pine nuts, toasted chopped walnuts or slivered almonds can work as a crunchy substitute, though the flavor will be a bit different. Or you can skip nuts altogether if preferred.
Final Thoughts
This Easy Baked Meat Buns | Soft & Juicy Recipe has become a go-to for me whenever I want a comforting, homemade treat without fuss. I love how they bring everyone to the table and disappear quickly—there’s just something so satisfying about biting into that soft bun with its flavorful, juicy filling. Honestly, I can’t recommend this recipe enough; it’s straightforward, flexible, and absolutely delicious. Give it a try next time you crave something warm and hearty—you won’t regret it, I promise!
Start by mixing all your dry dough ingredients in a large bowl—flour, yeast, sugar, and salt. Then add the warm water and oil and mix until a soft dough forms. Knead it for about 7 to 8 minutes until it’s smooth and elastic. Trust me, this kneading step is worth the effort—it really helps build the texture that makes the buns so soft.
Once kneaded, place the dough in a lightly greased bowl, cover it with a clean towel or plastic wrap, and let it rise in a warm spot for about an hour or until it’s doubled in size. This rising period is when all the magic happens!
Step 2: Prepare the Juicy Meat Filling
While your dough is rising, heat olive oil in a skillet over medium heat and sauté the chopped onions until they’re translucent and fragrant — about 4 to 5 minutes. Add your crushed garlic and stir for another minute.
Add the ground beef and cook thoroughly, breaking it apart with a wooden spoon until browned. Then stir in the salt, pepper, thyme, cumin, paprika, and tomato paste. Once combined, pour in the broth or water to keep the filling nice and juicy and let it simmer on low heat until just right—about a few minutes. Don’t skip this step; it keeps the meat luscious inside each bun. If you want, toss in pine nuts before letting the mixture cool.
Step 3: Shape the Buns with Love
Punch down the dough, then divide it into 18 equal pieces. Roll each piece into a smooth ball and then flatten it into a circle about 3 to 3.5 inches wide. Spoon about 2 tablespoons of your cooled filling into the center of each round, then gather the edges and pinch tightly to seal. Take your time sealing—I’ve learned that well-sealed buns hold their juicy filling perfectly without leaks.
Roll each sealed bun gently in your hands to shape it back into a smooth ball, seam-side down. Arrange the buns on a parchment-lined baking tray, cover, and let them rest for 20 minutes while you preheat the oven to 350°F (180°C).
Step 4: Brush, Sprinkle, and Bake to Golden Perfection
Before baking, brush each bun with the beaten egg to create that irresistible golden color. Sprinkle sesame seeds on top for extra crunch and visual appeal. Bake in the preheated oven for 18 to 22 minutes or until they turn a lovely golden brown. Keep an eye on them near the end; ovens vary, and you want that perfect crust without drying out the buns.
How to Serve Easy Baked Meat Buns | Soft & Juicy Recipe
Garnishes
Honestly, I usually keep it simple with garnishes—just a little sprinkle of freshly chopped parsley or a drizzle of tangy yogurt sauce complements the spices inside the buns wonderfully. Sometimes I add some pickled vegetables on the side for a bit of brightness and crunch.
Side Dishes
These buns are perfect alongside a fresh green salad or a simple cucumber-tomato salad tossed with lemon and olive oil. When I want a heartier plate, I serve them with roasted veggies or even a bowl of soup—comfort food heaven.
Creative Ways to Present
For parties, I like arranging these Easy Baked Meat Buns | Soft & Juicy Recipe on a large wooden board surrounded by small bowls of dipping sauces—think spicy harissa or garlicky yogurt. It turns them into finger food that’s both pretty and practical. Another favorite is wrapping a few in parchment paper tied with twine for a cute, rustic gift.
Make Ahead and Storage
Storing Leftovers
I usually store leftover buns in an airtight container in the fridge for up to 3 days. Reheating in the oven or toaster oven helps keep the crust crisp and the filling warm without drying it out. If you’re short on time, a quick zap in the microwave works—just cover them with a damp paper towel to retain moisture.
Freezing
One of the best parts about this recipe is how well the buns freeze. I let them cool completely after baking, then freeze in a single layer on a tray before transferring to a ziplock bag. When you want some, just pull them out and thaw overnight in the fridge or reheat directly from frozen—perfect for busy days or unexpected guests!
Reheating
To reheat, I preheat the oven to 325°F (160°C), place the buns on a baking tray, and warm them for about 10-15 minutes. This method keeps them soft inside while crisping up the outside nicely. Avoid microwaving too long or they might get rubbery.
FAQs
-
Can I make the dough without a stand mixer?
Absolutely! You can mix and knead the dough entirely by hand. Just make sure you knead it long enough—about 7 to 8 minutes—to develop that nice elastic texture. Using slightly warm water helps activate the yeast properly.
-
Can I use ground chicken or turkey instead of beef?
Yes, ground chicken or turkey works fine but tends to be leaner, so you might want to add a bit more oil or broth to keep the filling juicy. Adjust seasoning to taste since these meats have a milder flavor.
-
How do I know when the buns are fully baked?
Look for a golden brown exterior and a firm feel when gently pressed. If you’re unsure, you can insert a toothpick near the center—it should come out clean. Avoid opening the oven door too often to keep that lovely rise.
-
Are these buns good for making ahead for parties?
Definitely! You can prepare and bake the buns a day ahead, then reheat them before serving. Or freeze in advance and thaw them out as needed—either way, they’re a crowd-pleaser anytime.
-
Can I substitute pine nuts with something else?
If you don’t have pine nuts, toasted chopped walnuts or slivered almonds can work as a crunchy substitute, though the flavor will be a bit different. Or you can skip nuts altogether if preferred.
Final Thoughts
This Easy Baked Meat Buns | Soft & Juicy Recipe has become a go-to for me whenever I want a comforting, homemade treat without fuss. I love how they bring everyone to the table and disappear quickly—there’s just something so satisfying about biting into that soft bun with its flavorful, juicy filling. Honestly, I can’t recommend this recipe enough; it’s straightforward, flexible, and absolutely delicious. Give it a try next time you crave something warm and hearty—you won’t regret it, I promise!
Oh, if you’re like me and love those soft, fluffy buns packed with juicy, flavorful meat inside, then you’re going to adore this Easy Baked Meat Buns | Soft & Juicy Recipe. It’s one of those recipes that feels like a warm hug on a plate—perfect for family dinners, potlucks, or whenever you want to impress guests without spending all day in the kitchen. The dough comes out incredibly tender, while the meat filling is juicy and richly spiced, making every bite a delight.
I remember the first time I made these buns; the house smelled amazing, and everyone kept grabbing more before dinner even started! What makes this Easy Baked Meat Buns | Soft & Juicy Recipe stand out is how simple it is to pull together with minimal ingredients you probably already have. Plus, the buns freeze beautifully, so you can enjoy them on busy days without any fuss.
Ingredients You’ll Need
Every ingredient here plays a crucial role in making these Easy Baked Meat Buns | Soft & Juicy Recipe a success. The dough ingredients give you that soft, elastic texture you’ll love, and the filling is a perfect balance of savory spices and tender meat. Here are some shopping tips and why each one matters.
- All-purpose flour: This is your base for the dough, and using a good quality, fresh flour helps with softness and rise.
- Instant dry yeast: Quick to activate and easy to use, it ensures your buns get that perfect lift.
- Sugar: Just enough to feed the yeast and add a subtle hint of sweetness to the dough.
- Salt: Essential for flavor balance in both dough and filling.
- Oil: Adds moisture and tenderness to the dough—I’ve found that using neutral oils like canola or vegetable work best.
- Water: Warm, not hot, is key to waking the yeast without killing it during dough prep.
- Ground beef: I prefer 80/20 for juiciness, but leaner beef works if you want a lighter option.
- Onion: Adds sweetness and depth to the filling.
- Olive oil: For sautéing the filling, it brings a lovely richness.
- Garlic: Crushed fresh garlic offers that punch of aroma and flavor you just can’t skip.
- Salt & Black pepper: Basic seasoning to enhance the beef mixture.
- Thyme: Whether fresh or dried, it adds an earthy herbal note that complements the meat beautifully.
- Cumin: Brings a warm, slightly smoky depth—such a great companion to ground beef.
- Paprika: Adds color and a subtle sweet-spicy kick.
- Tomato paste: Concentrated tomato flavor that enriches the filling sauce.
- Broth or water: Helps keep the filling moist and juicy without being watery.
- Pine nuts (optional): Adds a surprising crunch and a touch of buttery flavor—definitely worth trying if you have them!
- Egg (beaten): For that beautiful golden sheen on top of your buns.
- Sesame seeds: Adds texture and a lovely nutty aroma when baked.
Variations
What I love most about the Easy Baked Meat Buns | Soft & Juicy Recipe is how adaptable it is. I often swap in different fillings depending on mood and what’s in the fridge. Feel free to make it your own!
- Vegetarian Variation: I’ve had great success swapping ground beef with sautéed mushrooms mixed with crumbled tofu and the same spices. It’s surprisingly hearty and satisfying.
- Spicy Twist: Adding a pinch of chili flakes or a dash of hot sauce to the filling spices brings a nice heat that my family loves.
- Cheese-Stuffed Buns: Sometimes, I tuck a small cube of mozzarella inside the meat filling for gooey surprises inside each bun.
- Gluten-Free Option: Using a gluten-free flour blend in the dough works, but the texture changes slightly—worth experimenting if you’re gluten sensitive.
- Herb Variations: Swapping thyme with rosemary or oregano offers a fresh twist depending on what herbs you prefer or have at hand.
How to Make Easy Baked Meat Buns | Soft & Juicy Recipe
Step 1: Make the Dough and Let It Rise
Start by mixing all your dry dough ingredients in a large bowl—flour, yeast, sugar, and salt. Then add the warm water and oil and mix until a soft dough forms. Knead it for about 7 to 8 minutes until it’s smooth and elastic. Trust me, this kneading step is worth the effort—it really helps build the texture that makes the buns so soft.
Once kneaded, place the dough in a lightly greased bowl, cover it with a clean towel or plastic wrap, and let it rise in a warm spot for about an hour or until it’s doubled in size. This rising period is when all the magic happens!
Step 2: Prepare the Juicy Meat Filling
While your dough is rising, heat olive oil in a skillet over medium heat and sauté the chopped onions until they’re translucent and fragrant — about 4 to 5 minutes. Add your crushed garlic and stir for another minute.
Add the ground beef and cook thoroughly, breaking it apart with a wooden spoon until browned. Then stir in the salt, pepper, thyme, cumin, paprika, and tomato paste. Once combined, pour in the broth or water to keep the filling nice and juicy and let it simmer on low heat until just right—about a few minutes. Don’t skip this step; it keeps the meat luscious inside each bun. If you want, toss in pine nuts before letting the mixture cool.
Step 3: Shape the Buns with Love
Punch down the dough, then divide it into 18 equal pieces. Roll each piece into a smooth ball and then flatten it into a circle about 3 to 3.5 inches wide. Spoon about 2 tablespoons of your cooled filling into the center of each round, then gather the edges and pinch tightly to seal. Take your time sealing—I’ve learned that well-sealed buns hold their juicy filling perfectly without leaks.
Roll each sealed bun gently in your hands to shape it back into a smooth ball, seam-side down. Arrange the buns on a parchment-lined baking tray, cover, and let them rest for 20 minutes while you preheat the oven to 350°F (180°C).
Step 4: Brush, Sprinkle, and Bake to Golden Perfection
Before baking, brush each bun with the beaten egg to create that irresistible golden color. Sprinkle sesame seeds on top for extra crunch and visual appeal. Bake in the preheated oven for 18 to 22 minutes or until they turn a lovely golden brown. Keep an eye on them near the end; ovens vary, and you want that perfect crust without drying out the buns.
How to Serve Easy Baked Meat Buns | Soft & Juicy Recipe
Garnishes
Honestly, I usually keep it simple with garnishes—just a little sprinkle of freshly chopped parsley or a drizzle of tangy yogurt sauce complements the spices inside the buns wonderfully. Sometimes I add some pickled vegetables on the side for a bit of brightness and crunch.
Side Dishes
These buns are perfect alongside a fresh green salad or a simple cucumber-tomato salad tossed with lemon and olive oil. When I want a heartier plate, I serve them with roasted veggies or even a bowl of soup—comfort food heaven.
Creative Ways to Present
For parties, I like arranging these Easy Baked Meat Buns | Soft & Juicy Recipe on a large wooden board surrounded by small bowls of dipping sauces—think spicy harissa or garlicky yogurt. It turns them into finger food that’s both pretty and practical. Another favorite is wrapping a few in parchment paper tied with twine for a cute, rustic gift.
Make Ahead and Storage
Storing Leftovers
I usually store leftover buns in an airtight container in the fridge for up to 3 days. Reheating in the oven or toaster oven helps keep the crust crisp and the filling warm without drying it out. If you’re short on time, a quick zap in the microwave works—just cover them with a damp paper towel to retain moisture.
Freezing
One of the best parts about this recipe is how well the buns freeze. I let them cool completely after baking, then freeze in a single layer on a tray before transferring to a ziplock bag. When you want some, just pull them out and thaw overnight in the fridge or reheat directly from frozen—perfect for busy days or unexpected guests!
Reheating
To reheat, I preheat the oven to 325°F (160°C), place the buns on a baking tray, and warm them for about 10-15 minutes. This method keeps them soft inside while crisping up the outside nicely. Avoid microwaving too long or they might get rubbery.
FAQs
-
Can I make the dough without a stand mixer?
Absolutely! You can mix and knead the dough entirely by hand. Just make sure you knead it long enough—about 7 to 8 minutes—to develop that nice elastic texture. Using slightly warm water helps activate the yeast properly.
-
Can I use ground chicken or turkey instead of beef?
Yes, ground chicken or turkey works fine but tends to be leaner, so you might want to add a bit more oil or broth to keep the filling juicy. Adjust seasoning to taste since these meats have a milder flavor.
-
How do I know when the buns are fully baked?
Look for a golden brown exterior and a firm feel when gently pressed. If you’re unsure, you can insert a toothpick near the center—it should come out clean. Avoid opening the oven door too often to keep that lovely rise.
-
Are these buns good for making ahead for parties?
Definitely! You can prepare and bake the buns a day ahead, then reheat them before serving. Or freeze in advance and thaw them out as needed—either way, they’re a crowd-pleaser anytime.
-
Can I substitute pine nuts with something else?
If you don’t have pine nuts, toasted chopped walnuts or slivered almonds can work as a crunchy substitute, though the flavor will be a bit different. Or you can skip nuts altogether if preferred.
Final Thoughts
This Easy Baked Meat Buns | Soft & Juicy Recipe has become a go-to for me whenever I want a comforting, homemade treat without fuss. I love how they bring everyone to the table and disappear quickly—there’s just something so satisfying about biting into that soft bun with its flavorful, juicy filling. Honestly, I can’t recommend this recipe enough; it’s straightforward, flexible, and absolutely delicious. Give it a try next time you crave something warm and hearty—you won’t regret it, I promise!
Start by mixing all your dry dough ingredients in a large bowl—flour, yeast, sugar, and salt. Then add the warm water and oil and mix until a soft dough forms. Knead it for about 7 to 8 minutes until it’s smooth and elastic. Trust me, this kneading step is worth the effort—it really helps build the texture that makes the buns so soft.
Once kneaded, place the dough in a lightly greased bowl, cover it with a clean towel or plastic wrap, and let it rise in a warm spot for about an hour or until it’s doubled in size. This rising period is when all the magic happens!
Step 2: Prepare the Juicy Meat Filling
While your dough is rising, heat olive oil in a skillet over medium heat and sauté the chopped onions until they’re translucent and fragrant — about 4 to 5 minutes. Add your crushed garlic and stir for another minute.
Add the ground beef and cook thoroughly, breaking it apart with a wooden spoon until browned. Then stir in the salt, pepper, thyme, cumin, paprika, and tomato paste. Once combined, pour in the broth or water to keep the filling nice and juicy and let it simmer on low heat until just right—about a few minutes. Don’t skip this step; it keeps the meat luscious inside each bun. If you want, toss in pine nuts before letting the mixture cool.
Step 3: Shape the Buns with Love
Punch down the dough, then divide it into 18 equal pieces. Roll each piece into a smooth ball and then flatten it into a circle about 3 to 3.5 inches wide. Spoon about 2 tablespoons of your cooled filling into the center of each round, then gather the edges and pinch tightly to seal. Take your time sealing—I’ve learned that well-sealed buns hold their juicy filling perfectly without leaks.
Roll each sealed bun gently in your hands to shape it back into a smooth ball, seam-side down. Arrange the buns on a parchment-lined baking tray, cover, and let them rest for 20 minutes while you preheat the oven to 350°F (180°C).
Step 4: Brush, Sprinkle, and Bake to Golden Perfection
Before baking, brush each bun with the beaten egg to create that irresistible golden color. Sprinkle sesame seeds on top for extra crunch and visual appeal. Bake in the preheated oven for 18 to 22 minutes or until they turn a lovely golden brown. Keep an eye on them near the end; ovens vary, and you want that perfect crust without drying out the buns.
How to Serve Easy Baked Meat Buns | Soft & Juicy Recipe
Garnishes
Honestly, I usually keep it simple with garnishes—just a little sprinkle of freshly chopped parsley or a drizzle of tangy yogurt sauce complements the spices inside the buns wonderfully. Sometimes I add some pickled vegetables on the side for a bit of brightness and crunch.
Side Dishes
These buns are perfect alongside a fresh green salad or a simple cucumber-tomato salad tossed with lemon and olive oil. When I want a heartier plate, I serve them with roasted veggies or even a bowl of soup—comfort food heaven.
Creative Ways to Present
For parties, I like arranging these Easy Baked Meat Buns | Soft & Juicy Recipe on a large wooden board surrounded by small bowls of dipping sauces—think spicy harissa or garlicky yogurt. It turns them into finger food that’s both pretty and practical. Another favorite is wrapping a few in parchment paper tied with twine for a cute, rustic gift.
Make Ahead and Storage
Storing Leftovers
I usually store leftover buns in an airtight container in the fridge for up to 3 days. Reheating in the oven or toaster oven helps keep the crust crisp and the filling warm without drying it out. If you’re short on time, a quick zap in the microwave works—just cover them with a damp paper towel to retain moisture.
Freezing
One of the best parts about this recipe is how well the buns freeze. I let them cool completely after baking, then freeze in a single layer on a tray before transferring to a ziplock bag. When you want some, just pull them out and thaw overnight in the fridge or reheat directly from frozen—perfect for busy days or unexpected guests!
Reheating
To reheat, I preheat the oven to 325°F (160°C), place the buns on a baking tray, and warm them for about 10-15 minutes. This method keeps them soft inside while crisping up the outside nicely. Avoid microwaving too long or they might get rubbery.
FAQs
-
Can I make the dough without a stand mixer?
Absolutely! You can mix and knead the dough entirely by hand. Just make sure you knead it long enough—about 7 to 8 minutes—to develop that nice elastic texture. Using slightly warm water helps activate the yeast properly.
-
Can I use ground chicken or turkey instead of beef?
Yes, ground chicken or turkey works fine but tends to be leaner, so you might want to add a bit more oil or broth to keep the filling juicy. Adjust seasoning to taste since these meats have a milder flavor.
-
How do I know when the buns are fully baked?
Look for a golden brown exterior and a firm feel when gently pressed. If you’re unsure, you can insert a toothpick near the center—it should come out clean. Avoid opening the oven door too often to keep that lovely rise.
-
Are these buns good for making ahead for parties?
Definitely! You can prepare and bake the buns a day ahead, then reheat them before serving. Or freeze in advance and thaw them out as needed—either way, they’re a crowd-pleaser anytime.
-
Can I substitute pine nuts with something else?
If you don’t have pine nuts, toasted chopped walnuts or slivered almonds can work as a crunchy substitute, though the flavor will be a bit different. Or you can skip nuts altogether if preferred.
Final Thoughts
This Easy Baked Meat Buns | Soft & Juicy Recipe has become a go-to for me whenever I want a comforting, homemade treat without fuss. I love how they bring everyone to the table and disappear quickly—there’s just something so satisfying about biting into that soft bun with its flavorful, juicy filling. Honestly, I can’t recommend this recipe enough; it’s straightforward, flexible, and absolutely delicious. Give it a try next time you crave something warm and hearty—you won’t regret it, I promise!
Oh, if you’re like me and love those soft, fluffy buns packed with juicy, flavorful meat inside, then you’re going to adore this Easy Baked Meat Buns | Soft & Juicy Recipe. It’s one of those recipes that feels like a warm hug on a plate—perfect for family dinners, potlucks, or whenever you want to impress guests without spending all day in the kitchen. The dough comes out incredibly tender, while the meat filling is juicy and richly spiced, making every bite a delight.
I remember the first time I made these buns; the house smelled amazing, and everyone kept grabbing more before dinner even started! What makes this Easy Baked Meat Buns | Soft & Juicy Recipe stand out is how simple it is to pull together with minimal ingredients you probably already have. Plus, the buns freeze beautifully, so you can enjoy them on busy days without any fuss.
Ingredients You’ll Need
Every ingredient here plays a crucial role in making these Easy Baked Meat Buns | Soft & Juicy Recipe a success. The dough ingredients give you that soft, elastic texture you’ll love, and the filling is a perfect balance of savory spices and tender meat. Here are some shopping tips and why each one matters.
- All-purpose flour: This is your base for the dough, and using a good quality, fresh flour helps with softness and rise.
- Instant dry yeast: Quick to activate and easy to use, it ensures your buns get that perfect lift.
- Sugar: Just enough to feed the yeast and add a subtle hint of sweetness to the dough.
- Salt: Essential for flavor balance in both dough and filling.
- Oil: Adds moisture and tenderness to the dough—I’ve found that using neutral oils like canola or vegetable work best.
- Water: Warm, not hot, is key to waking the yeast without killing it during dough prep.
- Ground beef: I prefer 80/20 for juiciness, but leaner beef works if you want a lighter option.
- Onion: Adds sweetness and depth to the filling.
- Olive oil: For sautéing the filling, it brings a lovely richness.
- Garlic: Crushed fresh garlic offers that punch of aroma and flavor you just can’t skip.
- Salt & Black pepper: Basic seasoning to enhance the beef mixture.
- Thyme: Whether fresh or dried, it adds an earthy herbal note that complements the meat beautifully.
- Cumin: Brings a warm, slightly smoky depth—such a great companion to ground beef.
- Paprika: Adds color and a subtle sweet-spicy kick.
- Tomato paste: Concentrated tomato flavor that enriches the filling sauce.
- Broth or water: Helps keep the filling moist and juicy without being watery.
- Pine nuts (optional): Adds a surprising crunch and a touch of buttery flavor—definitely worth trying if you have them!
- Egg (beaten): For that beautiful golden sheen on top of your buns.
- Sesame seeds: Adds texture and a lovely nutty aroma when baked.
Variations
What I love most about the Easy Baked Meat Buns | Soft & Juicy Recipe is how adaptable it is. I often swap in different fillings depending on mood and what’s in the fridge. Feel free to make it your own!
- Vegetarian Variation: I’ve had great success swapping ground beef with sautéed mushrooms mixed with crumbled tofu and the same spices. It’s surprisingly hearty and satisfying.
- Spicy Twist: Adding a pinch of chili flakes or a dash of hot sauce to the filling spices brings a nice heat that my family loves.
- Cheese-Stuffed Buns: Sometimes, I tuck a small cube of mozzarella inside the meat filling for gooey surprises inside each bun.
- Gluten-Free Option: Using a gluten-free flour blend in the dough works, but the texture changes slightly—worth experimenting if you’re gluten sensitive.
- Herb Variations: Swapping thyme with rosemary or oregano offers a fresh twist depending on what herbs you prefer or have at hand.
How to Make Easy Baked Meat Buns | Soft & Juicy Recipe
Step 1: Make the Dough and Let It Rise
Start by mixing all your dry dough ingredients in a large bowl—flour, yeast, sugar, and salt. Then add the warm water and oil and mix until a soft dough forms. Knead it for about 7 to 8 minutes until it’s smooth and elastic. Trust me, this kneading step is worth the effort—it really helps build the texture that makes the buns so soft.
Once kneaded, place the dough in a lightly greased bowl, cover it with a clean towel or plastic wrap, and let it rise in a warm spot for about an hour or until it’s doubled in size. This rising period is when all the magic happens!
Step 2: Prepare the Juicy Meat Filling
While your dough is rising, heat olive oil in a skillet over medium heat and sauté the chopped onions until they’re translucent and fragrant — about 4 to 5 minutes. Add your crushed garlic and stir for another minute.
Add the ground beef and cook thoroughly, breaking it apart with a wooden spoon until browned. Then stir in the salt, pepper, thyme, cumin, paprika, and tomato paste. Once combined, pour in the broth or water to keep the filling nice and juicy and let it simmer on low heat until just right—about a few minutes. Don’t skip this step; it keeps the meat luscious inside each bun. If you want, toss in pine nuts before letting the mixture cool.
Step 3: Shape the Buns with Love
Punch down the dough, then divide it into 18 equal pieces. Roll each piece into a smooth ball and then flatten it into a circle about 3 to 3.5 inches wide. Spoon about 2 tablespoons of your cooled filling into the center of each round, then gather the edges and pinch tightly to seal. Take your time sealing—I’ve learned that well-sealed buns hold their juicy filling perfectly without leaks.
Roll each sealed bun gently in your hands to shape it back into a smooth ball, seam-side down. Arrange the buns on a parchment-lined baking tray, cover, and let them rest for 20 minutes while you preheat the oven to 350°F (180°C).
Step 4: Brush, Sprinkle, and Bake to Golden Perfection
Before baking, brush each bun with the beaten egg to create that irresistible golden color. Sprinkle sesame seeds on top for extra crunch and visual appeal. Bake in the preheated oven for 18 to 22 minutes or until they turn a lovely golden brown. Keep an eye on them near the end; ovens vary, and you want that perfect crust without drying out the buns.
How to Serve Easy Baked Meat Buns | Soft & Juicy Recipe
Garnishes
Honestly, I usually keep it simple with garnishes—just a little sprinkle of freshly chopped parsley or a drizzle of tangy yogurt sauce complements the spices inside the buns wonderfully. Sometimes I add some pickled vegetables on the side for a bit of brightness and crunch.
Side Dishes
These buns are perfect alongside a fresh green salad or a simple cucumber-tomato salad tossed with lemon and olive oil. When I want a heartier plate, I serve them with roasted veggies or even a bowl of soup—comfort food heaven.
Creative Ways to Present
For parties, I like arranging these Easy Baked Meat Buns | Soft & Juicy Recipe on a large wooden board surrounded by small bowls of dipping sauces—think spicy harissa or garlicky yogurt. It turns them into finger food that’s both pretty and practical. Another favorite is wrapping a few in parchment paper tied with twine for a cute, rustic gift.
Make Ahead and Storage
Storing Leftovers
I usually store leftover buns in an airtight container in the fridge for up to 3 days. Reheating in the oven or toaster oven helps keep the crust crisp and the filling warm without drying it out. If you’re short on time, a quick zap in the microwave works—just cover them with a damp paper towel to retain moisture.
Freezing
One of the best parts about this recipe is how well the buns freeze. I let them cool completely after baking, then freeze in a single layer on a tray before transferring to a ziplock bag. When you want some, just pull them out and thaw overnight in the fridge or reheat directly from frozen—perfect for busy days or unexpected guests!
Reheating
To reheat, I preheat the oven to 325°F (160°C), place the buns on a baking tray, and warm them for about 10-15 minutes. This method keeps them soft inside while crisping up the outside nicely. Avoid microwaving too long or they might get rubbery.
FAQs
-
Can I make the dough without a stand mixer?
Absolutely! You can mix and knead the dough entirely by hand. Just make sure you knead it long enough—about 7 to 8 minutes—to develop that nice elastic texture. Using slightly warm water helps activate the yeast properly.
-
Can I use ground chicken or turkey instead of beef?
Yes, ground chicken or turkey works fine but tends to be leaner, so you might want to add a bit more oil or broth to keep the filling juicy. Adjust seasoning to taste since these meats have a milder flavor.
-
How do I know when the buns are fully baked?
Look for a golden brown exterior and a firm feel when gently pressed. If you’re unsure, you can insert a toothpick near the center—it should come out clean. Avoid opening the oven door too often to keep that lovely rise.
-
Are these buns good for making ahead for parties?
Definitely! You can prepare and bake the buns a day ahead, then reheat them before serving. Or freeze in advance and thaw them out as needed—either way, they’re a crowd-pleaser anytime.
-
Can I substitute pine nuts with something else?
If you don’t have pine nuts, toasted chopped walnuts or slivered almonds can work as a crunchy substitute, though the flavor will be a bit different. Or you can skip nuts altogether if preferred.
Final Thoughts
This Easy Baked Meat Buns | Soft & Juicy Recipe has become a go-to for me whenever I want a comforting, homemade treat without fuss. I love how they bring everyone to the table and disappear quickly—there’s just something so satisfying about biting into that soft bun with its flavorful, juicy filling. Honestly, I can’t recommend this recipe enough; it’s straightforward, flexible, and absolutely delicious. Give it a try next time you crave something warm and hearty—you won’t regret it, I promise!
Oh, if you’re like me and love those soft, fluffy buns packed with juicy, flavorful meat inside, then you’re going to adore this Easy Baked Meat Buns | Soft & Juicy Recipe. It’s one of those recipes that feels like a warm hug on a plate—perfect for family dinners, potlucks, or whenever you want to impress guests without spending all day in the kitchen. The dough comes out incredibly tender, while the meat filling is juicy and richly spiced, making every bite a delight.
I remember the first time I made these buns; the house smelled amazing, and everyone kept grabbing more before dinner even started! What makes this Easy Baked Meat Buns | Soft & Juicy Recipe stand out is how simple it is to pull together with minimal ingredients you probably already have. Plus, the buns freeze beautifully, so you can enjoy them on busy days without any fuss.
Ingredients You’ll Need
Every ingredient here plays a crucial role in making these Easy Baked Meat Buns | Soft & Juicy Recipe a success. The dough ingredients give you that soft, elastic texture you’ll love, and the filling is a perfect balance of savory spices and tender meat. Here are some shopping tips and why each one matters.
- All-purpose flour: This is your base for the dough, and using a good quality, fresh flour helps with softness and rise.
- Instant dry yeast: Quick to activate and easy to use, it ensures your buns get that perfect lift.
- Sugar: Just enough to feed the yeast and add a subtle hint of sweetness to the dough.
- Salt: Essential for flavor balance in both dough and filling.
- Oil: Adds moisture and tenderness to the dough—I’ve found that using neutral oils like canola or vegetable work best.
- Water: Warm, not hot, is key to waking the yeast without killing it during dough prep.
- Ground beef: I prefer 80/20 for juiciness, but leaner beef works if you want a lighter option.
- Onion: Adds sweetness and depth to the filling.
- Olive oil: For sautéing the filling, it brings a lovely richness.
- Garlic: Crushed fresh garlic offers that punch of aroma and flavor you just can’t skip.
- Salt & Black pepper: Basic seasoning to enhance the beef mixture.
- Thyme: Whether fresh or dried, it adds an earthy herbal note that complements the meat beautifully.
- Cumin: Brings a warm, slightly smoky depth—such a great companion to ground beef.
- Paprika: Adds color and a subtle sweet-spicy kick.
- Tomato paste: Concentrated tomato flavor that enriches the filling sauce.
- Broth or water: Helps keep the filling moist and juicy without being watery.
- Pine nuts (optional): Adds a surprising crunch and a touch of buttery flavor—definitely worth trying if you have them!
- Egg (beaten): For that beautiful golden sheen on top of your buns.
- Sesame seeds: Adds texture and a lovely nutty aroma when baked.
Variations
What I love most about the Easy Baked Meat Buns | Soft & Juicy Recipe is how adaptable it is. I often swap in different fillings depending on mood and what’s in the fridge. Feel free to make it your own!
- Vegetarian Variation: I’ve had great success swapping ground beef with sautéed mushrooms mixed with crumbled tofu and the same spices. It’s surprisingly hearty and satisfying.
- Spicy Twist: Adding a pinch of chili flakes or a dash of hot sauce to the filling spices brings a nice heat that my family loves.
- Cheese-Stuffed Buns: Sometimes, I tuck a small cube of mozzarella inside the meat filling for gooey surprises inside each bun.
- Gluten-Free Option: Using a gluten-free flour blend in the dough works, but the texture changes slightly—worth experimenting if you’re gluten sensitive.
- Herb Variations: Swapping thyme with rosemary or oregano offers a fresh twist depending on what herbs you prefer or have at hand.
How to Make Easy Baked Meat Buns | Soft & Juicy Recipe
Step 1: Make the Dough and Let It Rise
Start by mixing all your dry dough ingredients in a large bowl—flour, yeast, sugar, and salt. Then add the warm water and oil and mix until a soft dough forms. Knead it for about 7 to 8 minutes until it’s smooth and elastic. Trust me, this kneading step is worth the effort—it really helps build the texture that makes the buns so soft.
Once kneaded, place the dough in a lightly greased bowl, cover it with a clean towel or plastic wrap, and let it rise in a warm spot for about an hour or until it’s doubled in size. This rising period is when all the magic happens!
Step 2: Prepare the Juicy Meat Filling
While your dough is rising, heat olive oil in a skillet over medium heat and sauté the chopped onions until they’re translucent and fragrant — about 4 to 5 minutes. Add your crushed garlic and stir for another minute.
Add the ground beef and cook thoroughly, breaking it apart with a wooden spoon until browned. Then stir in the salt, pepper, thyme, cumin, paprika, and tomato paste. Once combined, pour in the broth or water to keep the filling nice and juicy and let it simmer on low heat until just right—about a few minutes. Don’t skip this step; it keeps the meat luscious inside each bun. If you want, toss in pine nuts before letting the mixture cool.
Step 3: Shape the Buns with Love
Punch down the dough, then divide it into 18 equal pieces. Roll each piece into a smooth ball and then flatten it into a circle about 3 to 3.5 inches wide. Spoon about 2 tablespoons of your cooled filling into the center of each round, then gather the edges and pinch tightly to seal. Take your time sealing—I’ve learned that well-sealed buns hold their juicy filling perfectly without leaks.
Roll each sealed bun gently in your hands to shape it back into a smooth ball, seam-side down. Arrange the buns on a parchment-lined baking tray, cover, and let them rest for 20 minutes while you preheat the oven to 350°F (180°C).
Step 4: Brush, Sprinkle, and Bake to Golden Perfection
Before baking, brush each bun with the beaten egg to create that irresistible golden color. Sprinkle sesame seeds on top for extra crunch and visual appeal. Bake in the preheated oven for 18 to 22 minutes or until they turn a lovely golden brown. Keep an eye on them near the end; ovens vary, and you want that perfect crust without drying out the buns.
How to Serve Easy Baked Meat Buns | Soft & Juicy Recipe
Garnishes
Honestly, I usually keep it simple with garnishes—just a little sprinkle of freshly chopped parsley or a drizzle of tangy yogurt sauce complements the spices inside the buns wonderfully. Sometimes I add some pickled vegetables on the side for a bit of brightness and crunch.
Side Dishes
These buns are perfect alongside a fresh green salad or a simple cucumber-tomato salad tossed with lemon and olive oil. When I want a heartier plate, I serve them with roasted veggies or even a bowl of soup—comfort food heaven.
Creative Ways to Present
For parties, I like arranging these Easy Baked Meat Buns | Soft & Juicy Recipe on a large wooden board surrounded by small bowls of dipping sauces—think spicy harissa or garlicky yogurt. It turns them into finger food that’s both pretty and practical. Another favorite is wrapping a few in parchment paper tied with twine for a cute, rustic gift.
Make Ahead and Storage
Storing Leftovers
I usually store leftover buns in an airtight container in the fridge for up to 3 days. Reheating in the oven or toaster oven helps keep the crust crisp and the filling warm without drying it out. If you’re short on time, a quick zap in the microwave works—just cover them with a damp paper towel to retain moisture.
Freezing
One of the best parts about this recipe is how well the buns freeze. I let them cool completely after baking, then freeze in a single layer on a tray before transferring to a ziplock bag. When you want some, just pull them out and thaw overnight in the fridge or reheat directly from frozen—perfect for busy days or unexpected guests!
Reheating
To reheat, I preheat the oven to 325°F (160°C), place the buns on a baking tray, and warm them for about 10-15 minutes. This method keeps them soft inside while crisping up the outside nicely. Avoid microwaving too long or they might get rubbery.
FAQs
-
Can I make the dough without a stand mixer?
Absolutely! You can mix and knead the dough entirely by hand. Just make sure you knead it long enough—about 7 to 8 minutes—to develop that nice elastic texture. Using slightly warm water helps activate the yeast properly.
-
Can I use ground chicken or turkey instead of beef?
Yes, ground chicken or turkey works fine but tends to be leaner, so you might want to add a bit more oil or broth to keep the filling juicy. Adjust seasoning to taste since these meats have a milder flavor.
-
How do I know when the buns are fully baked?
Look for a golden brown exterior and a firm feel when gently pressed. If you’re unsure, you can insert a toothpick near the center—it should come out clean. Avoid opening the oven door too often to keep that lovely rise.
-
Are these buns good for making ahead for parties?
Definitely! You can prepare and bake the buns a day ahead, then reheat them before serving. Or freeze in advance and thaw them out as needed—either way, they’re a crowd-pleaser anytime.
-
Can I substitute pine nuts with something else?
If you don’t have pine nuts, toasted chopped walnuts or slivered almonds can work as a crunchy substitute, though the flavor will be a bit different. Or you can skip nuts altogether if preferred.
Final Thoughts
This Easy Baked Meat Buns | Soft & Juicy Recipe has become a go-to for me whenever I want a comforting, homemade treat without fuss. I love how they bring everyone to the table and disappear quickly—there’s just something so satisfying about biting into that soft bun with its flavorful, juicy filling. Honestly, I can’t recommend this recipe enough; it’s straightforward, flexible, and absolutely delicious. Give it a try next time you crave something warm and hearty—you won’t regret it, I promise!
Oh, if you’re like me and love those soft, fluffy buns packed with juicy, flavorful meat inside, then you’re going to adore this Easy Baked Meat Buns | Soft & Juicy Recipe. It’s one of those recipes that feels like a warm hug on a plate—perfect for family dinners, potlucks, or whenever you want to impress guests without spending all day in the kitchen. The dough comes out incredibly tender, while the meat filling is juicy and richly spiced, making every bite a delight.
I remember the first time I made these buns; the house smelled amazing, and everyone kept grabbing more before dinner even started! What makes this Easy Baked Meat Buns | Soft & Juicy Recipe stand out is how simple it is to pull together with minimal ingredients you probably already have. Plus, the buns freeze beautifully, so you can enjoy them on busy days without any fuss.
Ingredients You’ll Need
Every ingredient here plays a crucial role in making these Easy Baked Meat Buns | Soft & Juicy Recipe a success. The dough ingredients give you that soft, elastic texture you’ll love, and the filling is a perfect balance of savory spices and tender meat. Here are some shopping tips and why each one matters.
- All-purpose flour: This is your base for the dough, and using a good quality, fresh flour helps with softness and rise.
- Instant dry yeast: Quick to activate and easy to use, it ensures your buns get that perfect lift.
- Sugar: Just enough to feed the yeast and add a subtle hint of sweetness to the dough.
- Salt: Essential for flavor balance in both dough and filling.
- Oil: Adds moisture and tenderness to the dough—I’ve found that using neutral oils like canola or vegetable work best.
- Water: Warm, not hot, is key to waking the yeast without killing it during dough prep.
- Ground beef: I prefer 80/20 for juiciness, but leaner beef works if you want a lighter option.
- Onion: Adds sweetness and depth to the filling.
- Olive oil: For sautéing the filling, it brings a lovely richness.
- Garlic: Crushed fresh garlic offers that punch of aroma and flavor you just can’t skip.
- Salt & Black pepper: Basic seasoning to enhance the beef mixture.
- Thyme: Whether fresh or dried, it adds an earthy herbal note that complements the meat beautifully.
- Cumin: Brings a warm, slightly smoky depth—such a great companion to ground beef.
- Paprika: Adds color and a subtle sweet-spicy kick.
- Tomato paste: Concentrated tomato flavor that enriches the filling sauce.
- Broth or water: Helps keep the filling moist and juicy without being watery.
- Pine nuts (optional): Adds a surprising crunch and a touch of buttery flavor—definitely worth trying if you have them!
- Egg (beaten): For that beautiful golden sheen on top of your buns.
- Sesame seeds: Adds texture and a lovely nutty aroma when baked.
Variations
What I love most about the Easy Baked Meat Buns | Soft & Juicy Recipe is how adaptable it is. I often swap in different fillings depending on mood and what’s in the fridge. Feel free to make it your own!
- Vegetarian Variation: I’ve had great success swapping ground beef with sautéed mushrooms mixed with crumbled tofu and the same spices. It’s surprisingly hearty and satisfying.
- Spicy Twist: Adding a pinch of chili flakes or a dash of hot sauce to the filling spices brings a nice heat that my family loves.
- Cheese-Stuffed Buns: Sometimes, I tuck a small cube of mozzarella inside the meat filling for gooey surprises inside each bun.
- Gluten-Free Option: Using a gluten-free flour blend in the dough works, but the texture changes slightly—worth experimenting if you’re gluten sensitive.
- Herb Variations: Swapping thyme with rosemary or oregano offers a fresh twist depending on what herbs you prefer or have at hand.
How to Make Easy Baked Meat Buns | Soft & Juicy Recipe
Step 1: Make the Dough and Let It Rise
Start by mixing all your dry dough ingredients in a large bowl—flour, yeast, sugar, and salt. Then add the warm water and oil and mix until a soft dough forms. Knead it for about 7 to 8 minutes until it’s smooth and elastic. Trust me, this kneading step is worth the effort—it really helps build the texture that makes the buns so soft.
Once kneaded, place the dough in a lightly greased bowl, cover it with a clean towel or plastic wrap, and let it rise in a warm spot for about an hour or until it’s doubled in size. This rising period is when all the magic happens!
Step 2: Prepare the Juicy Meat Filling
While your dough is rising, heat olive oil in a skillet over medium heat and sauté the chopped onions until they’re translucent and fragrant — about 4 to 5 minutes. Add your crushed garlic and stir for another minute.
Add the ground beef and cook thoroughly, breaking it apart with a wooden spoon until browned. Then stir in the salt, pepper, thyme, cumin, paprika, and tomato paste. Once combined, pour in the broth or water to keep the filling nice and juicy and let it simmer on low heat until just right—about a few minutes. Don’t skip this step; it keeps the meat luscious inside each bun. If you want, toss in pine nuts before letting the mixture cool.
Step 3: Shape the Buns with Love
Punch down the dough, then divide it into 18 equal pieces. Roll each piece into a smooth ball and then flatten it into a circle about 3 to 3.5 inches wide. Spoon about 2 tablespoons of your cooled filling into the center of each round, then gather the edges and pinch tightly to seal. Take your time sealing—I’ve learned that well-sealed buns hold their juicy filling perfectly without leaks.
Roll each sealed bun gently in your hands to shape it back into a smooth ball, seam-side down. Arrange the buns on a parchment-lined baking tray, cover, and let them rest for 20 minutes while you preheat the oven to 350°F (180°C).
Step 4: Brush, Sprinkle, and Bake to Golden Perfection
Before baking, brush each bun with the beaten egg to create that irresistible golden color. Sprinkle sesame seeds on top for extra crunch and visual appeal. Bake in the preheated oven for 18 to 22 minutes or until they turn a lovely golden brown. Keep an eye on them near the end; ovens vary, and you want that perfect crust without drying out the buns.
How to Serve Easy Baked Meat Buns | Soft & Juicy Recipe
Garnishes
Honestly, I usually keep it simple with garnishes—just a little sprinkle of freshly chopped parsley or a drizzle of tangy yogurt sauce complements the spices inside the buns wonderfully. Sometimes I add some pickled vegetables on the side for a bit of brightness and crunch.
Side Dishes
These buns are perfect alongside a fresh green salad or a simple cucumber-tomato salad tossed with lemon and olive oil. When I want a heartier plate, I serve them with roasted veggies or even a bowl of soup—comfort food heaven.
Creative Ways to Present
For parties, I like arranging these Easy Baked Meat Buns | Soft & Juicy Recipe on a large wooden board surrounded by small bowls of dipping sauces—think spicy harissa or garlicky yogurt. It turns them into finger food that’s both pretty and practical. Another favorite is wrapping a few in parchment paper tied with twine for a cute, rustic gift.
Make Ahead and Storage
Storing Leftovers
I usually store leftover buns in an airtight container in the fridge for up to 3 days. Reheating in the oven or toaster oven helps keep the crust crisp and the filling warm without drying it out. If you’re short on time, a quick zap in the microwave works—just cover them with a damp paper towel to retain moisture.
Freezing
One of the best parts about this recipe is how well the buns freeze. I let them cool completely after baking, then freeze in a single layer on a tray before transferring to a ziplock bag. When you want some, just pull them out and thaw overnight in the fridge or reheat directly from frozen—perfect for busy days or unexpected guests!
Reheating
To reheat, I preheat the oven to 325°F (160°C), place the buns on a baking tray, and warm them for about 10-15 minutes. This method keeps them soft inside while crisping up the outside nicely. Avoid microwaving too long or they might get rubbery.
FAQs
-
Can I make the dough without a stand mixer?
Absolutely! You can mix and knead the dough entirely by hand. Just make sure you knead it long enough—about 7 to 8 minutes—to develop that nice elastic texture. Using slightly warm water helps activate the yeast properly.
-
Can I use ground chicken or turkey instead of beef?
Yes, ground chicken or turkey works fine but tends to be leaner, so you might want to add a bit more oil or broth to keep the filling juicy. Adjust seasoning to taste since these meats have a milder flavor.
-
How do I know when the buns are fully baked?
Look for a golden brown exterior and a firm feel when gently pressed. If you’re unsure, you can insert a toothpick near the center—it should come out clean. Avoid opening the oven door too often to keep that lovely rise.
-
Are these buns good for making ahead for parties?
Definitely! You can prepare and bake the buns a day ahead, then reheat them before serving. Or freeze in advance and thaw them out as needed—either way, they’re a crowd-pleaser anytime.
-
Can I substitute pine nuts with something else?
If you don’t have pine nuts, toasted chopped walnuts or slivered almonds can work as a crunchy substitute, though the flavor will be a bit different. Or you can skip nuts altogether if preferred.
Final Thoughts
This Easy Baked Meat Buns | Soft & Juicy Recipe has become a go-to for me whenever I want a comforting, homemade treat without fuss. I love how they bring everyone to the table and disappear quickly—there’s just something so satisfying about biting into that soft bun with its flavorful, juicy filling. Honestly, I can’t recommend this recipe enough; it’s straightforward, flexible, and absolutely delicious. Give it a try next time you crave something warm and hearty—you won’t regret it, I promise!
Start by mixing all your dry dough ingredients in a large bowl—flour, yeast, sugar, and salt. Then add the warm water and oil and mix until a soft dough forms. Knead it for about 7 to 8 minutes until it’s smooth and elastic. Trust me, this kneading step is worth the effort—it really helps build the texture that makes the buns so soft.
Once kneaded, place the dough in a lightly greased bowl, cover it with a clean towel or plastic wrap, and let it rise in a warm spot for about an hour or until it’s doubled in size. This rising period is when all the magic happens!
Step 2: Prepare the Juicy Meat Filling
While your dough is rising, heat olive oil in a skillet over medium heat and sauté the chopped onions until they’re translucent and fragrant — about 4 to 5 minutes. Add your crushed garlic and stir for another minute.
Add the ground beef and cook thoroughly, breaking it apart with a wooden spoon until browned. Then stir in the salt, pepper, thyme, cumin, paprika, and tomato paste. Once combined, pour in the broth or water to keep the filling nice and juicy and let it simmer on low heat until just right—about a few minutes. Don’t skip this step; it keeps the meat luscious inside each bun. If you want, toss in pine nuts before letting the mixture cool.
Step 3: Shape the Buns with Love
Punch down the dough, then divide it into 18 equal pieces. Roll each piece into a smooth ball and then flatten it into a circle about 3 to 3.5 inches wide. Spoon about 2 tablespoons of your cooled filling into the center of each round, then gather the edges and pinch tightly to seal. Take your time sealing—I’ve learned that well-sealed buns hold their juicy filling perfectly without leaks.
Roll each sealed bun gently in your hands to shape it back into a smooth ball, seam-side down. Arrange the buns on a parchment-lined baking tray, cover, and let them rest for 20 minutes while you preheat the oven to 350°F (180°C).
Step 4: Brush, Sprinkle, and Bake to Golden Perfection
Before baking, brush each bun with the beaten egg to create that irresistible golden color. Sprinkle sesame seeds on top for extra crunch and visual appeal. Bake in the preheated oven for 18 to 22 minutes or until they turn a lovely golden brown. Keep an eye on them near the end; ovens vary, and you want that perfect crust without drying out the buns.
How to Serve Easy Baked Meat Buns | Soft & Juicy Recipe
Garnishes
Honestly, I usually keep it simple with garnishes—just a little sprinkle of freshly chopped parsley or a drizzle of tangy yogurt sauce complements the spices inside the buns wonderfully. Sometimes I add some pickled vegetables on the side for a bit of brightness and crunch.
Side Dishes
These buns are perfect alongside a fresh green salad or a simple cucumber-tomato salad tossed with lemon and olive oil. When I want a heartier plate, I serve them with roasted veggies or even a bowl of soup—comfort food heaven.
Creative Ways to Present
For parties, I like arranging these Easy Baked Meat Buns | Soft & Juicy Recipe on a large wooden board surrounded by small bowls of dipping sauces—think spicy harissa or garlicky yogurt. It turns them into finger food that’s both pretty and practical. Another favorite is wrapping a few in parchment paper tied with twine for a cute, rustic gift.
Make Ahead and Storage
Storing Leftovers
I usually store leftover buns in an airtight container in the fridge for up to 3 days. Reheating in the oven or toaster oven helps keep the crust crisp and the filling warm without drying it out. If you’re short on time, a quick zap in the microwave works—just cover them with a damp paper towel to retain moisture.
Freezing
One of the best parts about this recipe is how well the buns freeze. I let them cool completely after baking, then freeze in a single layer on a tray before transferring to a ziplock bag. When you want some, just pull them out and thaw overnight in the fridge or reheat directly from frozen—perfect for busy days or unexpected guests!
Reheating
To reheat, I preheat the oven to 325°F (160°C), place the buns on a baking tray, and warm them for about 10-15 minutes. This method keeps them soft inside while crisping up the outside nicely. Avoid microwaving too long or they might get rubbery.
FAQs
-
Can I make the dough without a stand mixer?
Absolutely! You can mix and knead the dough entirely by hand. Just make sure you knead it long enough—about 7 to 8 minutes—to develop that nice elastic texture. Using slightly warm water helps activate the yeast properly.
-
Can I use ground chicken or turkey instead of beef?
Yes, ground chicken or turkey works fine but tends to be leaner, so you might want to add a bit more oil or broth to keep the filling juicy. Adjust seasoning to taste since these meats have a milder flavor.
-
How do I know when the buns are fully baked?
Look for a golden brown exterior and a firm feel when gently pressed. If you’re unsure, you can insert a toothpick near the center—it should come out clean. Avoid opening the oven door too often to keep that lovely rise.
-
Are these buns good for making ahead for parties?
Definitely! You can prepare and bake the buns a day ahead, then reheat them before serving. Or freeze in advance and thaw them out as needed—either way, they’re a crowd-pleaser anytime.
-
Can I substitute pine nuts with something else?
If you don’t have pine nuts, toasted chopped walnuts or slivered almonds can work as a crunchy substitute, though the flavor will be a bit different. Or you can skip nuts altogether if preferred.
Final Thoughts
This Easy Baked Meat Buns | Soft & Juicy Recipe has become a go-to for me whenever I want a comforting, homemade treat without fuss. I love how they bring everyone to the table and disappear quickly—there’s just something so satisfying about biting into that soft bun with its flavorful, juicy filling. Honestly, I can’t recommend this recipe enough; it’s straightforward, flexible, and absolutely delicious. Give it a try next time you crave something warm and hearty—you won’t regret it, I promise!
Oh, if you’re like me and love those soft, fluffy buns packed with juicy, flavorful meat inside, then you’re going to adore this Easy Baked Meat Buns | Soft & Juicy Recipe. It’s one of those recipes that feels like a warm hug on a plate—perfect for family dinners, potlucks, or whenever you want to impress guests without spending all day in the kitchen. The dough comes out incredibly tender, while the meat filling is juicy and richly spiced, making every bite a delight.
I remember the first time I made these buns; the house smelled amazing, and everyone kept grabbing more before dinner even started! What makes this Easy Baked Meat Buns | Soft & Juicy Recipe stand out is how simple it is to pull together with minimal ingredients you probably already have. Plus, the buns freeze beautifully, so you can enjoy them on busy days without any fuss.
Ingredients You’ll Need
Every ingredient here plays a crucial role in making these Easy Baked Meat Buns | Soft & Juicy Recipe a success. The dough ingredients give you that soft, elastic texture you’ll love, and the filling is a perfect balance of savory spices and tender meat. Here are some shopping tips and why each one matters.
- All-purpose flour: This is your base for the dough, and using a good quality, fresh flour helps with softness and rise.
- Instant dry yeast: Quick to activate and easy to use, it ensures your buns get that perfect lift.
- Sugar: Just enough to feed the yeast and add a subtle hint of sweetness to the dough.
- Salt: Essential for flavor balance in both dough and filling.
- Oil: Adds moisture and tenderness to the dough—I’ve found that using neutral oils like canola or vegetable work best.
- Water: Warm, not hot, is key to waking the yeast without killing it during dough prep.
- Ground beef: I prefer 80/20 for juiciness, but leaner beef works if you want a lighter option.
- Onion: Adds sweetness and depth to the filling.
- Olive oil: For sautéing the filling, it brings a lovely richness.
- Garlic: Crushed fresh garlic offers that punch of aroma and flavor you just can’t skip.
- Salt & Black pepper: Basic seasoning to enhance the beef mixture.
- Thyme: Whether fresh or dried, it adds an earthy herbal note that complements the meat beautifully.
- Cumin: Brings a warm, slightly smoky depth—such a great companion to ground beef.
- Paprika: Adds color and a subtle sweet-spicy kick.
- Tomato paste: Concentrated tomato flavor that enriches the filling sauce.
- Broth or water: Helps keep the filling moist and juicy without being watery.
- Pine nuts (optional): Adds a surprising crunch and a touch of buttery flavor—definitely worth trying if you have them!
- Egg (beaten): For that beautiful golden sheen on top of your buns.
- Sesame seeds: Adds texture and a lovely nutty aroma when baked.
Variations
What I love most about the Easy Baked Meat Buns | Soft & Juicy Recipe is how adaptable it is. I often swap in different fillings depending on mood and what’s in the fridge. Feel free to make it your own!
- Vegetarian Variation: I’ve had great success swapping ground beef with sautéed mushrooms mixed with crumbled tofu and the same spices. It’s surprisingly hearty and satisfying.
- Spicy Twist: Adding a pinch of chili flakes or a dash of hot sauce to the filling spices brings a nice heat that my family loves.
- Cheese-Stuffed Buns: Sometimes, I tuck a small cube of mozzarella inside the meat filling for gooey surprises inside each bun.
- Gluten-Free Option: Using a gluten-free flour blend in the dough works, but the texture changes slightly—worth experimenting if you’re gluten sensitive.
- Herb Variations: Swapping thyme with rosemary or oregano offers a fresh twist depending on what herbs you prefer or have at hand.
How to Make Easy Baked Meat Buns | Soft & Juicy Recipe
Step 1: Make the Dough and Let It Rise
Start by mixing all your dry dough ingredients in a large bowl—flour, yeast, sugar, and salt. Then add the warm water and oil and mix until a soft dough forms. Knead it for about 7 to 8 minutes until it’s smooth and elastic. Trust me, this kneading step is worth the effort—it really helps build the texture that makes the buns so soft.
Once kneaded, place the dough in a lightly greased bowl, cover it with a clean towel or plastic wrap, and let it rise in a warm spot for about an hour or until it’s doubled in size. This rising period is when all the magic happens!
Step 2: Prepare the Juicy Meat Filling
While your dough is rising, heat olive oil in a skillet over medium heat and sauté the chopped onions until they’re translucent and fragrant — about 4 to 5 minutes. Add your crushed garlic and stir for another minute.
Add the ground beef and cook thoroughly, breaking it apart with a wooden spoon until browned. Then stir in the salt, pepper, thyme, cumin, paprika, and tomato paste. Once combined, pour in the broth or water to keep the filling nice and juicy and let it simmer on low heat until just right—about a few minutes. Don’t skip this step; it keeps the meat luscious inside each bun. If you want, toss in pine nuts before letting the mixture cool.
Step 3: Shape the Buns with Love
Punch down the dough, then divide it into 18 equal pieces. Roll each piece into a smooth ball and then flatten it into a circle about 3 to 3.5 inches wide. Spoon about 2 tablespoons of your cooled filling into the center of each round, then gather the edges and pinch tightly to seal. Take your time sealing—I’ve learned that well-sealed buns hold their juicy filling perfectly without leaks.
Roll each sealed bun gently in your hands to shape it back into a smooth ball, seam-side down. Arrange the buns on a parchment-lined baking tray, cover, and let them rest for 20 minutes while you preheat the oven to 350°F (180°C).
Step 4: Brush, Sprinkle, and Bake to Golden Perfection
Before baking, brush each bun with the beaten egg to create that irresistible golden color. Sprinkle sesame seeds on top for extra crunch and visual appeal. Bake in the preheated oven for 18 to 22 minutes or until they turn a lovely golden brown. Keep an eye on them near the end; ovens vary, and you want that perfect crust without drying out the buns.
How to Serve Easy Baked Meat Buns | Soft & Juicy Recipe
Garnishes
Honestly, I usually keep it simple with garnishes—just a little sprinkle of freshly chopped parsley or a drizzle of tangy yogurt sauce complements the spices inside the buns wonderfully. Sometimes I add some pickled vegetables on the side for a bit of brightness and crunch.
Side Dishes
These buns are perfect alongside a fresh green salad or a simple cucumber-tomato salad tossed with lemon and olive oil. When I want a heartier plate, I serve them with roasted veggies or even a bowl of soup—comfort food heaven.
Creative Ways to Present
For parties, I like arranging these Easy Baked Meat Buns | Soft & Juicy Recipe on a large wooden board surrounded by small bowls of dipping sauces—think spicy harissa or garlicky yogurt. It turns them into finger food that’s both pretty and practical. Another favorite is wrapping a few in parchment paper tied with twine for a cute, rustic gift.
Make Ahead and Storage
Storing Leftovers
I usually store leftover buns in an airtight container in the fridge for up to 3 days. Reheating in the oven or toaster oven helps keep the crust crisp and the filling warm without drying it out. If you’re short on time, a quick zap in the microwave works—just cover them with a damp paper towel to retain moisture.
Freezing
One of the best parts about this recipe is how well the buns freeze. I let them cool completely after baking, then freeze in a single layer on a tray before transferring to a ziplock bag. When you want some, just pull them out and thaw overnight in the fridge or reheat directly from frozen—perfect for busy days or unexpected guests!
Reheating
To reheat, I preheat the oven to 325°F (160°C), place the buns on a baking tray, and warm them for about 10-15 minutes. This method keeps them soft inside while crisping up the outside nicely. Avoid microwaving too long or they might get rubbery.
FAQs
-
Can I make the dough without a stand mixer?
Absolutely! You can mix and knead the dough entirely by hand. Just make sure you knead it long enough—about 7 to 8 minutes—to develop that nice elastic texture. Using slightly warm water helps activate the yeast properly.
-
Can I use ground chicken or turkey instead of beef?
Yes, ground chicken or turkey works fine but tends to be leaner, so you might want to add a bit more oil or broth to keep the filling juicy. Adjust seasoning to taste since these meats have a milder flavor.
-
How do I know when the buns are fully baked?
Look for a golden brown exterior and a firm feel when gently pressed. If you’re unsure, you can insert a toothpick near the center—it should come out clean. Avoid opening the oven door too often to keep that lovely rise.
-
Are these buns good for making ahead for parties?
Definitely! You can prepare and bake the buns a day ahead, then reheat them before serving. Or freeze in advance and thaw them out as needed—either way, they’re a crowd-pleaser anytime.
-
Can I substitute pine nuts with something else?
If you don’t have pine nuts, toasted chopped walnuts or slivered almonds can work as a crunchy substitute, though the flavor will be a bit different. Or you can skip nuts altogether if preferred.
Final Thoughts
This Easy Baked Meat Buns | Soft & Juicy Recipe has become a go-to for me whenever I want a comforting, homemade treat without fuss. I love how they bring everyone to the table and disappear quickly—there’s just something so satisfying about biting into that soft bun with its flavorful, juicy filling. Honestly, I can’t recommend this recipe enough; it’s straightforward, flexible, and absolutely delicious. Give it a try next time you crave something warm and hearty—you won’t regret it, I promise!
Oh, if you’re like me and love those soft, fluffy buns packed with juicy, flavorful meat inside, then you’re going to adore this Easy Baked Meat Buns | Soft & Juicy Recipe. It’s one of those recipes that feels like a warm hug on a plate—perfect for family dinners, potlucks, or whenever you want to impress guests without spending all day in the kitchen. The dough comes out incredibly tender, while the meat filling is juicy and richly spiced, making every bite a delight.
I remember the first time I made these buns; the house smelled amazing, and everyone kept grabbing more before dinner even started! What makes this Easy Baked Meat Buns | Soft & Juicy Recipe stand out is how simple it is to pull together with minimal ingredients you probably already have. Plus, the buns freeze beautifully, so you can enjoy them on busy days without any fuss.
Ingredients You’ll Need
Every ingredient here plays a crucial role in making these Easy Baked Meat Buns | Soft & Juicy Recipe a success. The dough ingredients give you that soft, elastic texture you’ll love, and the filling is a perfect balance of savory spices and tender meat. Here are some shopping tips and why each one matters.
- All-purpose flour: This is your base for the dough, and using a good quality, fresh flour helps with softness and rise.
- Instant dry yeast: Quick to activate and easy to use, it ensures your buns get that perfect lift.
- Sugar: Just enough to feed the yeast and add a subtle hint of sweetness to the dough.
- Salt: Essential for flavor balance in both dough and filling.
- Oil: Adds moisture and tenderness to the dough—I’ve found that using neutral oils like canola or vegetable work best.
- Water: Warm, not hot, is key to waking the yeast without killing it during dough prep.
- Ground beef: I prefer 80/20 for juiciness, but leaner beef works if you want a lighter option.
- Onion: Adds sweetness and depth to the filling.
- Olive oil: For sautéing the filling, it brings a lovely richness.
- Garlic: Crushed fresh garlic offers that punch of aroma and flavor you just can’t skip.
- Salt & Black pepper: Basic seasoning to enhance the beef mixture.
- Thyme: Whether fresh or dried, it adds an earthy herbal note that complements the meat beautifully.
- Cumin: Brings a warm, slightly smoky depth—such a great companion to ground beef.
- Paprika: Adds color and a subtle sweet-spicy kick.
- Tomato paste: Concentrated tomato flavor that enriches the filling sauce.
- Broth or water: Helps keep the filling moist and juicy without being watery.
- Pine nuts (optional): Adds a surprising crunch and a touch of buttery flavor—definitely worth trying if you have them!
- Egg (beaten): For that beautiful golden sheen on top of your buns.
- Sesame seeds: Adds texture and a lovely nutty aroma when baked.
Variations
What I love most about the Easy Baked Meat Buns | Soft & Juicy Recipe is how adaptable it is. I often swap in different fillings depending on mood and what’s in the fridge. Feel free to make it your own!
- Vegetarian Variation: I’ve had great success swapping ground beef with sautéed mushrooms mixed with crumbled tofu and the same spices. It’s surprisingly hearty and satisfying.
- Spicy Twist: Adding a pinch of chili flakes or a dash of hot sauce to the filling spices brings a nice heat that my family loves.
- Cheese-Stuffed Buns: Sometimes, I tuck a small cube of mozzarella inside the meat filling for gooey surprises inside each bun.
- Gluten-Free Option: Using a gluten-free flour blend in the dough works, but the texture changes slightly—worth experimenting if you’re gluten sensitive.
- Herb Variations: Swapping thyme with rosemary or oregano offers a fresh twist depending on what herbs you prefer or have at hand.
How to Make Easy Baked Meat Buns | Soft & Juicy Recipe
Step 1: Make the Dough and Let It Rise
Start by mixing all your dry dough ingredients in a large bowl—flour, yeast, sugar, and salt. Then add the warm water and oil and mix until a soft dough forms. Knead it for about 7 to 8 minutes until it’s smooth and elastic. Trust me, this kneading step is worth the effort—it really helps build the texture that makes the buns so soft.
Once kneaded, place the dough in a lightly greased bowl, cover it with a clean towel or plastic wrap, and let it rise in a warm spot for about an hour or until it’s doubled in size. This rising period is when all the magic happens!
Step 2: Prepare the Juicy Meat Filling
While your dough is rising, heat olive oil in a skillet over medium heat and sauté the chopped onions until they’re translucent and fragrant — about 4 to 5 minutes. Add your crushed garlic and stir for another minute.
Add the ground beef and cook thoroughly, breaking it apart with a wooden spoon until browned. Then stir in the salt, pepper, thyme, cumin, paprika, and tomato paste. Once combined, pour in the broth or water to keep the filling nice and juicy and let it simmer on low heat until just right—about a few minutes. Don’t skip this step; it keeps the meat luscious inside each bun. If you want, toss in pine nuts before letting the mixture cool.
Step 3: Shape the Buns with Love
Punch down the dough, then divide it into 18 equal pieces. Roll each piece into a smooth ball and then flatten it into a circle about 3 to 3.5 inches wide. Spoon about 2 tablespoons of your cooled filling into the center of each round, then gather the edges and pinch tightly to seal. Take your time sealing—I’ve learned that well-sealed buns hold their juicy filling perfectly without leaks.
Roll each sealed bun gently in your hands to shape it back into a smooth ball, seam-side down. Arrange the buns on a parchment-lined baking tray, cover, and let them rest for 20 minutes while you preheat the oven to 350°F (180°C).
Step 4: Brush, Sprinkle, and Bake to Golden Perfection
Before baking, brush each bun with the beaten egg to create that irresistible golden color. Sprinkle sesame seeds on top for extra crunch and visual appeal. Bake in the preheated oven for 18 to 22 minutes or until they turn a lovely golden brown. Keep an eye on them near the end; ovens vary, and you want that perfect crust without drying out the buns.
How to Serve Easy Baked Meat Buns | Soft & Juicy Recipe
Garnishes
Honestly, I usually keep it simple with garnishes—just a little sprinkle of freshly chopped parsley or a drizzle of tangy yogurt sauce complements the spices inside the buns wonderfully. Sometimes I add some pickled vegetables on the side for a bit of brightness and crunch.
Side Dishes
These buns are perfect alongside a fresh green salad or a simple cucumber-tomato salad tossed with lemon and olive oil. When I want a heartier plate, I serve them with roasted veggies or even a bowl of soup—comfort food heaven.
Creative Ways to Present
For parties, I like arranging these Easy Baked Meat Buns | Soft & Juicy Recipe on a large wooden board surrounded by small bowls of dipping sauces—think spicy harissa or garlicky yogurt. It turns them into finger food that’s both pretty and practical. Another favorite is wrapping a few in parchment paper tied with twine for a cute, rustic gift.
Make Ahead and Storage
Storing Leftovers
I usually store leftover buns in an airtight container in the fridge for up to 3 days. Reheating in the oven or toaster oven helps keep the crust crisp and the filling warm without drying it out. If you’re short on time, a quick zap in the microwave works—just cover them with a damp paper towel to retain moisture.
Freezing
One of the best parts about this recipe is how well the buns freeze. I let them cool completely after baking, then freeze in a single layer on a tray before transferring to a ziplock bag. When you want some, just pull them out and thaw overnight in the fridge or reheat directly from frozen—perfect for busy days or unexpected guests!
Reheating
To reheat, I preheat the oven to 325°F (160°C), place the buns on a baking tray, and warm them for about 10-15 minutes. This method keeps them soft inside while crisping up the outside nicely. Avoid microwaving too long or they might get rubbery.
FAQs
-
Can I make the dough without a stand mixer?
Absolutely! You can mix and knead the dough entirely by hand. Just make sure you knead it long enough—about 7 to 8 minutes—to develop that nice elastic texture. Using slightly warm water helps activate the yeast properly.
-
Can I use ground chicken or turkey instead of beef?
Yes, ground chicken or turkey works fine but tends to be leaner, so you might want to add a bit more oil or broth to keep the filling juicy. Adjust seasoning to taste since these meats have a milder flavor.
-
How do I know when the buns are fully baked?
Look for a golden brown exterior and a firm feel when gently pressed. If you’re unsure, you can insert a toothpick near the center—it should come out clean. Avoid opening the oven door too often to keep that lovely rise.
-
Are these buns good for making ahead for parties?
Definitely! You can prepare and bake the buns a day ahead, then reheat them before serving. Or freeze in advance and thaw them out as needed—either way, they’re a crowd-pleaser anytime.
-
Can I substitute pine nuts with something else?
If you don’t have pine nuts, toasted chopped walnuts or slivered almonds can work as a crunchy substitute, though the flavor will be a bit different. Or you can skip nuts altogether if preferred.
Final Thoughts
This Easy Baked Meat Buns | Soft & Juicy Recipe has become a go-to for me whenever I want a comforting, homemade treat without fuss. I love how they bring everyone to the table and disappear quickly—there’s just something so satisfying about biting into that soft bun with its flavorful, juicy filling. Honestly, I can’t recommend this recipe enough; it’s straightforward, flexible, and absolutely delicious. Give it a try next time you crave something warm and hearty—you won’t regret it, I promise!
Oh, if you’re like me and love those soft, fluffy buns packed with juicy, flavorful meat inside, then you’re going to adore this Easy Baked Meat Buns | Soft & Juicy Recipe. It’s one of those recipes that feels like a warm hug on a plate—perfect for family dinners, potlucks, or whenever you want to impress guests without spending all day in the kitchen. The dough comes out incredibly tender, while the meat filling is juicy and richly spiced, making every bite a delight.
I remember the first time I made these buns; the house smelled amazing, and everyone kept grabbing more before dinner even started! What makes this Easy Baked Meat Buns | Soft & Juicy Recipe stand out is how simple it is to pull together with minimal ingredients you probably already have. Plus, the buns freeze beautifully, so you can enjoy them on busy days without any fuss.
Ingredients You’ll Need
Every ingredient here plays a crucial role in making these Easy Baked Meat Buns | Soft & Juicy Recipe a success. The dough ingredients give you that soft, elastic texture you’ll love, and the filling is a perfect balance of savory spices and tender meat. Here are some shopping tips and why each one matters.
- All-purpose flour: This is your base for the dough, and using a good quality, fresh flour helps with softness and rise.
- Instant dry yeast: Quick to activate and easy to use, it ensures your buns get that perfect lift.
- Sugar: Just enough to feed the yeast and add a subtle hint of sweetness to the dough.
- Salt: Essential for flavor balance in both dough and filling.
- Oil: Adds moisture and tenderness to the dough—I’ve found that using neutral oils like canola or vegetable work best.
- Water: Warm, not hot, is key to waking the yeast without killing it during dough prep.
- Ground beef: I prefer 80/20 for juiciness, but leaner beef works if you want a lighter option.
- Onion: Adds sweetness and depth to the filling.
- Olive oil: For sautéing the filling, it brings a lovely richness.
- Garlic: Crushed fresh garlic offers that punch of aroma and flavor you just can’t skip.
- Salt & Black pepper: Basic seasoning to enhance the beef mixture.
- Thyme: Whether fresh or dried, it adds an earthy herbal note that complements the meat beautifully.
- Cumin: Brings a warm, slightly smoky depth—such a great companion to ground beef.
- Paprika: Adds color and a subtle sweet-spicy kick.
- Tomato paste: Concentrated tomato flavor that enriches the filling sauce.
- Broth or water: Helps keep the filling moist and juicy without being watery.
- Pine nuts (optional): Adds a surprising crunch and a touch of buttery flavor—definitely worth trying if you have them!
- Egg (beaten): For that beautiful golden sheen on top of your buns.
- Sesame seeds: Adds texture and a lovely nutty aroma when baked.
Variations
What I love most about the Easy Baked Meat Buns | Soft & Juicy Recipe is how adaptable it is. I often swap in different fillings depending on mood and what’s in the fridge. Feel free to make it your own!
- Vegetarian Variation: I’ve had great success swapping ground beef with sautéed mushrooms mixed with crumbled tofu and the same spices. It’s surprisingly hearty and satisfying.
- Spicy Twist: Adding a pinch of chili flakes or a dash of hot sauce to the filling spices brings a nice heat that my family loves.
- Cheese-Stuffed Buns: Sometimes, I tuck a small cube of mozzarella inside the meat filling for gooey surprises inside each bun.
- Gluten-Free Option: Using a gluten-free flour blend in the dough works, but the texture changes slightly—worth experimenting if you’re gluten sensitive.
- Herb Variations: Swapping thyme with rosemary or oregano offers a fresh twist depending on what herbs you prefer or have at hand.
How to Make Easy Baked Meat Buns | Soft & Juicy Recipe
Step 1: Make the Dough and Let It Rise
Start by mixing all your dry dough ingredients in a large bowl—flour, yeast, sugar, and salt. Then add the warm water and oil and mix until a soft dough forms. Knead it for about 7 to 8 minutes until it’s smooth and elastic. Trust me, this kneading step is worth the effort—it really helps build the texture that makes the buns so soft.
Once kneaded, place the dough in a lightly greased bowl, cover it with a clean towel or plastic wrap, and let it rise in a warm spot for about an hour or until it’s doubled in size. This rising period is when all the magic happens!
Step 2: Prepare the Juicy Meat Filling
While your dough is rising, heat olive oil in a skillet over medium heat and sauté the chopped onions until they’re translucent and fragrant — about 4 to 5 minutes. Add your crushed garlic and stir for another minute.
Add the ground beef and cook thoroughly, breaking it apart with a wooden spoon until browned. Then stir in the salt, pepper, thyme, cumin, paprika, and tomato paste. Once combined, pour in the broth or water to keep the filling nice and juicy and let it simmer on low heat until just right—about a few minutes. Don’t skip this step; it keeps the meat luscious inside each bun. If you want, toss in pine nuts before letting the mixture cool.
Step 3: Shape the Buns with Love
Punch down the dough, then divide it into 18 equal pieces. Roll each piece into a smooth ball and then flatten it into a circle about 3 to 3.5 inches wide. Spoon about 2 tablespoons of your cooled filling into the center of each round, then gather the edges and pinch tightly to seal. Take your time sealing—I’ve learned that well-sealed buns hold their juicy filling perfectly without leaks.
Roll each sealed bun gently in your hands to shape it back into a smooth ball, seam-side down. Arrange the buns on a parchment-lined baking tray, cover, and let them rest for 20 minutes while you preheat the oven to 350°F (180°C).
Step 4: Brush, Sprinkle, and Bake to Golden Perfection
Before baking, brush each bun with the beaten egg to create that irresistible golden color. Sprinkle sesame seeds on top for extra crunch and visual appeal. Bake in the preheated oven for 18 to 22 minutes or until they turn a lovely golden brown. Keep an eye on them near the end; ovens vary, and you want that perfect crust without drying out the buns.
How to Serve Easy Baked Meat Buns | Soft & Juicy Recipe
Garnishes
Honestly, I usually keep it simple with garnishes—just a little sprinkle of freshly chopped parsley or a drizzle of tangy yogurt sauce complements the spices inside the buns wonderfully. Sometimes I add some pickled vegetables on the side for a bit of brightness and crunch.
Side Dishes
These buns are perfect alongside a fresh green salad or a simple cucumber-tomato salad tossed with lemon and olive oil. When I want a heartier plate, I serve them with roasted veggies or even a bowl of soup—comfort food heaven.
Creative Ways to Present
For parties, I like arranging these Easy Baked Meat Buns | Soft & Juicy Recipe on a large wooden board surrounded by small bowls of dipping sauces—think spicy harissa or garlicky yogurt. It turns them into finger food that’s both pretty and practical. Another favorite is wrapping a few in parchment paper tied with twine for a cute, rustic gift.
Make Ahead and Storage
Storing Leftovers
I usually store leftover buns in an airtight container in the fridge for up to 3 days. Reheating in the oven or toaster oven helps keep the crust crisp and the filling warm without drying it out. If you’re short on time, a quick zap in the microwave works—just cover them with a damp paper towel to retain moisture.
Freezing
One of the best parts about this recipe is how well the buns freeze. I let them cool completely after baking, then freeze in a single layer on a tray before transferring to a ziplock bag. When you want some, just pull them out and thaw overnight in the fridge or reheat directly from frozen—perfect for busy days or unexpected guests!
Reheating
To reheat, I preheat the oven to 325°F (160°C), place the buns on a baking tray, and warm them for about 10-15 minutes. This method keeps them soft inside while crisping up the outside nicely. Avoid microwaving too long or they might get rubbery.
FAQs
-
Can I make the dough without a stand mixer?
Absolutely! You can mix and knead the dough entirely by hand. Just make sure you knead it long enough—about 7 to 8 minutes—to develop that nice elastic texture. Using slightly warm water helps activate the yeast properly.
-
Can I use ground chicken or turkey instead of beef?
Yes, ground chicken or turkey works fine but tends to be leaner, so you might want to add a bit more oil or broth to keep the filling juicy. Adjust seasoning to taste since these meats have a milder flavor.
-
How do I know when the buns are fully baked?
Look for a golden brown exterior and a firm feel when gently pressed. If you’re unsure, you can insert a toothpick near the center—it should come out clean. Avoid opening the oven door too often to keep that lovely rise.
-
Are these buns good for making ahead for parties?
Definitely! You can prepare and bake the buns a day ahead, then reheat them before serving. Or freeze in advance and thaw them out as needed—either way, they’re a crowd-pleaser anytime.
-
Can I substitute pine nuts with something else?
If you don’t have pine nuts, toasted chopped walnuts or slivered almonds can work as a crunchy substitute, though the flavor will be a bit different. Or you can skip nuts altogether if preferred.
Final Thoughts
This Easy Baked Meat Buns | Soft & Juicy Recipe has become a go-to for me whenever I want a comforting, homemade treat without fuss. I love how they bring everyone to the table and disappear quickly—there’s just something so satisfying about biting into that soft bun with its flavorful, juicy filling. Honestly, I can’t recommend this recipe enough; it’s straightforward, flexible, and absolutely delicious. Give it a try next time you crave something warm and hearty—you won’t regret it, I promise!
Oh, if you’re like me and love those soft, fluffy buns packed with juicy, flavorful meat inside, then you’re going to adore this Easy Baked Meat Buns | Soft & Juicy Recipe. It’s one of those recipes that feels like a warm hug on a plate—perfect for family dinners, potlucks, or whenever you want to impress guests without spending all day in the kitchen. The dough comes out incredibly tender, while the meat filling is juicy and richly spiced, making every bite a delight.
I remember the first time I made these buns; the house smelled amazing, and everyone kept grabbing more before dinner even started! What makes this Easy Baked Meat Buns | Soft & Juicy Recipe stand out is how simple it is to pull together with minimal ingredients you probably already have. Plus, the buns freeze beautifully, so you can enjoy them on busy days without any fuss.
Ingredients You’ll Need
Every ingredient here plays a crucial role in making these Easy Baked Meat Buns | Soft & Juicy Recipe a success. The dough ingredients give you that soft, elastic texture you’ll love, and the filling is a perfect balance of savory spices and tender meat. Here are some shopping tips and why each one matters.
- All-purpose flour: This is your base for the dough, and using a good quality, fresh flour helps with softness and rise.
- Instant dry yeast: Quick to activate and easy to use, it ensures your buns get that perfect lift.
- Sugar: Just enough to feed the yeast and add a subtle hint of sweetness to the dough.
- Salt: Essential for flavor balance in both dough and filling.
- Oil: Adds moisture and tenderness to the dough—I’ve found that using neutral oils like canola or vegetable work best.
- Water: Warm, not hot, is key to waking the yeast without killing it during dough prep.
- Ground beef: I prefer 80/20 for juiciness, but leaner beef works if you want a lighter option.
- Onion: Adds sweetness and depth to the filling.
- Olive oil: For sautéing the filling, it brings a lovely richness.
- Garlic: Crushed fresh garlic offers that punch of aroma and flavor you just can’t skip.
- Salt & Black pepper: Basic seasoning to enhance the beef mixture.
- Thyme: Whether fresh or dried, it adds an earthy herbal note that complements the meat beautifully.
- Cumin: Brings a warm, slightly smoky depth—such a great companion to ground beef.
- Paprika: Adds color and a subtle sweet-spicy kick.
- Tomato paste: Concentrated tomato flavor that enriches the filling sauce.
- Broth or water: Helps keep the filling moist and juicy without being watery.
- Pine nuts (optional): Adds a surprising crunch and a touch of buttery flavor—definitely worth trying if you have them!
- Egg (beaten): For that beautiful golden sheen on top of your buns.
- Sesame seeds: Adds texture and a lovely nutty aroma when baked.
Variations
What I love most about the Easy Baked Meat Buns | Soft & Juicy Recipe is how adaptable it is. I often swap in different fillings depending on mood and what’s in the fridge. Feel free to make it your own!
- Vegetarian Variation: I’ve had great success swapping ground beef with sautéed mushrooms mixed with crumbled tofu and the same spices. It’s surprisingly hearty and satisfying.
- Spicy Twist: Adding a pinch of chili flakes or a dash of hot sauce to the filling spices brings a nice heat that my family loves.
- Cheese-Stuffed Buns: Sometimes, I tuck a small cube of mozzarella inside the meat filling for gooey surprises inside each bun.
- Gluten-Free Option: Using a gluten-free flour blend in the dough works, but the texture changes slightly—worth experimenting if you’re gluten sensitive.
- Herb Variations: Swapping thyme with rosemary or oregano offers a fresh twist depending on what herbs you prefer or have at hand.
How to Make Easy Baked Meat Buns | Soft & Juicy Recipe
Step 1: Make the Dough and Let It Rise
Start by mixing all your dry dough ingredients in a large bowl—flour, yeast, sugar, and salt. Then add the warm water and oil and mix until a soft dough forms. Knead it for about 7 to 8 minutes until it’s smooth and elastic. Trust me, this kneading step is worth the effort—it really helps build the texture that makes the buns so soft.
Once kneaded, place the dough in a lightly greased bowl, cover it with a clean towel or plastic wrap, and let it rise in a warm spot for about an hour or until it’s doubled in size. This rising period is when all the magic happens!
Step 2: Prepare the Juicy Meat Filling
While your dough is rising, heat olive oil in a skillet over medium heat and sauté the chopped onions until they’re translucent and fragrant — about 4 to 5 minutes. Add your crushed garlic and stir for another minute.
Add the ground beef and cook thoroughly, breaking it apart with a wooden spoon until browned. Then stir in the salt, pepper, thyme, cumin, paprika, and tomato paste. Once combined, pour in the broth or water to keep the filling nice and juicy and let it simmer on low heat until just right—about a few minutes. Don’t skip this step; it keeps the meat luscious inside each bun. If you want, toss in pine nuts before letting the mixture cool.
Step 3: Shape the Buns with Love
Punch down the dough, then divide it into 18 equal pieces. Roll each piece into a smooth ball and then flatten it into a circle about 3 to 3.5 inches wide. Spoon about 2 tablespoons of your cooled filling into the center of each round, then gather the edges and pinch tightly to seal. Take your time sealing—I’ve learned that well-sealed buns hold their juicy filling perfectly without leaks.
Roll each sealed bun gently in your hands to shape it back into a smooth ball, seam-side down. Arrange the buns on a parchment-lined baking tray, cover, and let them rest for 20 minutes while you preheat the oven to 350°F (180°C).
Step 4: Brush, Sprinkle, and Bake to Golden Perfection
Before baking, brush each bun with the beaten egg to create that irresistible golden color. Sprinkle sesame seeds on top for extra crunch and visual appeal. Bake in the preheated oven for 18 to 22 minutes or until they turn a lovely golden brown. Keep an eye on them near the end; ovens vary, and you want that perfect crust without drying out the buns.
How to Serve Easy Baked Meat Buns | Soft & Juicy Recipe
Garnishes
Honestly, I usually keep it simple with garnishes—just a little sprinkle of freshly chopped parsley or a drizzle of tangy yogurt sauce complements the spices inside the buns wonderfully. Sometimes I add some pickled vegetables on the side for a bit of brightness and crunch.
Side Dishes
These buns are perfect alongside a fresh green salad or a simple cucumber-tomato salad tossed with lemon and olive oil. When I want a heartier plate, I serve them with roasted veggies or even a bowl of soup—comfort food heaven.
Creative Ways to Present
For parties, I like arranging these Easy Baked Meat Buns | Soft & Juicy Recipe on a large wooden board surrounded by small bowls of dipping sauces—think spicy harissa or garlicky yogurt. It turns them into finger food that’s both pretty and practical. Another favorite is wrapping a few in parchment paper tied with twine for a cute, rustic gift.
Make Ahead and Storage
Storing Leftovers
I usually store leftover buns in an airtight container in the fridge for up to 3 days. Reheating in the oven or toaster oven helps keep the crust crisp and the filling warm without drying it out. If you’re short on time, a quick zap in the microwave works—just cover them with a damp paper towel to retain moisture.
Freezing
One of the best parts about this recipe is how well the buns freeze. I let them cool completely after baking, then freeze in a single layer on a tray before transferring to a ziplock bag. When you want some, just pull them out and thaw overnight in the fridge or reheat directly from frozen—perfect for busy days or unexpected guests!
Reheating
To reheat, I preheat the oven to 325°F (160°C), place the buns on a baking tray, and warm them for about 10-15 minutes. This method keeps them soft inside while crisping up the outside nicely. Avoid microwaving too long or they might get rubbery.
FAQs
-
Can I make the dough without a stand mixer?
Absolutely! You can mix and knead the dough entirely by hand. Just make sure you knead it long enough—about 7 to 8 minutes—to develop that nice elastic texture. Using slightly warm water helps activate the yeast properly.
-
Can I use ground chicken or turkey instead of beef?
Yes, ground chicken or turkey works fine but tends to be leaner, so you might want to add a bit more oil or broth to keep the filling juicy. Adjust seasoning to taste since these meats have a milder flavor.
-
How do I know when the buns are fully baked?
Look for a golden brown exterior and a firm feel when gently pressed. If you’re unsure, you can insert a toothpick near the center—it should come out clean. Avoid opening the oven door too often to keep that lovely rise.
-
Are these buns good for making ahead for parties?
Definitely! You can prepare and bake the buns a day ahead, then reheat them before serving. Or freeze in advance and thaw them out as needed—either way, they’re a crowd-pleaser anytime.
-
Can I substitute pine nuts with something else?
If you don’t have pine nuts, toasted chopped walnuts or slivered almonds can work as a crunchy substitute, though the flavor will be a bit different. Or you can skip nuts altogether if preferred.
Final Thoughts
This Easy Baked Meat Buns | Soft & Juicy Recipe has become a go-to for me whenever I want a comforting, homemade treat without fuss. I love how they bring everyone to the table and disappear quickly—there’s just something so satisfying about biting into that soft bun with its flavorful, juicy filling. Honestly, I can’t recommend this recipe enough; it’s straightforward, flexible, and absolutely delicious. Give it a try next time you crave something warm and hearty—you won’t regret it, I promise!
Start by mixing all your dry dough ingredients in a large bowl—flour, yeast, sugar, and salt. Then add the warm water and oil and mix until a soft dough forms. Knead it for about 7 to 8 minutes until it’s smooth and elastic. Trust me, this kneading step is worth the effort—it really helps build the texture that makes the buns so soft.
Once kneaded, place the dough in a lightly greased bowl, cover it with a clean towel or plastic wrap, and let it rise in a warm spot for about an hour or until it’s doubled in size. This rising period is when all the magic happens!
Step 2: Prepare the Juicy Meat Filling
While your dough is rising, heat olive oil in a skillet over medium heat and sauté the chopped onions until they’re translucent and fragrant — about 4 to 5 minutes. Add your crushed garlic and stir for another minute.
Add the ground beef and cook thoroughly, breaking it apart with a wooden spoon until browned. Then stir in the salt, pepper, thyme, cumin, paprika, and tomato paste. Once combined, pour in the broth or water to keep the filling nice and juicy and let it simmer on low heat until just right—about a few minutes. Don’t skip this step; it keeps the meat luscious inside each bun. If you want, toss in pine nuts before letting the mixture cool.
Step 3: Shape the Buns with Love
Punch down the dough, then divide it into 18 equal pieces. Roll each piece into a smooth ball and then flatten it into a circle about 3 to 3.5 inches wide. Spoon about 2 tablespoons of your cooled filling into the center of each round, then gather the edges and pinch tightly to seal. Take your time sealing—I’ve learned that well-sealed buns hold their juicy filling perfectly without leaks.
Roll each sealed bun gently in your hands to shape it back into a smooth ball, seam-side down. Arrange the buns on a parchment-lined baking tray, cover, and let them rest for 20 minutes while you preheat the oven to 350°F (180°C).
Step 4: Brush, Sprinkle, and Bake to Golden Perfection
Before baking, brush each bun with the beaten egg to create that irresistible golden color. Sprinkle sesame seeds on top for extra crunch and visual appeal. Bake in the preheated oven for 18 to 22 minutes or until they turn a lovely golden brown. Keep an eye on them near the end; ovens vary, and you want that perfect crust without drying out the buns.
How to Serve Easy Baked Meat Buns | Soft & Juicy Recipe
Garnishes
Honestly, I usually keep it simple with garnishes—just a little sprinkle of freshly chopped parsley or a drizzle of tangy yogurt sauce complements the spices inside the buns wonderfully. Sometimes I add some pickled vegetables on the side for a bit of brightness and crunch.
Side Dishes
These buns are perfect alongside a fresh green salad or a simple cucumber-tomato salad tossed with lemon and olive oil. When I want a heartier plate, I serve them with roasted veggies or even a bowl of soup—comfort food heaven.
Creative Ways to Present
For parties, I like arranging these Easy Baked Meat Buns | Soft & Juicy Recipe on a large wooden board surrounded by small bowls of dipping sauces—think spicy harissa or garlicky yogurt. It turns them into finger food that’s both pretty and practical. Another favorite is wrapping a few in parchment paper tied with twine for a cute, rustic gift.
Make Ahead and Storage
Storing Leftovers
I usually store leftover buns in an airtight container in the fridge for up to 3 days. Reheating in the oven or toaster oven helps keep the crust crisp and the filling warm without drying it out. If you’re short on time, a quick zap in the microwave works—just cover them with a damp paper towel to retain moisture.
Freezing
One of the best parts about this recipe is how well the buns freeze. I let them cool completely after baking, then freeze in a single layer on a tray before transferring to a ziplock bag. When you want some, just pull them out and thaw overnight in the fridge or reheat directly from frozen—perfect for busy days or unexpected guests!
Reheating
To reheat, I preheat the oven to 325°F (160°C), place the buns on a baking tray, and warm them for about 10-15 minutes. This method keeps them soft inside while crisping up the outside nicely. Avoid microwaving too long or they might get rubbery.
FAQs
-
Can I make the dough without a stand mixer?
Absolutely! You can mix and knead the dough entirely by hand. Just make sure you knead it long enough—about 7 to 8 minutes—to develop that nice elastic texture. Using slightly warm water helps activate the yeast properly.
-
Can I use ground chicken or turkey instead of beef?
Yes, ground chicken or turkey works fine but tends to be leaner, so you might want to add a bit more oil or broth to keep the filling juicy. Adjust seasoning to taste since these meats have a milder flavor.
-
How do I know when the buns are fully baked?
Look for a golden brown exterior and a firm feel when gently pressed. If you’re unsure, you can insert a toothpick near the center—it should come out clean. Avoid opening the oven door too often to keep that lovely rise.
-
Are these buns good for making ahead for parties?
Definitely! You can prepare and bake the buns a day ahead, then reheat them before serving. Or freeze in advance and thaw them out as needed—either way, they’re a crowd-pleaser anytime.
-
Can I substitute pine nuts with something else?
If you don’t have pine nuts, toasted chopped walnuts or slivered almonds can work as a crunchy substitute, though the flavor will be a bit different. Or you can skip nuts altogether if preferred.
Final Thoughts
This Easy Baked Meat Buns | Soft & Juicy Recipe has become a go-to for me whenever I want a comforting, homemade treat without fuss. I love how they bring everyone to the table and disappear quickly—there’s just something so satisfying about biting into that soft bun with its flavorful, juicy filling. Honestly, I can’t recommend this recipe enough; it’s straightforward, flexible, and absolutely delicious. Give it a try next time you crave something warm and hearty—you won’t regret it, I promise!
Oh, if you’re like me and love those soft, fluffy buns packed with juicy, flavorful meat inside, then you’re going to adore this Easy Baked Meat Buns | Soft & Juicy Recipe. It’s one of those recipes that feels like a warm hug on a plate—perfect for family dinners, potlucks, or whenever you want to impress guests without spending all day in the kitchen. The dough comes out incredibly tender, while the meat filling is juicy and richly spiced, making every bite a delight.
I remember the first time I made these buns; the house smelled amazing, and everyone kept grabbing more before dinner even started! What makes this Easy Baked Meat Buns | Soft & Juicy Recipe stand out is how simple it is to pull together with minimal ingredients you probably already have. Plus, the buns freeze beautifully, so you can enjoy them on busy days without any fuss.
Ingredients You’ll Need
Every ingredient here plays a crucial role in making these Easy Baked Meat Buns | Soft & Juicy Recipe a success. The dough ingredients give you that soft, elastic texture you’ll love, and the filling is a perfect balance of savory spices and tender meat. Here are some shopping tips and why each one matters.
- All-purpose flour: This is your base for the dough, and using a good quality, fresh flour helps with softness and rise.
- Instant dry yeast: Quick to activate and easy to use, it ensures your buns get that perfect lift.
- Sugar: Just enough to feed the yeast and add a subtle hint of sweetness to the dough.
- Salt: Essential for flavor balance in both dough and filling.
- Oil: Adds moisture and tenderness to the dough—I’ve found that using neutral oils like canola or vegetable work best.
- Water: Warm, not hot, is key to waking the yeast without killing it during dough prep.
- Ground beef: I prefer 80/20 for juiciness, but leaner beef works if you want a lighter option.
- Onion: Adds sweetness and depth to the filling.
- Olive oil: For sautéing the filling, it brings a lovely richness.
- Garlic: Crushed fresh garlic offers that punch of aroma and flavor you just can’t skip.
- Salt & Black pepper: Basic seasoning to enhance the beef mixture.
- Thyme: Whether fresh or dried, it adds an earthy herbal note that complements the meat beautifully.
- Cumin: Brings a warm, slightly smoky depth—such a great companion to ground beef.
- Paprika: Adds color and a subtle sweet-spicy kick.
- Tomato paste: Concentrated tomato flavor that enriches the filling sauce.
- Broth or water: Helps keep the filling moist and juicy without being watery.
- Pine nuts (optional): Adds a surprising crunch and a touch of buttery flavor—definitely worth trying if you have them!
- Egg (beaten): For that beautiful golden sheen on top of your buns.
- Sesame seeds: Adds texture and a lovely nutty aroma when baked.
Variations
What I love most about the Easy Baked Meat Buns | Soft & Juicy Recipe is how adaptable it is. I often swap in different fillings depending on mood and what’s in the fridge. Feel free to make it your own!
- Vegetarian Variation: I’ve had great success swapping ground beef with sautéed mushrooms mixed with crumbled tofu and the same spices. It’s surprisingly hearty and satisfying.
- Spicy Twist: Adding a pinch of chili flakes or a dash of hot sauce to the filling spices brings a nice heat that my family loves.
- Cheese-Stuffed Buns: Sometimes, I tuck a small cube of mozzarella inside the meat filling for gooey surprises inside each bun.
- Gluten-Free Option: Using a gluten-free flour blend in the dough works, but the texture changes slightly—worth experimenting if you’re gluten sensitive.
- Herb Variations: Swapping thyme with rosemary or oregano offers a fresh twist depending on what herbs you prefer or have at hand.
How to Make Easy Baked Meat Buns | Soft & Juicy Recipe
Step 1: Make the Dough and Let It Rise
Start by mixing all your dry dough ingredients in a large bowl—flour, yeast, sugar, and salt. Then add the warm water and oil and mix until a soft dough forms. Knead it for about 7 to 8 minutes until it’s smooth and elastic. Trust me, this kneading step is worth the effort—it really helps build the texture that makes the buns so soft.
Once kneaded, place the dough in a lightly greased bowl, cover it with a clean towel or plastic wrap, and let it rise in a warm spot for about an hour or until it’s doubled in size. This rising period is when all the magic happens!
Step 2: Prepare the Juicy Meat Filling
While your dough is rising, heat olive oil in a skillet over medium heat and sauté the chopped onions until they’re translucent and fragrant — about 4 to 5 minutes. Add your crushed garlic and stir for another minute.
Add the ground beef and cook thoroughly, breaking it apart with a wooden spoon until browned. Then stir in the salt, pepper, thyme, cumin, paprika, and tomato paste. Once combined, pour in the broth or water to keep the filling nice and juicy and let it simmer on low heat until just right—about a few minutes. Don’t skip this step; it keeps the meat luscious inside each bun. If you want, toss in pine nuts before letting the mixture cool.
Step 3: Shape the Buns with Love
Punch down the dough, then divide it into 18 equal pieces. Roll each piece into a smooth ball and then flatten it into a circle about 3 to 3.5 inches wide. Spoon about 2 tablespoons of your cooled filling into the center of each round, then gather the edges and pinch tightly to seal. Take your time sealing—I’ve learned that well-sealed buns hold their juicy filling perfectly without leaks.
Roll each sealed bun gently in your hands to shape it back into a smooth ball, seam-side down. Arrange the buns on a parchment-lined baking tray, cover, and let them rest for 20 minutes while you preheat the oven to 350°F (180°C).
Step 4: Brush, Sprinkle, and Bake to Golden Perfection
Before baking, brush each bun with the beaten egg to create that irresistible golden color. Sprinkle sesame seeds on top for extra crunch and visual appeal. Bake in the preheated oven for 18 to 22 minutes or until they turn a lovely golden brown. Keep an eye on them near the end; ovens vary, and you want that perfect crust without drying out the buns.
How to Serve Easy Baked Meat Buns | Soft & Juicy Recipe
Garnishes
Honestly, I usually keep it simple with garnishes—just a little sprinkle of freshly chopped parsley or a drizzle of tangy yogurt sauce complements the spices inside the buns wonderfully. Sometimes I add some pickled vegetables on the side for a bit of brightness and crunch.
Side Dishes
These buns are perfect alongside a fresh green salad or a simple cucumber-tomato salad tossed with lemon and olive oil. When I want a heartier plate, I serve them with roasted veggies or even a bowl of soup—comfort food heaven.
Creative Ways to Present
For parties, I like arranging these Easy Baked Meat Buns | Soft & Juicy Recipe on a large wooden board surrounded by small bowls of dipping sauces—think spicy harissa or garlicky yogurt. It turns them into finger food that’s both pretty and practical. Another favorite is wrapping a few in parchment paper tied with twine for a cute, rustic gift.
Make Ahead and Storage
Storing Leftovers
I usually store leftover buns in an airtight container in the fridge for up to 3 days. Reheating in the oven or toaster oven helps keep the crust crisp and the filling warm without drying it out. If you’re short on time, a quick zap in the microwave works—just cover them with a damp paper towel to retain moisture.
Freezing
One of the best parts about this recipe is how well the buns freeze. I let them cool completely after baking, then freeze in a single layer on a tray before transferring to a ziplock bag. When you want some, just pull them out and thaw overnight in the fridge or reheat directly from frozen—perfect for busy days or unexpected guests!
Reheating
To reheat, I preheat the oven to 325°F (160°C), place the buns on a baking tray, and warm them for about 10-15 minutes. This method keeps them soft inside while crisping up the outside nicely. Avoid microwaving too long or they might get rubbery.
FAQs
-
Can I make the dough without a stand mixer?
Absolutely! You can mix and knead the dough entirely by hand. Just make sure you knead it long enough—about 7 to 8 minutes—to develop that nice elastic texture. Using slightly warm water helps activate the yeast properly.
-
Can I use ground chicken or turkey instead of beef?
Yes, ground chicken or turkey works fine but tends to be leaner, so you might want to add a bit more oil or broth to keep the filling juicy. Adjust seasoning to taste since these meats have a milder flavor.
-
How do I know when the buns are fully baked?
Look for a golden brown exterior and a firm feel when gently pressed. If you’re unsure, you can insert a toothpick near the center—it should come out clean. Avoid opening the oven door too often to keep that lovely rise.
-
Are these buns good for making ahead for parties?
Definitely! You can prepare and bake the buns a day ahead, then reheat them before serving. Or freeze in advance and thaw them out as needed—either way, they’re a crowd-pleaser anytime.
-
Can I substitute pine nuts with something else?
If you don’t have pine nuts, toasted chopped walnuts or slivered almonds can work as a crunchy substitute, though the flavor will be a bit different. Or you can skip nuts altogether if preferred.
Final Thoughts
This Easy Baked Meat Buns | Soft & Juicy Recipe has become a go-to for me whenever I want a comforting, homemade treat without fuss. I love how they bring everyone to the table and disappear quickly—there’s just something so satisfying about biting into that soft bun with its flavorful, juicy filling. Honestly, I can’t recommend this recipe enough; it’s straightforward, flexible, and absolutely delicious. Give it a try next time you crave something warm and hearty—you won’t regret it, I promise!