Deliciously Flaky Cheese Danish Recipe for Perfect Mornings Recipe
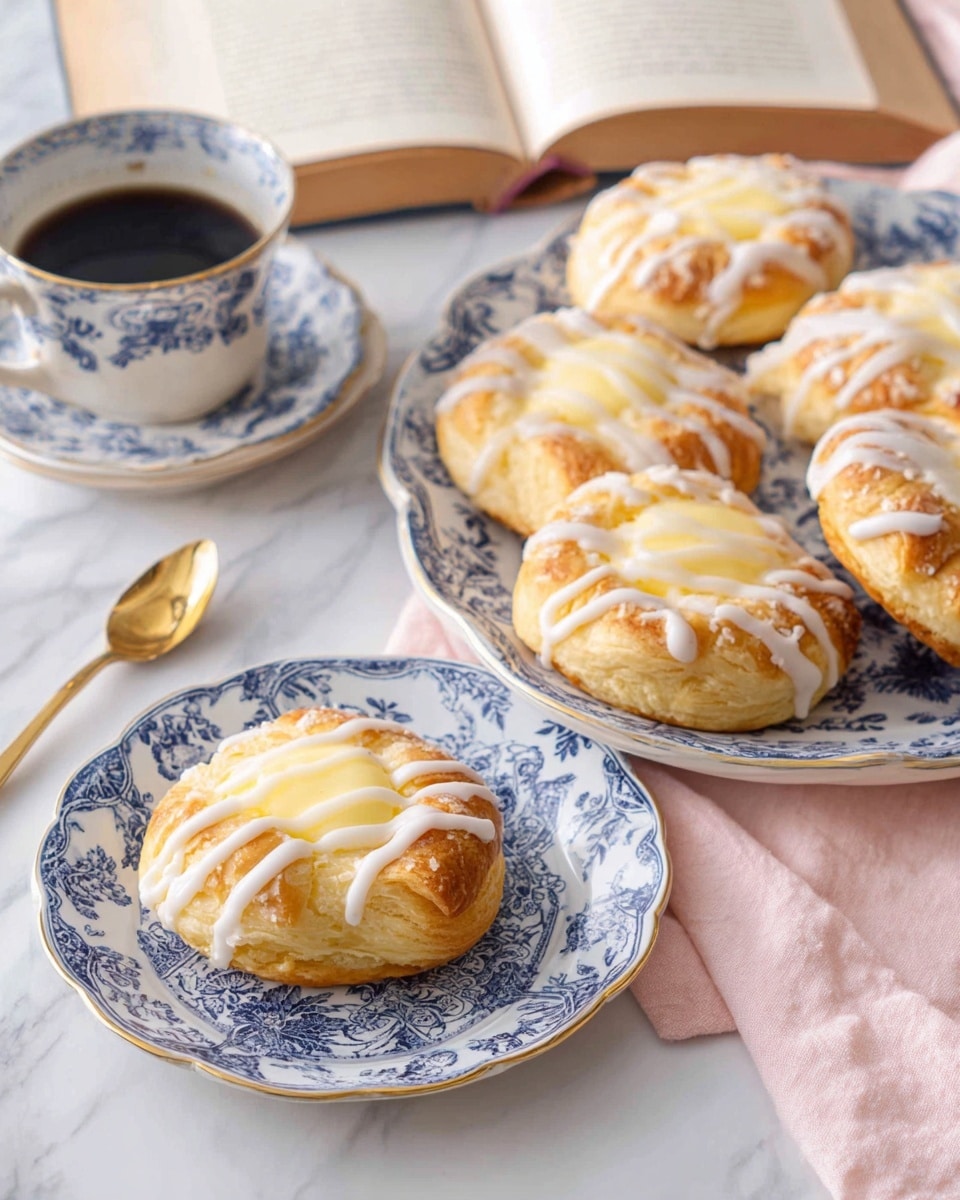
If you’ve ever dreamed of waking up to warm, flaky pastries that melt in your mouth, this Deliciously Flaky Cheese Danish Recipe for Perfect Mornings Recipe is here to make that dream a reality. I remember the first time I made these Danishes; the buttery layers puffed up perfectly, and the creamy cheese filling was just the right balance of sweet and tangy. They’re a little bit indulgent, but trust me, when you share these with friends or family on a slow weekend morning, every flaky bite is worth it.
This recipe really shines when you want to impress your loved ones or treat yourself on a leisurely Sunday. The key to success is in those layers of cold butter folded into the dough—it’s a bit of a process but totally doable with a little patience. I love that once you get the technique down, you’ll have a go-to pastry that feels bakery-quality, but with the warmth of homemade comfort. If you’re looking for a Deliciously Flaky Cheese Danish Recipe for Perfect Mornings Recipe that brings joy and buttery goodness to your breakfast table, this one’s for you!
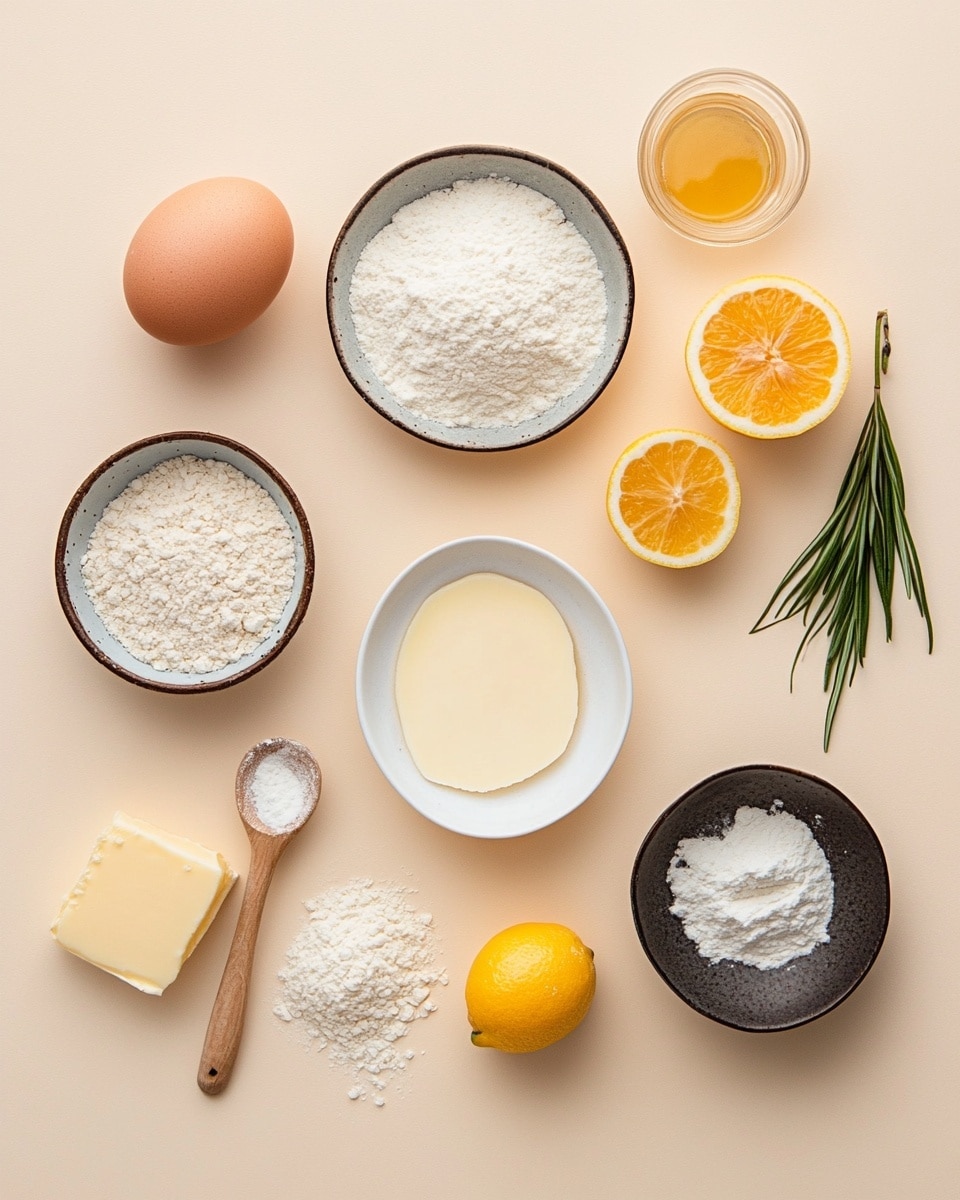
Ingredients You’ll Need
Each ingredient works in harmony here to create that signature flaky texture and rich cheese flavor. I find it’s important to use cold butter for laminating, and full-fat cream cheese makes all the difference in the filling’s silkiness.
- All-purpose flour: The foundation—gives structure but doesn’t overwhelm the delicate layers.
- Granulated sugar: Adds just enough sweetness to the dough without making it dessert-level sweet.
- Salt: Balances the flavors and enhances the buttery notes.
- Active dry yeast: The secret to that light, airy rise—make sure it’s fresh and alive!
- Whole milk (warm): Activates the yeast and keeps the dough tender.
- Egg: Adds richness and helps with dough binding.
- Cold unsalted butter: For laminating—this is what creates the signature flaky layers, so keep it cold and thick!
- Cream cheese (softened): The star of the filling—smooth and slightly tangy.
- Powdered sugar: For the glaze, to add sweetness and shine once baked.
- Vanilla extract: Adds warmth and depth to both filling and glaze.
- Lemon zest (optional): A personal fave for a fresh zing in the filling.
- Milk or lemon juice: For adjusting glaze consistency and adding subtle flavors.
- Optional toppings: Fruit preserves, fresh berries, or sliced almonds to customize your Danish.
Variations
I love to tweak this recipe depending on the season or mood. The great thing about a Deliciously Flaky Cheese Danish Recipe for Perfect Mornings Recipe is how customizable it can be—don’t hesitate to make it your own!
- Ricotta or mascarpone filling: I swapped cream cheese for mascarpone on a whim and loved the lighter, creamier texture for summer brunches.
- Fruit toppings: Raspberries or apricot jam add a lovely pop of color and fresh flavor—perfect for spring mornings.
- Nutty twist: Sprinkle sliced almonds or chopped pistachios on top after glazing for a satisfying crunch.
- Gluten-free adaptation: While not tested here, using a gluten-free flour blend designed for laminated dough might work—just make sure to chill well.
How to Make Deliciously Flaky Cheese Danish Recipe for Perfect Mornings Recipe
Step 1: Bring the Dough to Life
Start by mixing your flour, sugar, and salt in a big bowl. Meanwhile, dissolve the yeast in warm milk—it should turn foamy in about 5–10 minutes, which tells you it’s alive and kicking. Then, add the egg and yeast mixture to the dry ingredients and knead until you have a smooth and elastic dough, about 6 to 8 minutes. I usually use my stand mixer, but you can certainly do this by hand if you have the time. After that, cover it with plastic wrap and pop it in the fridge for 30 minutes to rest.
Step 2: Shape the Butter Block
Here’s where the magic happens—we’re prepping that buttery core. Lay your cold butter between two sheets of parchment and give it a few gentle pounds with a rolling pin until it’s about an 8-inch square. Chill this butter block until it’s firm but still bendable. Pro tip: if it gets too soft, just pop it back in the fridge to avoid greasy dough.
Step 3: Laminate the Dough
Roll your rested dough into a 16-inch square, then place the butter block in the center, positioned like a diamond. Fold each corner over the butter to encase it fully—kind of like a buttery envelope. Roll this package out into a long 8 × 24-inch rectangle, then fold it into thirds like a letter. This is your first “turn.” Chill it for 30 minutes, then repeat this rolling and folding process two more times, chilling between each. This step is crucial for building those flaky layers, so be patient and keep that butter cold!
Step 4: Cut and Fill
Roll the laminated dough to about ¼-inch thickness and cut into about 4-inch squares—this size makes perfect individual Danishes. Spoon a tablespoon of the cream cheese filling into the center of each square. Then fold corners toward the center or shape them however you like—some folks fold in just two corners or create a diamond shape. If you’re using fruit preserves or fresh berries, add them on top now for a lovely burst of flavor.
Step 5: Proof and Bake to Golden Perfection
Place your shaped Danishes on parchment-lined baking sheets and let them rise for about an hour at room temperature until puffy—not doubled. Preheat your oven to 390°F (200°C). Just before baking, brush tops with a little egg wash or milk to get that perfect golden crust. Bake for 15–20 minutes until they puff up beautifully and turn golden brown. Watching the layers reveal themselves in the oven is one of my favorite parts!
Step 6: Sweeten with Glaze
After the Danishes cool completely, mix powdered sugar with milk or lemon juice and vanilla to create a smooth glaze. Drizzle generously over each pastry to add a sweet finishing touch and a lovely shine. This glaze keeps it from feeling dry and adds that extra hint of vanilla and lemon zest that I personally can’t resist.
How to Serve Deliciously Flaky Cheese Danish Recipe for Perfect Mornings Recipe
Garnishes
I like to top my Danishes with a few fresh berries—blueberries or raspberries are my go-to because they are tart and pop beautifully against the creamy cheese. Sometimes I sprinkle sliced almonds on top before baking for a nutty crunch or a dusting of powdered sugar for extra charm.
Side Dishes
These Danishes are wonderful on their own, but I often serve them alongside fresh fruit salad or a cup of rich coffee or tea. For fancy brunches, they pair delightfully with smoked salmon and cream cheese on the side, balancing sweet and savory.
Creative Ways to Present
For special occasions, I arrange these Danishes on a tiered stand with colorful berries scattered around, making an inviting centerpiece. Wrapping them individually in parchment paper tied with twine also makes a sweet gift idea for brunch guests or neighbors.
Make Ahead and Storage
Storing Leftovers
When I have leftovers, I store them in an airtight container in the fridge for up to 5 days. I find that Danishes taste almost as good on day two after a quick reheat, and keeping them covered preserves moisture without sogginess.
Freezing
I love that you can freeze unbaked, shaped Danishes for up to a month. I wrap each one individually in plastic wrap and then place them all in a sealed bag. When I want fresh Danish, I bake them straight from the freezer and just add a few extra minutes to the baking time—no need to thaw!
Reheating
To reheat, I gently warm my Danishes in a 325°F (160°C) oven for about 5–7 minutes. This brings back that flaky crispness on the outside, while the cheese filling stays creamy. Avoid microwaving, as it tends to make the pastry soggy.
FAQs
-
Can I make the dough in advance?
Absolutely! You can prepare the dough and complete the laminating process the day before baking. Keep the shaped Danishes covered in the fridge overnight and bake them fresh in the morning. Just allow a little extra time for them to rise before baking if chilled.
-
What if my butter gets too soft during laminating?
If the butter softens too much and starts melting into the dough, chill the dough in the fridge for 15–30 minutes before continuing. Keeping the butter cold is essential for those flaky layers, so don’t rush this step.
-
Can I use store-bought puff pastry instead?
While store-bought puff pastry can save time, this Deliciously Flaky Cheese Danish Recipe for Perfect Mornings Recipe yields a fresher flavor and better texture. Making your own dough with the butter block creates those buttery layers that are hard to match with pre-made dough.
-
How can I prevent the filling from leaking out?
Make sure not to overfill the Danishes and fold the dough edges securely over the filling. Using chilled dough helps the shape hold better, and chilling the shaped pastries before proofing can minimize leakage.
-
Is there a vegan alternative for this recipe?
You can try substituting the milk with a plant-based alternative like oat or almond milk, and use vegan butter blocks for laminating. For the filling, vegan cream cheese makes a good replacement. Keep in mind that the dough may behave slightly differently, so experiment with chilling times as needed.
Final Thoughts
This Deliciously Flaky Cheese Danish Recipe for Perfect Mornings Recipe has become such a cozy ritual in my kitchen. It’s a little project that rewards you with flaky, buttery perfection every time. Whether you’re sharing it with loved ones or treating yourself to a special start, these Danishes bring that perfect mix of comfort and elegance. I hope you enjoy making them as much as I do—there’s just something truly satisfying about pulling a golden pastry fresh from the oven and savoring that first luscious bite.
PrintDeliciously Flaky Cheese Danish Recipe for Perfect Mornings Recipe

This Deliciously Flaky Cheese Danish recipe is perfect for making delightful morning pastries with layers of buttery, flaky dough filled with creamy sweet cheese. Using a laminated dough technique with cold butter, combined with a smooth cream cheese filling and a sweet glaze, it yields golden, tender Danishes ideal for breakfast or brunch.
- Prep Time: 1 hour
- Cook Time: 20 minutes
- Total Time: 1 hour 20 minutes
- Yield: 8 Danishes 1x
- Category: Breakfast Pastry
- Method: Baking
- Cuisine: American
- Diet: Vegetarian
Ingredients
Dough Ingredients
- 4 cups (500g) all-purpose flour
- 1/3 cup (75g) granulated sugar
- 1 tsp salt
- 1 tbsp (10g) active dry yeast
- 1 cup (240ml) whole milk, warm
- 1 large egg, room temperature
Butter Block
- 1 cup + 2 tbsp (250g) cold unsalted butter, for laminating
Cream Cheese Filling
- 7 oz (200g) cream cheese, softened
- 1/4 cup (50g) granulated sugar
- 1 tsp vanilla extract
- Zest of 1 lemon (optional)
Glaze
- 1 cup (100g) powdered sugar
- 1–2 tbsp milk or lemon juice
- 1/2 tsp vanilla extract
Optional Toppings
- Fruit preserves
- Fresh berries
- Sliced almonds
Instructions
- Make the Dough: In a large bowl, combine the all-purpose flour, granulated sugar, and salt. In a separate bowl, mix the warm milk with the active dry yeast and let it sit for 5–10 minutes until foamy. Add the egg and the yeast mixture to the dry ingredients. Knead the mixture until smooth and elastic, about 6–8 minutes. Cover the dough and chill in the refrigerator for 30 minutes.
- Prepare Butter Block: Place the cold unsalted butter between two sheets of parchment paper. Pound and shape it into an 8-inch square. Chill the butter block until it is firm but still pliable, ready for laminating.
- Laminate the Dough: Roll the chilled dough into a 16-inch square. Place the butter block in the center of the dough, positioning it like a diamond shape. Fold the dough corners over the butter to completely enclose it. Roll the dough out into a long rectangle measuring approximately 8 by 24 inches. Fold the dough into thirds, like folding a letter. Chill the dough for 30 minutes. Repeat this rolling, folding, and chilling process two more times, for a total of three turns, ensuring flaky layers.
- Shape the Danish: Roll the laminated dough to a thickness of about 1/4 inch. Cut into 4-inch squares. Place about a tablespoon of the cream cheese filling in the center of each square. Fold the corners towards the center or shape the dough as desired to enclose the filling. Optionally, add fresh berries or a dollop of fruit jam on top for extra flavor and decoration.
- Proof and Bake: Arrange the shaped Danishes on parchment-lined baking sheets. Let them rise at room temperature for about 1 hour until slightly puffed. Preheat the oven to 390°F (200°C). Brush the Danishes with egg wash or milk for a shiny, golden finish. Bake for 15–20 minutes until the pastries turn golden brown and flaky.
- Glaze and Serve: Allow the baked Danishes to cool completely on a wire rack. Mix the powdered sugar with milk or lemon juice and vanilla extract to create a smooth glaze. Drizzle the glaze generously over the cooled Danishes before serving to add sweetness and shine.
Notes
- Ricotta or mascarpone can be used instead of cream cheese for a lighter, different texture in the filling.
- Chilling the dough between folding steps ensures flaky layers by keeping the butter firm.
- Use fruit preserves like raspberry or apricot to add vibrant flavor and color to the Danishes.
- Store baked Danishes in the refrigerator for up to 5 days; reheat them at 325°F (160°C) for 5–7 minutes to restore freshness.
- You can freeze unbaked, shaped Danishes for up to 1 month and bake them from frozen, adding a few extra minutes to the baking time.
Keywords: Cheese Danish, Flaky Pastry, Breakfast Recipe, Cream Cheese Filling, Laminated Dough, Homemade Danish