Vegan Chocolate Cheesecake with Chocolate Crumb Crust and Vegan Magic Shell Recipe
Okay, friends, I have to tell you about this dreamy Vegan Chocolate Cheesecake with Chocolate Crumb Crust and Vegan Magic Shell recipe that has truly stolen my heart. It’s everything you want in a rich, indulgent dessert but completely plant-based—perfect for impressing guests or just treating yourself on a cozy night in. What makes this cheesecake extra special is that luscious chocolate crumb crust paired with a silky vegan filling that’s perfectly balanced between sweet and tangy, thanks to a bit of lemon juice. And if you’re anything like me, that Vegan Magic Shell topping is the cherry on top that makes each slice feel downright decadent.
I remember the first time I made this recipe—my kitchen smelled like a chocolate dream all day, and honestly, it felt like cheating because it’s so ridiculously easy. This recipe works beautifully for celebrations, but honestly, it’s so good you’ll want an excuse to whip it up any day. Plus, the ingredients are pantry-friendly, which is a win when you’re craving something sweet but don’t want to run all over town. Trust me, once you try this Vegan Chocolate Cheesecake with Chocolate Crumb Crust and Vegan Magic Shell recipe, it’ll become your go-to for vegan desserts.
Ingredients You’ll Need
Getting the right ingredients is key here because they come together to make textures and flavors that aren’t just good—they’re crave-worthy. Plus, these ingredients are easy to source, and I’ll share some tips for picking the best versions to elevate your cheesecake even more.
- Whole oats: These form the base of that chocolate crumb crust and add a lovely chewiness. Quick oats won’t hold up as well, so opt for rolled or old-fashioned oats.
- Vegan brown sugar (or coconut sugar): Adds sweetness with a hint of caramel—brown sugar brings a deeper flavor, but coconut sugar works nicely if you prefer a lower glycemic option.
- Cocoa powder: Use unsweetened cocoa powder for that intense chocolate hit without extra sugar. It really lifts both the crust and filling.
- Melted vegan butter (or refined coconut oil): This binds the crumb crust together. I like vegan butter for a rich flavor, but coconut oil keeps the crust crisp and slightly tropical.
- Vegan cream cheese (2 containers or about 2 cups): The star of the filling—make sure to pick a brand with a creamy texture for the best cheesecake vibe.
- Vegan sugar: I use organic cane sugar, but feel free to swap in coconut sugar for a twist.
- Melted refined coconut oil: This keeps the cheesecake silky and helps the filling set without needing gelatin or eggs.
- Lemon juice: Just a touch brightens the rich chocolate flavor and adds a slight tang that balances sweetness beautifully.
- Powdered sugar: For the magic shell—this blends smoothly with cocoa and coconut oil to make that glossy chocolate coating.
- Salt (a dash): Enhances the chocolatey depth of the magic shell so it’s not too sweet.
Variations
I love how flexible this Vegan Chocolate Cheesecake with Chocolate Crumb Crust and Vegan Magic Shell recipe is because it invites you to play around. I often tweak things depending on season or mood, so here are some ideas to get your creative juices flowing.
- Nutty Crust: Try adding chopped walnuts or pecans to the crust for a crunchy texture—I personally adore how it adds a toasty flavor contrast!
- Berry Swirl: Swirl in some raspberry or cherry jam into the filling before setting to add fruity brightness. Once, I wowed my brunch guests this way, and they kept asking for the recipe.
- Spiced Magic Shell: Mix a pinch of cinnamon or cayenne into the magic shell for a subtle spicy kick. It’s surprisingly addictive, especially on chilly evenings.
- Lower Sugar: You can reduce sugar amounts slightly if you prefer less sweet desserts—it still holds up well thanks to the cocoa and lemon juice balance.
How to Make Vegan Chocolate Cheesecake with Chocolate Crumb Crust and Vegan Magic Shell Recipe
Step 1: Prepare the Chocolate Crumb Crust
Start by toasting your oats lightly in a dry skillet until fragrant—this step is optional but gives the crust a nuttier profile I love. Then, combine the toasted oats, brown sugar, cocoa powder, and melted vegan butter in a bowl. Mix it well until the crumbs stick together when pressed. Press this mixture firmly into the bottom of a springform pan, creating an even, compact layer. Pop it into the fridge to chill while you prepare the filling; this chilling helps the crust hold its shape and prevents sogginess.
Step 2: Make the Chocolate Cheesecake Filling
In a large mixing bowl, beat the vegan cream cheese until smooth—no lumps, trust me, it makes all the difference for a velvety texture. Add your sugar and cocoa powder, then slowly pour in the melted coconut oil and lemon juice. Keep mixing until the filling feels silky and glossy; you don’t want to overbeat, or air bubbles will form and mess with the texture. Pour the filling onto the chilled crust, smoothing the top with a spatula. Refrigerate for at least 6 hours—or overnight—to let it set firmly.
Step 3: Whip Up the Vegan Magic Shell
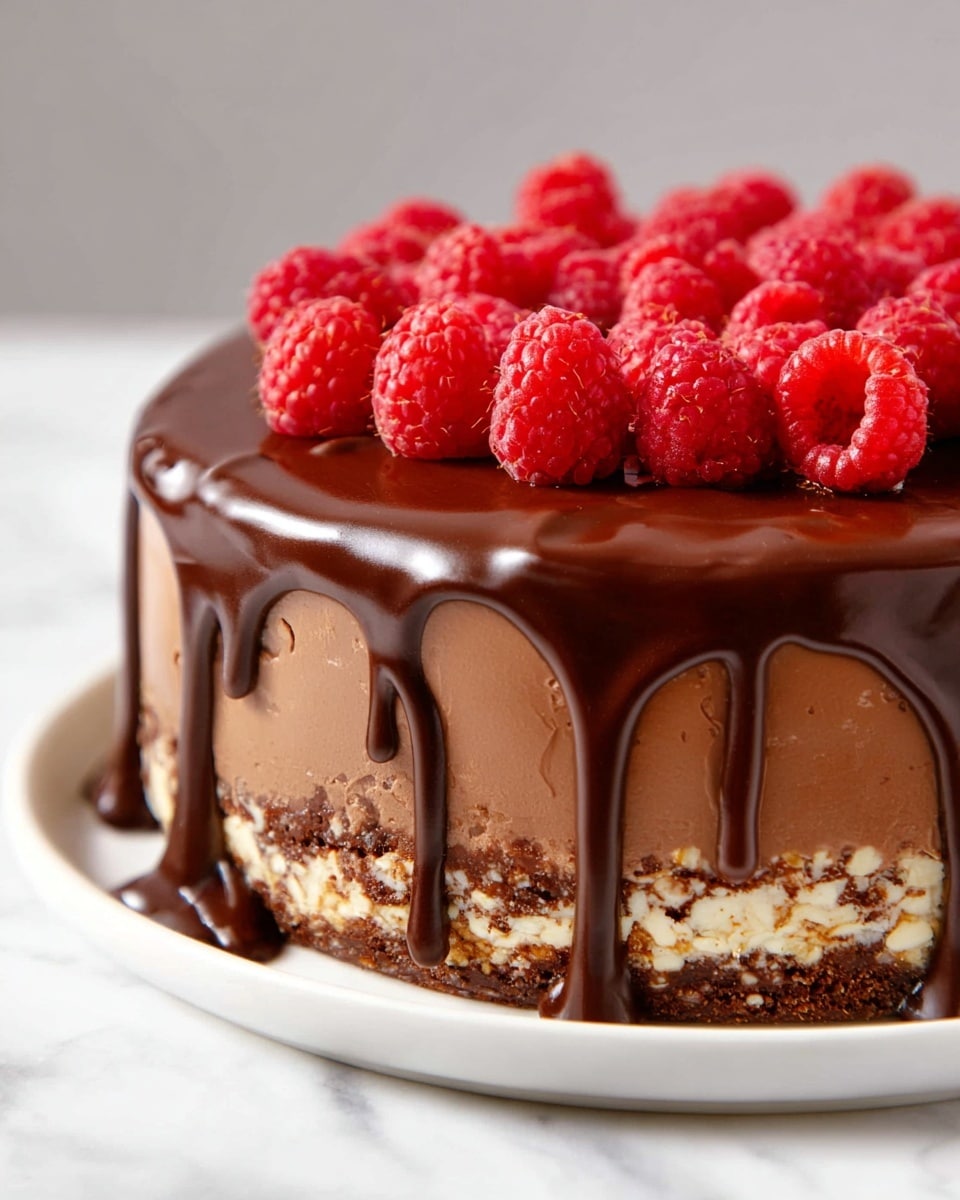
Right before you’re ready to serve, prepare the magic shell. Melt the refined coconut oil gently, then whisk in cocoa powder, powdered sugar, and a dash of salt until you get a glossy, pourable chocolate sauce. Pour it evenly over the chilled cheesecake. You’ll see it harden quickly as it cools—this magic shell is so fun and satisfying to crack through when slicing!
Step 4: Slice and Enjoy
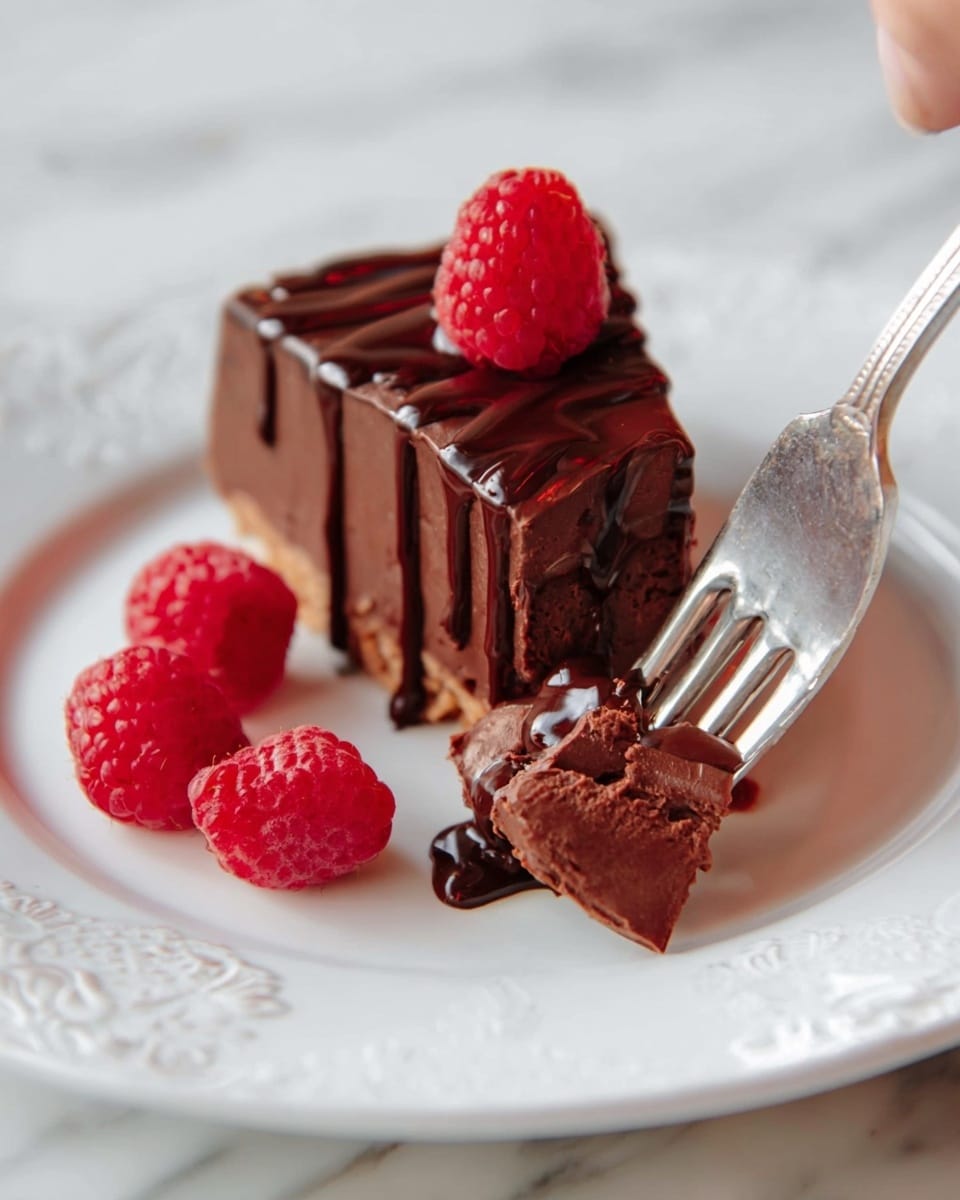
To get nice clean slices, I recommend using a sharp knife warmed under hot water and wiped dry before each cut. This prevents cracking the magic shell and keeps edges neat. Serve chilled, and watch your friends’ faces light up with every bite.
How to Serve Vegan Chocolate Cheesecake with Chocolate Crumb Crust and Vegan Magic Shell Recipe
Garnishes
I like to top my slices with a handful of fresh raspberries or sliced strawberries—the tartness cuts beautifully through the rich chocolate flavor. Sometimes I sprinkle a pinch of toasted coconut flakes or chopped nuts for added texture. If it’s a party, a dollop of coconut whipped cream elevates it even more. These little touches make the cheesecake feel extra special and festive.
Side Dishes
This cheesecake pairs wonderfully with a cup of freshly brewed coffee or a mug of creamy plant-based hot chocolate for an indulgent after-dinner duo. I’ve also served it alongside vegan vanilla ice cream for a fun contrast of warm and cold textures. It’s surprisingly flexible, so feel free to experiment depending on the occasion.
Creative Ways to Present
For birthdays or special holidays, I’ve used a springform pan with removable sides to keep presentation clean and elegant. Another fun idea is scooping small cheesecake cups into clear glasses layered with crushed crust and fresh fruit for mini individual servings. It’s perfect for parties where everyone wants just a taste rather than a big slice. I’ve also drizzled extra vegan magic shell on each plate for that wow factor.
Make Ahead and Storage
Storing Leftovers
I store leftover cheesecake tightly wrapped in plastic wrap or in an airtight container in the fridge. It keeps well for about 4-5 days, and honestly, it tastes even better after a day when the flavors meld more. Just remember to keep it chilled until serving for the best texture.
Freezing
If you want to make this ahead of time or save leftovers long-term, freezing works great. I slice the cheesecake first, then freeze on a parchment-lined tray before transferring to a freezer bag or container. This way, you can take out individual slices when the craving hits. To thaw, leave the slice in the fridge overnight, and the magic shell might soften slightly but the flavor remains wonderful.
Reheating
This cheesecake is best enjoyed cold, but if you want to soften it up a bit, let the slice sit at room temperature for 10-15 minutes. Avoid microwaving as it can ruin the magic shell and texture. If you’re serving frozen slices, thawing overnight in the fridge is your best bet for maintaining that perfect mouthfeel.
FAQs
-
Can I use store-bought vegan cream cheese for this cheesecake?
Absolutely! Store-bought vegan cream cheese works great, but I recommend choosing brands with a creamy, smooth texture for the best results. Some brands can be a bit grainy or tangy, so sampling a small amount ahead of time can help you pick your favorite.
-
Is the Vegan Magic Shell recipe difficult to make?
Not at all! The magic shell comes together in minutes and just requires whisking melted coconut oil with cocoa powder and powdered sugar. It’s a simple but transformative addition that hardens quickly when you pour it over cold cheesecake.
-
Can I make this cheesecake nut-free?
Yes! This whole recipe is nut-free naturally if you avoid adding nuts to the crust or garnishes. Just make sure your vegan cream cheese and other ingredients are also processed in nut-free facilities if allergies are a concern.
-
How long does the cheesecake need to chill to set properly?
I recommend chilling it for at least 6 hours, but overnight is best for a firm, sliceable texture. This resting time helps the filling solidify without compromising the creamy mouthfeel.
-
Can I replace coconut oil in the recipe?
If you don’t like coconut flavor or can’t find refined coconut oil, vegan butter is a good substitute for the crust and filling. However, for the magic shell, refined coconut oil is ideal because it hardens at room temperature to create that signature crackly shell.
Final Thoughts
This Vegan Chocolate Cheesecake with Chocolate Crumb Crust and Vegan Magic Shell recipe is one I reach for anytime I want a luxurious dessert without the fuss or dairy. It’s that rare treat that feels indulgent but is completely guilt-free and friendly to all dietary preferences. I hope you enjoy making and sharing it as much as I do—there’s something so joyful about the moment when the magic shell cracks and the rich chocolate filling melts on your tongue. Go ahead, give it a try—you won’t be disappointed!
PrintVegan Chocolate Cheesecake with Chocolate Crumb Crust and Vegan Magic Shell Recipe

This vegan chocolate cheesecake features a rich, creamy chocolate filling atop a wholesome oat-based chocolate crumb crust, topped with a glossy homemade vegan magic shell. Crafted entirely from plant-based ingredients, this dessert is perfect for those seeking a dairy-free, egg-free indulgence that doesn’t compromise on flavor or texture.
- Prep Time: 20 minutes
- Cook Time: 0 minutes
- Total Time: 4 hours 20 minutes (including chilling time)
- Yield: 8 servings 1x
- Category: Dessert
- Method: No-Cook
- Cuisine: Vegan
- Diet: Vegan
Ingredients
Chocolate Crumb Crust
- 1 cup whole oats
- 1/2 cup vegan brown sugar (or coconut sugar)
- 1/4 cup cocoa powder
- 4 tablespoons melted vegan butter (or refined coconut oil)
Chocolate Cheesecake Filling
- 2 (8 oz) containers vegan cream cheese (or 2 cups)
- 1 1/4 cups vegan sugar
- 1/2 cup cocoa powder
- 1/2 cup melted refined coconut oil
- 2 tablespoons lemon juice
Vegan Magic Shell
- 1/3 cup refined coconut oil
- 3 tablespoons cocoa powder
- 3 tablespoons powdered sugar
- 1 dash salt
Instructions
- Prepare the Chocolate Crumb Crust: In a food processor, pulse the whole oats until they become a coarse flour-like consistency. Transfer the oats to a mixing bowl and combine with vegan brown sugar and cocoa powder. Stir in the melted vegan butter until the mixture is evenly moistened and crumbly. Press the mixture firmly into the bottom of a springform pan to form an even crust layer. Set aside.
- Make the Chocolate Cheesecake Filling: In a large bowl, blend the vegan cream cheese with vegan sugar until smooth and creamy using a hand mixer or stand mixer. Add cocoa powder, melted refined coconut oil, and lemon juice to the cream cheese mixture. Continue mixing until fully incorporated and silky. Pour the filling evenly over the prepared chocolate crumb crust in the springform pan.
- Chill the Cheesecake: Cover the springform pan and refrigerate the cheesecake for at least 4 hours, preferably overnight, to allow the filling to set and flavors to meld fully.
- Prepare the Vegan Magic Shell: Combine the refined coconut oil, cocoa powder, powdered sugar, and a dash of salt in a small heat-proof bowl. Gently heat the mixture over a double boiler or in short bursts in the microwave, stirring frequently until completely melted and smooth.
- Apply the Magic Shell Topping: Once the cheesecake has set, carefully pour the slightly warm vegan magic shell over the chilled cheesecake surface, spreading it evenly. Allow the shell to set and harden at room temperature or in the refrigerator before slicing and serving.
Notes
- Use refined coconut oil to avoid coconut flavor in the crust and magic shell unless you prefer a hint of coconut taste.
- Ensure the vegan cream cheese is softened to room temperature for easier mixing and a smoother filling.
- Press the crust firmly to prevent crumbling when slicing.
- Refrigerate the cheesecake for at least 4 hours or overnight for the best texture and flavor development.
- The magic shell topping will harden quickly when exposed to the cold cheesecake, creating a delicious crackly chocolate surface.
Keywords: vegan chocolate cheesecake, chocolate crumb crust, vegan dessert, plant-based cheesecake, dairy-free chocolate cheesecake, vegan magic shell