S’mores Brownies Recipe

If you love the nostalgic campfire treat of s’mores but want to enjoy it in a new, indulgent way, this S’mores Brownies Recipe is an absolute game changer. It’s like all the best parts of gooey marshmallows, crunchy graham crackers, and rich chocolate smashed together in a fudgy brownie base — I’m telling you, it’s pure magic. Whether you’re making these for a cozy night in or impressing friends at a gathering, they’re always a crowd-pleaser that sparks smiles and maybe even a few requests for seconds.
One of the things I adore about this S’mores Brownies Recipe is how surprisingly simple it is to whip up, yet the layers of textures and flavors feel ultra-special. I often find myself baking them just for fun, because who can resist that toasted marshmallow topping and that perfect sweet-salty balance? Plus, they’re perfect any time of year — not just summer — and can be enjoyed chilled or warmed up for a snack or dessert that feels like a big, warm hug.
Ingredients You’ll Need
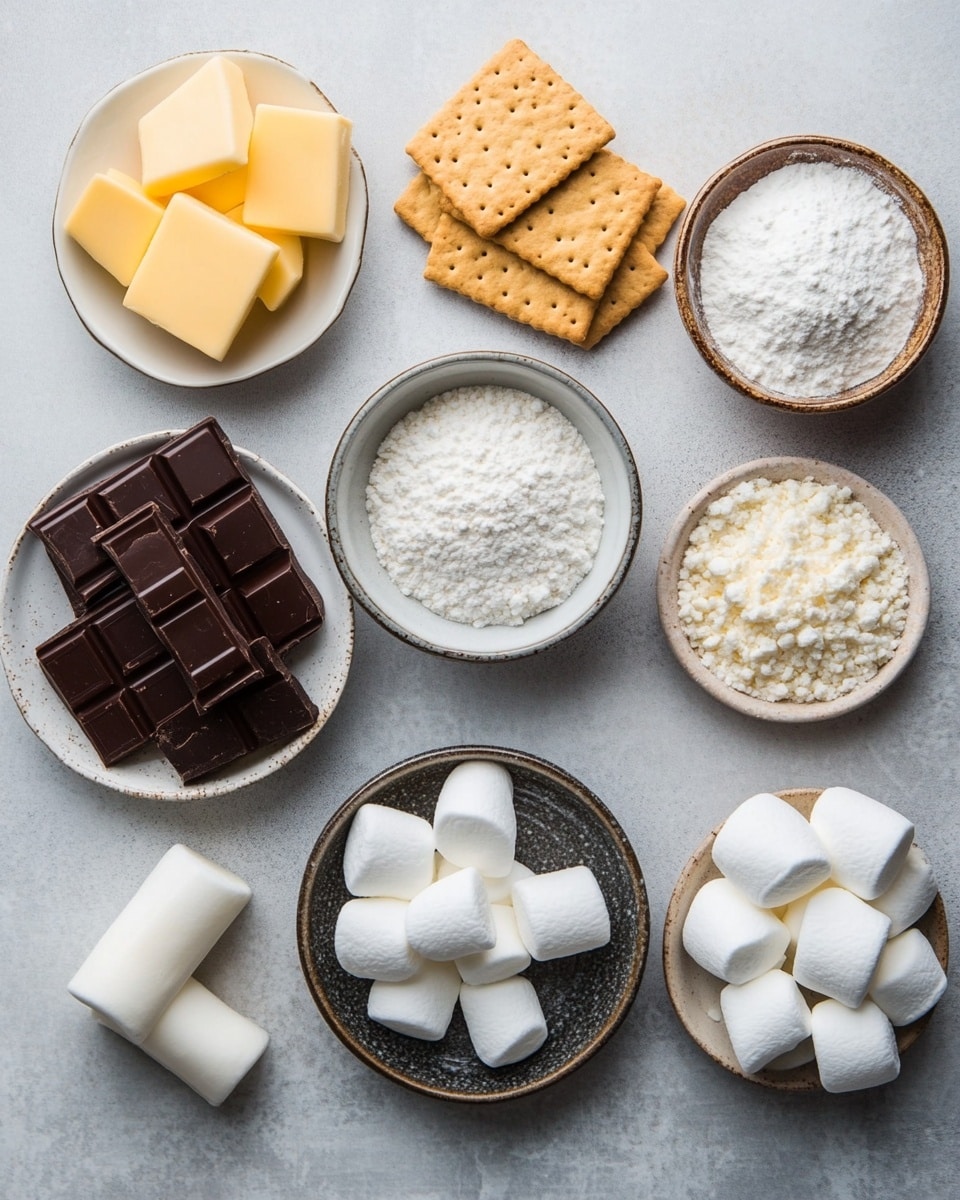
These ingredients might look simple, but each one plays a crucial part in making these S’mores Brownies Recipe delightfully memorable. If you shop thoughtfully, you’ll notice how the buttery, chocolatey, and crunchy elements come together beautifully, and grabbing quality marshmallows can truly elevate the end result.
- Unsalted butter: Using room temperature butter helps with easy mixing and ensures the brownies are tender, not greasy.
- Whole graham crackers: I swear by honey-flavored ones for that classic s’mores vibe, but plain work too.
- Granulated sugar: Sprinkling a little sugar on the crackers adds a lovely subtle crunch and sweetness.
- Bittersweet or semisweet chocolate: I like bittersweet to balance the sweet marshmallows, but semisweet works if you want it sweeter.
- Dark brown sugar: This packs moisture and rich molasses notes for chewy, fudgy brownies.
- Coarse kosher salt: Just a pinch amplifies all the flavors and prevents the brownies from tasting flat.
- Large eggs: They bind everything and help give the brownies structure while keeping them moist.
- Vanilla extract: It’s a tiny addition that brightens all the chocolate and marshmallow flavors.
- All-purpose flour: The base that holds everything together, choose a fresh batch for best results.
- Marshmallows: The star on top! I recommend the classic jet-puffed style for reliable melting and browning.
Variations
I love experimenting with this S’mores Brownies Recipe depending on the occasion or who’s eating, and you should feel completely free to make it your own. Sometimes I tweak the chocolate type or mess with mix-ins, and honestly, I’ve never met a kid or adult who wasn’t game for extra marshmallows or chocolate chunks.
- Peanut butter swirl: For a nutty twist, swirl in some creamy peanut butter before baking — it adds a dreamy richness and pairs beautifully with the chocolate and marshmallows.
- Gluten-free option: Swap the all-purpose flour for a gluten-free blend and ensure your marshmallows are gluten-free too for an allergy-friendly treat.
- Chocolate chip cookie base: One of my friends once swapped the graham cracker layer for a chocolate chip cookie crust, and it was instant hit — even got recipe requests at work!
- Dark chocolate lovers: Amp up the bittersweet chocolate to 70% or higher for a more intense cocoa flavor that balances sweet marshmallows perfectly.
- Miniature marshmallows: If you want a more even marshmallow topping and less giant puffs, mini marshmallows toast and melt really nicely.
How to Make S’mores Brownies Recipe
Step 1: Prep your pan and graham cracker base
Start by heating your oven to 400°F and prepping a 9-inch square baking pan. I like to grease it with some butter, then line it with parchment paper that hangs over two sides. This simple trick makes it super easy to lift the whole brownie slab out when they’re baked. Next, line the bottom with a single layer of whole graham crackers — break them as needed — and then crush the rest to sprinkle on top along with a bit of granulated sugar. This base will give your brownies that iconic s’mores texture and sweetness.
Step 2: Melt the chocolate and butter gently
Place a heatproof bowl over simmering water to create a double boiler — just make sure the bowl doesn’t touch the water. Add your butter and chocolate pieces, stirring constantly until smooth and glossy. This gentle melt prevents scorching and keeps your chocolate silky, which is key for brownies that have that melt-in-your-mouth texture. When done, carefully remove the bowl and dry its bottom before moving on.
Step 3: Mix everything and pour batter
Stir in brown sugar and a pinch of coarse salt to the melted chocolate mixture, then let it cool just enough so it’s warm but not hot to the touch. Whisk in the eggs and vanilla until the batter looks shiny and thick, then gradually fold in the flour until it’s fully combined without overmixing — you don’t want those pesky white streaks. Pour this luscious batter gently over the graham cracker base and smooth the top.
Step 4: Top with marshmallows and bake
Arrange marshmallows evenly on top of the batter and pop your pan in the oven. Watch for about 15 to 20 minutes — the marshmallows should turn golden and toasted, and when you insert a toothpick into the center, it should come out with only a few fudgy crumbs, not wet batter. Keep a close eye here since ovens vary — I once burned the marshmallow top by a minute or two and had to scrape off some charred bits (lesson learned!).
How to Serve S’mores Brownies Recipe
Garnishes
I usually keep it simple with these S’mores Brownies Recipe because the marshmallow topping acts like its own garnish. If I want to jazz things up, I sprinkle a tiny pinch of flaky sea salt or crumble some extra graham crackers on top for texture and that nostalgic crunch. You could also drizzle some melted chocolate or caramel for a fancier touch.
Side Dishes
To complement these brownie bars, I like pairing them with cool vanilla ice cream or even a dollop of whipped cream—the temperature contrast is incredible. A cup of coffee or hot cocoa on the side works wonders too, turning this into a cozy dessert experience. Sometimes I throw together fresh berries as a bright, fruity balance to the rich brownies.
Creative Ways to Present
If you’re bringing these to a party or potluck, I like to slice them into bite-sized squares and serve on a rustic wooden board with skewers to scoop out marshmallow-topped pieces easily. Another fun idea I tried was layering these brownies in a glass trifle dish with extra graham cracker crumbs and marshmallow fluff for a no-bake s’mores parfait vibe — it was a hit! Wrapping individual squares in parchment and tying with twine makes a charming homemade gift too.
Make Ahead and Storage
Storing Leftovers
After your brownies are fully cooled, I recommend storing them right in the pan (covered tightly with plastic wrap) or in an airtight container in the fridge. In my experience, these keep their fudge-like texture and that toasted marshmallow goodness for up to a week, which means you can enjoy them as a sweet treat throughout the week without worry.
Freezing
I’ve successfully frozen these S’mores Brownies Recipe by wrapping slices individually in plastic wrap, then placing them in a freezer-safe container. When you’re ready, just thaw at room temperature or in the fridge overnight. The texture stays surprisingly good — just know the marshmallows soften a bit more after freezing but it’s still delicious.
Reheating
To bring back that fresh-baked feeling, I like reheating individual brownie squares in the microwave for 15-20 seconds or warming them in the oven at 300°F for 5-7 minutes. This softens the marshmallows and intensifies the chocolate aroma without drying the brownies out, an easy way to enjoy them like they just came out of the oven.
FAQs
-
Can I use store-bought brownies instead of making the S’mores Brownies Recipe from scratch?
Absolutely, if you’re short on time or just want a shortcut, using a boxed brownie mix or pre-baked brownies as the base can work. Just layer the graham crackers and marshmallows on top and bake briefly to toast the marshmallows. While it won’t have quite the same homemade texture, it’s a quick way to enjoy that s’mores flavor.
-
What’s the best type of marshmallows to use for S’mores Brownies Recipe?
I recommend classic jet-puffed or similar marshmallows that toast and melt evenly. Some natural or organic marshmallows don’t brown as nicely and might burn faster, so keep an eye while baking. Mini marshmallows work well too if you prefer a more uniform topping.
-
How do I avoid burnt marshmallows on top of these brownies?
Every oven heats a bit differently, so I suggest checking your brownies at around 15 minutes. If the marshmallows are browning too fast but the brownies aren’t done, you can loosely tent foil over the pan to prevent over-browning while the center finishes baking. Also, baking on the middle rack helps distribute heat more evenly.
-
Can I make this S’mores Brownies Recipe gluten-free?
Yes! Use a gluten-free all-purpose flour blend and check that your graham crackers and marshmallows are certified gluten-free. The texture might vary slightly but the taste and gooeyness will still be scrumptious.
-
How long do these brownies keep fresh?
Stored airtight in the refrigerator, these brownies stay fresh for up to one week. Just make sure to cover them to prevent marshmallows from drying out or absorbing fridge odors.
Final Thoughts
This S’mores Brownies Recipe has been a favorite go-to for me when I want that nostalgic s’mores flavor without the hassle of a campfire. Baking them always feels like bringing a little summertime magic straight into my kitchen, and sharing them with friends or family sparks joyful memories. Give this recipe a try — I have a feeling it’ll become one of your favorites too, perfect for any occasion when you want a rich, playful, and comforting dessert.
PrintS’mores Brownies Recipe
Delight in the perfect blend of gooey marshmallows, rich chocolate, and crunchy graham crackers with this easy-to-make S’mores Brownies recipe, a nostalgic treat inspired by the classic campfire dessert.
- Prep Time: 5 minutes
- Cook Time: 30 minutes
- Total Time: 35 minutes
- Yield: 16 brownies 1x
- Category: Dessert
- Method: Baking
- Cuisine: American
Ingredients
Butter
- 1/2 cup (113 grams) unsalted butter, at room temperature, divided
Base
- 5 ounces (135 grams) whole graham crackers, preferably honey (about 9 whole crackers)
- 1 tablespoon granulated sugar
Chocolate Mixture
- 4 ounces (113 grams) bittersweet or semisweet chocolate, broken into pieces
- 1/2 cup (100 grams) packed dark brown sugar
- 1/2 teaspoon coarse kosher salt, such as Morton, or fine salt
- 2 large eggs
- 1 tablespoon vanilla extract
- 1/2 cup (60 grams) all-purpose flour
Topping
- 6 ounces (170 grams) marshmallows
Instructions
- Preheat Oven: Position a rack in the center of the oven and heat it to 400°F (200°C) to prepare for baking the brownies.
- Prepare Baking Pan: Grease a 9-inch square metal baking pan with 1/2 tablespoon of the butter. Line the pan with a long piece of parchment paper leaving an overhang on two sides to easily lift the brownies out later. Grease the parchment with another 1/2 tablespoon of butter.
- Layer Graham Crackers: Arrange a single layer of graham crackers on the bottom of the pan, breaking them as needed to fit. Crush the remaining crackers and sprinkle evenly over the graham cracker base, then sprinkle the granulated sugar on top.
- Melt Chocolate and Butter: Fill a small saucepan with an inch of water and heat over low until simmering. Place a medium heatproof bowl over the pan without touching the water. Add the remaining 7 tablespoons of butter and chocolate pieces to the bowl. Stir constantly with a flexible spatula until the mixture is smooth and melted. Remove the bowl from heat and dry the bottom with a towel to remove moisture.
- Create Brownie Batter: Stir the brown sugar and salt into the melted chocolate mixture and allow it to cool slightly until the bowl is no longer hot to touch. Whisk in the eggs and vanilla extract until smooth and shiny, about 1 minute. Then whisk in the flour until fully incorporated with no white streaks. Pour this batter evenly over the graham cracker base in the pan.
- Add Marshmallow Topping and Bake: Arrange the marshmallows in a single layer over the batter. Bake for 15 to 20 minutes or until the marshmallows are toasted and a toothpick inserted in the center comes out with a little fudgy chocolate.
- Cool and Serve: Allow the brownies to cool completely in the pan, then refrigerate until ready to serve. Use the parchment overhang to lift out the brownies and cut into squares or bars. These can be enjoyed chilled, at room temperature, or warmed slightly and keep fresh up to 1 week refrigerated in a sealed container.
Notes
- Using parchment with an overhang makes removing the brownies from the pan easy and neat.
- Monitor marshmallows closely during baking to prevent burning, especially in toaster ovens.
- Marshmallow type affects browning; traditional jet-puffed marshmallows toast better than some organic brands.
- You can substitute the graham cracker base with chocolate chip cookies for a different twist.
- Store brownies refrigerated and consume within a week for optimal freshness.
Keywords: s’mores brownies, graham cracker brownies, marshmallow brownies, chocolate dessert, easy brownies, campfire treats