Rainbow Jello Cake Recipe
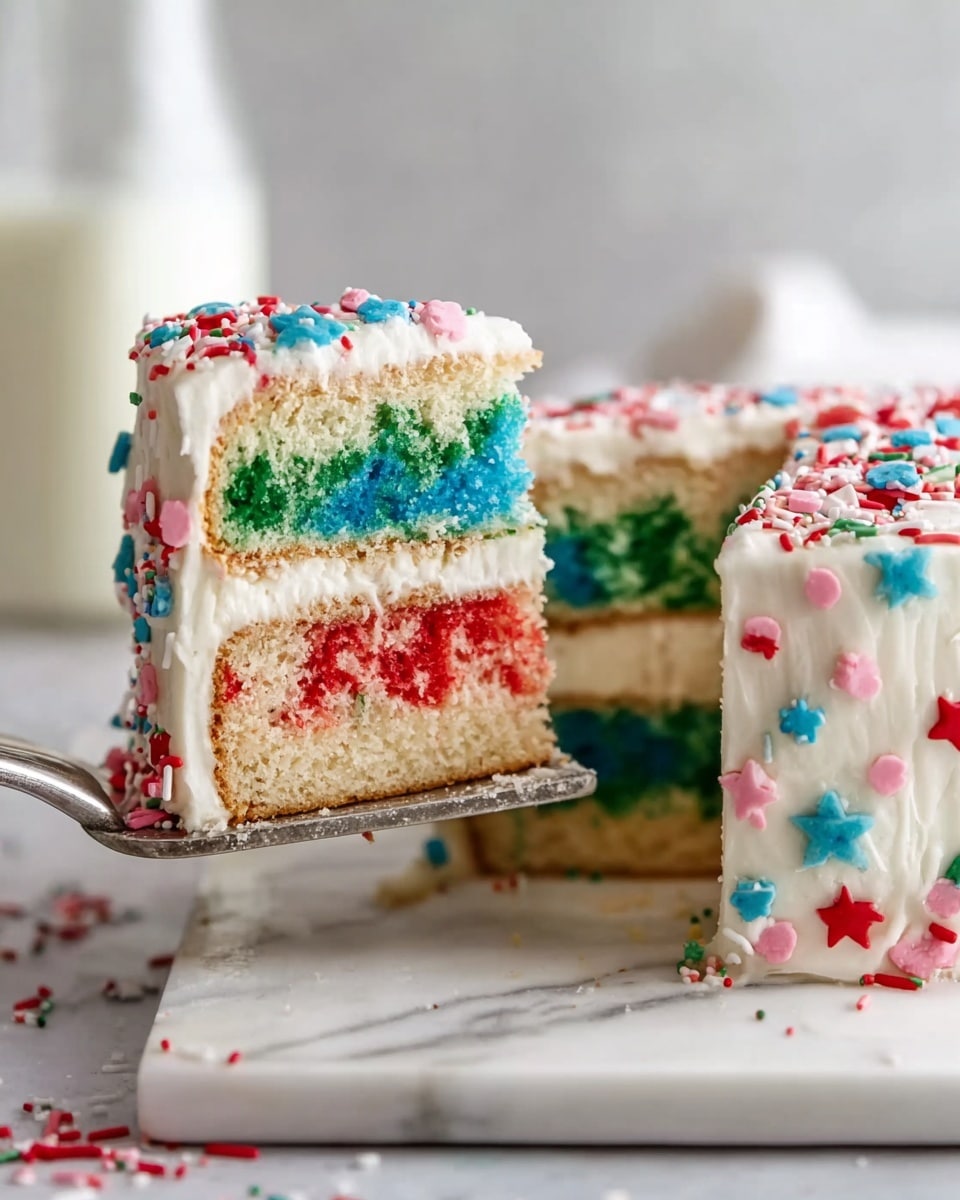
I’m so excited to share this Rainbow Jello Cake Recipe with you because it’s one of those vibrant, nostalgic desserts that instantly brings a smile. The layers of colorful jello sitting atop a fluffy white cake make it a showstopper perfect for birthdays, celebrations, or whenever you want to wow guests with minimal fuss.
What I love most about this Rainbow Jello Cake Recipe is how it combines simple ingredients into something so visually stunning yet easy to make. Whether you’re making it for kids or adults, the bright flavors and playful appearance always get rave reviews – plus, it’s surprisingly light and refreshing compared to traditional heavy cakes.
Ingredients You’ll Need
Each ingredient here plays a key role in building those colorful, jiggly layers framed by a moist cake base and topped with fluffy goodness. Shopping for the right jello colors and quality cake mix will make your Rainbow Jello Cake Recipe stand out even more.
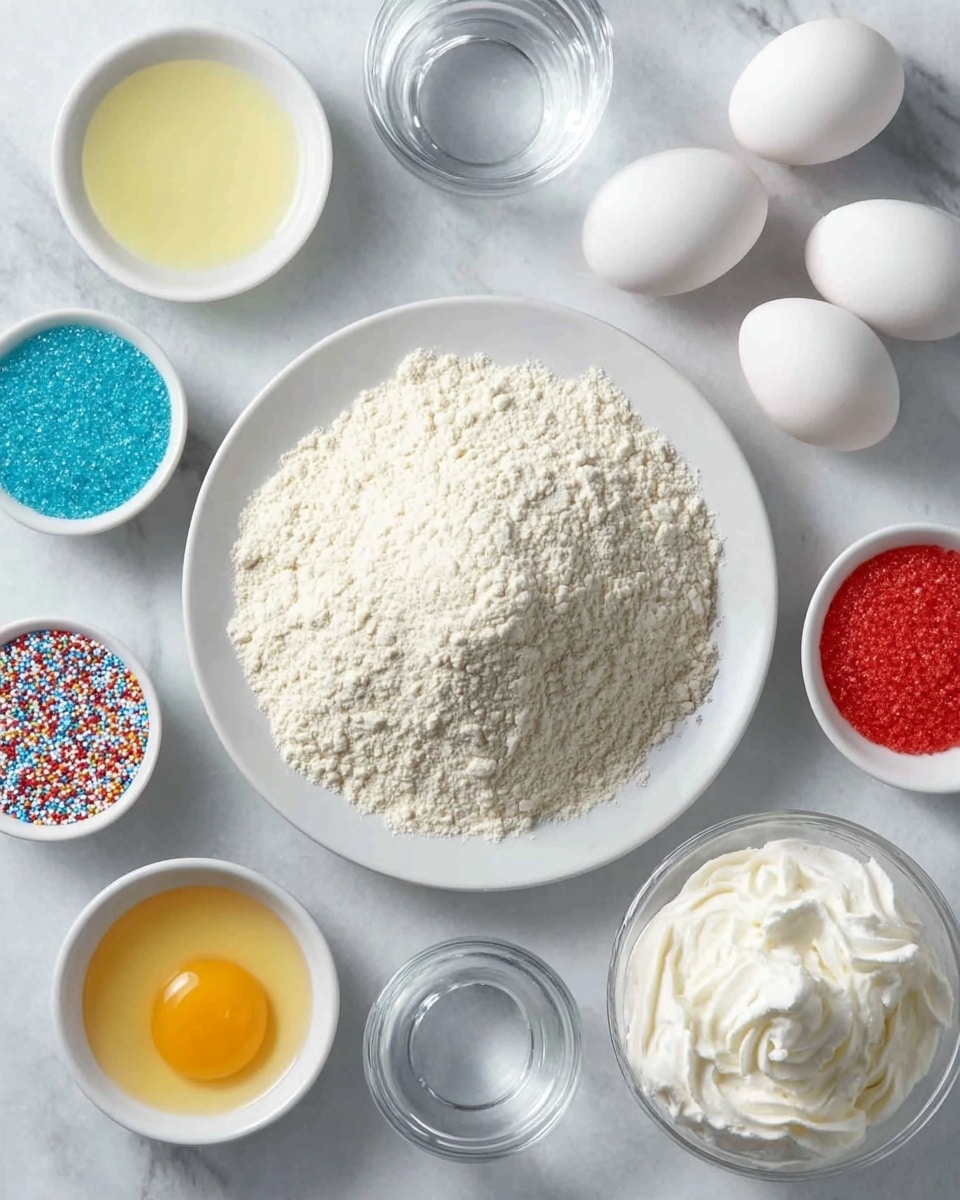
- White cake mix: I prefer a good-quality box mix for consistency and ease — it’s the perfect neutral base.
- Water: Needed to hydrate the cake and gelatin mixes – room temp for cake and boiling for gelatin layers.
- Vegetable oil: Helps keep the cake moist and tender without overpowering flavors.
- Egg whites: Using whites instead of whole eggs keeps the cake lighter and lets the colors pop against the pale crumb.
- Strawberry gelatin mix: One of the first colorful layers with a sweet, familiar berry flavor.
- Orange gelatin mix: Adds a bright citrus note and a gorgeous orange hue.
- Lemon gelatin mix: Tart and tangy, perfect for balancing sweetness.
- Lime gelatin mix: Brings a fresh green color and zesty flavor.
- Berry blue gelatin mix: That striking blue layer that completes the rainbow spectrum.
- Red, orange, yellow, green, and blue food color gel: Just a few drops to deepen the colors if you want them extra vibrant like I do.
- Whipped topping: For a fluffy, creamy finishing layer that contrasts beautifully with the jello’s texture.
- Rainbow sprinkles (optional): For that extra cheerful touch that feels just right on a celebratory cake.
Variations
I enjoy playing around with the flavors and colors depending on the occasion — it’s such a flexible recipe. Feel free to personalize the gelatin mixes or try different toppings to make the Rainbow Jello Cake Recipe really your own.
- All fruit flavors: Swap out artificial gelatin flavors for natural fruit gelatin alternatives — I tried it with natural strawberry and blueberry gelatin once, and it added a fresh twist!
- Dietary switch: For a lighter version, use sugar-free gelatin and low-fat whipped topping; it still looks just as stunning.
- Extra creamy: Add a layer of cream cheese mixed with whipped topping as a middle layer – it gives a cheesecake vibe that my family loved.
- Seasonal colors: Tailor the colors for holidays, like pastel shades in spring or rich jewel tones for fall — it’s all about making the Rainbow Jello Cake Recipe fit your style.
How to Make Rainbow Jello Cake Recipe
Step 1: Bake the Perfect White Cake Base
Start with your cake mix by following the box instructions but swapping whole eggs for 4 egg whites at room temperature — this keeps the flavor light and the crumb pale so the jello layers really pop visually. Mix the cake batter with 1 cup water, ½ cup vegetable oil, and the egg whites until smooth. Pour into a greased 9×13 pan and bake according to package directions, usually around 25-30 minutes. Once done, let it cool completely — this step is key because warm cake will cause your jello to melt when you pour the layers on.
Step 2: Prepare the Colorful Gelatin Layers
Now, for the fun part! Dissolve each 3-ounce box of gelatin in 1 cup of boiling water (so 5 cups total boiled water for all layers) — stir until fully dissolved. To brighten the colors, I like adding 5-7 drops of matching food color gel to each gelatin mixture. Pour each layer separately over the cooled cake, chilling between each pour. For each color, let it set in the fridge for about 20-30 minutes or until the surface is just firm to the touch before adding the next color. This patience ensures clean, distinct layers without colors bleeding into one another.
Step 3: Top with Whipped Topping and Sprinkles
Once all the gelatin layers are firmly set, spread the whipped topping evenly over the surface — I do this gently with an offset spatula to avoid breaking the jello. If you’re feeling whimsical, sprinkle rainbow sprinkles on top right after spreading the whipped topping, so they stick nicely. Chill your cake for at least another hour before serving for the best texture and flavor balance.
How to Serve Rainbow Jello Cake Recipe
Garnishes
I always top my Rainbow Jello Cake Recipe with a generous layer of smooth whipped topping—it’s the perfect creamy contrast to the jiggly textures below. For extra flair, a light sprinkle of rainbow nonpareils or edible glitter adds that wow factor without overpowering the delicate flavors.
Side Dishes
This colorful cake pairs beautifully with a scoop of vanilla ice cream or a dollop of fresh whipped cream on the side. For a refreshing pairing, I like serving it alongside fresh seasonal berries or a simple fruit salad which balances sweetness and cuts through the creamy texture.
Creative Ways to Present
For a party or potluck, I like cutting the cake into bite-sized squares and placing them on a platter with little cocktail forks — it turns the Rainbow Jello Cake Recipe into such a fun finger food! Another time, I layered the jello cake inside a clear trifle bowl for a mesmerizing display of colors through the glass, which was a big hit with guests.
Make Ahead and Storage
Storing Leftovers
Leftover Rainbow Jello Cake Recipe stays best enjoyed within 3-4 days stored in the fridge. I cover mine tightly with plastic wrap or a cake dome to keep the layers fresh and prevent the whipped topping from drying out. It’s amazing how well the colors hold up overnight!
Freezing
While I personally haven’t frozen the entire cake because the jelly texture changes when thawed, you can freeze individual pieces wrapped well in plastic wrap and foil. Just be aware the jello layers might lose some firmness upon thawing, so it’s best saved for fresh enjoyment.
Reheating
Since this Rainbow Jello Cake Recipe is served cold, reheating isn’t necessary. Just take it out of the fridge about 10 minutes before serving so it’s not too chilled and the flavors can shine.
FAQs
-
Can I use homemade cake instead of box mix for the Rainbow Jello Cake Recipe?
Absolutely! A simple vanilla or white cake from scratch works wonderfully. Just make sure it’s fully cooled before adding the gelatin layers to prevent melting or bleeding.
-
Why do I need to use egg whites instead of whole eggs?
Using just egg whites keeps the cake’s crumb lighter and whiter, which really helps those bright jello colors stand out. It’s a subtle tweak that makes a big difference visually.
-
How do I prevent the jello layers from mixing when I pour them?
Patience is key — let each jello layer chill in the fridge until it’s firm enough to hold the next layer without blending. Usually, about 20-30 minutes per layer works well in my experience.
-
Can I omit the food coloring gels?
You can, but the colors won’t be as vibrant. I find a few drops deepen the hues nicely without affecting flavor, giving that perfect rainbow effect everyone loves.
-
Is the Rainbow Jello Cake Recipe kid-friendly?
Totally! Kids adore the bright colors and jiggly texture. It’s a fun way to get them involved in the kitchen as well since layering is pretty simple and hands-on.
Final Thoughts
This Rainbow Jello Cake Recipe has been such a joyful addition to my dessert rotation — it’s colorful, fun, and surprisingly approachable for any skill level. If you’re looking to add a pop of color and flavor to your next gathering, I can’t recommend it enough. Go ahead, give it a try, and watch how it lights up your table and your guests’ faces just like it did mine!
PrintRainbow Jello Cake Recipe

This Rainbow Jello Cake is a vibrant and fun dessert that combines a moist white cake base with colorful layers of flavored gelatin. Topped with a light whipped cream and garnished with rainbow sprinkles, it’s perfect for celebrations and adds a playful splash of color to your dessert table.
- Prep Time: 30 minutes
- Cook Time: 30 minutes
- Total Time: 4 hours (including chilling time)
- Yield: 12 servings 1x
- Category: Dessert
- Method: Baking
- Cuisine: American
Ingredients
Cake Ingredients
- 15.25 ounces box of white cake mix
- 1 cup water
- ½ cup vegetable oil
- 4 egg whites, room temperature
Gelatin Layers
- 3 cups boiling water, divided
- 3 ounce box of strawberry gelatin mix
- 3 ounce box of orange gelatin mix
- 3 ounce box of lemon gelatin mix
- 3 ounce box of lime gelatin mix
- 3 ounce box of berry blue gelatin mix
- Red food color gel, 5-7 drops
- Orange food color gel, 5-7 drops
- Yellow food color gel, 5-7 drops
- Green food color gel, 5-7 drops
- Blue food color gel, 5-7 drops
Topping and Garnish
- 8 ounce container of whipped topping, thawed
- Rainbow sprinkles, optional garnish
Instructions
- Prepare Cake Batter: In a large mixing bowl, combine the white cake mix, water, vegetable oil, and room temperature egg whites. Mix until smooth and fully incorporated following the cake mix package instructions.
- Bake Cake: Pour the prepared cake batter into a greased and floured 9×13 inch baking pan. Bake in a preheated oven at 350°F (175°C) for 25-30 minutes or until a toothpick inserted into the center comes out clean. Let the cake cool completely.
- Make Gelatin Mixtures: Dissolve each flavored gelatin mix separately in ½ cup boiling water. Stir until fully dissolved. Add 5-7 drops of the corresponding food color gel to each gelatin mixture to enhance the vibrancy of the colors. Allow the gelatin mixtures to cool slightly at room temperature.
- Layer Gelatin on Cake: Once the cake is completely cooled, gently pour each gelatin mixture in layers over the cake. Start with the strawberry (red) gelatin, then orange, lemon (yellow), lime (green), and finally berry blue (blue). Pour slowly and evenly to avoid mixing layers. Refrigerate the cake for at least 3-4 hours or until all gelatin layers are fully set.
- Add Topping and Garnish: Once the gelatin layers are firm, spread the thawed whipped topping evenly over the top of the cake. Sprinkle with rainbow sprinkles if desired for a festive finishing touch.
- Serve: Cut the cake into slices and serve chilled for best texture and flavor.
Notes
- Ensure the cake is completely cooled before pouring the gelatin layers to prevent melting and mixing.
- Adding food color gels enhances the intensity of each gelatin color for a more vibrant rainbow effect.
- Use room temperature egg whites to achieve better volume and texture in the cake.
- The cake must be refrigerated for several hours to allow the gelatin layers to set properly.
- You can substitute the whipped topping with homemade whipped cream for a fresher taste.
- Store any leftovers covered in the refrigerator and consume within 3 days.
Keywords: rainbow jello cake, layered gelatin cake, white cake with jelly layers, colorful dessert, party cake