No Bake Peanut Butter Oat Cups Recipe
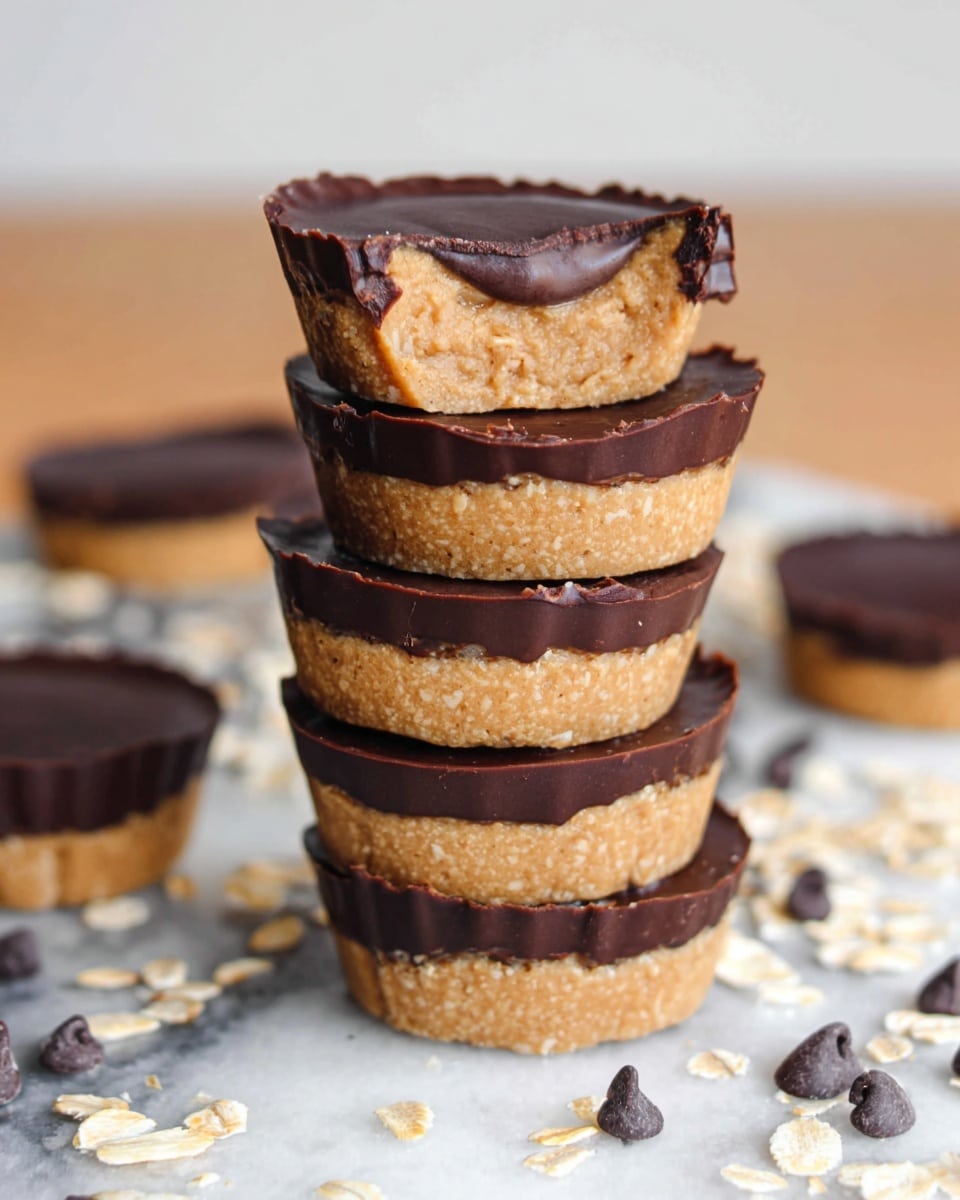
Oh, let me tell you about my new obsession — the No Bake Peanut Butter Oat Cups Recipe. These little gems are just perfect when you want a sweet treat that doesn’t require firing up the oven. It’s like getting all the best parts of a peanut butter cookie and an energy bite rolled into one easy, no-fuss snack.
Whether you’re rushing out the door or craving something satisfying midday, these cups deliver every time. I love how the combination of creamy peanut butter and wholesome oats makes them both indulgent and a bit nourishing — perfect for those moments when you need a quick energy boost without the sugar crash.
Ingredients You’ll Need
Each ingredient plays a starring role here, coming together like a dream team for flavor and texture. I always recommend using good-quality peanut butter and fresh rolled oats to get the best results — trust me, it makes a difference.
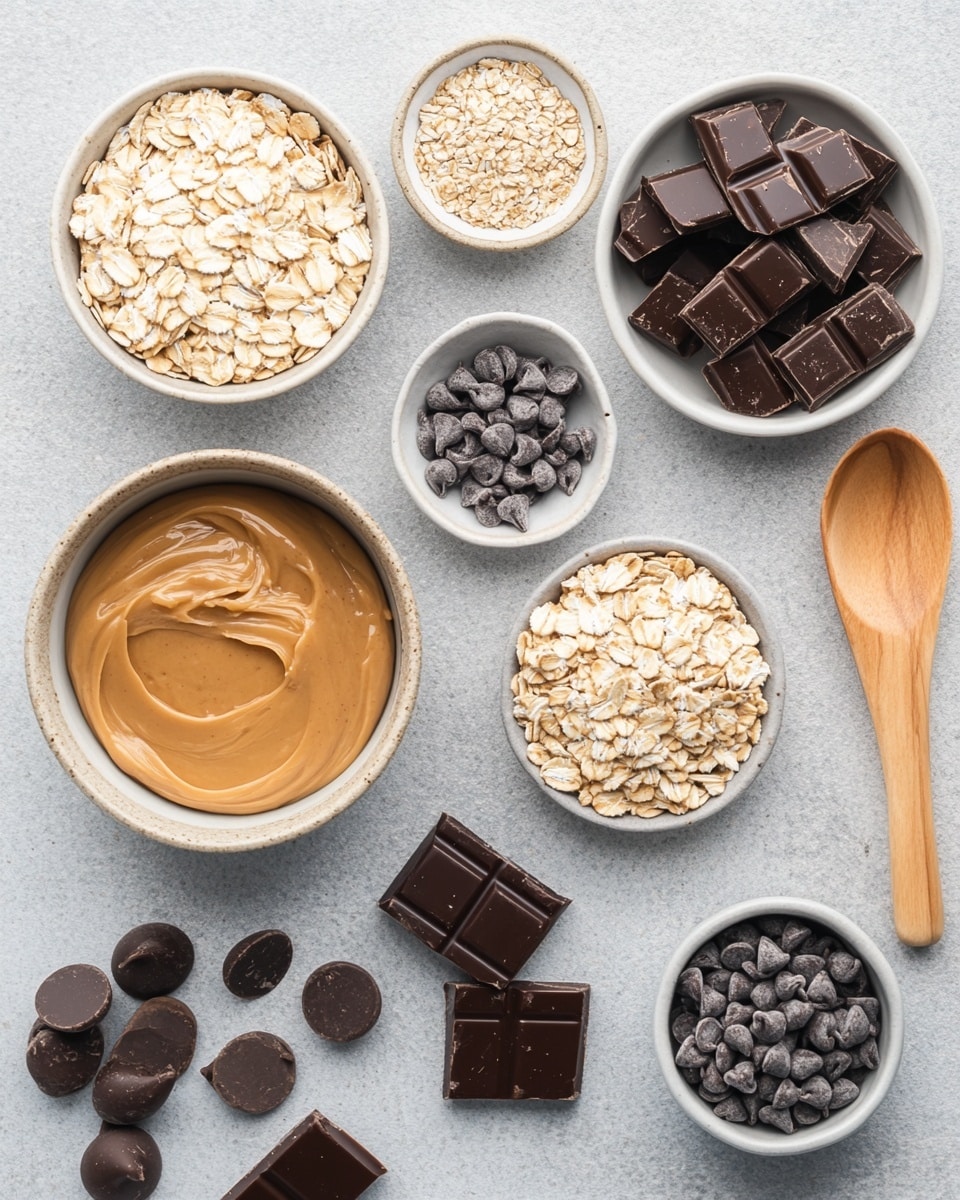
- Peanut Butter: Creamy works best for easy mixing, but crunchy adds a nice texture. Make sure it’s natural— no added sugars or oils if possible for a cleaner flavor.
- Rolled Oats: You’ll pulse these to oat flour, so fresh oats mean a finer, smoother flour. Avoid instant oats—they won’t give you the same texture.
- Maple Syrup: Adds subtle sweetness and helps bind the mixture. I love the depth it brings versus plain sugar.
- Chocolate Chips: I go for semi-sweet or dark chocolate to balance the sweetness. You can experiment with milk chocolate if you prefer it sweeter.
- Coconut Oil (optional): Just a teaspoon helps melt the chocolate smoothly and adds a glossy finish — you can skip it if you’re in a pinch.
Variations
I love making this recipe my own by swapping a few ingredients depending on mood or season. You’ll find these tweaks easy and fun to try out, so feel free to personalize!
- Pumpkin Spice Twist: Adding pumpkin puree and pumpkin spice really brightened up my cups during fall. The moisture makes them extra soft too.
- No-Sugar Option: Try swapping maple syrup with mashed bananas or a sugar-free syrup to lower sweetness.
- Nut-Free Version: Substitute peanut butter with sunflower seed butter if allergies are a concern — just as delicious!
- Mix-ins: Toss in chopped nuts, dried fruit, or seeds for some crunch and variety.
How to Make No Bake Peanut Butter Oat Cups Recipe
Step 1: Make Your Oat Flour
Start by pulsing rolled oats in a food processor or high-speed blender until they turn into a fine oat flour. This step is crucial because it creates the smooth base you want for your peanut butter cups. Don’t rush—make sure there are no big flakes left; it should almost look like a powder.
Step 2: Melt and Mix Peanut Butter with Maple Syrup
Pop your peanut butter and maple syrup into a microwave-safe bowl and heat for about 40–60 seconds. This softens the peanut butter so when you stir it, the two combine smoothly into a luscious syrupy mixture. Stir really well—this step helps avoid any uneven sweetness later.
Step 3: Combine Oat Flour with the Peanut Butter Mixture
Slowly add the oat flour to your peanut butter mix. You’ll want to mix thoroughly—it should be thick but still moldable. If you find the mixture too dry, no worries! Just add a little extra maple syrup or another spoonful of peanut butter, one teaspoon at a time. When I made the pumpkin spice version, I added pumpkin puree here for a moister finish.
Step 4: Prepare Your Muffin Pan
Line a muffin pan with cupcake liners or, better yet, grab a silicone muffin tray if you have one—it makes getting the cups out a breeze. Without liners, the cups can stick, so don’t skip this! If you prefer bite-sized treats, mini muffin pans work wonderfully too.
Step 5: Fill and Press the Cups
Scoop your mixture into each muffin hole, pressing down firmly with your fingers to form a compact cup base. This part is satisfying—I love seeing how the mixture holds shape. Make sure each cup is evenly packed so they set consistently.
Step 6: Melt Chocolate and Coconut Oil
In a small microwave-safe bowl, combine chocolate chips with that teaspoon of coconut oil (totally optional but so worth it). Heat in short bursts of 30 seconds, stirring between each, until your chocolate is glossy and smooth. Patience here prevents burning and yields perfect melting results.
Step 7: Top the Cups with Chocolate
Pour a layer of melted chocolate over each peanut butter cup base and smooth it with the back of a spoon. If you want to get fancy, sprinkle a little flaky sea salt, colorful sprinkles, or mini chocolate chips on top before the chocolate hardens—adds a nice touch, both visually and flavor-wise.
Step 8: Chill and Set
Pop the whole tray into the fridge for at least 2-3 hours to let everything firm up. Trust me, the wait is worth it for that perfect bite. Once set, carefully remove from the pan or liners and enjoy!
How to Serve No Bake Peanut Butter Oat Cups Recipe
Garnishes
Whenever I serve these, I like to sprinkle flaky sea salt on top — it cuts through the sweetness and makes each bite pop. Sometimes, I add mini chocolate chips or even a tiny bit of crushed pretzels for a salty crunch. These simple touches elevate the cups so well.
Side Dishes
Pairing these with a cup of your favorite tea or coffee is my go-to. They also work great alongside a fresh fruit salad or yogurt for a balanced snack, especially if you’re enjoying them as an afternoon pick-me-up.
Creative Ways to Present
For a cozy gathering, I once arranged these cups on a wooden board with fresh berries and nuts around for a beautiful spread. You can also wrap individual cups in parchment paper and tie with twine for a charming homemade gift — your friends will swoon over this thoughtful touch!
Make Ahead and Storage
Storing Leftovers
I always keep leftover No Bake Peanut Butter Oat Cups in an airtight container in the fridge. They stay fresh and perfectly firm for up to 5 days — just be sure to chill them since the ingredients can get melty at room temperature.
Freezing
Freezing these cups works beautifully if you want to prep in advance. I stack them separated by parchment paper in a freezer-safe box. When I take them out, they thaw in the fridge overnight and still taste just as creamy and satisfying.
Reheating
Since these are no bake and meant to be served chilled, I don’t recommend heating them. But if they get too firm from the fridge, just let them sit at room temperature for 10-15 minutes before enjoying — they soften nicely without losing structure.
FAQs
-
Can I use crunchy peanut butter in the No Bake Peanut Butter Oat Cups Recipe?
Absolutely! Crunchy peanut butter adds a lovely bit of texture to your cups. Just be aware that the chunks might make mixing a bit more challenging and your cups will have little peanut bits throughout, which many people actually enjoy.
-
What if I don’t have a food processor to make oat flour?
If you don’t have a food processor or blender, you can try purchasing pre-made oat flour at the store. Alternatively, finely chopping rolled oats with a knife or crushing them in a sealed bag with a rolling pin can work in a pinch, though the texture might be a little coarser.
- How long do these peanut butter oat cups last?
Stored in an airtight container in the fridge, these cups should stay good and tasty for about 5 days. Beyond that, they can start to dry out or the peanut butter might lose some freshness.
- Can I make this recipe vegan?
Yes! Just be sure your chocolate chips are dairy-free and use a maple syrup that is purely vegan. The peanut butter and oats are naturally vegan, so it’s an easy swap.
- Is there a way to make these cups softer or chewier?
Definitely! Adding a bit of pumpkin puree or even mashed banana to the mixture makes the cups moister and chewier. Just keep an eye on the wet ingredients so your mixture doesn’t get too loose.
Final Thoughts
Honestly, this No Bake Peanut Butter Oat Cups Recipe has become my go-to when I want something quick, sweet, and satisfying without heating up the kitchen. It’s easy, forgiving, and so flexible — you really can make it your own. I hope you give it a try and find yourself reaching for these little cups whenever you want a reliable, delicious snack like I do!
PrintNo Bake Peanut Butter Oat Cups Recipe

These No Bake Peanut Butter Oat Cups are a delicious, quick, and easy treat made with natural ingredients like peanut butter, oats, maple syrup, and chocolate. Perfect for a healthy snack or dessert, they require no baking and can be customized with add-ins like pumpkin puree for extra moisture and flavor.
- Prep Time: 10 minutes
- Cook Time: 0 minutes
- Total Time: 3 hours 10 minutes
- Yield: 12 cups 1x
- Category: Dessert
- Method: No-Cook
- Cuisine: American
- Diet: Vegetarian
Ingredients
Main Ingredients
- 1.5 cups peanut butter
- 1.5 cups rolled oats (processed finely to make oat flour)
- 1/4 cup maple syrup
- 1 cup chocolate chips
- 1 tsp coconut oil (optional)
Optional Add-ins
- 1/4–1/3 cup pumpkin puree (for moister cups)
- Sprinkles, flaky salt, or mini chocolate chips (for topping)
- 1 1/2 tsp pumpkin spice (for pumpkin version)
Instructions
- Make oat flour: Blend the rolled oats in a high-speed blender or food processor until they become a fine oat flour.
- Warm peanut butter and syrup: In a medium microwave-safe bowl, combine peanut butter and maple syrup. Microwave for 40-60 seconds, then stir thoroughly to combine until smooth.
- Mix oat flour in: Slowly add the oat flour to the peanut butter and syrup mixture. Mix well until the mixture is very thick but moldable. If too dry, add a teaspoon of maple syrup or peanut butter at a time. Optionally, mix in pumpkin puree for added moisture.
- Prepare muffin pan: Line a muffin pan with cupcake liners or use a silicone muffin pan for easy removal.
- Form cups: Scoop the peanut butter oat mixture evenly into the muffin pan and press down firmly with your fingers to shape the cups.
- Melt chocolate topping: In a microwave-safe small bowl, combine chocolate chips and coconut oil (if using). Heat in 30-second increments, stirring in between, until fully melted and smooth.
- Add chocolate layer: Pour a layer of melted chocolate on top of each peanut butter oat cup. Smooth the surface with the back of a spoon. Optionally sprinkle flaky salt, sprinkles, or mini chocolate chips before chocolate sets.
- Chill to set: Refrigerate the cups for 2-3 hours until fully set. Carefully remove from the muffin pan and liners or silicone mold.
- Store properly: Keep the cups in an airtight container in the refrigerator for up to 5 days to maintain freshness.
Notes
- For a pumpkin variation, add 1/3 cup pumpkin puree and 1 1/2 tsp pumpkin spice to the peanut butter oat mixture.
- Use silicone muffin pans for easier removal without liners.
- If the mixture is crumbly, add a bit more maple syrup or peanut butter incrementally.
- Store these no-bake treats refrigerated due to fresh ingredients, especially maple syrup.
Keywords: no bake peanut butter oat cups, no bake dessert, healthy snack, peanut butter oats, easy no bake recipe, chocolate peanut butter cups, vegan dessert option