No-Bake Biscoff Cheesecake Cups Recipe

If you’re anything like me and adore that rich, caramel-spiced flavor of Biscoff, then you’re going to fall head over heels for this No-Bake Biscoff Cheesecake Cups Recipe. These little cups are a dream come true when you want an impressive dessert without turning on the oven. Plus, the creamy cheesecake filling paired with the buttery Biscoff crumb base feels like a slice of pure indulgence in every bite.
What I love most is how versatile and user-friendly this dessert is—it’s perfect for warm afternoons, last-minute dinner parties, or whenever you’re craving something sweet but fuss-free. The No-Bake Biscoff Cheesecake Cups Recipe gives you that gourmet touch with minimal effort, which is why I keep coming back to it again and again.
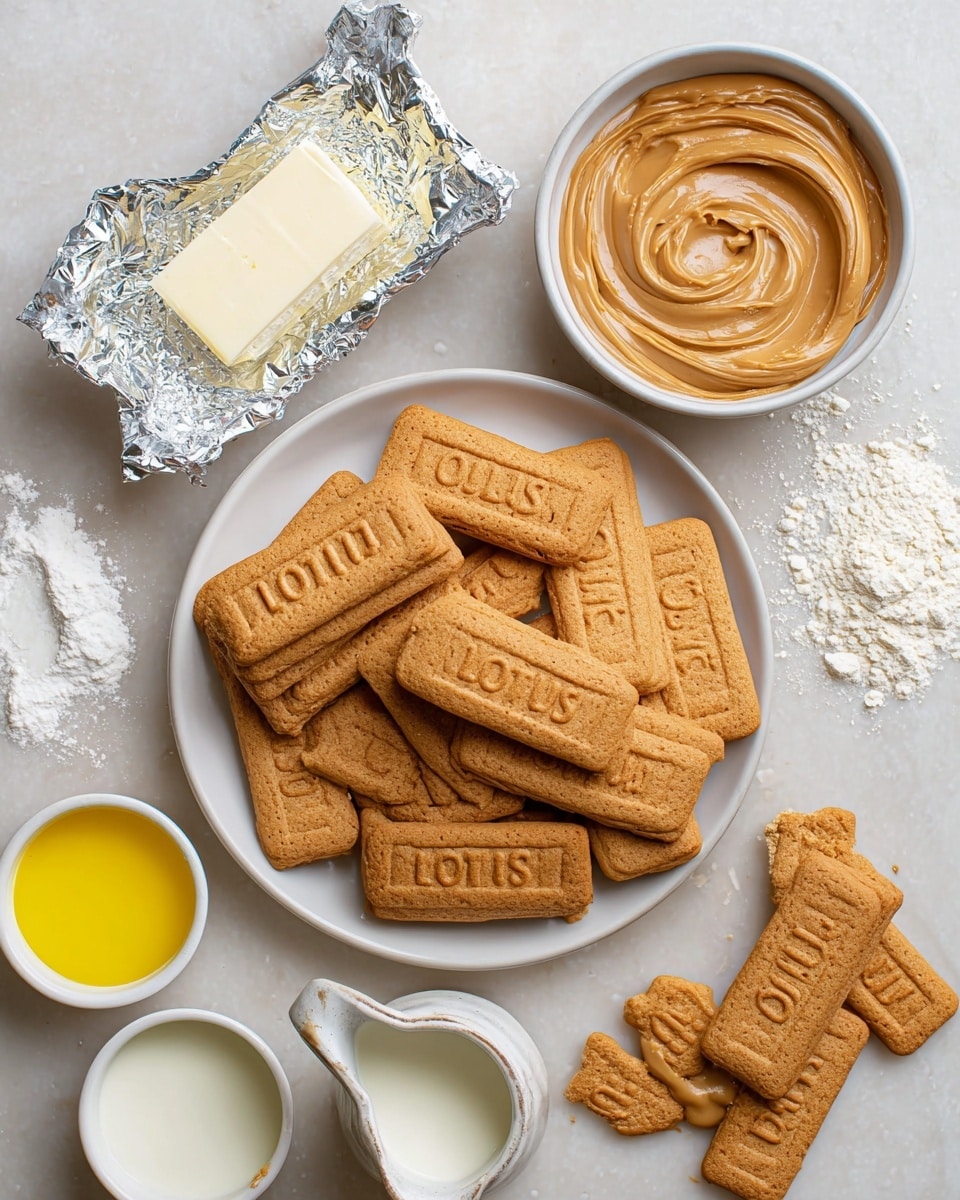
Ingredients You’ll Need
Every ingredient in this recipe works harmoniously to bring out Biscoff’s signature flavor and creamy texture. A little heads-up—make sure your cream cheese is softened nicely; it makes mixing so much smoother.
- Lotus Biscoff biscuits: These form a crisp, spiced base that perfectly complements the creamy filling.
- Unsalted butter: Melted butter helps bind the biscuit crumbs into a sturdy but tender crust.
- Heavy cream: Whipped to soft peaks, it adds that light, fluffy texture to the cheesecake filling.
- Cream cheese: The rich tang balances the sweetness and adds that classic cheesecake creaminess.
- Powdered sugar: It sweetens gently and dissolves smoothly into the filling.
- Biscoff spread: This is where the magic happens—the creamy, spiced spread brings deep caramel goodness straight into the filling and garnish.
- Vanilla extract: A small splash goes a long way to enhance all the flavors.
- Biscoff cookies (for garnish): Halved cookies add a lovely crunch and beautiful finishing touch on top.
Variations
I love that this No-Bake Biscoff Cheesecake Cups Recipe can be personalized so easily—whether that means adding a touch more spice or swapping out ingredients for dietary needs. Feel free to get creative and make it your own!
- Greek yogurt twist: For a tangier kick, replace half the cream cheese with Greek yogurt. I tried this once, and it brightened up the flavors beautifully without losing that silky texture.
- Vegan option: Use coconut cream instead of heavy cream and vegan cream cheese to tailor this recipe to a plant-based diet. The flavor remains indulgent, I promise!
- Chocolate Biscoff combo: Swirl some melted dark chocolate into the filling for those days when you want a little chocolate decadence with your caramel spice.
- Fresh fruit topping: Try topping your cups with fresh raspberries or sliced bananas for a fruity contrast that adds freshness and color.
How to Make No-Bake Biscoff Cheesecake Cups Recipe
Step 1: Create the Biscuit Crumb Base
Start by blitzing the 30 Lotus Biscoff biscuits into fine crumbs—you can use a food processor or place them in a sealed bag and crush them with a rolling pin if you want to keep things low-tech. Melt your butter and pour it over the crumbs, then mix well to combine. Press this mixture firmly into the bottom of your serving cups or jars—this is the foundation, so don’t skimp on pressing it down tightly. I find a small measuring cup works perfectly for compacting the crumbs evenly. Pop them in the fridge while you make the filling so they firm up nicely.
Step 2: Whip Up the Cheesecake Filling
In a large mixing bowl, beat the cream cheese until smooth and creamy—patience here pays off to avoid lumps. Add the powdered sugar, biscoff spread, and vanilla extract, and mix until fully incorporated. In a separate bowl, whip the heavy cream until it forms soft peaks, meaning it holds its shape but is still light and airy. Gently fold the whipped cream into the cream cheese mixture, taking your time to keep that fluffy texture intact. This technique keeps the filling light and not overly dense, which is key to a delightful cheesecake experience.
Step 3: Assemble and Chill
Spoon or pipe the cheesecake filling over your chilled crumb bases, filling each cup near the top. Smooth the surface lightly, and cover them with plastic wrap or lids. Chill in the fridge for at least 4 hours, or ideally overnight—this resting time is essential because it allows the flavors to meld and the filling to set beautifully.
How to Serve No-Bake Biscoff Cheesecake Cups Recipe
Garnishes
When it’s time to impress, I warm up a little extra biscoff spread before drizzling it artistically over each cheesecake cup. Then, I add half a biscoff cookie on top for that satisfying crunch and visual flair. This simple garnish takes the whole dessert to the next level—plus, it’s so pretty on the table!
Side Dishes
I like serving these No-Bake Biscoff Cheesecake Cups Recipe alongside fresh berries or a light fruit salad to balance the richness. A hot cup of coffee or chai tea pairs beautifully, especially if you’re enjoying them as a mid-afternoon treat.
Creative Ways to Present
Once, for a birthday party, I layered the crumb base and cheesecake filling in tall clear glasses, then topped with a sprinkle of crushed Biscoff cookies and edible gold dust for a little sparkle. Presentation like that instantly elevates these cups from casual dessert to celebration-worthy, and they disappear fast!
Make Ahead and Storage
Storing Leftovers
I store any leftover cheesecake cups in an airtight container in the fridge—it keeps them fresh for up to 3 days. The flavors actually deepen after a day, so they often taste even better as leftovers. Just remember to keep them covered to prevent absorbing other fridge odors.
Freezing
I’ve frozen the No-Bake Biscoff Cheesecake Cups Recipe successfully a couple of times when I needed to prep ahead. Just freeze them uncovered for a few hours, then wrap tightly with plastic wrap and place in a container. When thawed overnight in the fridge, the texture holds up remarkably well—though the crumb base is slightly softer, it’s still delicious!
Reheating
This dessert is best enjoyed cold, so I recommend skipping reheating altogether. That said, if you want the biscoff spread drizzle a little warmer for serving, just heat it gently in the microwave for 10-15 seconds. Keep the cups chilled otherwise—they’re at their creamiest and most refreshing straight from the fridge.
FAQs
-
Can I use regular cream cheese instead of room temperature?
It’s best to use cream cheese at room temperature so it mixes smoothly without lumps. If your cream cheese is cold, just microwave it for 10-15 seconds or leave it out for about 30 minutes before preparing the filling.
-
How long do the No-Bake Biscoff Cheesecake Cups stay fresh?
These cups stay fresh in the fridge for up to 3 days when properly covered. Beyond that, the texture may start to change.
-
Can I substitute the Biscoff spread for peanut butter?
While peanut butter will change the flavor profile, it’s a fun alternative if you want a different twist—but just keep in mind it won’t have the same caramel-spiced note that Biscoff brings.
-
What if I don’t have Biscoff biscuits on hand?
If you can’t find Lotus Biscoff biscuits, ginger snaps or speculoos cookies can make a great substitute. The spice and crunch profile is similar, keeping the dessert’s signature flavor close enough.
-
Do I need a food processor for this recipe?
Not at all! Crushing the Biscoff biscuits with a rolling pin inside a sealed plastic bag works just fine. I often do this when I want less cleanup and still get a fine crumb base.
Final Thoughts
This No-Bake Biscoff Cheesecake Cups Recipe holds a special place in my dessert rotation because it’s quick, delicious, and always wows guests. If you’re looking for a no-fuss treat that feels indulgent and unique, you simply have to try it. Trust me, once you experience that creamy, caramel-spiced bliss, you’ll find yourself making these cups again and again—just like I do!
PrintNo-Bake Biscoff Cheesecake Cups Recipe

Delight in these luscious No-Bake Biscoff Cheesecake Cups featuring a crunchy Lotus Biscoff crumb base with a creamy, fluffy cheesecake filling infused with biscoff spread. Easy to prepare and perfect for any occasion, these individual dessert cups require no baking and are finished with a generous biscoff spread garnish and cookie halves for extra crunch and flavor.
- Prep Time: 20 minutes
- Cook Time: 0 minutes
- Total Time: 4 hours 20 minutes (including chilling time)
- Yield: 8 individual cups 1x
- Category: Dessert
- Method: No-Cook
- Cuisine: American
Ingredients
Crumb Base
- 30 Lotus Biscoff biscuits
- 2 tablespoons unsalted butter, melted
Cheesecake Filling
- 16 oz heavy cream (2 cups)
- 8 oz cream cheese, at room temperature
- 1/2 cup powdered sugar
- 1/2 cup Biscoff spread
- 1 teaspoon vanilla extract
Garnish
- 1/2 cup Biscoff spread
- 8 Biscoff cookies, cut in half
Instructions
- Prepare the crumb base: Crush 30 Lotus Biscoff biscuits into fine crumbs using a food processor or by placing them in a ziplock bag and crushing with a rolling pin. Combine the crumbs with 2 tablespoons of melted unsalted butter until the mixture resembles wet sand.
- Form the base: Spoon the crumb mixture into individual serving cups and press firmly and evenly on the bottom to create a compact crust layer. Place the cups in the refrigerator to chill while you prepare the filling.
- Whip the cream: In a large mixing bowl, whip 16 oz (2 cups) of heavy cream until stiff peaks form. This will give the cheesecake filling its light and airy texture.
- Mix the cheesecake filling: In another bowl, beat 8 oz of room temperature cream cheese until smooth. Gradually add 1/2 cup powdered sugar, 1/2 cup Biscoff spread, and 1 teaspoon vanilla extract, continuing to beat until fully combined and fluffy.
- Combine cream and cream cheese mixture: Gently fold the whipped cream into the cream cheese and biscoff mixture until well incorporated, being careful not to deflate the whipped cream.
- Assemble the cheesecake cups: Spoon or pipe the cheesecake filling over the chilled crumb base in each cup, smoothing the surface evenly.
- Chill: Refrigerate the assembled cups for at least 4 hours or overnight to allow the filling to set properly.
- Garnish and serve: Before serving, warm 1/2 cup Biscoff spread slightly to make it drizzle-friendly. Drizzle over the cheesecake cups and garnish each with halves of 8 Biscoff cookies. Enjoy chilled.
Notes
- Ensure the cream cheese is at room temperature to avoid lumps in the filling.
- For a firmer crust, you can refrigerate the crumb base for 30 minutes before adding the filling.
- You can substitute heavy cream with whipping cream if preferred.
- If Biscoff spread is too thick, warm it gently over a double boiler for easier mixing and drizzling.
- These cheesecake cups keep well in the refrigerator for up to 3 days.
Keywords: No-Bake Cheesecake, Biscoff, Dessert Cups, Easy Cheesecake, Cream Cheese Dessert, Lotus Cookie Crust