Meringue Christmas Trees Recipe
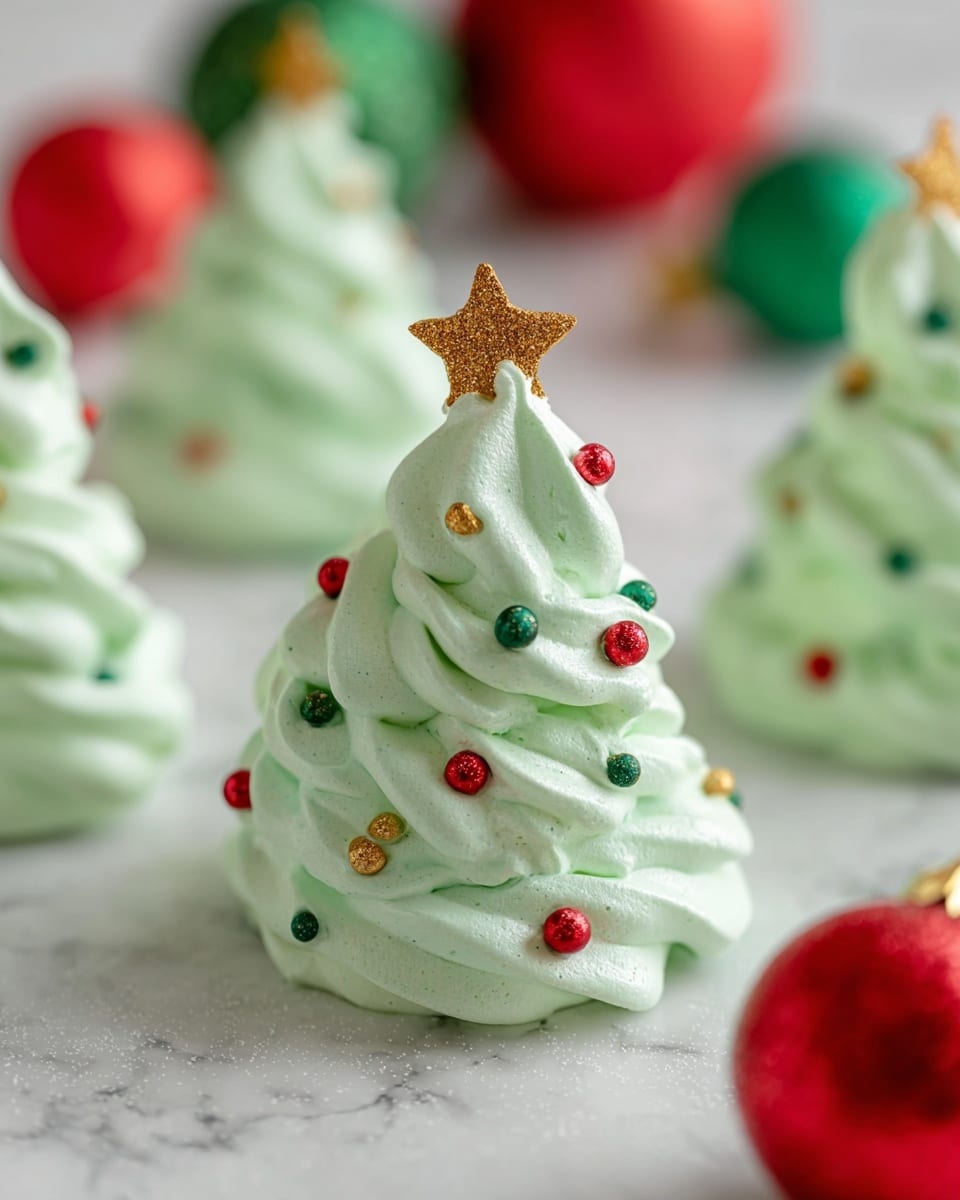
I absolutely adore making these Meringue Christmas Trees Recipe every holiday season—it’s such a fun twist on classic meringues, and they bring a little festive magic right to my kitchen. What makes them truly special is that they’re light, airy, and just sweet enough, plus that gorgeous green color and sprinkles make them look like little edible Christmas trees. Whether you’re hosting a holiday party or want a charming treat to bake with the kids, this recipe is a guaranteed hit.
One of the best parts? These meringue trees don’t require fancy ingredients or complicated steps, just some patience and a good electric mixer. I’ve found that they’re perfect to make ahead of time, so you can focus on other holiday prep while they gently dry in the oven. If you’ve never thought of shaping meringue as trees, you’ll love how festive and easy this Meringue Christmas Trees Recipe is—you’re going to wow your friends and family with almost zero stress.
Ingredients You’ll Need
These ingredients work together to create that perfect meringue texture—crispy outside, airy inside—with just a hint of vanilla warmth. When shopping, make sure the egg whites are separated perfectly without any yolk to get that beautiful fluffy lift.
- Large egg whites: Room temperature egg whites whip up better and achieve more volume, so plan ahead to get them out of the fridge early.
- Cream of tartar: This little acid helps stabilize the egg whites and keeps the meringue from collapsing—don’t skip it!
- Granulated sugar: Adding sugar slowly is key to that glossy, stiff peak stage—patience pays off here.
- Vanilla extract: I love the subtle vanilla flavor, but feel free to try almond extract for a fun twist.
- Green gel food coloring: Gel works best for vibrant color without thinning the meringue mixture.
- Round sprinkles (optional): These mimic little ornaments—perfect for decorating your meringue Christmas trees.
- Star sprinkles (optional): I always add stars on top to give the finishing festive touch.
Variations
I love experimenting with different finishes and flavors in this Meringue Christmas Trees Recipe—sometimes I add a bit of peppermint extract to give it that cool holiday twist. Feel free to personalize these as much as you’d like; the beauty is in the simplicity and your creativity.
- Chocolate-dipped bases: I dipped the bottoms in melted dark chocolate once, and it made the treat feel extra special and indulgent—plus it’s a fun contrast to the sweetness.
- Colored sprinkles mix: Swapping in red, gold, or silver sprinkles can turn these trees into a whole new look for different parties or just to match your decor.
- Mini meringue stars: Piping smaller meringue stars to decorate on top adds dimension, and kids love placing them themselves.
- Vegan alternative: If you want to try vegan meringue using aquafaba, it’s doable but needs a bit more practice—let me know if you want tips on that!
How to Make Meringue Christmas Trees Recipe
Step 1: Whip Up Those Egg Whites to Stiff Peaks
Start by beating your room temperature egg whites with cream of tartar using a clean, grease-free bowl and beaters—this is crucial for volume. I usually use my stand mixer on medium speed until the egg whites get frothy, then slowly add sugar a tablespoon at a time while increasing speed to high. You’ll know you’re ready for the next step when the meringue forms stiff, glossy peaks that hold their shape without drooping.
Step 2: Add the Flavor and Color Carefully
Gently fold in the vanilla extract and a small amount of green gel food coloring until the color is even. I add the gel slowly, just a tiny bit at a time, to get that perfect Christmas tree green without overmixing. Overmixing at this point can deflate your meringue, so be gentle!
Step 3: Pipe Your Christmas Trees
Fit a piping bag with a star tip (or whatever shape you like) and start piping meringue mounds onto a parchment-lined baking sheet in a tiered cone shape to mimic a Christmas tree. I find working from the bottom up in layers creates the cutest, most recognizable shape. Leave a little space between trees because they do spread slightly while baking.
Step 4: Decorate with Sprinkles Before Baking
Sprinkle your round and star sprinkles gently over the piped meringues. This is the fun part! Just don’t overdo it, or the meringues might not crisp up properly around them. If you prefer, you can add decorations after baking with a dab of icing instead.
Step 5: Bake Low and Slow
This recipe is all about the low and slow approach—bake your meringue trees at around 200°F (93°C) for 1.5 to 2 hours. You want them completely dry and crisp without browning. I usually check by gently lifting one; if it feels firm and doesn’t stick, you’re good. Then, turn off the oven and let the meringues cool inside with the door slightly ajar to avoid cracks from sudden temperature changes.
How to Serve Meringue Christmas Trees Recipe

Garnishes
I love adding a little edible shimmer dust or a light dusting of powdered sugar after baking to mimic snow on the trees. The round and star sprinkles bring the perfect festive look, but if you want to get creative, tiny edible pearls or crushed candy canes add texture and extra holiday vibes.
Side Dishes
These meringue trees pair beautifully with a cup of peppermint hot chocolate or mulled wine—something warm and cozy to balance the crisp sweetness. If you’re serving a holiday dessert platter, complement them with gingerbread cookies and fresh berries for color and contrast.
Creative Ways to Present
One of my favorite festive traditions is arranging the Meringue Christmas Trees Recipe upright on a platter surrounded by holly leaves or edible glitter for sparkle. For kids’ parties, placing them on small cupcake liners or creating a mini forest centerpiece always delights. You can even glue pretzel sticks as trunks before baking for an extra touch of realism.
Make Ahead and Storage
Storing Leftovers
If you have leftover meringue trees (which is rare because they disappear fast!), store them in an airtight container at room temperature to keep their crisp texture. Moisture is the enemy here, so avoid refrigeration as it can make them sticky and chewy.
Freezing
I’ve tried freezing baked meringue trees wrapped well in plastic wrap and then foil. They thaw great and stay crisp, but you’ll want to let them come fully to room temp before serving to avoid condensation.
Reheating
Since meringues are all about texture, reheating isn’t usually needed—but if they get a little soft, a quick 10-minute stint in a low oven (about 200°F) with the door cracked open helps dry them back out nicely.
FAQs
-
Can I make Meringue Christmas Trees Recipe without cream of tartar?
Yes, but cream of tartar helps stabilize the egg whites and gives your meringues a better structure. If you don’t have it, you can substitute with a few drops of lemon juice or white vinegar to achieve similar effects.
-
How do I know when the meringue trees are done baking?
They’re done when they feel dry and crisp to the touch and easily lift off the parchment without sticking. There should be no softness or tackiness on the surface. Leaving them to cool in the oven helps them set fully.
-
Can I use regular food coloring instead of gel?
You can, but gel food coloring is preferable because it doesn’t add extra liquid that can deflate your meringue. If you use liquid coloring, add it sparingly and watch the texture closely.
-
What’s the best way to pipe the Meringue Christmas Trees Recipe?
Using a piping bag with a sturdy star tip lets you create the layers to mimic tree branches. Start with a larger base, then pipe smaller circles/layers on top to build the shape. Practice on parchment first if you’re new to piping.
-
Can I add other flavors to this meringue recipe?
Absolutely! Vanilla is classic, but almond, peppermint, or even a touch of lemon zest can be wonderful additions. Just be careful not to add too much liquid so the meringue keeps its texture.
Final Thoughts
This Meringue Christmas Trees Recipe is one of those joyful holiday projects that brings a little sparkle and sweetness to the season without fuss. I love seeing the smiles when I serve these delicate green beauties, and honestly, making them feels like a special tradition I look forward to every year. Give them a try—you’ll enjoy how making and sharing these little trees adds to your festive cheer and maybe even becomes a holiday favorite in your home, too.
PrintMeringue Christmas Trees Recipe

These festive Meringue Christmas Trees are light, airy, and perfect for holiday celebrations. Made with simple ingredients like egg whites and sugar, these sweet treats are piped into tree shapes, decorated with green food coloring and sprinkles to resemble Christmas trees, making them a delightful and visually appealing dessert or snack for the season.
- Prep Time: 15 minutes
- Cook Time: 2 hours 30 minutes
- Total Time: 2 hours 45 minutes
- Yield: 10–12 Christmas tree meringues 1x
- Category: Dessert
- Method: Baking
- Cuisine: American
- Diet: Vegetarian
Ingredients
For the Meringue Trees
- 4 large egg whites, room temperature
- ¼ teaspoon cream of tartar
- 1 cup granulated sugar
- 1 teaspoon vanilla extract
- Green gel food coloring, as needed
For Decoration
- Round sprinkles (optional)
- Star sprinkles (optional)
Instructions
- Prepare the egg whites. In a clean, grease-free bowl, whisk the 4 large egg whites along with ¼ teaspoon cream of tartar using an electric mixer on medium speed until soft peaks form. This stage is crucial for the meringue’s structure.
- Add sugar gradually. Increase the mixer speed to high and slowly add 1 cup granulated sugar, one tablespoon at a time, allowing the sugar to dissolve completely after each addition. Continue to beat the mixture until stiff, glossy peaks form and the sugar is fully dissolved, ensuring the meringue is smooth and stable.
- Incorporate vanilla and color. Gently fold in 1 teaspoon vanilla extract and add green gel food coloring a little at a time until you achieve your desired festive green shade. Be careful not to deflate the meringue while mixing.
- Pipe the Christmas trees. Fit a piping bag with a star-shaped tip and fill it with the green meringue mixture. On a parchment-lined baking sheet, pipe the meringue in a layered triangular shape resembling a Christmas tree, starting at the base and working upwards to form tiers.
- Add decorations. While the meringue is still soft, decorate with optional round and star sprinkles to mimic ornaments and a tree topper, adding a festive touch.
- Bake the meringue trees. Preheat your oven to 200°F (93°C). Bake the piped meringue trees for approximately 90 minutes to 2 hours until they are completely dry and can be easily lifted off the parchment without sticking. Turn off the oven and leave the meringues inside for another hour to cool and dry out further, which prevents cracking and preserves crispness.
- Serve and store. Once completely cooled, carefully remove the meringue trees and serve immediately, or store in an airtight container to keep them crisp for up to a week.
Notes
- Ensure egg whites are at room temperature for best volume.
- Use a clean, grease-free mixing bowl to help the meringue whip properly.
- Adding cream of tartar stabilizes the egg whites for a firmer meringue.
- Low oven temperature is key to drying out the meringue without browning.
- Do not open the oven door frequently during baking, as this can cause the meringue to crack.
- Colored gel food coloring is preferred as it does not alter the consistency like liquid colors can.
- Store meringues in an airtight container to maintain crispness and prevent moisture absorption.
Keywords: meringue, Christmas trees, holiday dessert, festive dessert, egg whites, baked meringue, Christmas treats