Melted Snowman Peanut Butter Cookies Recipe
Oh, I’m so excited to share this Melted Snowman Peanut Butter Cookies Recipe with you! These are not your average peanut butter cookies—they come alive with a fun and festive twist that’s just perfect for chilly winter days or holiday cookie swaps. Imagine that warm, nutty peanut butter flavor combined with sweet white chocolate and those adorable melted snowman faces you can create right on top. It’s a delightful combo that always brings a smile to my face (and everyone else’s at the party!).
What I love most about this Melted Snowman Peanut Butter Cookies Recipe is how it blends simple ingredients into something incredibly whimsical yet easy to make. Whether you’re baking with the kids or just want a cheerful treat to brighten your day, these cookies deliver. Plus, the decorations let you get creative without needing fancy skills or tools. Seriously, you’ll want to keep this recipe handy all winter long!
Ingredients You’ll Need
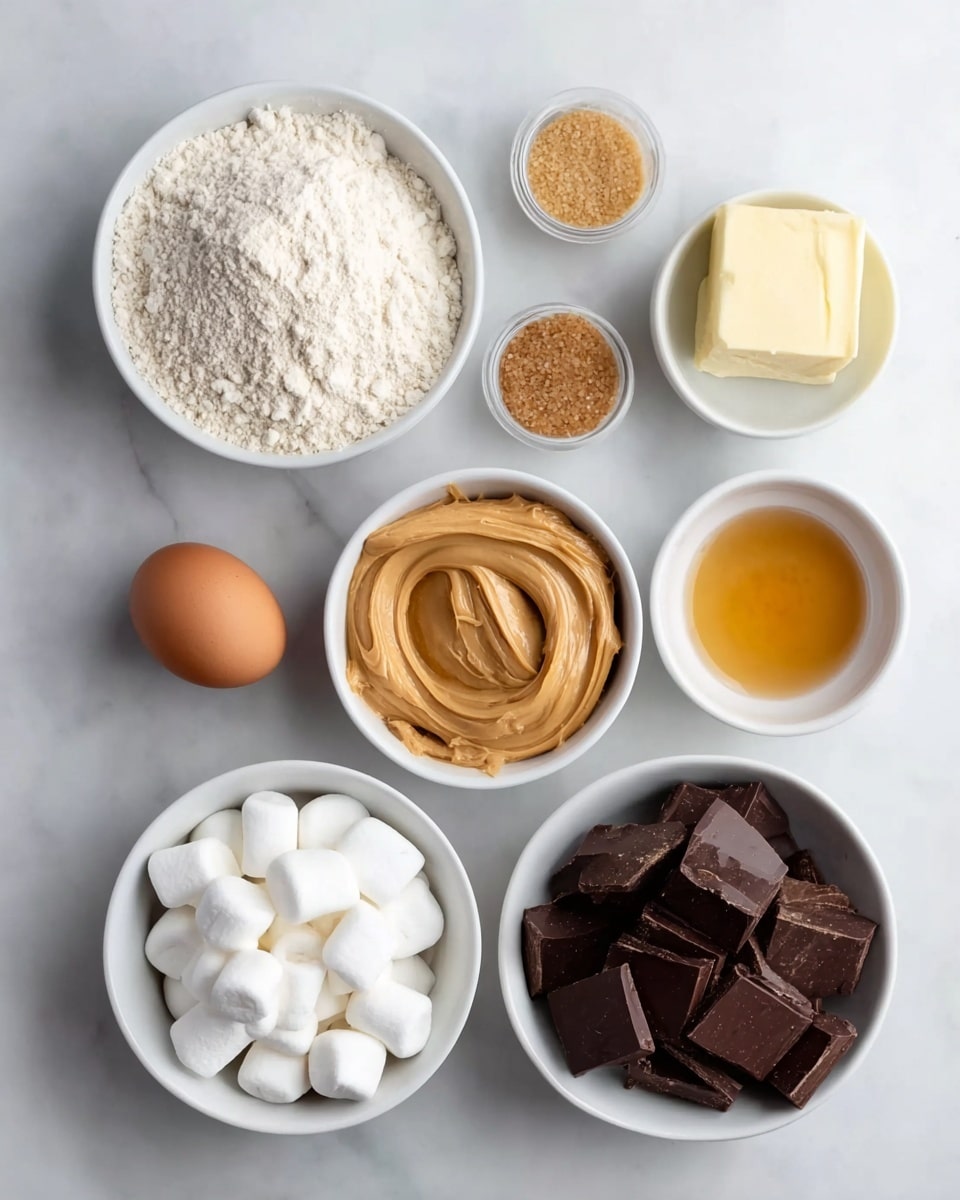
Each ingredient plays a key role in nailing the perfect balance of texture and flavor in these Melted Snowman Peanut Butter Cookies. I usually recommend using fresh, high-quality basics—you’ll taste the difference!
- Smooth peanut butter: Creamy works best here to give that classic peanut butter cookie richness.
- Butter, softened: Softened butter helps the dough whip up easily while adding a tender bite to the cookie.
- Brown sugar: Adds a subtle molasses note that deepens the flavor.
- Granulated sugar: Balances sweetness and helps achieve that slight crisp edge.
- Egg (room temperature): Bringing the egg to room temp ensures it blends smoothly without cool spots.
- Vanilla extract: A touch of vanilla accentuates all those cozy flavors.
- All-purpose flour: The base for structure—measure carefully to avoid dry cookies.
- Baking powder: Gives a subtle lift so the cookies aren’t too dense.
- Baking soda: Reacts with the sugars and acidity, adding tenderness and spread.
- Corn starch: This little ingredient brings softness and a delicate texture.
- Salt: Just a pinch enhances all the other flavors without being salty.
- White chocolate peanut butter cups: These are the “melting snowman’s bodies” — so fun and tasty!
- White chocolate chips (melted): Used for that smooth snowy shine on top.
- Black candy melts or semi-sweet chocolate chips: Perfect for drawing the eyes and buttons.
- Orange candy melts: Ideal for the little carrot noses!
Variations
While I adore the original Melted Snowman Peanut Butter Cookies Recipe, it’s fun to make it your own. Feel free to swap or add ingredients to suit your taste or dietary needs. I find that tweaking things a bit keeps the baking adventure interesting.
- Gluten-Free: I’ve swapped the all-purpose flour for a 1:1 gluten-free blend and the cookies still come out wonderfully soft and tasty.
- Crunchy Peanut Butter: If you love texture, try crunchy peanut butter—it gives a lovely surprise crunch inside.
- Darker Chocolate: Using dark chocolate for the eyes and buttons adds a nice richness, and I personally like the contrast it creates.
- No Candy Melts: You can always use colored frosting or edible markers if you don’t have candy melts handy.
- Nut-Free Version: For friends with nut allergies, sunflower seed butter makes an excellent substitute.
How to Make Melted Snowman Peanut Butter Cookies Recipe
Step 1: Cream the Peanut Butter and Butter Until Fluffy
Start by beating together your softened butter and smooth peanut butter until the mixture is creamy and fluffy—this usually takes about 2 minutes with an electric mixer on medium speed. I find this step so satisfying because it’s the base of that lovely soft texture. Make sure your butter is truly softened; otherwise, it won’t whip up well, and you’ll notice denser cookies.
Step 2: Add Sugars, Egg, and Vanilla
Next, add both brown sugar and granulated sugar. Keep beating until everything is blended and a little lighter in color. Then, crack in the egg (room temperature is best to prevent any curdling) and the vanilla extract. Mix just until combined. Overmixing here can make the cookies tough, so I usually keep it gentle from this point.
Step 3: Combine Dry Ingredients Separately
In a separate bowl, whisk together the flour, baking powder, baking soda, corn starch, and salt. This helps distribute the leavening agents evenly, which is super important for a consistent rise and texture.
Step 4: Gently Mix Dry Ingredients Into Wet Mixture
Slowly add the dry ingredients into your peanut butter mixture, folding carefully until just mixed. It’s tempting to keep stirring, but I remind myself that less is more here to keep the cookies soft and tender. The dough should be firm enough to scoop but not crumbly.
Step 5: Form Dough Balls & Add the White Chocolate Peanut Butter Cups
Preheat your oven to 350°F (175°C). Then, scoop out cookie dough balls about a tablespoon each onto your baking sheet, leaving space for spreading. Gently press one white chocolate peanut butter cup onto the top of each dough ball—this will create the snowman’s body once baked. You don’t need to press too hard; just enough to keep it in place.
Step 6: Bake and Cool Slightly
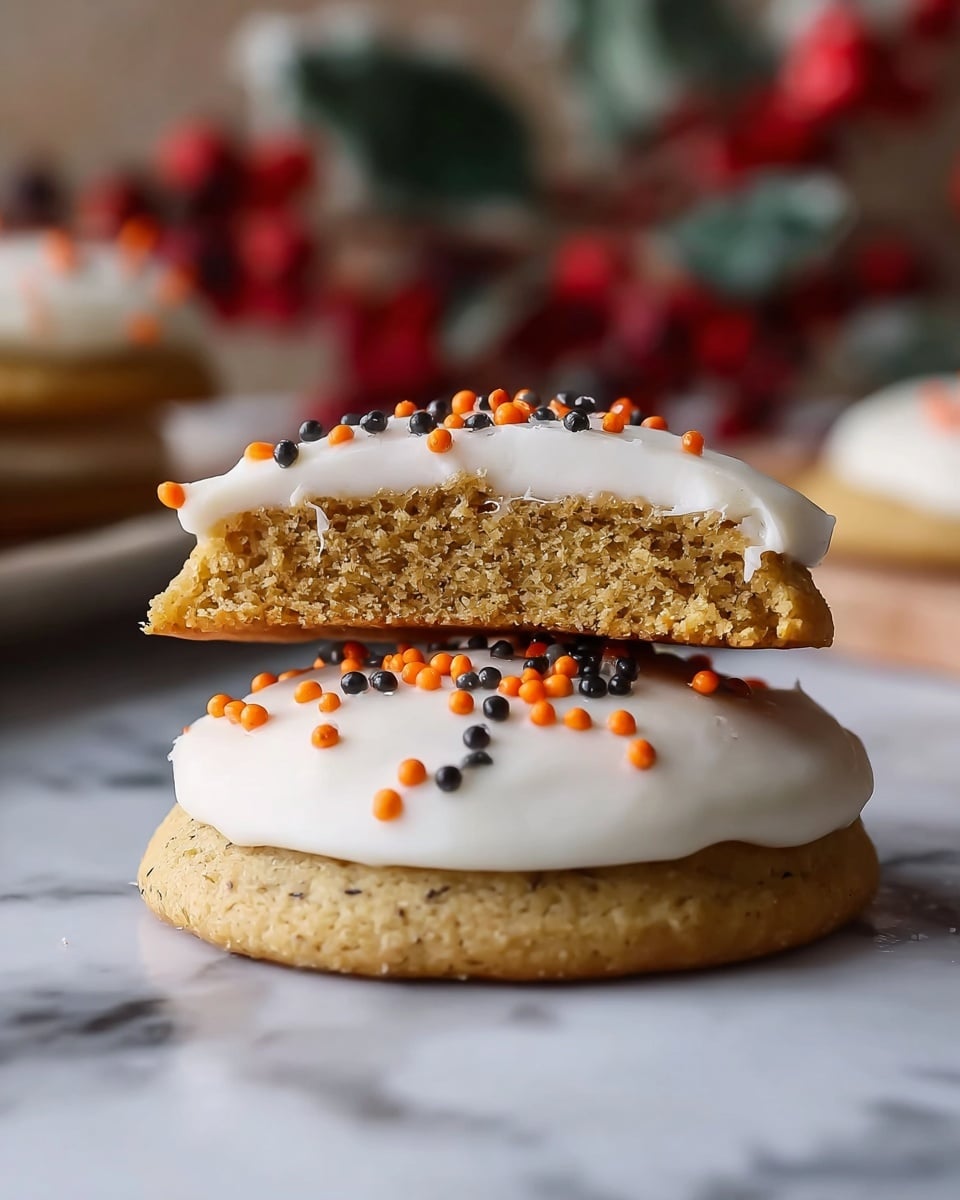
Bake for about 10 to 12 minutes until the edges are just set and lightly golden but the centers remain soft. This baking time is crucial because overbaking makes the cookies dry, and underbaking leaves them too doughy. Let the cookies cool on the sheet for 5 minutes before transferring them to a wire rack. They’ll firm up and be easier to decorate.
Step 7: Decorate the Snowmen
While your cookies cool, melt the white chocolate chips, black candy melts, and orange candy melts in separate microwave-safe bowls (use 20-second bursts, stirring in between). Using a small spoon or piping bag, carefully outline and fill the white melted “snow” on top of the peanut butter cups. Then, use the black melted chocolate to create the eyes and buttons, and the orange melt for the carrot noses. I usually work on a few cookies at a time so the melts don’t harden before I finish decorating.
How to Serve Melted Snowman Peanut Butter Cookies Recipe
Garnishes
I like to keep it simple with garnishes—sometimes just a light dusting of powdered sugar to mimic fresh snow on the tray. If you’re feeling fancy, a sprinkle of edible glitter or a few colorful sprinkles around the plate makes the snowman cookies pop even more. Plus, it adds a little holiday magic that everyone notices.
Side Dishes
Personally, I love pairing these cookies with a warm mug of hot cocoa or a glass of cold milk (nothing beats dipping a snowman cookie, right?). They also go beautifully with a bowl of fresh fruit or a simple cup of tea for an afternoon treat. If you’re bringing these to a gathering, consider setting out a platter with some savory cheese and crackers to balance the sweetness.
Creative Ways to Present
Once, for a winter party, I arranged the Melted Snowman Peanut Butter Cookies Recipe on a platter lined with shredded coconut to look like snow. I added mini marshmallows here and there and scattered some pine sprigs for that forest vibe—everyone loved the festive look! You could even place the cookies in cellophane bags tied with colorful ribbons as little gifts. It’s such an easy way to spread some cheer.
Make Ahead and Storage
Storing Leftovers
Store any leftovers in an airtight container at room temperature for up to 4 days. I find keeping a piece of bread in the container helps keep the cookies soft and moist, which is a neat trick I learned from my grandma. Just make sure the container is sealed well to avoid any stale edges.
Freezing
If you want to freeze the cookies, it’s best to freeze the plain baked cookies before decorating. Arrange them in a single layer on a baking sheet, freeze until firm, then stack with parchment paper between layers in a freezer-safe bag. When you’re ready, thaw and then decorate as usual. I’ve done this for holiday cookie prep, and it saves so much time!
Reheating
To freshen up the cookies after storage, pop them in the microwave for 10-15 seconds. This melts the white chocolate a bit, making them even more ooey-gooey. Just be careful not to overheat or they’ll get too soft and lose their shape. Alternatively, warming them briefly in a low oven (about 300°F) works well, too.
FAQs
-
Can I use natural peanut butter for the Melted Snowman Peanut Butter Cookies Recipe?
You can, but keep in mind natural peanut butter tends to be more oily and runny, which might change your cookie’s texture and how much it spreads. If you use natural peanut butter, I recommend chilling the dough before baking to keep the cookies from flattening too much.
-
What’s the best way to melt the candy melts without burning?
I always melt candy melts in short 20-30 second bursts in the microwave, stirring well between each burst. This helps prevent overheating and clumping. If you prefer, you can also melt them gently over a double boiler, stirring constantly until smooth.
-
Can I decorate these cookies ahead of time?
Definitely! Just make sure the cookies are completely cool before decorating, and store them in an airtight container. The decorations hold up well for a few days, making this a great make-ahead cookie for parties.
-
How do I prevent my cookies from spreading too much?
Using softened—not melted—butter and chilling your dough for 15-20 minutes before baking helps control spreading. Also, avoid flattening the dough balls too much before putting the peanut butter cups on top.
-
Can I substitute the white chocolate peanut butter cups?
Yes, you can substitute with regular white chocolate chips or any candy of your choice. Just keep in mind that the peanut butter cups add a nice flavor and structure that makes the “snowman” effect so cute, so pick something slightly thick and sturdy.
Final Thoughts
Honestly, this Melted Snowman Peanut Butter Cookies Recipe holds a special place in my heart—it’s become our go-to festive treat every winter. I love how it brings out smiles not just because of the taste, but because of the fun decorating process that feels like a craft project. If you try making these at home, I have no doubt you’ll enjoy every step as much as the eating part. So grab your peanut butter and candy melts, and let’s get baking—your next favorite cookie is waiting!
PrintMelted Snowman Peanut Butter Cookies Recipe

These Melted Snowman Peanut Butter Cookies combine the rich, creamy flavor of peanut butter with the sweetness of white chocolate, creating a festive and delightful treat. Decorated with melted white and colored chocolate, these cookies capture the charm of a melted snowman, perfect for holiday celebrations or any time you crave a fun, delicious cookie.
- Prep Time: 15 minutes
- Cook Time: 12 minutes
- Total Time: 30 minutes
- Yield: 9 cookies 1x
- Category: Dessert
- Method: Baking
- Cuisine: American
Ingredients
Peanut Butter Cookie Base
- 1/2 cup smooth peanut butter
- 1/2 cup butter, softened
- 1/2 cup brown sugar
- 1/3 cup granulated sugar
- 1 egg, at room temperature
- 1/2 tsp vanilla extract
- 1 & 1/3 cups all-purpose flour
- 1/2 tsp baking powder
- 1/2 tsp baking soda
- 1 tbsp corn starch
- 1/4 tsp salt
Decoration
- 9 white chocolate peanut butter cups
- 2/3 cup white chocolate chips, melted
- 3 tablespoons black candy melts or semi-sweet chocolate chips, melted
- 1 tablespoon orange candy melts, melted
Instructions
- Preheat Oven: Preheat your oven to 350°F (175°C) to prepare for baking the cookies.
- Prepare Dough: In a large bowl, cream together the softened butter and smooth peanut butter until smooth and well mixed. Add the brown sugar and granulated sugar, and beat until fluffy.
- Add Wet Ingredients: Beat in the egg and vanilla extract until combined thoroughly.
- Combine Dry Ingredients: In a separate bowl, whisk together the all-purpose flour, baking powder, baking soda, corn starch, and salt.
- Mix Dry and Wet Ingredients: Gradually add the dry ingredients to the wet mixture, stirring until a uniform dough forms.
- Shape Cookies: Scoop dough into approximately 1.5-inch balls and place them on a baking sheet lined with parchment paper, leaving enough space between them.
- Bake Cookies: Bake in the preheated oven for 10-12 minutes or until the edges are lightly golden but the center is still soft.
- Cool Cookies: Remove the cookies from the oven and let them cool on the baking sheet for 5 minutes, then transfer to a wire rack to cool completely.
- Apply White Chocolate Layer: Melt the white chocolate chips in a microwave or double boiler. Spread or drizzle the melted white chocolate over each cooled cookie to create the snowy base of the melted snowman.
- Add Peanut Butter Cup Heads: Place one white chocolate peanut butter cup on the top part of each cookie to represent the snowman’s head.
- Decorate Faces and Buttons: Melt the black candy melts or semi-sweet chocolate chips, and the orange candy melts in separate bowls. Use the black melted chocolate to create eyes, mouth, and buttons on the snowman, and use the orange melted candy to create a carrot nose on the head.
- Set Decorations: Allow the chocolate decorations to set completely at room temperature or in the refrigerator before serving.
Notes
- For best results, use room temperature egg and softened butter to ensure the dough blends well.
- You can substitute the black candy melts with semi-sweet chocolate chips melted carefully if candy melts are unavailable.
- The white chocolate layer should be allowed to cool slightly before decorating to prevent the peanut butter cup from melting.
- Store cookies in an airtight container at room temperature for up to 5 days.
- These cookies freeze well; wrap individually and freeze up to 3 months.
Keywords: Peanut Butter Cookies, Holiday Cookies, Melted Snowman Cookies, White Chocolate Cookies, Festive Treats