Magnolia Bakery’s Famous Banana Pudding Recipe

If you’ve ever tasted Magnolia Bakery’s Famous Banana Pudding Recipe, you know it’s the kind of dessert that’s both comforting and downright addictive. The creamy layers of vanilla pudding, fresh bananas, and crisp vanilla wafers come together in a perfect harmony that’s just hard to beat. I first tried this recipe at a family gathering, and it instantly became a crowd favorite — I promise, it’ll win over all your guests too.
Whether you’re making it for a summer picnic, a holiday party, or just a cozy night in, this banana pudding hits the spot every time. What makes Magnolia Bakery’s Famous Banana Pudding Recipe truly special is its simplicity paired with such indulgent flavors; it’s easy to whip up yet feels like a fancy treat. Plus, it’s a fantastic make-ahead dessert, so you’re not stuck in the kitchen last minute.
Ingredients You’ll Need
These ingredients work together to create that rich, creamy pudding layered with fresh banana goodness and the perfect vanilla crunch. When shopping, try to get fresh, ripe bananas and the classic vanilla wafers to stay true to the original recipe’s texture and flavor.
- Sweetened condensed milk: This adds a lovely sweetness and creamy texture without needing extra sugar; I love how it balances the pudding.
- Ice cold water: Helps the instant pudding set just right; cold water really makes a difference in texture.
- Instant vanilla pudding mix: I use Jell-O brand as recommended because it thickens perfectly and has that classic vanilla taste.
- Heavy cream: Whipped until stiff, this component adds luxurious creaminess and elevates the pudding’s texture.
- Vanilla wafers: Nabisco Nilla Wafers are a must—they stay crisp enough to add crunch but soften slightly to blend with the pudding.
- Ripe bananas: The star of the show! Make sure they’re ripe but still firm enough to slice neatly for the layers.
Variations
While I love sticking to the classic Magnolia Bakery’s Famous Banana Pudding Recipe, I’ve experimented a bit over time. Feel free to play around with it to fit your taste or dietary needs—it’s pretty forgiving!
- Chocolate twist: I once added a layer of chocolate pudding for a rich duo flavor. It was a big hit during a family birthday party.
- Dairy-free substitution: If you can’t have dairy, try coconut cream whipped instead of heavy cream and a dairy-free instant pudding mix. It’s surprisingly good!
- Extra fresh fruit: Adding sliced strawberries or even toasted coconut on top adds a fun, fresh note that I like for summer barbecues.
- Individual servings: Preparing it in small jars or cups makes for a charming presentation and easy portion control when guests arrive.
How to Make Magnolia Bakery’s Famous Banana Pudding Recipe
Step 1: Whip up the pudding base
Start by combining the sweetened condensed milk, ice cold water, and instant vanilla pudding mix in a large mixing bowl. Whisk them together vigorously for about 2 minutes until the mixture starts to thicken. This step is key—don’t rush it! Letting the pudding set for a little while before folding in the cream gives you that silky texture.
Step 2: Whip the heavy cream
In a separate bowl, whip the heavy cream to stiff peaks using an electric mixer. I like to start on low speed to avoid splatters and then ramp it up. Be careful not to overwhip or you’ll end up with butter — but if it happens, just add a little cream to salvage it!
Step 3: Fold cream into pudding
Gently fold the whipped cream into the pudding mixture using a spatula, making sure to keep as much air in the mixture as possible. This lightens up the dessert and gives it that airy texture you want in Magnolia Bakery’s Famous Banana Pudding Recipe.
Step 4: Assemble the layers
Start by placing a layer of vanilla wafers at the bottom of your serving dish. Then add sliced bananas in a single layer, followed by a generous scoop of the pudding mixture. Repeat these layers until you run out of ingredients, finishing with a pudding layer on top. Trust me, layering is worth the little extra time—it makes all the difference in flavor distribution.
Step 5: Chill and let flavors meld
Cover your dish with plastic wrap and refrigerate for at least 4 hours, though overnight is even better. The chilling step allows the vanilla wafers to soften slightly, blending beautifully with the creamy layers. When I make this, I often prepare it the night before a gathering—it’s always a relief to have dessert ready ahead of time!
How to Serve Magnolia Bakery’s Famous Banana Pudding Recipe
Garnishes
While the pudding is delicious on its own, I like to add a few garnishes for an extra touch. A sprinkle of crushed vanilla wafers on top adds a little crunch, and sometimes I grate a bit of white chocolate or dust a hint of cinnamon. Fresh mint leaves also add a lovely aroma and color contrast that my guests always appreciate.
Side Dishes
This banana pudding makes a perfect dessert after light meals. I enjoy pairing it with simple dishes like fried chicken or a fresh garden salad. It’s also a refreshing treat alongside a cup of hot coffee or tea in the afternoon—makes any snack feel like a mini celebration.
Creative Ways to Present
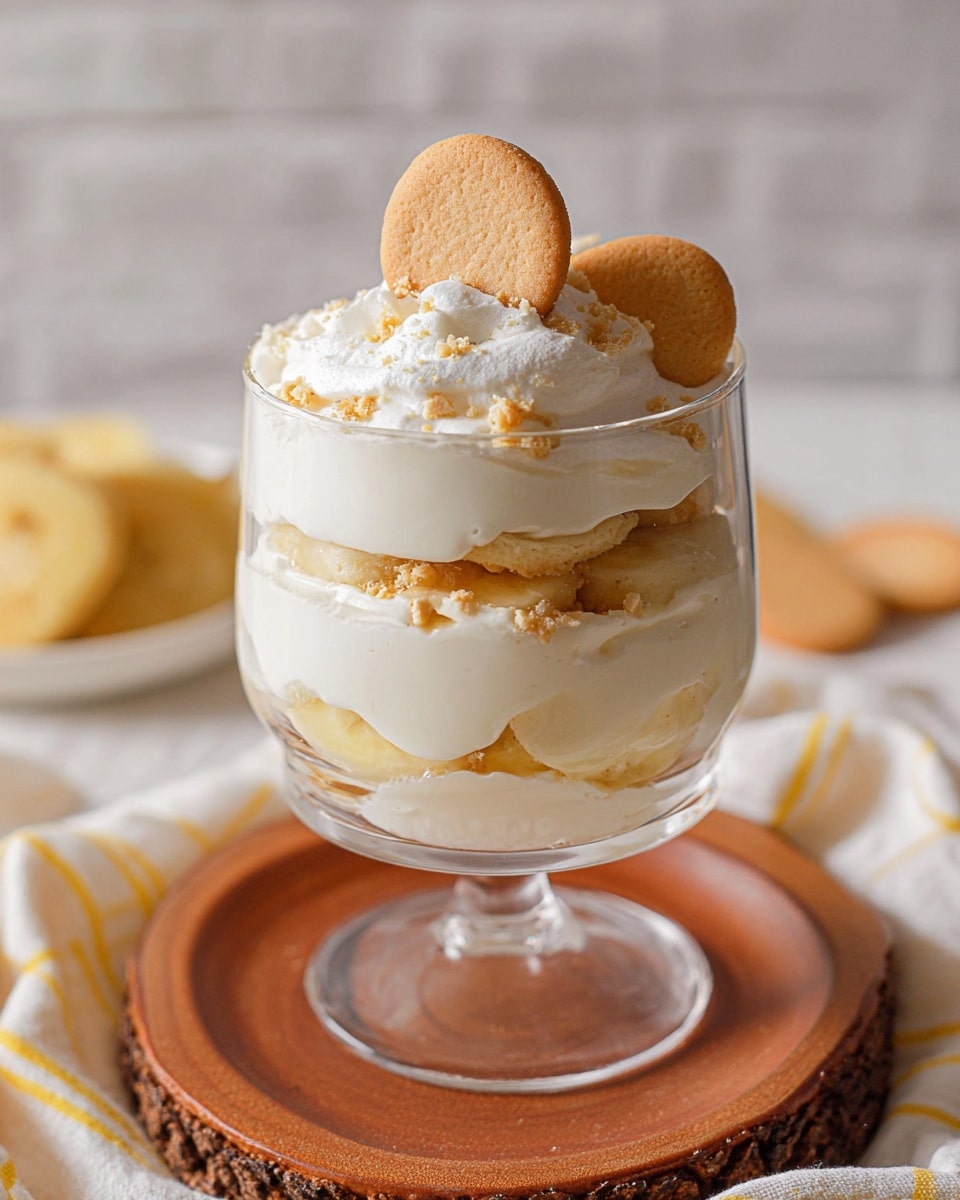
For special occasions, I love making individual parfaits in clear glasses so everyone can see the beautiful layers. You can also serve it in mini mason jars topped with a wafer or banana slice for a charming, rustic look. Another idea: use edible flower petals for an elegant twist that impresses at dinner parties.
Make Ahead and Storage
Storing Leftovers
Store your leftover banana pudding covered tightly with plastic wrap or in an airtight container in the fridge. It stays good for about 3 days, but be mindful the bananas might brown slightly over time. To minimize this, I like to toss the banana slices with a little lemon juice before layering.
Freezing
Freezing banana pudding isn’t my favorite because the texture can get watery when thawed, but if you must, freeze it in single portions without the wafers for best results. When ready to eat, thaw overnight in the fridge and add fresh wafers just before serving. I’ve done this in a pinch and it worked okay, but fresh always wins.
Reheating
This is a chilled dessert, so reheating isn’t really needed. However, if you want to bring it to room temperature, just let it sit out for about 15-20 minutes before serving. That subtle warming helps the flavors come alive without losing the creamy texture.
FAQs
-
Can I make Magnolia Bakery’s Famous Banana Pudding Recipe without instant pudding mix?
While instant pudding mix gives the dessert its signature texture and ease, you can make a homemade vanilla pudding from scratch using eggs, sugar, milk, and cornstarch. However, expect a longer prep time and a slightly different texture. The instant mix is a reliable shortcut that keeps this recipe simple and spot on.
-
How ripe should the bananas be for this pudding?
Choose bananas that are ripe with bright yellow skin and just a few brown spots. They should be firm enough to slice without mushiness, which ensures your banana layers hold up well during assembly and chilling.
-
Can I prepare Magnolia Bakery’s Famous Banana Pudding Recipe the day before?
Absolutely! In fact, making it a day ahead lets the flavors meld beautifully, and the vanilla wafers soften into a wonderfully cake-like texture. I usually recommend at least 4 hours of chilling, but overnight is even better.
-
Is there a way to make this recipe lighter?
You can try using half-and-half instead of heavy cream or substitute a lower-fat whipped topping for the heavy cream. Keep in mind, this will slightly change the texture and richness, but it still tastes delicious if you want a lighter version.
-
What’s the best dish to assemble this in?
I recommend using a glass baking dish or a trifle bowl so you can see those beautiful layers. It also makes serving easier and looks great on your dessert table.
Final Thoughts
I can’t recommend Magnolia Bakery’s Famous Banana Pudding Recipe enough—it’s a dessert that brings smiles every time I make it. Its creamy, dreamy layers remind me of sweet gatherings with loved ones and the simple joy of sharing something homemade. If you’re looking for a recipe that’s straightforward, impressive, and addictive, give this one a try. Your taste buds (and friends!) will thank you.
PrintMagnolia Bakery’s Famous Banana Pudding Recipe

Magnolia Bakery’s Famous Banana Pudding is a classic Southern dessert featuring layers of creamy vanilla pudding, fresh banana slices, and crunchy vanilla wafers, all combined with whipped cream for a delightfully smooth and indulgent treat.
- Prep Time: 20 minutes
- Cook Time: 0 minutes
- Total Time: 4 hours 20 minutes (including chilling time)
- Yield: 8–10 servings 1x
- Category: Dessert
- Method: No-Cook
- Cuisine: Southern American
Ingredients
Banana Pudding Mixture
- 14 oz can sweetened condensed milk
- 1½ cups ice cold water
- 3.4 oz package instant vanilla pudding mix (Jell-O brand recommended)
- 3 cups heavy cream
Additional Ingredients
- 11 oz box vanilla wafers (Nabisco Nilla Wafers recommended)
- 5 ripe bananas, sliced
Instructions
- Prepare the Pudding Base: In a large mixing bowl, combine the sweetened condensed milk and ice-cold water. Stir thoroughly until well mixed. Add the instant vanilla pudding mix and whisk for about 2 minutes until the mixture thickens and is smooth.
- Whip the Cream: In a separate chilled bowl, whip the heavy cream using an electric mixer until stiff peaks form. This should take about 3-5 minutes on medium-high speed.
- Combine Cream with Pudding Base: Gently fold the whipped cream into the pudding mixture, ensuring it is fully incorporated but still light and fluffy.
- Layer the Pudding: In a large trifle bowl or 9×13 inch dish, start with a layer of vanilla wafers on the bottom. Add a layer of sliced bananas evenly over the wafers. Pour a layer of the pudding and whipped cream mixture over the bananas. Repeat the layers (wafers, bananas, pudding) until all ingredients are used, finishing with a layer of pudding on top.
- Chill the Dessert: Cover the dish with plastic wrap and refrigerate for at least 4 hours, preferably overnight, to allow the flavors to meld and the wafers to soften slightly.
- Serve and Enjoy: Just before serving, you can optionally garnish the top with additional sliced bananas or crushed vanilla wafers for added texture and presentation.
Notes
- Using ripe bananas is key for natural sweetness and flavor.
- Make sure the heavy cream and water are cold to achieve the best whipping and pudding texture.
- The pudding thickens quickly, so work efficiently when combining ingredients.
- For a lighter version, you can substitute half and half for heavy cream, but the texture will be less rich.
- Banana pudding is best served chilled and will last for 2-3 days refrigerated.
Keywords: banana pudding, Magnolia Bakery, vanilla pudding, banana dessert, no bake dessert, layered pudding, vanilla wafers