Hot Cocoa Cookie Blossoms Recipe

There’s something magical about warm, cozy flavors rolled into a sweet little bundle, and that’s exactly what my Hot Cocoa Cookie Blossoms Recipe delivers. Imagine soft cocoa-infused cookies, rolled in sugar and crowned with a melty marshmallow and a kiss of rich chocolate — perfect for chilly nights or whenever you want a nostalgic treat that feels like a warm hug.
I’ve made these cookies for holiday parties, winter movie marathons, and anytime my sweet tooth calls. What makes this Hot Cocoa Cookie Blossoms Recipe really stand out is the combination of fudgy cocoa, the crunchy sugar coating, and that delightful twist of marshmallow topped with a hot cocoa chocolate. Trust me, once you try them, they become your go-to cookie for gifting and cozy moments.
Ingredients You’ll Need
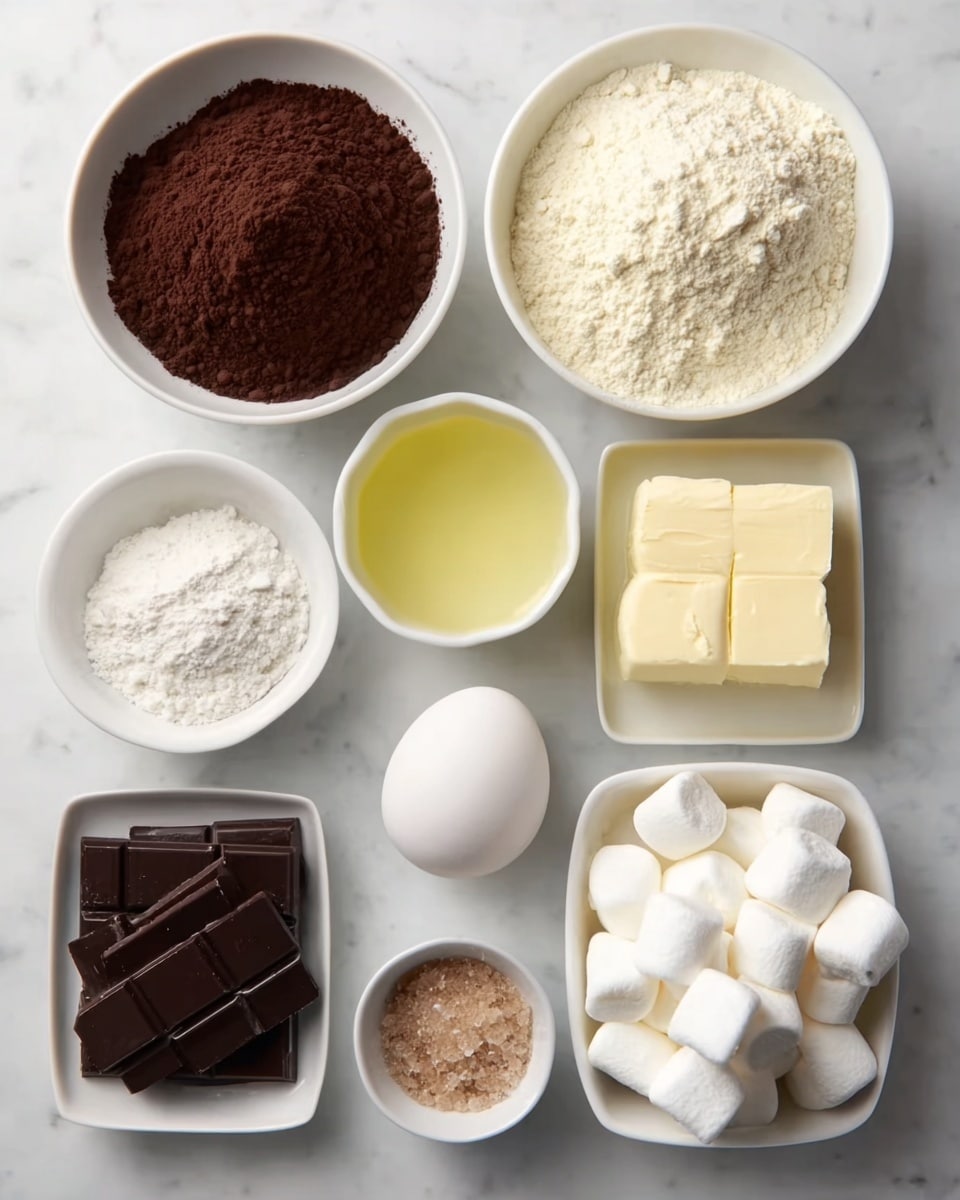
The ingredients for this recipe all come together beautifully to create those soft, chocolaty cookies with just the right texture and sweetness. The cocoa powder gives it that signature hot cocoa flavor, while the marshmallows and Hershey’s Kisses bring an extra element of fun and nostalgia.
- All-purpose flour: The base of your cookies; make sure to spoon and level when measuring for the best texture.
- Baking soda: Helps the cookies rise, keeping them soft and tender.
- Baking powder: Adds a bit of lift alongside the baking soda, essential for that perfect crumb.
- Unsweetened cocoa powder: This is where the hot cocoa flavor shines, so I use a good quality natural cocoa.
- Salt: Balances the sweetness and enhances the chocolate notes.
- Unsalted butter, melted and cooled: Gives the cookies a rich flavor; be sure it’s cooled so it doesn’t cook the eggs.
- Brown sugar (light or dark): Adds moisture and a hint of caramel flavor for depth.
- White granulated sugar: Adds sweetness and helps with that wonderful sugary crust on the outside.
- Pure vanilla extract: Boosts flavor and rounds out the chocolate.
- Large egg and egg yolk, room temperature: Provides structure and richness—room temp is key for smooth mixing.
- White granulated sugar for rolling: Makes the cookie edges sparkle and adds a subtle crunch.
- Regular sized marshmallows: The gooey surprise on top, bringing that nostalgic hot cocoa feel.
- Hershey’s Kisses Hot Cocoa Chocolates: The perfect finishing touch — their creamy, hot chocolate flavor complements the cookie beautifully.
Variations
I love how flexible this Hot Cocoa Cookie Blossoms Recipe is—it’s easy to make it your own. Sometimes I swap in dark chocolate chips or add a pinch of cinnamon for a spicy twist. Don’t be shy to get creative; you can tailor these cookies to fit your holiday traditions or whatever mood you’re in.
- Use white chocolate chips: I once replaced the Hershey’s Kisses with white chocolate for a creamy contrast and it was a hit with friends who prefer milder chocolate.
- Vegan/Dairy-free: Swap butter for coconut oil and pick dairy-free chocolate kisses to make these cookies vegan-friendly.
- Add peppermint extract: For a festive touch, adding a little peppermint extract to the dough makes a delightful holiday cookie.
- Mini marshmallows topping: If you want more gooey marshmallow on top, I recommend cutting mini marshmallows in half and piling a couple on before baking.
How to Make Hot Cocoa Cookie Blossoms Recipe
Step 1: Mix the Dry Ingredients
Start by whisking together the all-purpose flour, baking soda, baking powder, unsweetened cocoa powder, and salt in a medium bowl. This ensures everything is evenly distributed, so your cookies bake uniformly. Trust me, skipping this step might cause uneven flavor or texture.
Step 2: Combine the Wet Ingredients
In a large bowl, whisk the melted butter with brown sugar and white granulated sugar until smooth and creamy. Then add the vanilla extract, room temperature egg, and egg yolk. Mix everything until fully combined and you get a silky texture. Make sure the butter is cool enough to avoid scrambling the eggs here—that’s a classic pitfall I’ve seen before.
Step 3: Bring the Dough Together
Gradually add your dry ingredients to the wet mixture. Stir gently with a wooden spoon or spatula just until combined—don’t overmix, or your cookies might turn out tough instead of soft. The dough should be a bit sticky but firm enough to scoop.
Step 4: Roll and Chill the Dough
Form your dough into 1-inch balls, then roll each ball in the extra granulated sugar. This creates that delightful sugar crust we love on these cookie blossoms. Place them on a baking tray lined with parchment, spaced well apart because they will spread a bit. Pop the tray into the fridge for at least 30 minutes—it helps keep the cookies from flattening too much and maintains their beautiful shape.
Step 5: Bake and Add the Marshmallow
Bake the cookies at 350°F (175°C) for 8 minutes. Then, quickly remove the tray and gently press a marshmallow onto each cookie. Return to the oven and bake for 1 to 2 more minutes until the marshmallow starts to melt and puff. This two-step baking is what gives you that iconic gooey top without burning the cookies.
Step 6: Top With Hershey’s Kisses and Cool
Once out of the oven, immediately press a Hershey’s Kiss Hot Cocoa Chocolate into each marshmallow. The warmth will slightly melt the chocolate, helping it stick perfectly. Let the cookies cool for at least 10 minutes on the tray before moving them, so everything sets nicely. Watching the marshmallow and chocolate meld together is one of my favorite parts!
How to Serve Hot Cocoa Cookie Blossoms Recipe
Garnishes
I usually serve these cookies just as they are because they’re already dressed to impress. But if you want to fancy things up, a light dusting of powdered sugar or a drizzle of melted chocolate adds a festive touch. For holiday parties, I sometimes sprinkle a tiny pinch of edible glitter or crushed peppermint on top for extra sparkle and flavor.
Side Dishes
These cookies pair wonderfully with a steaming mug of hot cocoa (to keep the theme going), coffee, or even a glass of cold milk. If you’re serving after dinner, a bowl of fresh berries or a light fruit salad balances the richness of the cookies nicely.
Creative Ways to Present
I love arranging these Hot Cocoa Cookie Blossoms on a rustic wooden board with sprigs of pine or holly for a holiday gathering. Wrapped individually in clear cellophane with a pretty ribbon, they make fantastic edible gifts. You can even stack them in cute tins layered with parchment—it’s a beautiful way to share these little cocoa delights with friends and family.
Make Ahead and Storage
Storing Leftovers
These cookies keep well at room temperature for up to three days if stored in an airtight container. I usually line the container with parchment paper and layer the cookies carefully to protect those fragile marshmallow tops. After a day or so, the marshmallows might firm up, but the flavor stays delicious.
Freezing
I recommend freezing the cookie dough balls before baking rather than frozen baked cookies since marshmallows and chocolate don’t freeze well together. Freeze the dough balls on a tray, then transfer them to a freezer-safe bag. When you want cookies, bake directly from frozen adding an extra minute or two to the baking time.
Reheating
If you have leftovers, reheating gently in a low oven for a few minutes works wonders—especially to revive the marshmallow’s gooey charm. Avoid microwaving, as it can make the marshmallow tough or overly melty. I like 300°F for about 5 minutes covered with foil to warm without drying out.
FAQs
-
Can I use a different type of chocolate instead of Hershey’s Kisses Hot Cocoa Chocolates?
Absolutely! While Hershey’s Kisses Hot Cocoa Chocolates provide that classic flavor and perfect size, you can substitute with any bite-sized chocolate you like. Milk chocolate, dark chocolate, or even flavored chocolates can add a fun twist. Just keep in mind how they melt and their sweetness level to balance with the marshmallow and cookie.
-
Why do I need both baking soda and baking powder in this recipe?
Good question! Baking soda and baking powder work together to create the ideal rise and texture. Baking soda reacts with acidic ingredients to give tenderness and spread, while baking powder provides additional lift. Using both helps achieve soft, slightly puffy cookies perfect for topping with marshmallows.
-
How do I prevent the cookies from spreading too much?
Chilling your dough balls before baking is key. It firms up the butter and sugar, so your cookies don’t melt into flat discs. Also avoid using melted butter that’s too warm when mixing—it can cause the dough to be too loose, leading to spreading. Remember, a bit of spread is normal, but these tips help keep the shape.
-
Can I make this recipe without marshmallows?
You can omit the marshmallows if needed, but they really add that iconic hot cocoa vibe and texture contrast. If you don’t have marshmallows, try topping with a chocolate chip or a small scoop of chocolate ganache after baking for a similar effect.
-
Is it okay to use dark brown sugar instead of light brown sugar?
Yes! Dark brown sugar will just give a slightly deeper molasses flavor. I’ve tried both, and the cookies come out fantastic either way, so go ahead and use what you have on hand.
Final Thoughts
This Hot Cocoa Cookie Blossoms Recipe has a special place in my recipe box because it brings a bit of warmth and nostalgia to any day. I hope you’ll try these cookies next time you want something comforting yet a little whimsical. They’re easy enough for weekday baking but impressive for sharing with friends and family. Honestly, once you take a bite and feel that melty marshmallow with the chocolate kiss, you’ll understand why I keep making them over and over again!
PrintHot Cocoa Cookie Blossoms Recipe

These Hot Cocoa Cookie Blossoms combine rich cocoa-flavored cookie dough rolled in sugar and topped with a fluffy marshmallow and a melty Hershey’s Kisses Hot Cocoa Chocolate, making for a festive and irresistible treat perfect for winter gatherings or cozy nights in.
- Prep Time: 15 minutes
- Cook Time: 10 minutes
- Total Time: 25 minutes
- Yield: 20 cookies 1x
- Category: Dessert
- Method: Baking
- Cuisine: American
Ingredients
Dry Ingredients
- 1 1/3 cup All-purpose flour
- 1/4 tsp Baking soda
- 1/4 tsp Baking powder
- 1/4 cup Unsweetened cocoa powder
- 1/2 tsp Salt
Wet Ingredients
- 1/2 cup Unsalted butter, melted and cooled
- 3/4 cup Brown sugar, packed (light or dark)
- 1/4 cup White granulated sugar
- 2 tsp Pure vanilla extract
- 1 Large egg, room temperature
- 1 Egg yolk, room temperature
For Rolling and Topping
- 1/3 cup White granulated sugar, for rolling
- 10 Marshmallows, regular sized
- 20 Hershey’s Kisses Hot Cocoa Chocolates
Instructions
- Preheat the Oven: Begin by preheating your oven to 350°F (177°C) and line two baking sheets with parchment paper or silicone baking mats to prevent sticking.
- Combine Dry Ingredients: In a medium bowl, sift together the all-purpose flour, baking soda, baking powder, unsweetened cocoa powder, and salt until fully incorporated to ensure an even distribution of leavening and cocoa flavor.
- Mix Wet Ingredients: In a large bowl, whisk the melted and cooled unsalted butter with brown sugar and granulated sugar until smooth and combined. Add the vanilla extract, large egg, and egg yolk, mixing well before gradually stirring in the dry ingredients until you have a soft, chocolatey cookie dough.
- Shape and Roll Dough Balls: Scoop dough into uniform tablespoon-sized portions and roll each into a ball. Then roll each ball in the 1/3 cup of granulated sugar to coat completely; this adds a delightful sparkle and slight crunch to the outside of the cookies.
- Arrange on Baking Sheets: Place the sugar-coated dough balls about 2 inches apart on the prepared baking sheets, allowing enough space for spreading during baking.
- Bake the Cookies: Bake the cookies in the preheated oven for about 8 minutes, until they are just set but still soft and slightly underbaked in the center for optimal chewiness.
- Add Marshmallows and Kisses: Remove the baking sheets from the oven and quickly press one regular-sized marshmallow onto each cookie. Return to the oven for an additional 1-2 minutes, just until the marshmallows become puffy and slightly toasted.
- Top with Hershey’s Kisses: Immediately after removing the cookies with toasted marshmallows from the oven, press one Hershey’s Kisses Hot Cocoa Chocolate onto each marshmallow, allowing the heat to melt the chocolate slightly and create a gooey topping.
- Cool Completely: Let the cookie blossoms cool on the baking sheet for 10-15 minutes to set the toppings before transferring to a wire rack to cool fully. This helps the marshmallow and chocolate to firm up slightly for easy handling and eating.
Notes
- Use room temperature eggs for better mixing and a consistent dough texture.
- If you prefer softer marshmallows, keep the second bake time to just 1 minute.
- For a more intense chocolate flavor, you can use Dutch-processed cocoa powder instead of natural unsweetened cocoa powder.
- The cookies can be stored in an airtight container at room temperature for up to 3 days; adding marshmallows and chocolates just before serving keeps them freshest.
- To make more or fewer cookies, maintain the ratio of ingredients and adjust baking time slightly for larger or smaller dough balls.
Keywords: Hot Cocoa Cookies, Cookie Blossoms, Marshmallow Cookies, Hershey’s Kisses Cookies, Chocolate Cookies, Winter Cookies, Holiday Treats