Easy Garlic Pita Bread from Scratch Recipe
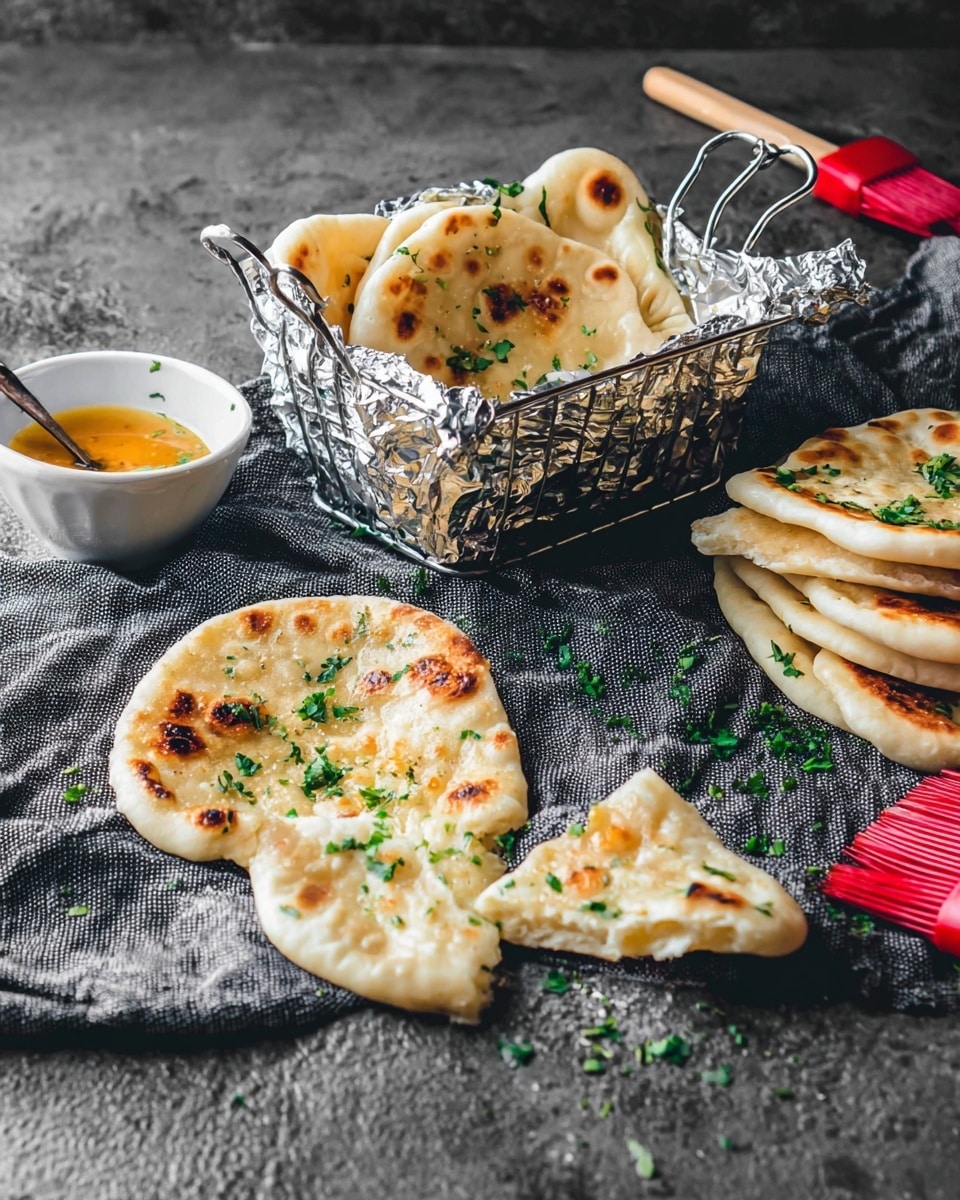
Let me tell you, mastering the Easy Garlic Pita Bread from Scratch Recipe has totally changed my homemade bread game! There’s something so comforting about warm, pillowy pitas infused with garlic aroma fresh out of your own kitchen. Whether you’re looking to elevate weeknight dinners or impress friends at your next get-together, these garlic pitas make a simple, yet flavorful addition that’s always a hit.
What I love most is how approachable this recipe is—even if you’re new to baking bread, you’ll find success here. Making it from scratch means you control every ingredient, and the result? A soft, garlicky pita that’s not just tasty but also incredibly satisfying to make. Trust me, once you try this Easy Garlic Pita Bread from Scratch Recipe, you’ll wonder why you ever settled for store-bought.
Ingredients You’ll Need
The ingredients come together beautifully to create a simple yet flavorful dough with a garlicky twist. Most of these staples probably live in your pantry, and I highly recommend using fresh yeast and good olive oil for best results.
- Water: Warm water between 90º-95ºF helps activate the yeast perfectly without killing it.
- Instant yeast: This keeps the process quick and easy—no need to proof in advance.
- Granulated sugar: Just a hint to feed the yeast and encourage rising.
- All-purpose flour: The perfect balance of protein to create soft but sturdy pita bread.
- Salt: Essential for flavor balance in any bread recipe.
- Garlic powder: Optional, but I strongly suggest it for that even garlic taste throughout the dough.
- Extra virgin olive oil: Adds moisture and a subtle richness to your dough.
- Unsalted butter (for garlic butter): Use real butter here for that comforting richness.
- Kosher salt: To season the garlic butter perfectly.
- Dried parsley: Sprinkles of green that add freshness and a little color to your garlic butter topping.
- Shredded parmesan cheese: Totally optional, but I love adding this for a savory, salty finish on top.
Variations
I’m a big fan of playing around with this Easy Garlic Pita Bread from Scratch Recipe, and you should definitely make it your own. You can switch up the herbs or try different toppings to suit your mood or the season.
- Herb Variation: I sometimes swap dried parsley for rosemary or oregano, which gives a Mediterranean vibe, especially when paired with feta cheese on top.
- Spicy Kick: Add a pinch of red pepper flakes to the garlic butter if you’re in the mood for a little heat. It’s a game-changer for snacks!
- Whole Wheat Pita: For a healthier tweak, replace half the flour with whole wheat flour—it adds a delicious nuttiness and more fiber.
- Dairy-Free Version: Use olive oil instead of butter for the garlic spread, and you’ll still have incredible flavor without the dairy.
How to Make Easy Garlic Pita Bread from Scratch Recipe
Step 1: Activate Your Yeast and Mix the Dough
Start by warming your water to between 90º-95ºF—too hot, and you risk killing your yeast. I like to test it with my finger; it should feel like a warm bath. Stir in the instant yeast and sugar gently and let it sit for about 5 minutes until it looks foamy and alive. Next, combine your flour, salt, and garlic powder (if using) in a large mixing bowl.
Pour in the yeast mixture and olive oil, then stir with a wooden spoon or your hand until the dough starts to come together. If it feels too sticky, sprinkle in a bit more flour—but remember, the dough should be soft, not stiff. I usually aim for 2 ½ to 3 cups depending on humidity.
Step 2: Knead Until Smooth and Elastic
Now, flour your surface lightly and knead your dough for about 8 to 10 minutes. This is where patience pays off. The dough should feel silky and spring back when you press it. If it sticks excessively to your hands, dust with a little more flour—just a little!
Pro tip: If kneading by hand isn’t your favorite task, using a stand mixer with a dough hook saves time. Just mix on medium-low for the same amount of time until the dough is stretchy and smooth.
Step 3: Let It Rise in a Warm Spot
Transfer your dough ball to a lightly oiled bowl and cover it with a clean kitchen towel or plastic wrap. Let it rise in a warm, draft-free area for about 1 to 1 ½ hours, or until doubled in size. I like to put mine inside my oven with just the light on—it’s the perfect cozy spot!
Step 4: Shape and Rest Your Pitas
Once risen, punch the dough down gently and divide it into 6-8 equal pieces. Roll each piece into a smooth ball and then flatten into discs around 6 inches wide. This step is fun—you get to feel the dough’s transformation.
Lay the discs on a floured surface, cover them lightly, and let them rest for another 20-30 minutes. This resting phase helps them puff beautifully when cooking.
Step 5: Cook Your Pita Bread to Puffy Perfection
Heat a cast iron skillet or heavy-bottomed pan over medium-high heat—no oil needed. Carefully place one pita in the pan and cook for about 1-2 minutes until bubbles form, then flip it to cook the other side for another 1-2 minutes. You’ll see it puff up like a balloon—that’s the magic!
If it doesn’t puff immediately, don’t worry. It’ll still taste fantastic. Just keep the heat steady and adjust if you see it browning too fast without puffing.
Step 6: Make Your Garlic Butter and Spread
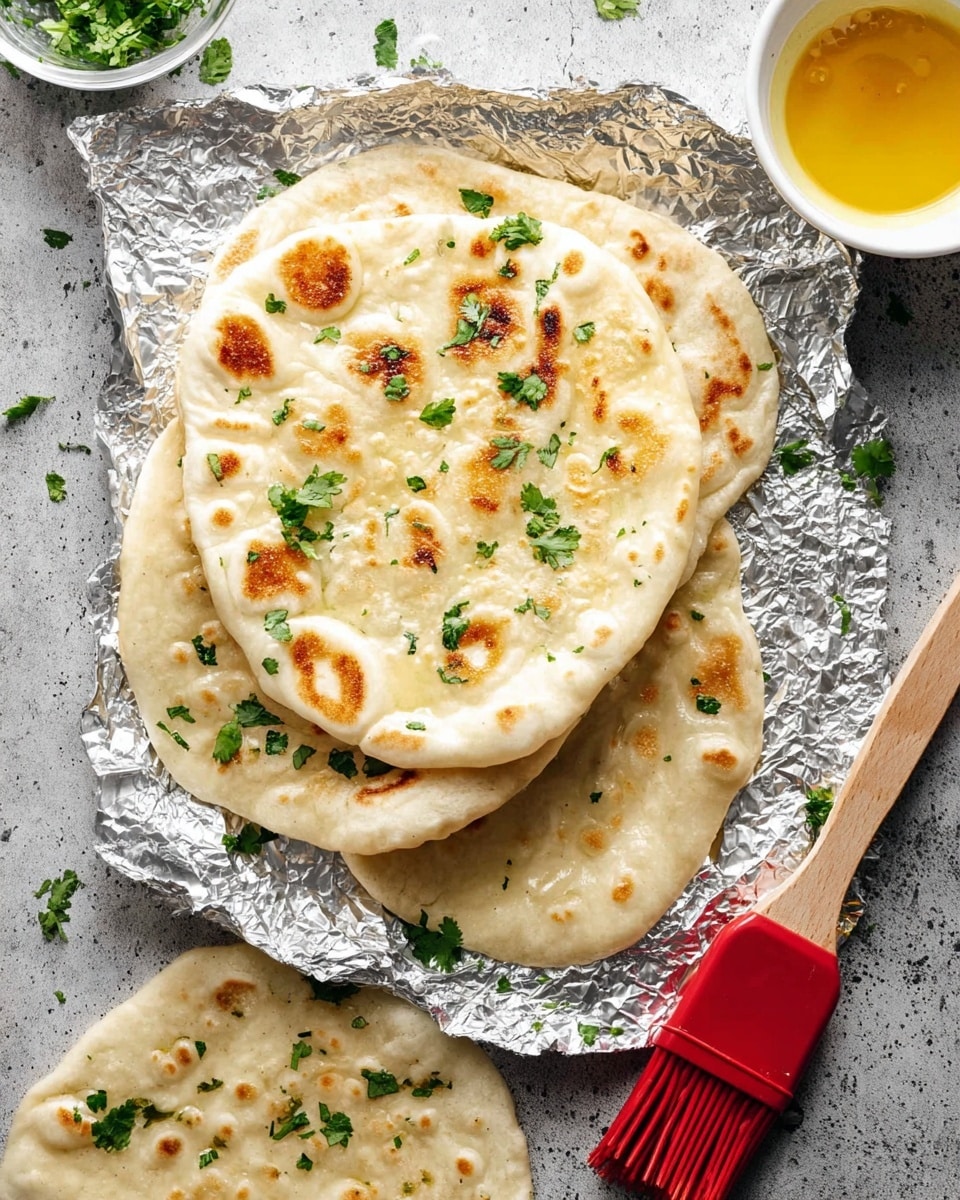
While your pitas cook, melt butter in a small saucepan or microwave. Stir in garlic powder, kosher salt, and dried parsley. When each pita is warm, brush them generously with this garlic butter mixture. For a final special touch, sprinkle shredded parmesan cheese right after buttering—it melts perfectly and adds a delicious punch.
How to Serve Easy Garlic Pita Bread from Scratch Recipe
Garnishes
I love topping these pitas with a little extra fresh parsley for color and a zing of fresh flavor. Sometimes I go bold and add thinly sliced green onions or even a sprinkle of sumac to echo Middle Eastern flavors. Don’t be shy—garnishes are your friend here!
Side Dishes
This garlic pita pairs wonderfully with homemade hummus or tzatziki for dipping. For heartier meals, serve alongside grilled chicken or kebabs—trust me, it’s a crowd-pleaser. I also enjoy it with a fresh Greek salad on the side for a lighter option.
Creative Ways to Present
For parties, I like to cut the pitas into small triangles and arrange them around bowls of various dips. Another favorite is stuffing each pita with roasted veggies, greens, and a drizzle of tahini for an easy hand-held feast. Presentation can elevate this simple bread into something special!
Make Ahead and Storage
Storing Leftovers
Once completely cooled, I store leftover pita bread in an airtight plastic bag at room temperature for up to 2 days. Keeping them sealed prevents them from drying out, and they stay surprisingly soft.
Freezing
These pitas freeze beautifully! Just wrap a stack tightly in foil and place in a freezer bag. I usually freeze them for up to a month. When I’m ready to enjoy, I thaw at room temperature or heat straight from frozen in a skillet for a minute or two.
Reheating
To reheat, I prefer a quick toast in a hot skillet or a few seconds in the microwave wrapped in a damp paper towel to keep them moist. Avoid the oven unless you’re warming a large batch to retain that soft, flexible texture.
FAQs
-
Can I make the Easy Garlic Pita Bread from Scratch Recipe without garlic powder?
Absolutely! Garlic powder adds that subtle garlic flavor throughout the dough, but if you prefer, you can skip it and rely on the garlic butter spread for flavor. Fresh garlic minced into the butter mixture is a great alternative, too.
-
What’s the secret to making pita bread puff up?
The key is properly resting the shaped dough discs to relax the gluten, a hot pan, and a quick cook time. The steam inside the dough causes the puff. Make sure your pan is hot enough and don’t press down on the pita while cooking.
-
Can I use active dry yeast instead of instant yeast?
Yes, but you’ll need to proof the active dry yeast in warm water with sugar for about 5-10 minutes before mixing it with your other ingredients. Instant yeast lets you skip this step for convenience.
-
How do I store leftover pita bread to keep it soft?
Store your cooled pitas in an airtight bag at room temperature for a couple of days. You can also keep a piece of bread or a damp paper towel in the container to help maintain moisture.
-
Is this recipe suitable for beginners?
Definitely! The Easy Garlic Pita Bread from Scratch Recipe uses simple ingredients and straightforward techniques. Following the step-by-step instructions closely takes the guesswork out.
Final Thoughts
This Easy Garlic Pita Bread from Scratch Recipe holds a special place in my kitchen because it’s more than just bread—it’s a fresh, fragrant way to bring people together over food you made yourself. I hope you’ll give it a try, savoring those warm, garlicky pockets as much as I do. Once you get the hang of it, you’ll be baking these pitas whenever you want a simple, delicious homemade bread fix.
PrintEasy Garlic Pita Bread from Scratch Recipe

This Easy Garlic Pita Bread from Scratch is a soft and flavorful homemade flatbread infused with garlic. Perfectly puffed and golden, these pitas are ideal for sandwiches, dipping, or as a side to your favorite Mediterranean dishes. The recipe includes a simple pita dough made with instant yeast and a luscious garlic butter for brushing, which can be topped with optional shredded Parmesan cheese for an extra savory kick.
- Prep Time: 20 minutes
- Cook Time: 15 minutes
- Total Time: 1 hour 45 minutes
- Yield: 6 to 8 pita breads 1x
- Category: Bread
- Method: Stovetop
- Cuisine: Mediterranean
Ingredients
Pita Dough
- 1 cup water, 90º-95ºF
- 2 teaspoons instant yeast
- ½ teaspoon granulated sugar
- 2 ½ – 3 cups all-purpose flour, divided
- 1 ½ teaspoons salt
- 1 teaspoon garlic powder (optional)
- 2 tablespoons extra virgin olive oil, plus more for the bowl
Garlic Butter
- ½ cup unsalted butter
- 1 ½ teaspoons garlic powder
- ½ teaspoon kosher salt
- ½ teaspoon dried parsley
- Shredded Parmesan cheese (optional, for topping)
Instructions
- Activate Yeast: Warm the water to about 90º-95ºF and combine it with the instant yeast and granulated sugar in a mixing bowl. Let it sit for 5 minutes until it becomes foamy, indicating the yeast is active.
- Make Dough: Add 2 ½ cups of flour, salt, garlic powder (if using), and 2 tablespoons olive oil to the yeast mixture. Stir and then knead the dough on a lightly floured surface, adding more flour as needed, until smooth and elastic, about 8-10 minutes.
- First Rise: Lightly oil a clean bowl and place the dough inside, turning to coat. Cover with a damp cloth or plastic wrap and let it rise in a warm place until doubled in size, about 1 to 1.5 hours.
- Shape Pitas: Punch down the risen dough and divide it into 6 to 8 equal pieces. Roll each piece into a ball, then flatten into a ¼ inch thick round disc approximately 6 inches in diameter.
- Second Rise: Place the rounds on a floured surface, cover lightly, and let rest for 15-20 minutes to puff slightly.
- Cook Pitas: Heat a heavy skillet or cast iron pan over medium-high heat. Cook each pita for 1-2 minutes on each side or until puffed and golden brown spots appear. Remove and keep warm wrapped in a clean towel.
- Prepare Garlic Butter: Melt the butter in a small saucepan over low heat. Stir in garlic powder, kosher salt, and dried parsley until combined.
- Brush Pitas: Immediately brush the warm pitas generously with the garlic butter and sprinkle with shredded Parmesan if desired.
Notes
- Water temperature is critical for yeast activation; too hot can kill the yeast, too cold and it won’t activate properly.
- Use a heavy skillet or cast iron pan to get even heat for puffing the pitas perfectly.
- Resting the dough discs before cooking helps them puff better in the pan.
- The garlic butter can be stored in the fridge and reused for other breads or as a flavorful spread.
- For a gluten-free option, substitute all-purpose flour with a gluten-free baking mix designed for yeast breads, but expect slightly different texture.
Keywords: garlic pita bread, homemade pita, garlic flatbread, easy pita recipe, Mediterranean bread, yeast bread