Easy Challah Bread Recipe

There’s something truly magical about baking your own Challah bread, and this Easy Challah Bread Recipe is my go-to when I want that perfect balance of soft, fluffy, and slightly sweet. Whether it’s for a special dinner or just a cozy weekend morning, this bread always brings a little joy and warmth to my kitchen. I love how approachable it is too—you don’t need to be a seasoned baker to nail the texture and braid!
I’ve found that this Easy Challah Bread Recipe works wonders for both beginners and those who want a reliable, no-fuss loaf without compromising on taste. Plus, the ingredients come together quickly, and the honey adds such a lovely gentle sweetness that makes this bread incredibly versatile. Honestly, once you try it, I bet you’ll be braiding Challah for every occasion.
Ingredients You’ll Need
The beauty of this Easy Challah Bread Recipe is in its simple, pantry-friendly ingredients that come together perfectly to create that rich, soft crumb. Here are a few tips before you start shopping: choose quality bread flour for the best structure, and don’t skip the honey—that little bit of sweetness helps the yeast do its magic and adds warmth.
- Bread flour: Opt for bread flour instead of all-purpose to get that chewy, elastic texture Challah is known for.
- Fast-action yeast: This helps the dough rise quickly without needing to fuss a lot over timing.
- Fine salt: Enhances flavor and balances the sweetness.
- Liquid honey: Adds subtle sweetness and moisture, making the crumb tender.
- Light-tasting olive oil: Choose a mild oil so it doesn’t overpower the bread’s flavor.
- Large eggs & egg yolks: They enrich the dough, giving the bread its signature golden color and soft texture.
- Water: Lukewarm, to activate the yeast properly without killing it.
- Egg yolk for glazing: Brushed on top for that beautiful shiny crust.
Variations
I love experimenting with this Easy Challah Bread Recipe to suit different occasions or moods. Sometimes I throw in some raisins or sprinkle sesame seeds on top for extra texture and a hint of nuttiness. Feel free to make it your own—you’ll find it’s a wonderfully forgiving dough.
- Sweet Challah with raisins or dried cranberries: I’ve added these for brunch gatherings, and everyone loved the surprise bursts of sweetness.
- Sesame or poppy seed topping: Gives a lovely crunch and classic bakery look that’s easy to achieve.
- Whole wheat variation: You can swap half the bread flour for whole wheat flour for a heartier loaf—but expect a denser bread.
- Dairy-free version: This recipe is already dairy-free, which is great if you’re avoiding milk or butter.
How to Make Easy Challah Bread Recipe
Step 1: Activate the Yeast and Mix Wet Ingredients
Start by dissolving your fast-action yeast in the lukewarm water. It should be around 100°F (38°C), just warm enough to wake the yeast up but not so hot that it kills it. Let it sit for about 5 minutes until you see a slight foam—this means your yeast is active and ready. Meanwhile, whisk together the eggs, egg yolks, honey, and olive oil in a large bowl. Once the yeast is bubbly, add it to your egg mixture and give everything a gentle stir.
Step 2: Combine Dry Ingredients and Form Dough
In another bowl, mix the bread flour and fine salt. Gradually incorporate the dry ingredients into the wet mixture, stirring as you go. When the dough starts to come together, use your hands to knead in the bowl or on a lightly floured surface for about 8-10 minutes. The dough should be soft but not sticky—if it’s too sticky, dust a little more flour as you knead. This kneading step is where the gluten forms, which gives your Challah its wonderful texture.
Step 3: Let the Dough Rise
Once kneaded, transfer the dough to a lightly oiled bowl. Cover it with a clean kitchen towel or plastic wrap and set it in a warm spot to rise. Depending on your kitchen temperature, it may take 1 to 1.5 hours, but you’ll want the dough to double in size. This part is crucial because a good rise means your bread will be light and airy rather than dense.
Step 4: Braid and Final Proof
After the dough has doubled, punch it down gently to release excess air. Divide it into three even pieces for a traditional three-strand braid. Roll each piece into long ropes of equal length. If braiding feels intimidating, no worries – there are plenty of tutorials online, and practicing really helps. Once braided, place the loaf on a parchment-lined baking tray and cover it loosely to let it proof for another 30-45 minutes until puffy.
Step 5: Glaze and Bake
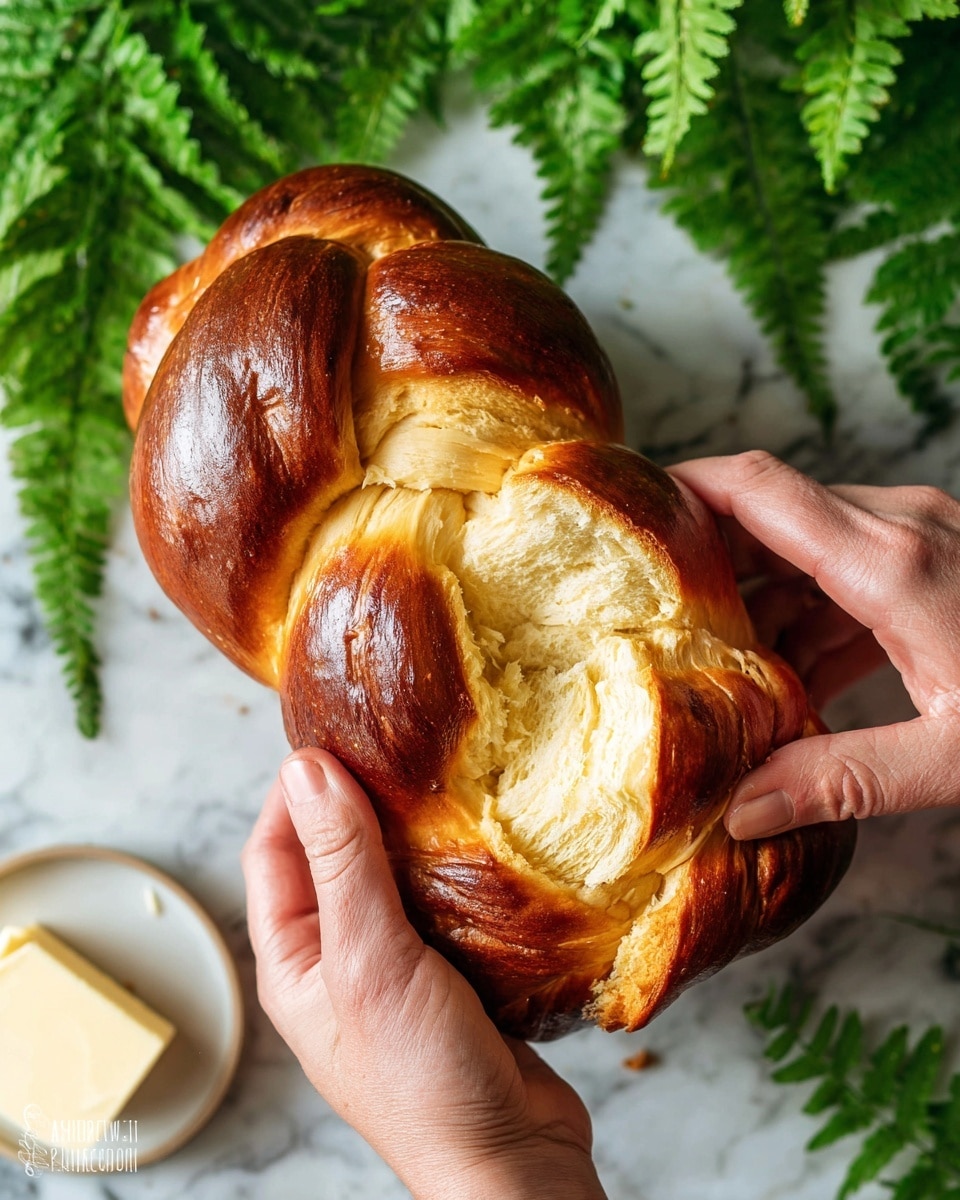
Preheat your oven to 350°F (175°C). Just before baking, brush your braid with the egg yolk glaze for that classic shiny look. Bake for 30-35 minutes until the Challah is golden brown and sounds hollow when tapped at the bottom. If the crust begins to brown too quickly, tent the loaf with foil. Let it cool completely on a wire rack before slicing—this helps the crumb set up beautifully.
How to Serve Easy Challah Bread Recipe
Garnishes
My favorite garnish? A sprinkle of sesame seeds right before baking—they add a subtle nutty bite that pairs wonderfully with the slightly sweet bread. Sometimes, I’ll use poppy seeds or even a pinch of sea salt for a contrasting flavor profile. It’s amazing how a simple topping can elevate the final look and taste.
Side Dishes
Challah bread is incredibly versatile. You can serve it alongside savory dishes like beef stew or shakshuka for a comforting meal, or slice it thick with butter and jam for breakfast. Personally, I love using the leftover bread to whip up classic French toast—it’s a game changer!
Creative Ways to Present
For festive occasions, I’ve braided mini Challah loaves or shaped them into circles for a stunning centerpiece. You can even add edible flowers or dust the top lightly with powdered sugar for a sweet brunch display. Presentation can be so simple but makes a huge difference in delighting your guests.
Make Ahead and Storage
Storing Leftovers
This Easy Challah Bread Recipe holds up really well if you store leftovers properly. I like to wrap the cooled bread tightly in plastic wrap or put it in a zip-tight bag to keep it soft. It typically stays fresh on the counter for about 2-3 days, depending on your room’s humidity.
Freezing
Freezing Challah is a total lifesaver. Slice it beforehand for convenience, then wrap pieces individually in plastic wrap and place them in a freezer bag. This way, you can pull out what you need and avoid thawing the whole loaf. It freezes beautifully and keeps for up to 3 months.
Reheating
When I want to enjoy leftover Challah as if it’s fresh, I pop frozen slices straight into a toaster or warm them in the oven at 325°F (160°C) for about 5-7 minutes. This revives the soft texture and golden crust without drying it out. Just be sure not to overheat!
FAQs
-
Can I make this Easy Challah Bread Recipe without eggs?
You can try an egg substitute if you need to avoid eggs, such as a flax egg or commercial egg replacer, but keep in mind the eggs give Challah its rich texture and color. The bread might be less tender and not as golden without them, but it will still taste good.
-
How long can I leave the dough to rise?
For this Easy Challah Bread Recipe, the first rise should take about 1 to 1.5 hours at room temperature. If your room is cool, it might take longer. Don’t rush this step—wait until the dough has doubled in size for the best results.
-
What if my Challah turns out dense?
Dense Challah usually means the dough didn’t rise enough or the yeast was not fully activated. Make sure your water isn’t too hot or cold when mixing the yeast, and give the dough enough time to double in size. Also, knead well to develop the gluten structure.
-
Can I use all-purpose flour instead of bread flour?
You can, but bread flour is preferred because of its higher protein content, which provides more gluten formation. Using all-purpose flour might result in a softer, less chewy Challah, but it’ll still taste delicious.
-
How do I keep my Challah shiny after baking?
Applying an egg yolk glaze before baking is key. Be sure to brush it on evenly and use a fresh egg yolk mixed with a splash of water for that brilliant shine. Avoid brushing after baking as it won’t absorb and can look sticky.
Final Thoughts
This Easy Challah Bread Recipe holds a special place in my heart because it’s more than just bread—it’s those moments spent braiding dough while chatting with family, the smell filling the kitchen, and the joy of sharing something homemade. I hope you’ll give it a go and feel that same warmth. Trust me, once you make this Challah, you’ll want to bake it again and again, making every meal a little more special.
PrintEasy Challah Bread Recipe

This Easy Challah Bread recipe produces a soft, slightly sweet braided bread that is perfect for sandwiches, toasting, or enjoying with a spread. With simple ingredients and straightforward steps, it’s an accessible way to bake traditional Jewish braided bread at home.
- Prep Time: 20 minutes
- Cook Time: 30 minutes
- Total Time: 2 hours 35 minutes
- Yield: 1 loaf (serves 10-12) 1x
- Category: Bread
- Method: Baking
- Cuisine: Jewish
- Diet: Kosher
Ingredients
Dough
- 4 cups bread flour
- 3 teaspoons fast-action yeast
- 2 teaspoons fine salt
- 5 tablespoons liquid honey
- ⅓ cup light-tasting olive oil
- 2 large eggs
- 2 large egg yolks
- ⅔ cup water
Glaze
- 1 large egg yolk (for glazing)
Instructions
- Prepare the Dough: In a large mixing bowl, combine the bread flour, fast-action yeast, and fine salt. Mix these dry ingredients thoroughly to ensure even distribution of the yeast and salt.
- Add Wet Ingredients: In a separate bowl, whisk together the liquid honey, light-tasting olive oil, 2 large eggs, 2 large egg yolks, and water until well combined. Gradually pour this mixture into the dry ingredients and stir until a dough starts to form.
- Knead the Dough: Transfer the dough to a lightly floured surface and knead it for about 8-10 minutes until it is smooth, elastic, and slightly tacky but not sticky. If you prefer, use a stand mixer fitted with a dough hook for 6-7 minutes instead.
- First Rise: Place the kneaded dough into a lightly oiled bowl, cover it with a clean kitchen towel or plastic wrap, and let it rise in a warm, draft-free place for 1 to 1.5 hours or until it has doubled in size.
- Shape the Challah: After the dough has risen, punch it down gently to release the air. Divide the dough into three equal portions and roll each into long ropes. Braid the ropes together tightly and tuck the ends under to create a neat loaf.
- Second Rise: Place the braided loaf onto a baking sheet lined with parchment paper. Cover it loosely with a towel and let it rise again for about 45 minutes until it puffs up noticeably.
- Preheat Oven: While the dough is undergoing its second rise, preheat your oven to 350°F (175°C).
- Apply Egg Wash: Lightly beat the remaining large egg yolk and brush it over the surface of the braided loaf. This glaze will create a shiny, golden crust.
- Bake: Bake the challah in the preheated oven for 30 to 35 minutes, or until the loaf is golden brown and sounds hollow when tapped on the bottom. If the loaf begins to brown too quickly, tent it loosely with aluminum foil to prevent over-browning.
- Cool: Remove the challah from the oven and let it cool completely on a wire rack before slicing and serving.
Notes
- Make sure the water used is lukewarm to activate the yeast without killing it.
- For a richer flavor, you can substitute some of the water with milk or add an extra egg yolk.
- The honey can be replaced with sugar if preferred, but honey adds moisture and a subtle sweetness.
- Allow the bread to cool fully to avoid a gummy interior when slicing.
- Challah freezes well; slice before freezing for easy thawing.
- If you prefer, sesame or poppy seeds can be sprinkled on top after applying the egg wash for added texture and flavor.
Keywords: Challah bread, braided bread, Jewish bread, homemade bread, easy bread recipe, sweet bread