Easy Brazilian Cheese Bread (Pão de Queijo) Recipe

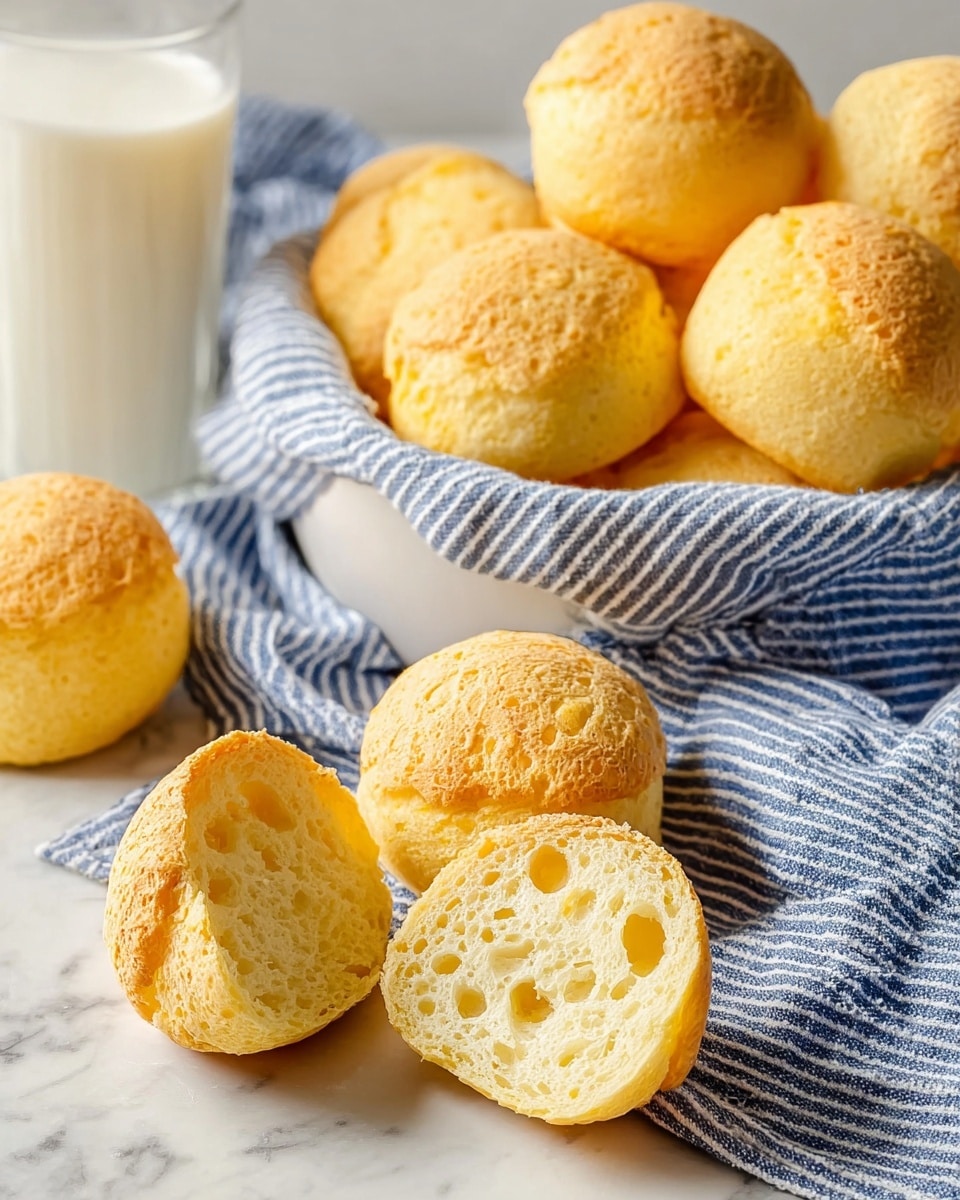
If you’re looking for a cozy, cheesy snack that’s as addictive as it is simple to make, you’ve just found it with this Easy Brazilian Cheese Bread (Pão de Queijo) Recipe. These little puffs deliver a wonderful chewiness on the inside and a slight crisp on the outside that simply melts in your mouth. I love how they come together with minimal ingredients and can be whipped up in just under 30 minutes—perfect for when unexpected guests arrive or when you need an easy pick-me-up.
What makes this Easy Brazilian Cheese Bread (Pão de Queijo) Recipe so special is its unique texture and flavor, completely gluten-free thanks to tapioca flour. I found it to be a brilliant alternative to typical cheese breads or rolls, especially when I crave something tangy and cheesy but still light. Plus, you can customize the cheese to your own preference, which feels like a little kitchen adventure every time I make it.
Ingredients You’ll Need
The beauty of this Easy Brazilian Cheese Bread (Pão de Queijo) Recipe lies in its simplicity—each ingredient is carefully picked to create that signature chewy texture and rich, cheesy flavor. Here’s what you’ll need, and a few tips to get the best from each one.
- Egg: Make sure it’s at room temperature to help the dough come together nicely and make the bread tender.
- Extra virgin olive oil: Adds a subtle richness; don’t skimp on quality for the best flavor.
- Milk: I use whole milk for creaminess, but you can try alternatives if needed.
- Tapioca flour: This is the magic ingredient that gives pão de queijo its chewy, airy texture. It’s naturally gluten-free, find it in most grocery stores or Latin markets.
- Cheese: I prefer a mix of parmesan and mozzarella for sharpness and meltiness, but you can choose any packed grated or crumbled cheese you love.
- Salt: Essential for balancing flavors; adjust carefully to your taste.
Variations
I like to shake things up with this Easy Brazilian Cheese Bread (Pão de Queijo) Recipe every once in a while. It’s such a straightforward base, it’s easy to add your own twist — and I encourage you to make it yours too!
- Add herbs: Fresh rosemary or thyme folded in the dough adds a delightful herbaceous note—one of my favorite quick upgrades.
- Dairy free version: Swap regular milk for almond or oat milk and choose a vegan cheese option to keep it friendly for dairy-free diets.
- Spicy cheese bread: Mix in a pinch of cayenne or smoked paprika to bring a little heat and complexity.
- Mini bites: Make mini versions for parties or as appetizers—these bake faster and are perfect for dipping.
How to Make Easy Brazilian Cheese Bread (Pão de Queijo) Recipe
Step 1: Warm the Milk, Oil, and Salt
Start by gently warming the milk, olive oil, and salt together in a small saucepan over medium heat. You want it hot but not boiling — about when you see steam rising and tiny bubbles around the edges. This helps the tapioca flour absorb moisture properly, which is key for that perfect dough consistency. Turn off the heat once it’s hot and proceed to the next step without delay.
Step 2: Combine Tapioca Flour and Hot Milk Mixture
Transfer the tapioca flour into a mixing bowl, then pour the hot milk and oil mix over it. Use a wooden spoon or spatula to stir vigorously—this might feel like a lot of work, but it helps gelatinize the flour and create that smooth dough. You’ll notice it looking sticky and clumpy, which is just right. Let it cool for about 10 minutes before the next step to avoid cooking the egg prematurely.
Step 3: Mix in Egg and Cheese
Now, add the egg (remember, room temperature) to the cooled tapioca mixture and stir well to combine. The dough will become shiny and stretchy—that’s a good sign you’re on the right track. Next, fold in your grated or crumbled cheese evenly. If your dough feels too sticky, just let it rest a bit longer or add a teaspoon more tapioca flour until it’s manageable but still soft.
Step 4: Shape and Bake
Preheat your oven to 375°F (190°C) and grease a baking sheet lightly with olive oil. Wet your hands to prevent sticking, then shape the dough into golf ball-sized rounds and place them on the sheet, leaving a little space between each. Bake for about 20–25 minutes until the tops turn golden and crisp. Be careful not to overbake—you want them puffed up and chewy inside, not dry.
How to Serve Easy Brazilian Cheese Bread (Pão de Queijo) Recipe

Garnishes
I usually keep it simple with a light dusting of grated parmesan or a sprinkle of fresh parsley after baking. Sometimes, a little brush of garlic-infused olive oil adds a mouthwatering aroma. These breads don’t really need much garnish because their cheesy flavor shines through beautifully on its own.
Side Dishes
They pair wonderfully with a cup of strong coffee or herbal tea for a snack, but if you’re serving a meal, I love them alongside fresh tomato salsa or a light green salad. They also make a great side for Brazilian feijoada or any Brazilian-inspired dish you might whip up.
Creative Ways to Present
For gatherings, I like to arrange mini pão de queijo on a tiered stand with little dipping bowls filled with spicy mayo, chimichurri, or even sweet guava paste for an unexpected twist. It never fails to spark compliments and double takes. Plus, the bite-sized version makes mingling easier without the mess!
Make Ahead and Storage
Storing Leftovers
Leftovers? I usually let the cheese bread cool completely, then store them in an airtight container at room temperature for up to two days. They stay surprisingly fresh, though I always recommend reheating for best texture.
Freezing
To make life easier, I freeze leftover unbaked dough balls spaced on a tray, then transfer them to a freezer bag once solid. When I’m ready, I bake them straight from frozen, adding a few extra minutes to the baking time. It’s a total game changer for effortless snacks.
Reheating
Reheating is best done in a hot oven (about 350°F/175°C) for 5-8 minutes to revive that fresh-baked crispness and melty interior. I avoid microwaving since it tends to make them rubbery.
FAQs
-
Can I use regular wheat flour instead of tapioca flour for this Brazilian cheese bread?
Unfortunately, tapioca flour is essential for the unique chewy texture of pão de queijo. Wheat flour won’t replicate that springy, airy quality, and the bread will turn out denser and less authentic. If you’re gluten-free, tapioca flour is your best bet!
-
What type of cheese works best in this Easy Brazilian Cheese Bread (Pão de Queijo) Recipe?
A combination of parmesan for sharpness and mozzarella for gooey meltiness is classic, but you can experiment with any hard or semi-hard cheeses that melt well. Avoid overly soft cheeses like fresh ricotta, which can affect the dough’s texture.
-
Can I make this recipe dairy-free?
Yes! Substitute milk with a plant-based milk like almond or oat milk, and use a dairy-free cheese alternative. Keep in mind the flavor and texture might vary slightly, but it’s a delicious option for dairy-free diets.
-
How long does pão de queijo keep fresh?
These cheese breads are best enjoyed fresh but can keep at room temperature for about two days stored in an airtight container. For longer keeping, freezing is a great option.
Final Thoughts
This Easy Brazilian Cheese Bread (Pão de Queijo) Recipe holds a special place in my kitchen because it’s both comfort food and a crowd-pleaser. It’s one of those recipes that feels fancy but is incredibly forgiving and quick, so you can cozy up anytime with a warm batch. If you haven’t tried making pão de queijo at home yet, I promise you’ll be hooked once you do—give it a shot and enjoy that cheesy, chewy magic!
PrintEasy Brazilian Cheese Bread (Pão de Queijo) Recipe
Pão de Queijo, or Brazilian Cheese Bread, is a delightful, gluten-free snack made with tapioca flour and cheese, resulting in a chewy, cheesy, and slightly crispy bite. This easy recipe combines simple ingredients and is perfect for breakfast, snack time, or as an appetizer.
- Prep Time: 10 minutes
- Cook Time: 20 minutes
- Total Time: 30 minutes
- Yield: 12 to 15 cheese breads 1x
- Category: Snack
- Method: Baking
- Cuisine: Brazilian
- Diet: Gluten Free
Ingredients
Wet Ingredients
- 1 large egg, room temperature
- 1/3 cup extra virgin olive oil, plus more for greasing the pan
- 2/3 cup milk
Dry Ingredients
- 1 1/2 cups (170 g) tapioca flour
- 1/2 cup (66 g) packed grated or crumbled cheese, your preference (commonly Parmesan or mozzarella)
- 1 teaspoon salt (or more to taste)
Instructions
- Preheat the oven: Preheat your oven to 375°F (190°C) and lightly grease a baking sheet with extra virgin olive oil to prevent sticking.
- Mix wet ingredients: In a mixing bowl, whisk together the egg, olive oil, and milk until thoroughly combined and smooth.
- Add dry ingredients: Gradually stir in the tapioca flour and salt until the dough is well combined and slightly sticky. Finally, fold in the grated cheese evenly throughout the dough.
- Shape the dough: Using your hands or a spoon, shape the dough into small balls about 1 to 1 1/2 inches in diameter and place them evenly spaced on the greased baking sheet.
- Bake the bread: Bake in the preheated oven for 20 to 25 minutes, or until the cheese breads puff up and turn a light golden color on top.
- Cool and serve: Remove from the oven, allow to cool slightly, and serve warm. Enjoy the cheesy, chewy texture fresh out of the oven!
Notes
- You can use Parmesan, mozzarella, or a traditional Brazilian cheese like Minas cheese for authentic flavor.
- This bread is best enjoyed fresh but can be reheated in the oven for a few minutes to regain crispiness.
- If you want a dairy-free version, try substituting cheese with a vegan alternative, but expect a different texture and flavor.
Keywords: Pão de Queijo, Brazilian Cheese Bread, tapioca bread, gluten-free snack, cheesy bread


