Easter No Bake Mini Cheesecakes Recipe

I can’t wait to share this Easter No Bake Mini Cheesecakes Recipe with you—it’s one of those treats that feels fancy but is actually super easy to make. The best part? You don’t need an oven, which means you can whip these up quickly and have a beautiful dessert ready to go in a snap. Plus, the colorful layers add a festive touch that’s perfect for Easter brunches or spring gatherings.
Whenever I make these mini cheesecakes, I love how simple yet impressive they look and taste. The creamy texture paired with that buttery graham cracker crust is just divine. You’re going to find yourself reaching for seconds, and honestly, who can blame you? This Easter No Bake Mini Cheesecakes Recipe is definitely worth trying if you want a crowd-pleaser that feels special without the fuss.
Ingredients You’ll Need
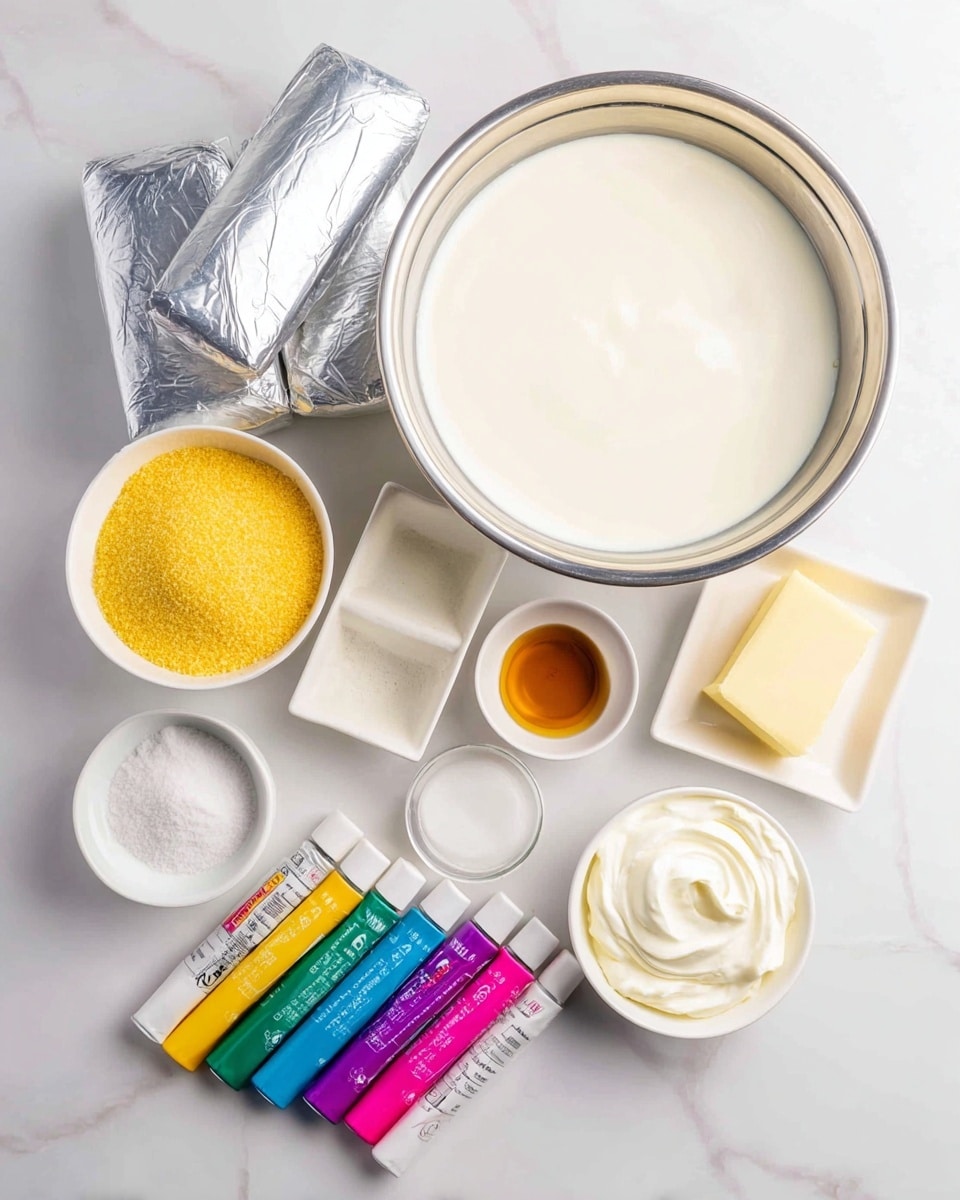
Each ingredient in this Easter No Bake Mini Cheesecakes Recipe plays a key role in creating that silky, dreamy texture and vibrant look. When shopping, aim for full-fat cream cheese and fresh heavy whipping cream to get the richest flavor and best consistency.
- Heavy whipping cream: This is what gives the cheesecake its light, fluffy texture when whipped into stiff peaks.
- Cream cheese: Softened to room temperature, it blends smoothly into the mixture for that rich, creamy base.
- Granulated sugar: Adds just the right amount of sweetness without overpowering the tang of the cream cheese.
- Sour cream: This little addition keeps the cheesecake moist and adds a subtle tang that balances the sweetness.
- Vanilla extract: A splash amps up the flavor, creating that familiar warm note we all love.
- Food coloring: Pink, purple, yellow, teal—these fun colors make the mini cheesecakes festive and visually exciting.
- Graham cracker crumbs: Essential for the buttery, crunchy crust that contrasts the creamy filling perfectly.
- Butter: Melted and mixed with the crumbs, it helps bind the crust together firmly.
- Optional toppings (whipped cream, sprinkles, candy): These add a festive finish and your personal flair.
Variations
I love customizing this Easter No Bake Mini Cheesecakes Recipe to suit different moods or dietary needs. Feel free to get creative with colors, flavors, or even the crust — the possibilities are endless, and it’s always fun to experiment when you’re in the kitchen.
- Berry Swirl: I sometimes swirl in fresh raspberry purée to one color for a fruity twist that punches up the flavor and looks pretty too.
- Gluten-Free Crust: Swap graham crackers for crushed gluten-free cookies—works like a charm if you’re avoiding gluten.
- Dairy-Free Version: Use dairy-free cream cheese and coconut cream instead of heavy whipping cream to make it vegan-friendly.
- Chocolate Chip Crust: Add mini chocolate chips to your crust mixture for a fun surprise inside every bite.
How to Make Easter No Bake Mini Cheesecakes Recipe
Step 1: Whip the Heavy Cream
Start by pouring your cold heavy whipping cream into a large bowl. Using an electric mixer, whip it up until it forms stiff peaks. This means when you lift the beaters, the cream holds its shape without collapsing. It’s a little workout for your mixer but worth it — the whipped cream is what gives these cheesecakes their light, airy texture.
Step 2: Mix the Cream Cheese Base
In a separate bowl, beat together the softened cream cheese, granulated sugar, sour cream, and vanilla extract until smooth and creamy. Take your time here—the smoother it is, the better the final texture. If you see any lumps, just keep mixing, and they’ll disappear in no time.
Step 3: Combine and Color
Gently fold the whipped cream into the cream cheese mixture until combined. This keeps the batter light and creamy. Then divide it into four bowls and add your food coloring to each, mixing until you get vibrant colors. I always start with a little color and add more if needed—it’s easier than fixing a shade that’s too dark!
Step 4: Fill the Molds
Transfer each colored batter into its own small zip-top bag and snip a tiny corner off to create piping bags. Pipe one color into your silicone molds, then bang the mold gently on the counter to release any air bubbles and level the batter. Keep layering colors this way until the mold is almost full. This creates that gorgeous layered effect that looks so fun and festive.
Step 5: Prepare the Crust Topping
Melt your butter in a microwave-safe bowl, then stir in the graham cracker crumbs and sugar. Spoon this crumb mixture onto the top of each cheesecake, pressing lightly so it sticks and forms a crust. This step adds the perfect crunch that balances the smooth filling beautifully.
Step 6: Freeze Until Firm
Place the filled silicone molds on a tray and pop them in the freezer for at least 2-4 hours. I usually do a full 4 hours so they’re completely set — this makes removing them super easy and ensures every bite holds its shape perfectly.
Step 7: Serve and Enjoy!
Carefully pop the mini cheesecakes out of the molds, add your favorite garnishes, and serve. They’re not only adorable but taste amazing. Plus, kids and adults both love the colorful layers—it’s a total win.
How to Serve Easter No Bake Mini Cheesecakes Recipe
Garnishes
For garnishes, I usually reach for dollops of whipped cream and a sprinkle of pastel-colored sprinkles or tiny candy eggs. They add a whimsical touch that really brings out the Easter vibe. Sometimes I toss on fresh berries or edible flowers if I want to get a little fancy.
Side Dishes
I like to serve these mini cheesecakes alongside fresh fruit platters or light salads during brunch. They also pair wonderfully with cupcakes or mini quiches if you’re putting together a bigger Easter spread. The creamy dessert balances savory dishes perfectly.
Creative Ways to Present
For a fun twist, I’ve presented these mini cheesecakes in clear glass jars layered with crushed cookies or fruit compotes. It’s a charming way to show off the layers and easy to grab for parties. Another idea is serving them on pastel-colored dessert plates with little edible flowers perched on top for an elegant spring look.
Make Ahead and Storage
Storing Leftovers
If you have leftovers (although that’s rare!), I store them in an airtight container in the refrigerator. They stay fresh and creamy for up to 3 days. Just remember to let them sit out for about 10 minutes before serving so they soften slightly—it makes a big difference in texture.
Freezing
I’ve frozen these mini cheesecakes several times with great success. Wrap each one individually in plastic wrap and place them in a freezer-safe container to avoid freezer burn. When you want one, just thaw in the fridge overnight and enjoy as if freshly made.
Reheating
Since this is a no bake cheesecake, reheating isn’t necessary—but if you want them a little less chilled, remove from the fridge and let sit at room temperature for 10-15 minutes before serving. This softens the cheesecake and lets all those flavors shine through.
FAQs
-
Can I make this Easter No Bake Mini Cheesecakes Recipe without food coloring?
Absolutely! The food coloring is just for fun and to match the Easter theme. If you prefer natural tones, just skip the colors or use natural food dyes like beet powder or turmeric for subtle hues.
-
What if I don’t have silicone molds?
You can use mini cupcake liners or a mini muffin tin instead. Just line the tins with paper liners and follow the same layering steps. Freezing might take a bit longer, so keep an eye on firmness.
- How long do these mini cheesecakes last in the fridge?
Stored in an airtight container, they’ll keep well for about 3 days. After that, the texture might start to change, so it’s best to enjoy them fresh or freeze any extras.
- Can I use light cream cheese or reduced-fat options?
You can use them, but keep in mind the texture and flavor might be less rich and creamy. Full-fat cream cheese tends to yield the best results for this recipe.
- Is it necessary to whip the cream to stiff peaks?
Yes! Whipping the cream to stiff peaks incorporates air, which keeps the cheesecake light and fluffy. Under-whipped cream can make the cheesecake dense and less smooth.
Final Thoughts
This Easter No Bake Mini Cheesecakes Recipe holds a special place in my heart because it’s proof that you don’t need to spend all day baking to impress your family or guests. The colorful layers, creamy texture, and easy preparation make it my go-to dessert for spring celebrations. I hope you enjoy making these just as much as I do—it’s like sharing a little slice of joy with everyone you love.
PrintEaster No Bake Mini Cheesecakes Recipe

These festive Easter No Bake Mini Cheesecakes are a colorful and creamy treat perfect for spring celebrations. Made with a smooth cream cheese filling dyed in vibrant pastel colors and nestled on a buttery graham cracker crust, these cheesecakes require no baking and only a few hours in the freezer. Decorated with optional whipped cream, sprinkles, and candies, they’re both fun and delicious.
- Prep Time: 20 minutes
- Cook Time: 4 hours
- Total Time: 4 hours 20 minutes
- Yield: 6 mini cheesecakes 1x
- Category: Dessert
- Method: No-Cook
- Cuisine: American
Ingredients
Cheesecake Filling
- 1 ¼ cups heavy whipping cream
- 24 ounces cream cheese, softened to room temperature
- ½ cup granulated sugar
- ¼ cup sour cream
- 1 teaspoon vanilla extract
- Pink, purple, yellow, teal food coloring (to color the batter)
- Whipped cream, sprinkles, candy for topping (optional)
Crust
- ½ cup graham cracker crumbs
- 1 tablespoon sugar
- 2 tablespoons butter
Instructions
- Whip the Cream: In a large bowl, use an electric mixer to whip the heavy whipping cream until stiff peaks form, creating a light and airy texture.
- Prepare the Cream Cheese Mixture: In another bowl, combine the softened cream cheese, granulated sugar, sour cream, and vanilla extract. Mix until the batter is smooth and creamy.
- Combine Whipped Cream and Cream Cheese Mixture: Gently fold the whipped cream into the cream cheese mixture using the mixer until fully incorporated and smooth.
- Divide and Color Batter: Separate the cheesecake batter evenly into four bowls. Add a different food coloring to each to create pink, purple, yellow, and teal colored batters.
- Fill Piping Bags: Transfer each colored batter into separate Ziploc bags and snip off the corners for piping.
- Pipe Layers into Molds: Pipe one color into six silicone molds, then tap the mold gently on the counter to level the batter.
- Repeat Layers: Continue layering and piping different colored batters into the molds until nearly full, tapping after each layer to settle the mixture.
- Melt Butter: In a microwave-safe bowl, melt the butter until fully liquid.
- Prepare Crust Mixture: Stir the graham cracker crumbs and 1 tablespoon sugar into the melted butter until combined.
- Add Crust Topping: Spoon the graham cracker crust mixture onto the top of each cheesecake and gently press it into the batter to adhere.
- Freeze the Cheesecakes: Place the filled molds on a tray and freeze for 2 to 4 hours, allowing the cheesecakes to set firmly.
- Serve: Once set, carefully remove the mini cheesecakes from the molds. Garnish with whipped cream, sprinkles, or candy as desired before serving.
Notes
- You can substitute graham cracker crumbs with digestive biscuits if preferred.
- Ensure cream cheese is fully softened to avoid lumps in the batter.
- Use silicone molds for easy removal of cheesecakes.
- Freezing time can vary; make sure cheesecakes are firm before unmolding.
- These mini cheesecakes should be stored in the freezer and consumed within 3 days for best taste and texture.
Keywords: Easter dessert, no bake cheesecake, mini cheesecakes, colorful cheesecake, spring dessert, easy cheesecake recipe