Delicious Grilled Cheese Roll-Ups with Ham Recipe
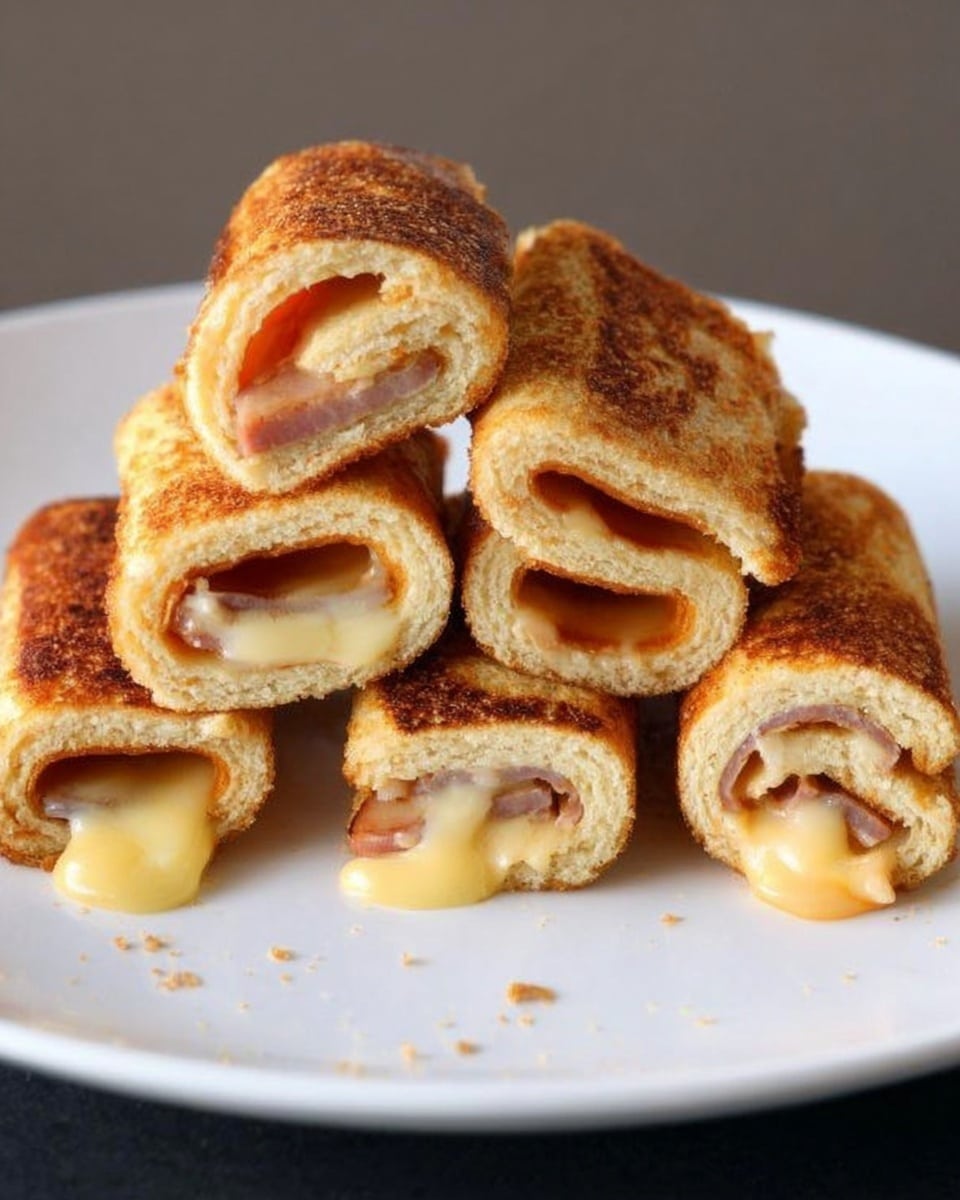
Let me tell you, this Delicious Grilled Cheese Roll-Ups with Ham Recipe is one of those quick comfort foods that feels like a warm hug on a plate. It takes the classic grilled cheese to a new, fun level by rolling everything up into bite-sized pockets—perfect for when you want something crispy, cheesy, and a little special without the fuss. Whether it’s a busy weeknight or a casual lunch with friends, these roll-ups never disappoint.
What I love most is how versatile and forgiving this recipe is. You can easily customize it with different cheeses, add ham if you like, or even sneak in some herbs. Plus, since they cook so fast, you’ll have dinner or snacks ready in no time. If you’ve been hunting for a tasty grilled cheese twist, this Delicious Grilled Cheese Roll-Ups with Ham Recipe is definitely worth giving a try—you’ll be hooked!
Ingredients You’ll Need
These simple ingredients come together beautifully to create a crispy outside with cheesy, melty goodness on the inside. A couple of tips: go for sturdy sandwich bread to avoid sogginess and use a cheese that melts smoothly for that perfect gooey texture.
- Bread: I prefer plain white or whole wheat sandwich bread—just remove the crusts so the roll-ups seal nicely.
- Cheese: Choose a cheese that melts well like cheddar, mozzarella, or American. Freshly shredded cheese works best for melting.
- Ham: Thinly sliced deli ham is my go-to. It adds a salty, savory punch but you can easily skip it if you want a vegetarian version.
- Butter: Real butter is key for that golden, crispy exterior. It browns beautifully and adds flavor you just can’t beat.
Variations
I like to switch things up with this recipe, making it my own little canvas for flavors depending on what I have on hand or who I’m feeding. Don’t hesitate to try different combos!
- Spicy Twist: Adding a dash of hot sauce or some sliced jalapeños inside gives these roll-ups a fun spicy kick—I always get requests to make this version repeat.
- Veggie Boost: Toss in some spinach or thinly sliced bell peppers before rolling for a crunch and extra nutrients.
- Different Meats: Turkey or leftover roast chicken works great instead of ham if you want a change.
- Cheese Variations: Gouda, provolone, or a blend make the texture and flavor exciting—try a mix to see what you like best.
How to Make Delicious Grilled Cheese Roll-Ups with Ham Recipe
Step 1: Prepare Your Bread
Start by trimming off the crusts from your bread slices—that helps the bread roll up neatly without cracking. Then, flatten each slice lightly with a rolling pin or your hands to make it more pliable. This little trick stops the bread from tearing when you roll, ensuring your roll-ups stay intact and look gorgeous.
Step 2: Layer the Cheese and Ham
Sprinkle about a generous tablespoon or two of shredded cheese on each bread slice, leaving a small margin near the edge. Add a thin slice of ham on top, if you’re using it, layering evenly. This balance helps everything melt perfectly while still rolling up tightly without spilling out.
Step 3: Roll Them Up Tight
Roll each piece of bread up gently but tightly from one end to the other. Keep the seam side down so it seals better while cooking. This is where a little patience pays off—if you roll too loosely, you might end up with cheesy leaks, which isn’t the end of the world but can be a bit messy.
Step 4: Butter and Brown on the Stove
Heat a skillet over medium heat and melt about a tablespoon of butter. Place the roll-ups seam side down and cook, turning occasionally, until all sides are golden brown and crispy and the cheese inside is melted—usually 3 to 4 minutes total. Remember to lower the heat a bit if they start browning too fast before the cheese melts.
How to Serve Delicious Grilled Cheese Roll-Ups with Ham Recipe
Garnishes
I love sprinkling a little fresh parsley or chives over mine just for a pop of color and fresh flavor. Sometimes, a light drizzle of honey mustard or even a little sriracha mayo on the side makes a delicious dipping experience — totally optional but highly underrated!
Side Dishes
Pair these roll-ups with a crisp garden salad or some warm tomato soup for the ultimate comfort combo. They’re also fantastic alongside crunchy pickles or coleslaw if you want some texture contrast on your plate.
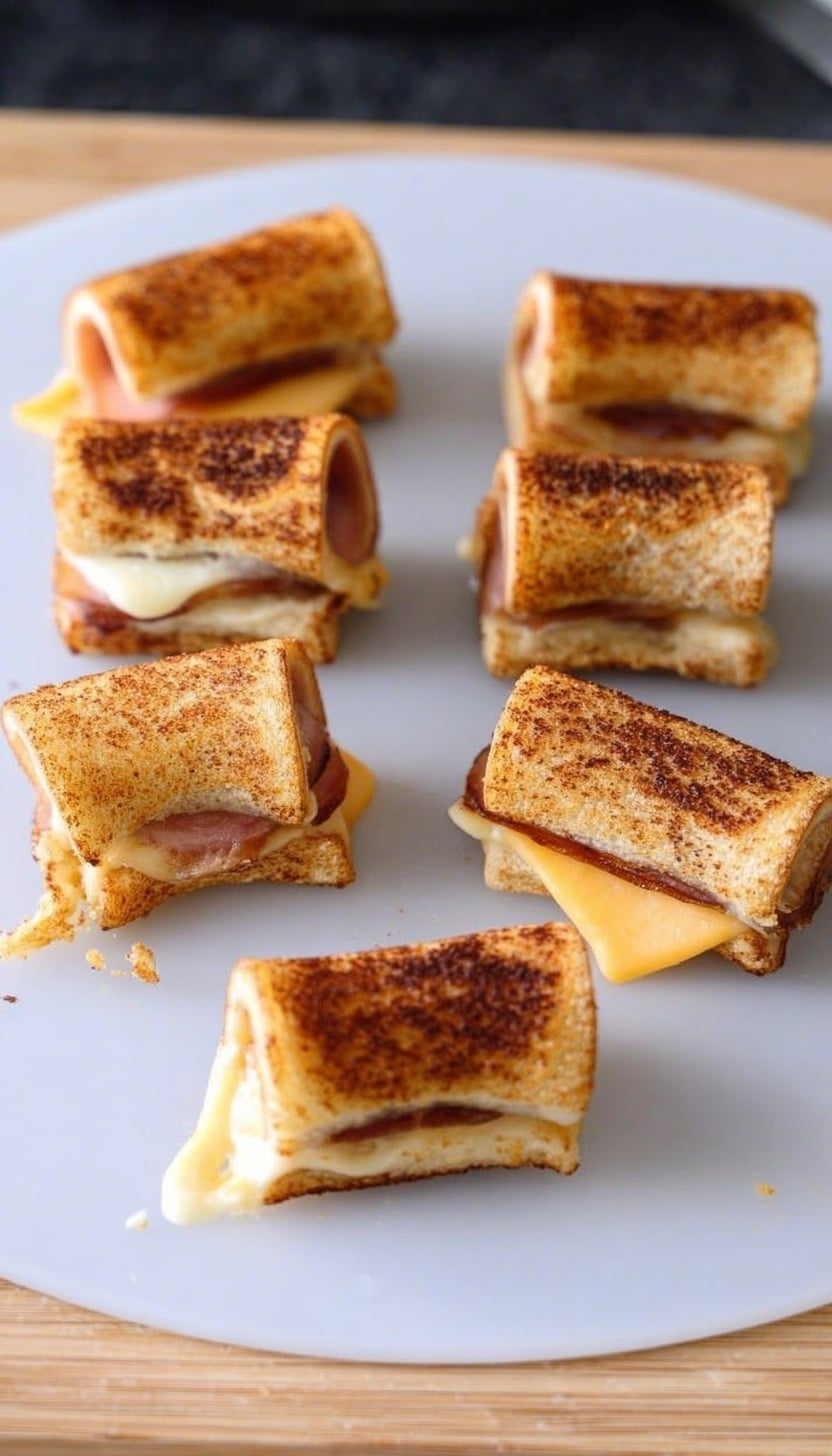
Creative Ways to Present
For a party, I slice the roll-ups into bite-sized pinwheels and arrange them on a platter with colorful veggies and dips around them. Kids love it because they’re easy to grab and eat. It also makes a charming addition to a brunch spread where you want to serve something familiar but fun.
Make Ahead and Storage
Storing Leftovers
If you have any leftovers (rare in my house!), wrap them tightly in plastic wrap or store in an airtight container in the fridge. I’ve found they keep well for up to two days without losing much crispness if you reheat them properly.
Freezing
I’ve frozen these roll-ups before by flash-freezing them laid flat on a baking sheet, then transferring to a freezer bag. They thaw quickly and reheat nicely, making them perfect for meal prep or quick snacks later on.
Reheating
Reheat in a toaster oven or skillet rather than the microwave to keep that crunch. Just warm them gently until heated through and crisp outside—it’s the best way to revive that fresh-cooked texture and flavor.
FAQs
-
Can I use gluten-free bread for this recipe?
Absolutely! Just make sure to choose a sturdy gluten-free bread so it holds up to rolling and grilling. You might need to be extra gentle when rolling, but the result is still delicious and a great option for those avoiding gluten.
-
What’s the best cheese for melting in these roll-ups?
Cheddar, mozzarella, and American cheese are my favorites because they melt smoothly and create that ooey-gooey texture we all crave in grilled cheese. Feel free to experiment with blends too!
-
Can I make this recipe without ham?
Definitely! The ham is optional and while it adds delicious flavor, you can easily enjoy these as classic grilled cheese roll-ups or add other fillings like sautéed mushrooms or roasted veggies for variety.
-
How do I prevent the cheese from leaking out while cooking?
Make sure to leave a small border around the edges when adding cheese and roll tightly with the seam side down in the pan. Also, cook on moderate heat so the cheese has time to melt before the bread gets too brown.
-
Can I bake these roll-ups instead of pan-frying?
Yes! Arrange the roll-ups seam side down on a greased baking sheet, brush with melted butter, and bake at 375°F (190°C) for about 10-12 minutes, turning halfway through, until golden and crispy.
Final Thoughts
This Delicious Grilled Cheese Roll-Ups with Ham Recipe holds a special place in my kitchen because of how easy and versatile it is. It’s one of those recipes I can whip up when I want something comforting but a bit different from the everyday grilled cheese. Trust me, once you try it, you’ll love how quick, customizable, and downright tasty these roll-ups are. So grab your ingredients, get rolling, and enjoy every melty, crispy bite like an old friend sharing a warm hug.
PrintDelicious Grilled Cheese Roll-Ups with Ham Recipe

Grilled Cheese Roll-Ups are a fun and easy twist on the classic grilled cheese sandwich. Thin slices of bread are flattened, filled with shredded cheese and optional ham, then rolled up and pan-fried in butter until golden and melty inside. Perfect for a quick snack or kid-friendly meal.
- Prep Time: 10 minutes
- Cook Time: 6 minutes
- Total Time: 16 minutes
- Yield: 6 roll-ups 1x
- Category: Snack
- Method: Frying
- Cuisine: American
Ingredients
Bread and Filling
- 6 slices of bread
- 1 cup thinly shredded cheese (any melty cheese like cheddar or mozzarella)
- 6 thinly sliced pieces of ham (optional)
Cooking
- 2 tbsp of butter
Instructions
- Prepare the bread: Trim the crusts off the bread slices, then use a rolling pin to flatten each slice evenly until thin and flat.
- Add the filling: Spread a portion of shredded cheese evenly over each flattened bread slice. If using ham, place one thin slice on top of the cheese.
- Roll up the bread: Starting from one end, carefully roll each bread slice tightly into a cylinder shape, enclosing the cheese and ham inside.
- Heat the pan and melt butter: Place a large skillet or frying pan over medium heat and add the butter, allowing it to melt and coat the surface.
- Cook the roll-ups: Place the roll-ups seam side down in the hot pan. Cook for about 2-3 minutes per side, turning carefully, until all sides are golden brown and the cheese inside is melted.
- Serve: Remove from heat and let cool slightly before serving warm as a delicious, melty snack or meal.
Notes
- Use any type of bread you like, but white sandwich bread works best for rolling.
- The cheese can be substituted with your favorite kinds like mozzarella, Swiss, or a cheese blend.
- Adding ham is optional; you can also add other fillings like turkey, bacon, or vegetables.
- To ensure the cheese melts evenly, cook over medium heat and don’t rush flipping.
- Serve with ketchup, mustard, or your favorite dipping sauce.
Keywords: grilled cheese, cheese roll-ups, quick snack, pan-fried sandwich, ham and cheese, easy recipe