Dark Chocolate and Sea Salt Nut Bars Recipe

Oh, these Dark Chocolate and Sea Salt Nut Bars are an absolute game-changer! Every time I make them, I’m reminded just how perfectly the rich, slightly bitter dark chocolate pairs with the crunch of toasted nuts and that pinch of sea salt. They’re the kind of snack that feels indulgent but also gives you a boost of energy, making them great for mid-afternoon cravings or a pre-workout treat.
What really makes this Dark Chocolate and Sea Salt Nut Bars Recipe so special is how simple it is yet so rewarding. I’ve brought these bars to road trips, office snack swaps, and even casual dinner parties—they literally disappear every time. Trust me, once you try making them at home, you’ll want to keep a batch stashed away for whenever hunger strikes.
Ingredients You’ll Need
Choosing the right ingredients here is key to getting that perfect balance of textures and flavors. I like mixing different nuts for both taste and crunch, and the brown rice syrup acts as a sticky, natural sweetener that holds everything together beautifully.
- Unsalted nuts: I usually mix cashews, peanuts, and almonds—each adds its own unique crunch and flavor.
- Puffed rice: Adds a light crispiness without weighing the bars down.
- Brown rice syrup: This is your natural sweetener and binding agent—don’t swap it for honey or maple syrup unless you want a stickier texture.
- Vanilla extract: Just a little boost of warmth and complexity.
- Sea salt: Enhances the chocolate and nuts—don’t skip it!
- Dark chocolate chips: I recommend 70% cacao or higher for that rich, slightly bitter edge.
- Coconut oil: Helps melt the chocolate smoothly and adds a subtle tropical note.
- Optional flaky salt: Perfect for sprinkling on top to amp up that sea salt flavor and add a pretty finishing touch.
Variations
One of the reasons I adore this Dark Chocolate and Sea Salt Nut Bars Recipe is how easy it is to make it your own. I often tweak the nuts or mix in other add-ins depending on what I have handy or what vibe I’m going for.
- Nut-free version: Swap nuts with seeds like pumpkin and sunflower to keep it crunchy but allergy-friendly. I tried this for a friend once, and it still had that fantastic bite!
- Extra chocolatey: Double the dark chocolate chips or drizzle melted chocolate over the top for an over-the-top treat.
- Spicy twist: Add a pinch of cayenne or cinnamon to the mix—it gives a surprising but delightful kick I’ve come to love.
- Vegan adaptation: This recipe is basically vegan already, but just be sure your chocolate chips don’t contain milk solids.
How to Make Dark Chocolate and Sea Salt Nut Bars Recipe
Step 1: Prep and Toast the Nuts
Start by preheating your oven to 350°F (180°C). Spread the nuts out evenly on a baking sheet and toast them for about 8-10 minutes until they’re fragrant and lightly golden. Toasting unlocks that amazing nutty flavor and gives the bars a wonderful crunchy texture that raw nuts just can’t match. Keep an eye on them so they don’t burn!
Step 2: Combine Nuts and Puffed Rice
Once the nuts have cooled a bit, toss them together with the puffed rice in a large bowl. This is where your bars start taking shape—a delightful mix of textures that’s both satisfying and light.
Step 3: Mix the Syrup, Vanilla, and Salt
In a small saucepan over low heat, warm the brown rice syrup, vanilla extract, and sea salt, stirring gently until everything is blended and smooth. This step is crucial because it softens the syrup and allows it to evenly coat the nuts and puffed rice. Don’t boil—it just needs to warm enough to mix nicely.
Step 4: Combine and Press
Pour the warm syrup mixture over your nuts and rice, folding to coat everything evenly. Press the mixture firmly into a parchment-lined baking pan. Don’t skimp on pressing it down—you want your bars to hold together well. I find using the back of a spoon or a flat-bottomed glass works perfectly here.
Step 5: Melt the Chocolate Topping
In a double boiler or microwave in short bursts, melt the dark chocolate chips together with the coconut oil until silky smooth. Spread this luscious layer over your pressed nut mixture, then sprinkle some flaky salt if you like that finishing touch. Chill in the fridge for at least an hour to set before slicing into bars.
How to Serve Dark Chocolate and Sea Salt Nut Bars Recipe

Garnishes
I love sprinkling a bit of flaky sea salt on top—just enough to make the chocolate flavors pop. Sometimes I add a few toasted coconut flakes or a drizzle of almond butter for a little extra flair. It’s all about those tiny touches that elevate a simple bar.
Side Dishes
These bars are pretty spectacular on their own, but I also like pairing them with a cup of rich black coffee or a creamy herbal tea. They make a great little dessert after a salad-rich lunch too, balancing healthy greens with a decadent but wholesome treat.
Creative Ways to Present
For parties, I’ve arranged the bars on a wooden platter with fresh berries and edible flowers to make the snack table pop. Wrapping individual bars in parchment and tying them with kitchen twine makes them perfect for gifting or lunchbox treats—you’ll get so many compliments!
Make Ahead and Storage
Storing Leftovers
I store leftover Dark Chocolate and Sea Salt Nut Bars in an airtight container in the fridge. This keeps them crisp and fresh for up to a week—though honestly, they rarely last that long in my house. Just layer parchment paper between bars so they don’t stick together.
Freezing
Freezing these bars works surprisingly well! I cut them into individual portions, wrap each one tightly in plastic wrap, and pop them into a freezer-safe bag. When you’re ready to enjoy one, just thaw at room temperature for 15-20 minutes. The texture stays just right without losing that satisfying snap.
Reheating
Since these bars don’t really require reheating, I usually just eat them cold or at room temperature. However, if the chocolate feels too firm, a few seconds in the microwave (like 5–7 seconds) can soften it nicely without melting the whole bar.
FAQs
-
Can I use other sweeteners instead of brown rice syrup?
Brown rice syrup is preferred because it’s sticky but mild in flavor, helping the bars hold together without overpowering sweetness. You can experiment with honey or maple syrup, but keep in mind the texture might be softer or stickier.
-
Is it necessary to toast the nuts?
While you can use raw nuts, toasting them enhances their flavor and crunch, which really elevates the whole bar. I highly recommend it if you have the time.
-
Can I make this recipe nut-free?
Absolutely! Swap nuts for a mix of seeds like pumpkin, sunflower, and chia seeds. The texture will be a bit different but still delicious and crunchy.
-
How long do these bars keep?
Stored in an airtight container in the fridge, these bars stay fresh for up to one week. For longer storage, freezing is your best bet.
-
Can I use milk chocolate instead of dark chocolate?
You can, but the bars will be sweeter and less rich. I prefer dark chocolate for that perfect bittersweet flavor that balances the nuts and salt beautifully.
Final Thoughts
This Dark Chocolate and Sea Salt Nut Bars Recipe has become one of my go-to homemade snacks, and I truly think you’ll enjoy making it as much as eating it. It hits that perfect sweet-salty spot and is simple enough to whip up on a lazy Sunday afternoon. Give it a try—you might find yourself sneaking a bar or two straight from the fridge, just like I do!
PrintDark Chocolate and Sea Salt Nut Bars Recipe
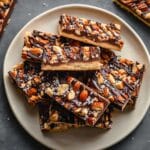
These Dark Chocolate and Sea Salt Nut Bars are a perfect blend of crunchy nuts, puffed rice, and rich dark chocolate with a hint of sea salt. Easy to make and naturally sweetened with brown rice syrup, they create an indulgent yet wholesome snack bar that satisfies your sweet tooth while delivering a delightful crunch.
- Prep Time: 15 minutes
- Cook Time: 10 minutes
- Total Time: 2 hours 25 minutes
- Yield: 12 bars 1x
- Category: Snack
- Method: No-Cook
- Cuisine: American
- Diet: Gluten Free
Ingredients
Dry Ingredients
- 2 ½ cups unsalted nuts (¾ cup cashews, ¾ cup peanuts, 1 cup almonds)
- ½ cup puffed rice
- ½ teaspoon sea salt
Wet Ingredients
- ¼ cup brown rice syrup
- 1 ½ teaspoon vanilla extract
- 2 teaspoons coconut oil
Chocolate Coating
- 1 cup dark chocolate chips
- Optional: flaky sea salt for topping
Instructions
- Prepare the nut mixture: In a large mixing bowl, combine the unsalted cashews, peanuts, and almonds with the puffed rice and ½ teaspoon of sea salt. Mix well to evenly distribute the ingredients.
- Create the syrup binder: In a small saucepan over low heat, gently warm the brown rice syrup with vanilla extract, stirring often until combined and slightly fluid but not boiling.
- Combine nuts and syrup: Pour the warm syrup mixture over the nuts and puffed rice. Stir thoroughly to ensure everything is evenly coated with the syrup, helping the bars to bind together.
- Form the bars: Line a square baking dish with parchment paper and press the nut mixture firmly and evenly into the pan to create a compact layer. Refrigerate for at least 30 minutes to set.
- Melt the chocolate coating: In a microwave-safe bowl or double boiler, melt the dark chocolate chips with coconut oil until smooth and glossy, stirring frequently to avoid burning.
- Coat the bars: Remove the set nut mixture from the refrigerator and pour the melted chocolate evenly over the top. Use a spatula to smooth the surface.
- Add finishing touches: If desired, sprinkle flaky sea salt over the melted chocolate for an extra burst of flavor and texture.
- Chill to harden: Return the pan to the refrigerator and chill for another 1-2 hours or until the chocolate is completely firm.
- Slice and serve: Once set, lift the bars out using the parchment paper and cut into desired sized pieces. Store bars in an airtight container in the fridge to maintain freshness.
Notes
- Use a mix of your favorite unsalted nuts for variety and texture.
- Brown rice syrup acts as a natural sweetener and binder; honey or maple syrup can be substituted but may affect texture.
- Press the nut mixture firmly into the pan to help the bars hold their shape.
- Melt chocolate gently to avoid separating or burning.
- Store bars refrigerated to keep the chocolate coating firm and fresh.
- These bars are naturally gluten-free and vegan if using vegan-certified chocolate chips.
Keywords: dark chocolate nut bars, sea salt nut bars, healthy snack bars, gluten free snack, vegan nut bars, homemade energy bars, chocolate nut bars