Cottage Cheese Lava Cake Recipe
If you’re craving something decadent but still want to keep things on the lighter side, you’re going to love this Cottage Cheese Lava Cake Recipe. It’s got that irresistible molten center we all adore in lava cakes, but with a surprising twist—cottage cheese adds protein and a silky texture that keeps it feeling rich without overloading on heavy cream or butter. Plus, it’s quick enough for when you want dessert tonight, not tomorrow.
I first stumbled upon this recipe when I wanted a chocolate fix but didn’t want to feel sluggish afterward. Let me tell you, this Cottage Cheese Lava Cake Recipe quickly became one of my favorite go-to sweet treats. It’s perfect for date nights, impressing friends, or even guilt-free weekend indulgence. You’re going to want to keep this one bookmarked!
Ingredients You’ll Need
These ingredients might sound simple, but they come together to make an unbelievably creamy and chocolatey cake. I love that you can find everything easily in your pantry or fridge, and the cottage cheese is key for that creamy texture and protein boost.
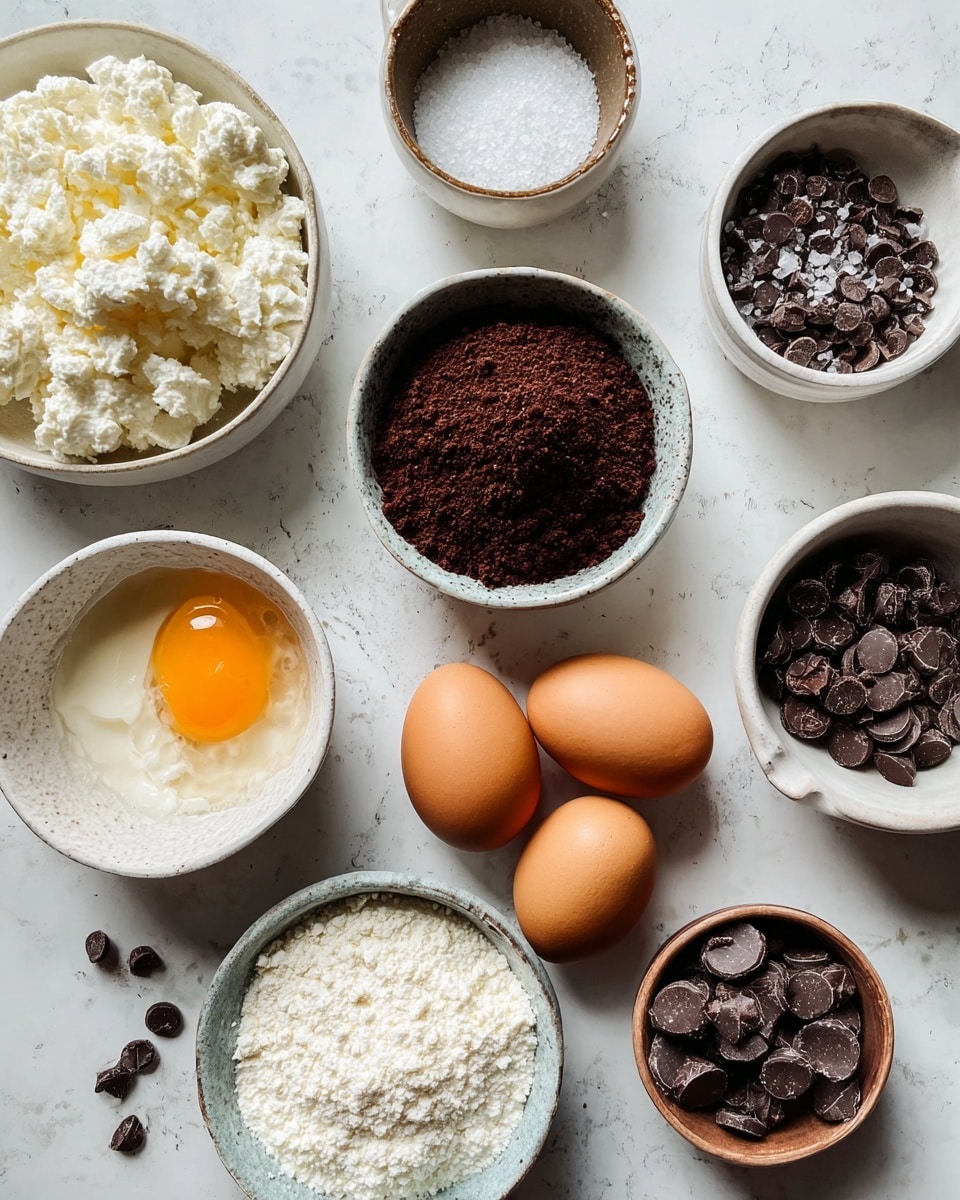
- Full-fat cottage cheese: The creaminess here is unmatched compared to low-fat versions—trust me, it makes all the difference in texture and flavor.
- Egg: Helps bind everything together and gives structure to your lava cake.
- Cocoa powder or melted dark chocolate: Use what you prefer! I like cocoa for a more intense chocolate flavor and melted chocolate if I’m feeling indulgent.
- Sweetener of choice: Depending on your diet, you can use sugar, honey, maple syrup, or a sugar substitute—adjust sweetness to your taste.
- Vanilla extract: Adds a subtle warmth that enhances the chocolate flavor beautifully.
- Pinch of salt (optional): Salt always brings the chocolate to life and balances the sweetness.
- Chocolate chips (optional): Drop them in the center if you want an extra molten gooey surprise—my personal favorite touch.
Variations
One thing I love about the Cottage Cheese Lava Cake Recipe is how easy it is to tweak based on what you crave or have on hand. Don’t hesitate to experiment—you’ll enjoy discovering your favorite tweaks!
- Adding espresso powder: I once tossed a teaspoon in for a mocha version, and it gave the chocolate a rich kick that was amazing with a scoop of vanilla ice cream.
- Using a sugar-free sweetener: If you’re watching sugar intake, I’ve replaced sweetener with erythritol and still got a great rise and flavor.
- Introducing berries or nuts: Sometimes, I sprinkle chopped walnuts on top right before baking for a crunchy contrast or serve with fresh raspberries for a tart balance.
- Make it vegan: I haven’t tried this myself, but swapping the egg for flax seed “egg” and using vegan chocolate might work with some adjustments.
How to Make Cottage Cheese Lava Cake Recipe
Step 1: Prep Your Oven and Ramekins
Preheat your oven to 350°F (175°C). Lightly grease two ramekins with butter or oil to ensure the cakes don’t stick. I like to use a little bit of cocoa powder dusted inside the ramekins as well—it gives a nice flavor and helps with clean edges when unmolding.
Step 2: Blend the Batter Smooth
Into your blender, add half a cup of full-fat cottage cheese, one egg, two tablespoons of cocoa powder or two ounces of melted dark chocolate, 2 to 3 tablespoons of your chosen sweetener, a quarter teaspoon of vanilla extract, and a pinch of salt if you’re using it. Blend everything until you get that silky smooth texture—no lumps of cottage cheese should remain. Trust me, this step is crucial for that creamy lava cake feel.
Step 3: Fill Ramekins and Add the Lava Center
Pour the batter into your ramekins, filling them about three-quarters full. If you want that molten center, place about a teaspoon of chocolate chips right in the middle of each ramekin, then gently cover with a little more batter on top. This creates that magical molten chocolate core.
Step 4: Bake to Perfection
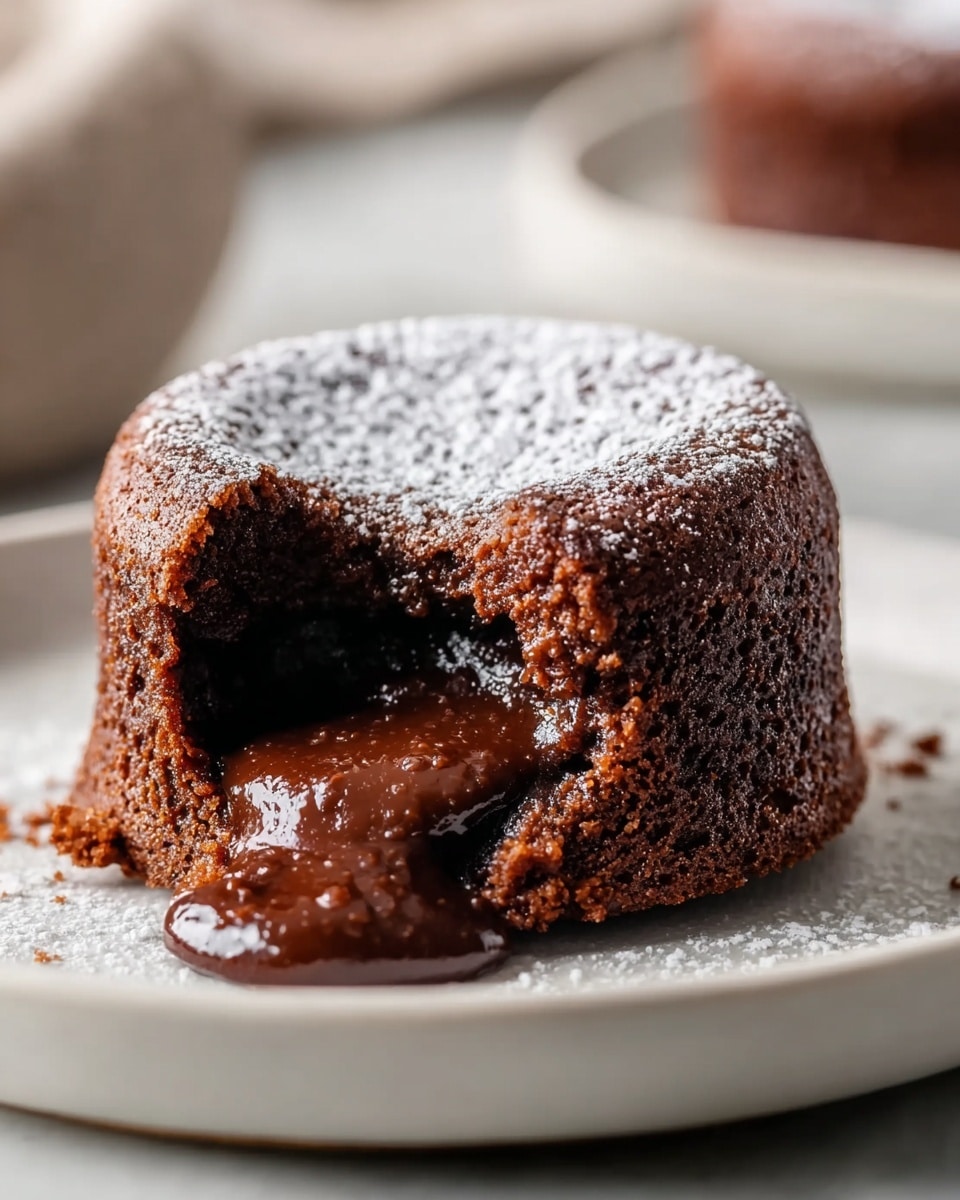
Bake your cakes for 12 to 15 minutes. You’re looking for set edges but a center that’s still soft and wobbly—like pudding that’s almost set but not quite. I usually check at 12 minutes and then give it extra time if needed, but watch carefully to avoid overbaking. This step is all about getting that perfect gooey center.
Step 5: Rest Before Servings
Let your lava cakes sit for about 2 minutes after baking. They’re super hot right out of the oven and need just a moment to settle. This rest helps the edges firm up enough to hold their lovely shape when you dig in but keeps the center luscious and molten.
How to Serve Cottage Cheese Lava Cake Recipe
Garnishes
I love serving these little cakes with a dusting of powdered sugar for a pretty touch. Sometimes, I add a few fresh berries or a sprig of mint to brighten things up. If I’m feeling indulgent, a small scoop of vanilla ice cream or whipped cream on the side takes it over the top—melting into the warm cake beautifully.
Side Dishes
Since this dessert is rich yet lighter thanks to the cottage cheese, I often pair it with a simple mixed green salad if I serve it at a dinner party—just to balance the meal. Of course, a cup of strong coffee or espresso complements the chocolate notes perfectly.
Creative Ways to Present
For special occasions, try serving the lava cakes in clear glasses layered with whipped cream and berries for a layered dessert effect. Another time, I poured a little raspberry coulis on the plate and placed the cake on top—looks fancy but is super easy!
Make Ahead and Storage
Storing Leftovers
If you have leftovers (rare in my house!), I recommend storing them in an airtight container in the fridge. They’ll keep nicely for up to 2 days, although they’re best enjoyed fresh. The texture changes a bit but they still taste great warmed up.
Freezing
I’ve frozen these cakes individually wrapped in plastic wrap and then popped in a freezer-safe container with good results. Just thaw overnight in the fridge and reheat gently. The molten center isn’t quite the same, but it’s a fantastic quick dessert when you need it.
Reheating
I reheat leftovers in the microwave for about 20 seconds, keeping an eye so they don’t overcook. Alternatively, a quick 5-minute warm-up in a low oven (300°F) helps regain some of that gooey texture.
FAQs
-
Can I use low-fat cottage cheese instead of full-fat?
You can, but full-fat cottage cheese makes a creamier texture and richer flavor. Low-fat versions tend to yield a slightly drier cake, so you might want to add a little extra fat like a teaspoon of butter or oil to compensate.
-
What’s the best way to get that molten center?
The key is not to overbake. Bake until the edges are set, but the center still jiggles a bit. Adding chocolate chips or a small chunk of chocolate in the middle before baking helps create that lava effect.
-
Can I double the recipe for more servings?
Absolutely! Just double all the ingredients and bake in multiple ramekins. Just keep the baking time around the same but start checking a minute or two earlier since oven temps can vary.
-
Is this recipe gluten-free?
Yes! This Cottage Cheese Lava Cake Recipe contains no flour, so it’s naturally gluten-free—perfect if you’re avoiding gluten but still want an indulgent dessert.
-
How do I prevent the cakes from sticking?
Make sure to grease your ramekins well, and for extra insurance, dust them lightly with cocoa powder after greasing. Also, letting the cakes rest briefly post-bake helps them release easily.
Final Thoughts
This Cottage Cheese Lava Cake Recipe is one of those gems that blends indulgence with a bit of nutritional balance, which makes it feel like a total win-win. I’ve made it countless times, and every single time the rich chocolate and creamy texture surprise my family and friends. I really hope you give it a try—you’ll enjoy that molten, silky center as much as I do. It’s a quick dessert that feels special enough for company but easy enough for a weeknight treat. Happy baking, friend!
PrintCottage Cheese Lava Cake Recipe

This Cottage Cheese Lava Cake is a delightful low-carb dessert featuring a silky smooth batter made from full-fat cottage cheese, egg, and rich cocoa or dark chocolate. Baked until the edges are set and the center remains deliciously soft and molten, this treat offers a perfect balance of creamy texture and deep chocolate flavor, ideal for a quick and healthy indulgence.
- Prep Time: 10 minutes
- Cook Time: 15 minutes
- Total Time: 25 minutes
- Yield: 2 servings 1x
- Category: Dessert
- Method: Baking
- Cuisine: International
- Diet: Low Fat
Ingredients
Main Ingredients
- 1/2 cup full-fat cottage cheese
- 1 egg
- 2 tbsp cocoa powder or 2 oz melted dark chocolate
- 2–3 tbsp sweetener of choice (such as erythritol, stevia, or sugar)
- 1/4 tsp vanilla extract
- Optional: Pinch of salt
- Optional: 1 tsp chocolate chips for lava center
Instructions
- Preheat Oven: Set your oven to 350°F (175°C) and lightly grease two ramekins to prevent sticking and ensure easy cake removal.
- Prepare Batter: In a blender, combine full-fat cottage cheese, egg, cocoa powder or melted dark chocolate, your choice of sweetener, vanilla extract, and a pinch of salt if using. Blend until the mixture is silky smooth and well incorporated.
- Fill Ramekins: Pour the batter into the ramekins, filling them about three-quarters full to leave room for the lava center and expansion during baking.
- Add Lava Center: Place 1 teaspoon of chocolate chips in the center of each ramekin and cover with a little more batter to seal them inside.
- Bake Cakes: Bake the ramekins for 12 to 15 minutes. The edges should be set while the center remains soft and molten, creating the lava effect.
- Rest and Serve: Allow the cakes to rest for 2 minutes out of the oven to slightly firm up before serving warm for the best molten texture experience.
Notes
- Use full-fat cottage cheese for the creamiest texture and best flavor.
- The lava center with chocolate chips is optional but provides a richer molten effect.
- If you don’t add chocolate chips, the center will be less molten but still delicious.
- Serve the cakes warm to enjoy the smooth, gooey texture.
Keywords: Cottage Cheese Lava Cake, Low Carb Dessert, Molten Chocolate Cake, Healthy Chocolate Dessert, Quick Dessert Recipe