Chocolate Easter Egg Nest Cake Recipe
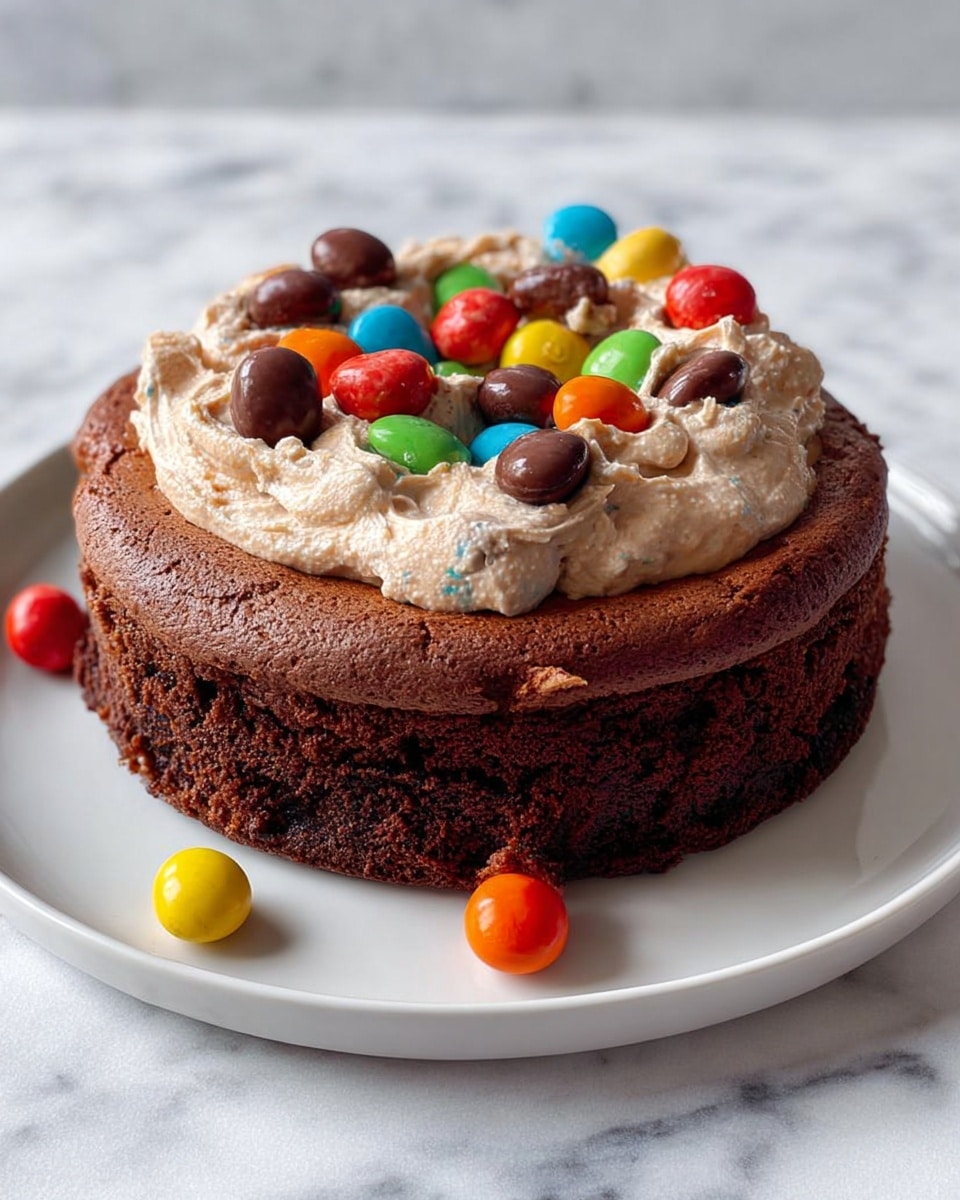
Oh, I can’t wait to share this Chocolate Easter Egg Nest Cake Recipe with you—it’s honestly one of my all-time favorites during the spring season! There’s something so magical about combining a rich, moist chocolate cake with a glossy ganache and then topping it with a delicate chocolate nest filled with colorful Easter eggs. It just instantly brings a festive, whimsical touch to any Easter celebration or spring gathering.
This Chocolate Easter Egg Nest Cake Recipe works beautifully if you want to impress guests without spending hours in the kitchen. Plus, the blend of chocolate and coffee in the batter really elevates the flavor, making it surprisingly decadent but still approachable. Trust me, you’ll enjoy every bite, and it’s perfect for sharing (or keeping all to yourself—I won’t judge!).
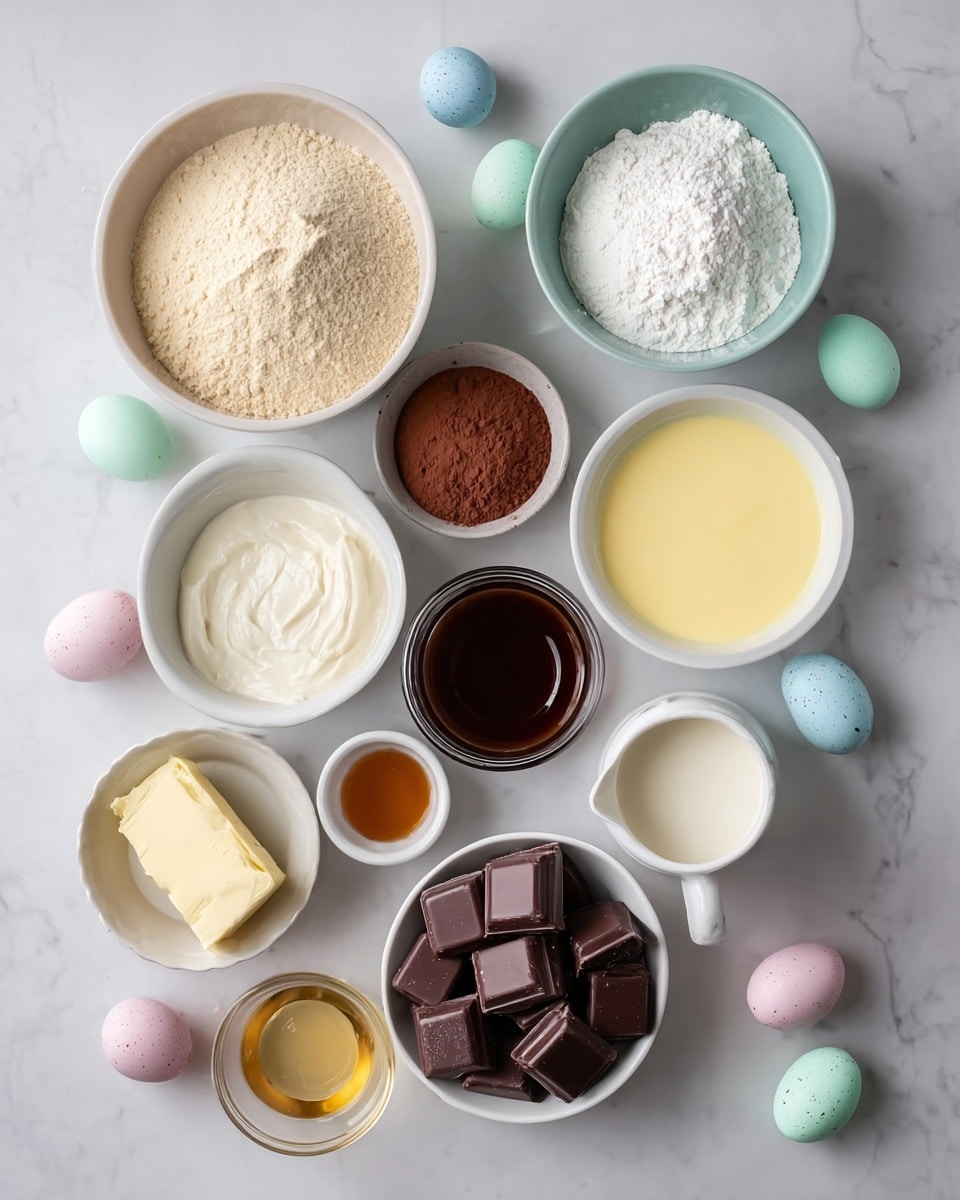
Ingredients You’ll Need
All these ingredients come together to create a luscious layered dessert that’s perfectly balanced. When you shop, look for high-quality cocoa powder and dark chocolate as they make a big difference in the cake’s final taste and the ganache’s smoothness.
- All-purpose flour: This gives the cake structure; make sure to measure it properly by spooning it into your cup.
- Unsweetened cocoa powder: I prefer Dutch-processed for a smoother flavor, but natural cocoa works well too.
- Granulated sugar: Adds sweetness and helps with the cake’s moist texture.
- Baking powder: Gives the cake a nice rise; ensure it’s fresh for best results.
- Baking soda: Works with the acidic buttermilk to lighten the cake.
- Salt: Enhances all the flavors and balances sweetness.
- Buttermilk: Adds moisture and tenderness—if you don’t have any, mixing milk with a little lemon juice works in a pinch.
- Vegetable oil: Keeps the cake super moist and tender.
- Eggs: Bind everything together and add richness.
- Vanilla extract: Boosts the chocolate flavor subtly but effectively.
- Hot water or coffee: I love using coffee to deepen the chocolate flavor, but hot water works fine if you prefer.
- Heavy cream: Essential for that silky ganache texture.
- Dark chocolate (for ganache and nest): Use good-quality chocolate with at least 70% cocoa for richness.
- Unsalted butter: Adds shine and smoothness to your ganache.
- Mini chocolate eggs or candy-coated Easter eggs: The colorful jewels that make this cake festive and fun!
Variations
One of the best parts about this Chocolate Easter Egg Nest Cake Recipe is just how easy it is to make your own. I often tweak things depending on the occasion or who I’m baking for, and it’s fun to experiment!
- Gluten-Free Version: Swap the all-purpose flour for a gluten-free blend. I tried this once using almond flour mix, and it turned out beautifully moist, though a bit denser.
- Vegan Variation: Use flax eggs instead of chicken eggs and plant-based milk with some vinegar for buttermilk. I made this for a friend’s Easter last year, and everyone loved it (the ganache just needs dairy-free chocolate!).
- Nutty Twist: Fold chopped toasted hazelnuts or almonds into the batter for added crunch. It’s a nice surprise that pairs well with the chocolate flavors.
- Berry Toppings: Adding fresh berries around the cake alongside the chocolate eggs adds a pop of color and a fresh tang.
- Different Chocolate Types for Ganache: Using milk or white chocolate for the ganache can completely change the flavor profile—perfect if you want to mix things up!
How to Make Chocolate Easter Egg Nest Cake Recipe
Step 1: Whisk together the dry ingredients
First things first, preheat your oven to 350°F (175°C) and prepare your pan—you want it well greased and lined with parchment paper for easy removal later. Taking a minute to sift or whisk your flour, cocoa, sugar, baking powder, baking soda, and salt together ensures the cake bakes evenly and the texture comes out perfect. I always do this step carefully because clumps in cocoa powder can be tricky to mix out later.
Step 2: Mix the wet ingredients and combine
In a separate bowl, stir together your buttermilk, vegetable oil, eggs, and vanilla extract. I usually crack my eggs into a bowl first—not only for safety but it keeps things smooth. Add the wet to the dry ingredients and mix until just combined. Then, the game changer: slowly stir in your hot coffee or water. The batter will look thin and runny—don’t worry, that’s exactly right. This thinness keeps the cake super moist and tender once baked.
Step 3: Bake the cake until just right
Pour your batter into the prepared pan, give it a little shake to level it out, and slide it into the oven. Bake for 30-35 minutes. Start checking at 30—insert a toothpick in the center and if it comes out clean or just a few moist crumbs, your cake is done. I find that ovens vary, so this is where attention to timing helps you avoid a dry cake.
Step 4: Make the silky chocolate ganache
While the cake cools, warm your heavy cream gently until it’s just about to simmer (don’t let it boil—burnt cream is a no-go). Pour the hot cream over chopped dark chocolate and wait a few minutes for it to melt. Stir it up until smooth, then add your butter and stir again. Let it cool slightly to thicken but still be pourable—this will make it perfect for drizzling over your cake.
Step 5: Craft the chocolate nest
Melt your dark chocolate in short bursts in the microwave or use a double boiler until glossy and smooth. Transfer it to a piping bag or a plastic bag with a tiny cut in the corner. On parchment paper, pipe the chocolate into a crisscross circular “nest” shape. Pop it in the fridge for 15-20 minutes so it sets firm. This is one of my favorite steps because the nest adds such a fun, creative touch that always wows at gatherings.
Step 6: Assemble and decorate
Place your cooled cake on a serving plate. Pour the ganache over it liberally, letting it drip down the sides for that beautiful, glossy look. Gently peel off the chocolate nest and place it on top, then fill it with mini chocolate eggs or candy-coated Easter eggs. Voila—you’ve created a show-stopping dessert that tastes just as good as it looks!
How to Serve Chocolate Easter Egg Nest Cake Recipe
Garnishes
I like to keep it simple by just adding those vibrant mini eggs in the nest, which already bring a burst of color. Sometimes, I sprinkle a little edible gold dust or a few fresh mint leaves around the base for a fresh, elegant touch. If you want more texture, chopped toasted nuts around the bottom edge of the cake work beautifully.
Side Dishes
Since this cake is rich, I often serve it with a light side of fresh berries or a dollop of whipped cream to balance out the chocolate. A simple cup of coffee or a glass of cold milk pairs perfectly, too. For Easter brunch, I like to set it alongside some citrusy fruit salad to add brightness to the table.
Creative Ways to Present
One fun idea I tried was adding edible flowers around the edges for a whimsical spring vibe. You could also make individual mini nests on cupcakes for party favors or assemble the nest on a chocolate tart instead of a cake for a slightly different twist. I once added small bunny-shaped chocolates nestled in the eggs for an extra dose of Easter charm—the kids loved it!
Make Ahead and Storage
Storing Leftovers
After enjoying the cake, you can store leftovers covered loosely with foil or in an airtight container in the fridge for up to 4 days. I find that the ganache slightly firms up in the fridge, so letting the cake sit at room temperature for 30 minutes before serving brings back its silky texture.
Freezing
This cake freezes well but I recommend freezing it before adding the ganache and nest. Wrap the cooled cake tightly in plastic wrap and foil, then freeze for up to 2 months. When ready to serve, thaw overnight in the fridge before finishing with ganache and your chocolate nest—this keeps everything fresh and prevents any sogginess.
Reheating
I usually don’t reheat this cake but if you want to warm a slice slightly, just pop it in the microwave for about 15-20 seconds. This helps the ganache soften just enough to melt deliciously but doesn’t dry out the cake. Be careful not to overheat, or the texture can suffer.
FAQs
-
Can I make the chocolate nest without a piping bag?
Absolutely! If you don’t have a piping bag, you can use a resealable plastic bag and snip off a tiny corner to pipe the chocolate strands. Alternatively, you can drizzle the melted chocolate with a spoon, though the strands might be thicker and less nest-like.
-
What if I don’t have buttermilk?
You can easily make a buttermilk substitute by adding 1 tablespoon of lemon juice or white vinegar to 1 cup of milk. Let it sit for 5-10 minutes until it curdles slightly, then use in your recipe as usual.
-
Can I use milk instead of coffee or water in the batter?
I wouldn’t recommend milk here since the hot water or coffee helps bloom the cocoa powder and intensify the chocolate flavor. But if you must, use warm water—coffee just adds a nice depth without making the cake taste like coffee.
-
How do I prevent the ganache from becoming grainy?
Make sure your chopped chocolate is even and use hot cream poured over it, allowing it to sit before stirring gently. Avoid boiling the cream, and don’t stir too vigorously, which can cause the ganache to seize or become grainy.
-
Can this cake be made into cupcakes?
Definitely! Divide the batter into a lined cupcake tin and bake for about 18-22 minutes or until a toothpick comes out clean. You can make mini nests using melted chocolate on parchment and place them on top with tiny eggs for cute individual treats.
Final Thoughts
This Chocolate Easter Egg Nest Cake Recipe holds such a warm place in my heart because it brings together the fun of Easter and the joy of chocolate all in one. It’s a recipe I turn to when I want something both special and approachable, that looks like a little edible work of art but doesn’t require a pastry chef’s skill to pull off. I hope when you make this cake, you find as much joy in baking and sharing it as I have—whether that’s with family, friends, or just savoring a quiet slice yourself with a cup of tea. Give it a shot, and have fun with it!
PrintChocolate Easter Egg Nest Cake Recipe

This Chocolate Easter Egg Nest Cake is a delightful and festive dessert perfect for celebrating Easter. Moist chocolate cake layers are topped with a rich, silky chocolate ganache and adorned with a delicate chocolate nest filled with mini chocolate eggs, creating an impressive and delicious centerpiece for any spring celebration.
- Prep Time: 30 minutes
- Cook Time: 35 minutes
- Total Time: 1 hour 35 minutes
- Yield: 12 servings 1x
- Category: Dessert
- Method: Baking
- Cuisine: American
Ingredients
For the Chocolate Cake
- 1 ¾ cups (220g) all-purpose flour
- ¾ cup (75g) unsweetened cocoa powder
- 2 cups (400g) granulated sugar
- 2 teaspoons baking powder
- 1 teaspoon baking soda
- ½ teaspoon salt
- 1 cup (240ml) buttermilk
- ½ cup (120ml) vegetable oil
- 2 large eggs
- 2 teaspoons vanilla extract
- 1 cup (240ml) hot water or coffee
For the Chocolate Ganache
- 1 cup (240ml) heavy cream
- 8 oz (225g) dark chocolate, chopped
- 1 tablespoon unsalted butter
For the Chocolate Nest
- 6 oz (170g) dark chocolate, melted
- Parchment paper
- Mini chocolate eggs or candy-coated Easter eggs
Instructions
- Prepare the Chocolate Cake: Preheat your oven to 350°F (175°C). Grease and line a 9-inch round cake pan that is at least 2.5 inches deep with parchment paper. In a large mixing bowl, whisk together the flour, cocoa powder, sugar, baking powder, baking soda, and salt. Add the buttermilk, vegetable oil, eggs, and vanilla extract, mixing until everything is well combined. Gradually stir in the hot water or coffee until the batter is smooth but thin. Pour this batter into the prepared pan and bake for 30-35 minutes. Check doneness with a toothpick inserted in the center; it should come out clean. Let the cake cool in the pan for 10 minutes, then transfer to a wire rack to cool fully.
- Make the Ganache: Heat the heavy cream in a saucepan over medium heat until it just begins to simmer, being careful not to boil it. Remove from heat and pour the hot cream over the chopped dark chocolate. Let this mixture sit for 2-3 minutes to soften the chocolate, then stir gently until the ganache is smooth and shiny. Add the butter and stir it in until completely melted and incorporated. Allow the ganache to cool slightly until it thickens but remains pourable.
- Create the Chocolate Nest: Melt the dark chocolate in a microwave-safe bowl by heating in 30-second intervals, stirring between each to prevent burning and ensure smoothness. Once melted, transfer the chocolate into a piping bag or a small ziplock bag with the tip cut off. Place parchment paper on a baking tray and pipe the chocolate in overlapping, crisscrossing strands to form a circular nest shape resembling twigs intertwined. Refrigerate the tray for 15-20 minutes until the chocolate nest hardens firmly.
- Assemble the Cake: Place the fully cooled cake on a serving platter. Pour the chocolate ganache evenly over the top, allowing it to drip down the sides for an elegant look. Gently peel the hardened chocolate nest off the parchment paper and set it delicately on top of the ganache-coated cake. Finally, fill the nest with mini chocolate eggs or candy-coated Easter eggs just before serving to complete the festive Easter presentation.
Notes
- Using coffee instead of hot water in the cake batter enhances the chocolate flavor without imparting a coffee taste.
- Be sure not to overbake the cake to maintain moistness; start checking for doneness at 30 minutes.
- The ganache should be warm enough to pour but not too hot so it doesn’t slide off the cake.
- Allow the chocolate nest to fully harden in the refrigerator before handling to prevent breakage.
- Store the cake in a cool place or the refrigerator if your environment is warm to keep the ganache set.
- The cake pan should be deep to allow the batter to rise without spilling.
Keywords: Chocolate Easter Cake, Easter Dessert, Chocolate Ganache, Chocolate Nest Cake, Holiday Cake, Festive Cake, Spring Dessert