Chocolate Covered Cherry Brownie Bombs Recipe
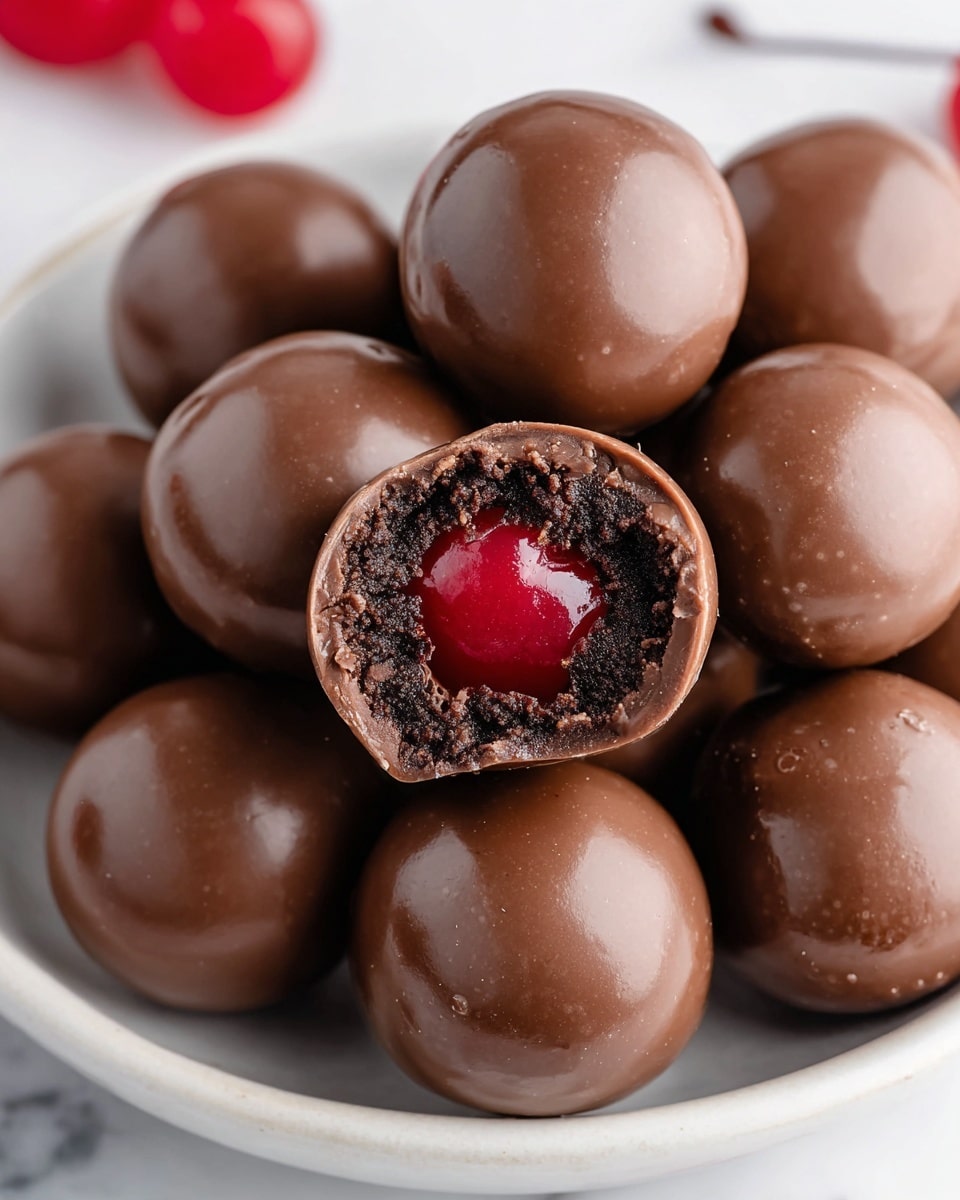
I’m so excited to share this Chocolate Covered Cherry Brownie Bombs Recipe with you because it’s one of those treats that surprises everyone at the party. Imagine fudgy little brownies bursting with a juicy cherry inside, all wrapped up in a smooth chocolate shell. It’s the kind of dessert that feels fancy but is totally doable in your kitchen, perfect for impressing friends or making your family smile on any casual day.
What I love most about this Chocolate Covered Cherry Brownie Bombs Recipe is how versatile it is — it works great as a decadent snack, a conversation-starting dessert, or a make-ahead treat for holidays. Plus, it’s so fun to assemble and customize, and once you master the basics, you’ll want to keep whipping up batches for every celebration.
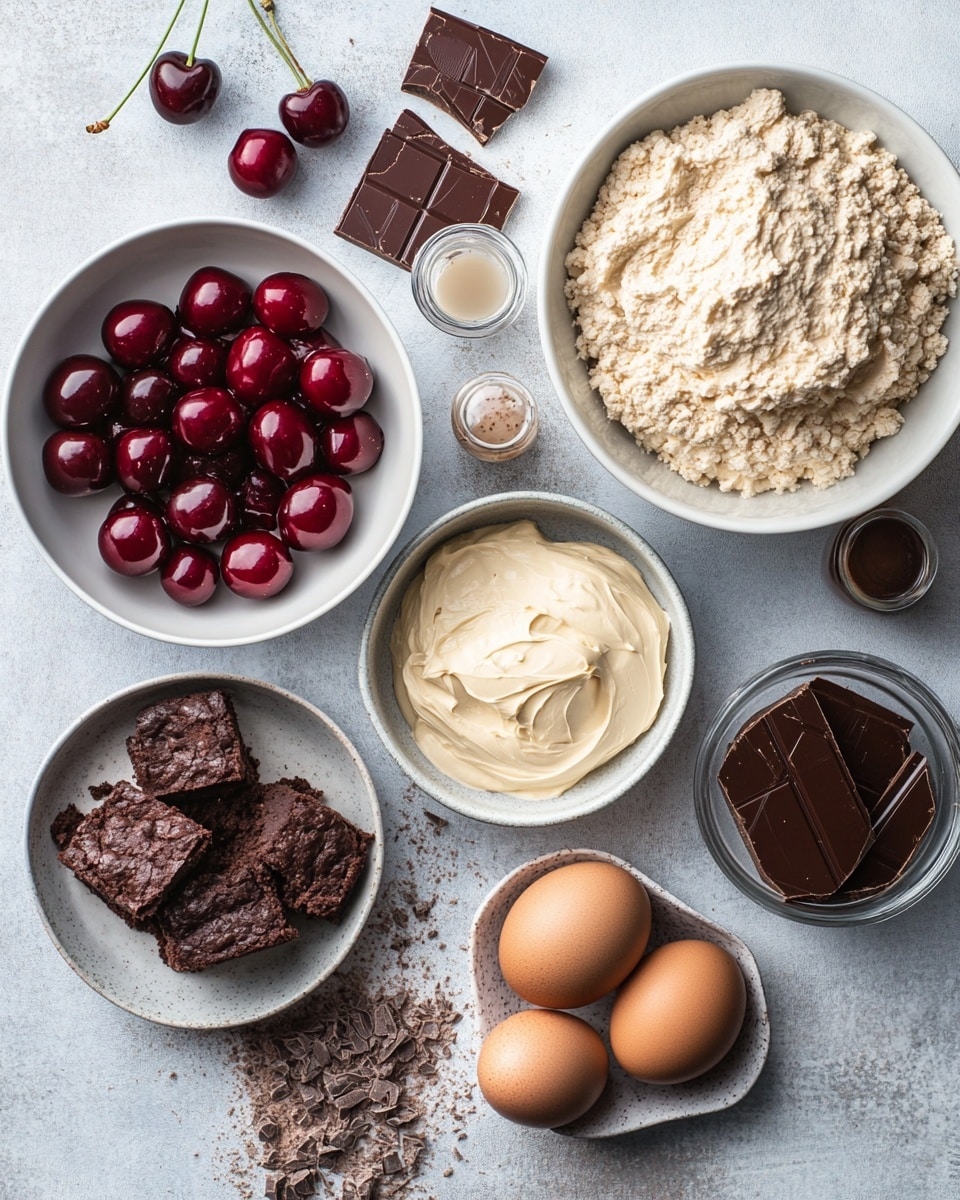
Ingredients You’ll Need
Each ingredient plays a key role here, from the rich brownie base to the sweet surprise of cherries, all enveloped in a glossy chocolate coating. I always recommend going for good-quality chocolate and fresh cherries – it really makes a difference in the final flavor.
- Chewy fudge brownie mix: Choose your favorite boxed mix for an easy fudgy base; I usually use Duncan Hines because it gives that perfect chewy texture.
- Vegetable oil: This keeps the brownies moist and tender – don’t sub with butter here or the texture will change.
- Water: Helps keep the batter just right; room temp is fine.
- Large eggs: I always use room temperature eggs to ensure smooth mixing and even baking.
- Whipped chocolate frosting: This adds richness and a creamy contrast inside the brownie bomb; Betty Crocker is my go-to brand for smooth frosting.
- Maraschino cherries: Drain well and remove stems—dabbing them dry prevents excess moisture from making your brownies soggy.
- Chocolate almond bark: Perfect for melting and coating because it hardens beautifully and has a nice snap; avoid regular baking chocolate for coating.
Variations
I love how flexible this recipe is, so I encourage you to tweak it to fit your tastes or dietary needs. You can play around with different frostings or even use fresh cherries when they’re in season for a fresher bite.
- Dark chocolate coating: Switching to dark chocolate almond bark adds a rich, slightly bitter edge that I enjoy when I want a less sweet bomb.
- Nut allergy-friendly: Use a nut-free chocolate bark and verify your brownie mix is free from nuts to keep everyone safe and happy.
- Cherry juice glaze: Drizzle a quick cherry syrup over the cooled bomb for an extra pop of cherry flavor—perfect for a summer twist!
- Mini brownie bombs: I sometimes use a mini muffin tin to make bite-size versions—they’re super cute and go fast at parties.
How to Make Chocolate Covered Cherry Brownie Bombs Recipe
Step 1: Prepare the Brownie Batter
Start by mixing your boxed chewy fudge brownie mix with vegetable oil, water, and eggs exactly as the package instructions say. I like to whisk this just until combined—overmixing can make brownies tough. Then, line a baking sheet with parchment and spread the batter into a thin, even layer about ¼ inch thick. This thinner layer will make wrapping the cherries easier later on.
Step 2: Bake and Cool
Bake the brownies at the temperature suggested on the box, usually around 350°F, but check early for doneness since this is a thinner layer. They should be set but slightly soft in the middle—think fudgy, not cakey. Once out of the oven, let them cool completely on the pan; I find putting the pan on a wire rack speeds this up without drying the brownies too much.
Step 3: Cut and Fill
Once cooled, cut the brownies into squares just big enough to wrap around a cherry comfortably, about 2-by-2 inches. Now comes the best part: spread a dollop of whipped chocolate frosting in the middle of each square, then place a maraschino cherry on top. Carefully bring the brownie edges together around the cherry and frosting, sealing it completely. This step takes a little practice, but going slow and using your fingers helps a lot without tearing the brownie.
Step 4: Melt and Dip in Chocolate
Melt the chocolate almond bark in the microwave or a double boiler until smooth, stirring often to prevent burning. Using forks or skewers, dip each brownie bomb into the melted chocolate, fully coating it. I usually do this over parchment paper for easy cleanup. Let any extra chocolate drip off before placing them on a tray to set. For faster results, pop the tray into the fridge for about 15 minutes until the chocolate hardens.
How to Serve Chocolate Covered Cherry Brownie Bombs Recipe
Garnishes
I like to sprinkle a little sea salt or finely chopped nuts on top of the chocolate before it hardens—it adds a great texture contrast. When I’m feeling fancy, a drizzle of white chocolate over the bombs creates a pretty look and tastes amazing against the rich dark coating.
Side Dishes
These brownie bombs pair wonderfully with a scoop of vanilla ice cream or a glass of cold milk to balance out the intense chocolate and cherry flavors. I’ve also served them alongside fresh fruit platters at brunch, and they hold their own as a perfect sweet bite.
Creative Ways to Present
For special occasions, I arrange these brownie bombs in cupcake liners and place them on tiered dessert stands. It makes a stunning centerpiece and guests love picking their own “bomb” from the tower. I’ve also packaged them in clear boxes tied with a ribbon, which makes a heartfelt gift.
Make Ahead and Storage
Storing Leftovers
I store leftover brownie bombs in an airtight container in the fridge — they stay fresh and the chocolate stays crisp for about 4-5 days. When I pack them for parties or gifts, I add a layer of parchment between each layer to keep them from sticking together.
Freezing
These bombs freeze beautifully if you want to prepare ahead. I freeze them on a tray first, then transfer to a freezer-safe container or bag. When you want to enjoy them, just thaw in the fridge overnight. This method keeps the brownie base and chocolate coating intact without becoming soggy.
Reheating
Since these are best served chilled or at room temperature, I recommend enjoying them straight from the fridge or let them sit out for 15-20 minutes to soften slightly. If you want a warm treat, a quick 5-second zap in the microwave works, but be careful not to melt the chocolate shell completely.
FAQs
-
Can I use fresh cherries instead of maraschino cherries in the Chocolate Covered Cherry Brownie Bombs Recipe?
Yes, fresh cherries can be a delicious alternative, especially when they’re in season. Just make sure to pit and dry them thoroughly to avoid extra moisture soaking into the brownies. You might also want to reduce any added sugar since fresh cherries are less sweet than maraschino.
-
What kind of chocolate is best for coating the brownie bombs?
Chocolate almond bark is my favorite for coating because it melts smoothly and hardens with a beautiful snap, making the bombs easy to handle and eat. Candy melts work too, but avoid regular baking chocolate as it doesn’t set as hard and can be messy.
-
How can I prevent the brownie bombs from falling apart?
Make sure the brownie layer isn’t too thin or brittle, and seal the edges firmly around the cherry and frosting. Chilling the brownie bombs before dipping in chocolate helps them hold their shape better during coating.
-
Can I make these brownie bombs ahead of time?
Absolutely! They store well in the fridge for several days and can even be frozen for longer storage. Just thaw and bring them to room temperature before serving for the best taste and texture.
-
Are the brownie bombs gluten-free?
The gluten content depends on the brownie mix you use. To make this recipe gluten-free, choose a certified gluten-free brownie mix and double-check the other ingredients for any gluten-containing additives.
Final Thoughts
This Chocolate Covered Cherry Brownie Bombs Recipe holds a special place in my kitchen because it combines nostalgic flavors with a bit of grown-up indulgence. Every time I make them, I’m reminded how little effort can create something truly memorable. I hope you give this recipe a try—you’ll enjoy how impressive they look and how delicious they taste, and your friends or family will absolutely love the surprise center hiding in every bite!
PrintChocolate Covered Cherry Brownie Bombs Recipe

These Chocolate Covered Cherry Brownie Bombs are a decadent treat combining fudgy brownie bites with a surprise cherry center, all enveloped in rich chocolate coating. Perfect for cherry lovers and chocolate enthusiasts alike, this recipe transforms a simple boxed brownie mix into an impressive dessert that melts in your mouth with every bite.
- Prep Time: 20 minutes
- Cook Time: 25 minutes
- Total Time: 1 hour 15 minutes
- Yield: Approximately 24 brownie bombs 1x
- Category: Dessert
- Method: Baking
- Cuisine: American
Ingredients
Brownie Batter
- 18.3 ounces box of chewy fudge brownie mix (your favorite brand, e.g., Duncan Hines)
- ½ cup vegetable oil
- ¼ cup water
- 2 large eggs, room temperature
Filling and Coating
- 12-ounce can whipped chocolate frosting (your favorite brand, e.g., Betty Crocker)
- 10-ounce jar of maraschino cherries, drained, stems removed, and patted dry
- 18 ounces chocolate almond bark
Instructions
- Prepare Brownie Batter: In a medium bowl, mix the brownie mix, vegetable oil, water, and eggs until well combined to form the batter.
- Bake Brownies: Follow the box instructions to bake brownies in a greased pan; typically at 350°F for 20-25 minutes. Allow to cool completely.
- Form Brownie Bombs: Once cooled, crumble the brownies into a large bowl. Mix in whipped chocolate frosting to create a dough-like consistency suitable for shaping.
- Insert Cherries: Take a small amount of the brownie-frosting mixture, flatten it in your hand, place one maraschino cherry in the center, and mold the mixture around the cherry to form a ball. Repeat for all cherries.
- Melt Chocolate Almond Bark: Using a microwave-safe bowl, melt the chocolate almond bark in 30-second intervals, stirring in between until smooth.
- Coat Brownie Bombs: Dip each brownie ball into the melted chocolate bark to fully coat. Place them on wax paper or a cooling rack to set.
- Chill: Refrigerate the coated brownie bombs until the chocolate is firm, about 30 minutes to 1 hour.
- Serve: Enjoy these decadent, bite-sized Chocolate Covered Cherry Brownie Bombs as a delightful dessert or party treat.
Notes
- Make sure cherries are well drained and patted dry to prevent excess moisture in the brownie bombs.
- If melted chocolate thickens, gently reheat using short microwave bursts to maintain smoothness.
- Use room temperature eggs for a better batter consistency.
- Store brownie bombs in an airtight container in the refrigerator for up to 5 days.
Keywords: chocolate cherry brownies, brownie bombs, cherry filled dessert, fudge brownie snacks, chocolate almond bark treats